
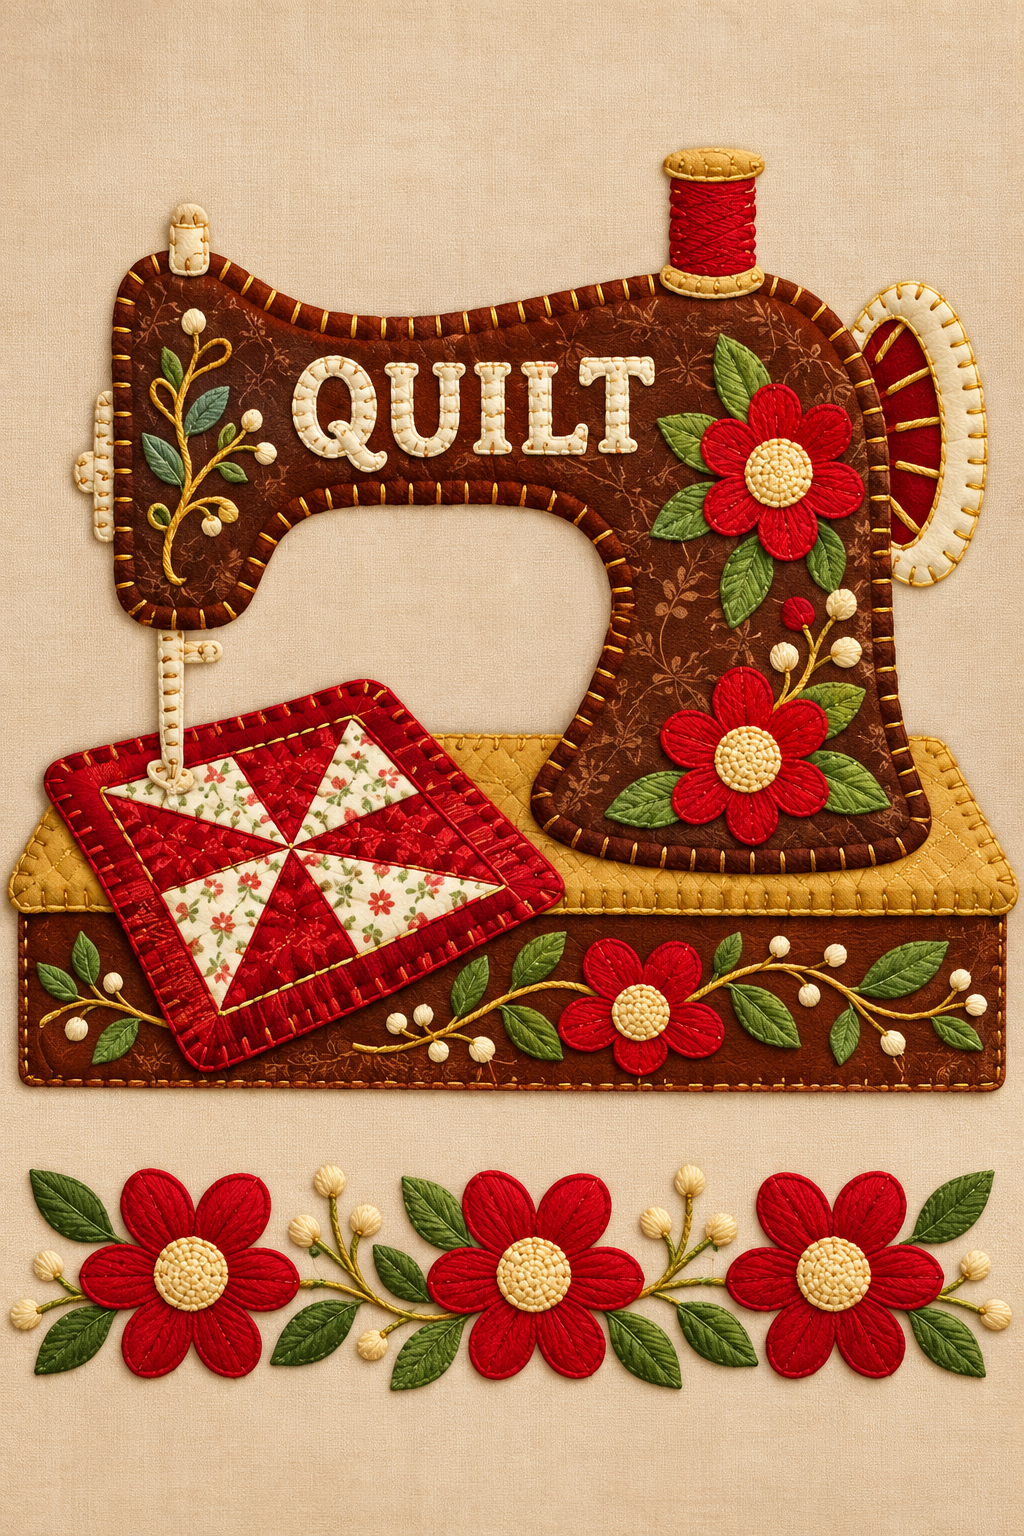
The Wall Panel for Machine Quilting Pattern is a charming sewing-room decoration that combines appliqué, patchwork, decorative stitching, and machine quilting in one cheerful project. Inspired by the handmade panel shown in the reference image, the design features a large vintage-style sewing machine surrounded by bright red flowers, green leaves, delicate branches, and a miniature quilt block. Warm brown fabric gives the sewing machine a traditional appearance, while cream, mustard, red, and green accents create a welcoming country-inspired palette. This type of project is especially attractive because it allows quilters to combine several familiar techniques without needing to make a full-size quilt. The finished panel can become wall décor for a sewing room, craft studio, quilting corner, or handmade gift. Even though the design contains many details, it can be approached gradually by preparing the background, building the sewing machine appliqué, adding the floral pieces, and finishing everything with decorative quilting.
Creating a Wall Panel for Machine Quilting Pattern also provides an excellent opportunity to practice accurate fabric cutting and layered appliqué. The sewing machine is the visual center of the composition, so its silhouette should be prepared carefully before the smaller decorative elements are attached. The reference design uses brown printed fabric for the machine body, cream fabric for the lettering and mechanical details, red fabric for the spool and flowers, and several shades of green for the leaves. A small red-and-cream pinwheel-style quilt block adds another traditional quilting element to the composition. Decorative blanket stitches around the appliqué pieces help define every shape while also securing the fabric edges. Beginners can simplify the project by reducing the number of leaves and buds, while experienced quilters can add extra free-motion quilting, embroidery, or textured stitching.
One of the most appealing aspects of this machine quilting wall panel is the balance between practical sewing techniques and decorative creativity. You do not need to reproduce every tiny detail exactly for the project to look beautiful. Instead, use the reference as a guide for proportion, placement, and color harmony while adapting the dimensions to your preferred wall space. A finished panel around 45 cm wide by 55 cm high is a practical starting size, although the pattern can easily be enlarged or reduced. Cotton quilting fabric is recommended because it is stable, easy to press, and available in countless prints and colors. Fusible web can make the appliqué process easier, while batting gives the panel the softly padded appearance associated with traditional quilting. Careful preparation before stitching will make the final quilting stage much easier and help the decorative motifs remain crisp and well positioned.
Materials, Fabric Selection, and Pattern Preparation
Begin your Wall Panel for Machine Quilting Pattern by selecting a firm cotton fabric for the background. A warm cream, beige, or natural linen-look quilting cotton works particularly well because it allows the darker sewing machine and colorful flowers to stand out clearly. For a finished panel measuring approximately 45 × 55 cm, cut the background slightly larger, approximately 50 × 60 cm. The additional fabric provides working space during quilting and can be trimmed after the layers have been stitched.
DISCOVER MORE FREE PATTERNS HERE!
For the sewing machine appliqué, choose approximately 30 × 35 cm of brown quilting cotton. A subtle floral, tonal, or vintage print can add visual depth without competing with the decorative elements. You will also need smaller pieces of cream, red, mustard, and green cotton. Fabric scraps are perfect for the flowers, leaves, spool, lettering, small mechanical details, and decorative quilt block, making this project an excellent fabric scrap quilting project.
Prepare a paper template for the sewing machine before cutting the fabric. The main machine silhouette can measure approximately 33 cm wide by 30 cm high, depending on your chosen panel dimensions. Divide complicated areas into separate pieces rather than attempting to cut everything from a single fabric shape. The main body, handwheel, needle bar, spool, base, and decorative components can all be assembled individually. Remember that appliqué pieces may overlap slightly, so include enough fabric where one section will sit beneath another.
A lightweight fusible web for appliqué can simplify assembly considerably. Trace each pattern component onto the paper side of the fusible web, remembering to reverse directional pieces when necessary. Rough-cut around each traced shape, fuse it to the wrong side of the appropriate fabric according to the product instructions, and then cut accurately along the traced line. Keep all prepared pieces organized in labeled groups so that flowers, leaves, machine components, and lettering do not become mixed together.
To recreate the floral appearance of the reference panel, prepare several red flowers in different sizes. Larger flowers can measure approximately 8–10 cm across, while smaller blossoms may measure around 5–7 cm. Cut individual petals when you want a dimensional appliqué effect, or create each flower as a single silhouette for easier construction. Add circular cream or golden centers measuring approximately 2–3 cm. Leaves between 3 and 7 cm long will create natural variation around the flowers.
Finally, gather the basic quilting supplies before assembly begins. Useful materials include cotton batting, backing fabric, coordinating sewing thread, contrasting decorative thread, embroidery thread if desired, pins or fabric clips, fabric scissors, a rotary cutter, cutting mat, acrylic ruler, iron, removable fabric marker, and your sewing machine. A walking foot is useful for straight quilting, while a free-motion quilting foot can be used for curved decorative designs. Preparing everything in advance makes the construction process smoother and reduces interruptions once the appliqué arrangement has been established.
Building the Sewing Machine, Flowers, and Quilt Block
Place the prepared background fabric on a flat surface and lightly mark its vertical and horizontal centers. Position the large sewing machine silhouette slightly above the middle of the panel, leaving enough room beneath it for the decorative base and lower floral arrangement. Before fusing anything permanently, arrange every major component and photograph the layout. This gives you a visual reference if pieces shift while you are working on the sewing machine appliqué pattern.
Start assembling the sewing machine from the largest shapes toward the smallest. Position the brown machine body first, followed by the base, handwheel, spool, needle assembly, and cream decorative details. The open throat area beneath the machine arm should remain clearly visible because this negative space helps the silhouette read instantly as a sewing machine. Once satisfied with the arrangement, fuse the pieces carefully, working in sections rather than pressing the entire project repeatedly.
The word “QUILT” can be added across the upper body as a decorative appliqué detail. Cut each letter individually from cream fabric and position the letters evenly across the brown machine body. A narrow blanket stitch around each letter produces the padded handcrafted effect visible in the inspiration. If cutting small fabric letters feels difficult, enlarge them slightly. Clear, well-spaced lettering generally looks better than extremely small letters with uneven edges.
Next, construct the miniature quilt block hanging near the needle area. A finished block around 14 × 14 cm works nicely with a medium-size wall panel. Create a simple pinwheel using alternating red and cream triangles. Sew the triangles into squares, join the units carefully so the center points meet, and press the seams without stretching the bias edges. Add a narrow red border around the completed block. You can quilt this miniature section separately before attaching it or stitch it directly onto the panel as an appliqué element.
Arrange the red flowers and green leaves around the machine after the central structure is secure. The reference composition places prominent flowers along the right side of the machine and additional blossoms across the lower portion of the design. Avoid placing every flower at exactly the same angle. Slight rotations create a more natural arrangement. Position green leaves beneath the flower petals so the layers appear connected rather than floating independently on the background.
Complete the botanical decoration with narrow stems, small cream buds, and curved branches. These details can be made from very narrow bias strips, embroidery stitches, couching cord, or machine-stitched lines. Curved stems help visually connect separate leaves and flowers while filling empty areas without making the panel feel crowded. At this stage, step several feet away from the project and examine the overall balance. The Wall Panel for Machine Quilting Pattern should have one clear focal point—the sewing machine—supported by flowers rather than hidden by them.
Appliqué Stitching, Layering, and Machine Quilting
Once the appliqué pieces have been fused in place, secure their edges with decorative stitching. A blanket stitch appliqué is especially suitable for this project because it gives each component a traditional handcrafted outline. Use coordinating thread for a subtle appearance or contrasting golden thread to emphasize the edges. Test the stitch width and length on scrap fabric first. Small shapes usually look better with a shorter, narrower stitch than the larger sewing machine silhouette.
Stitch around the large machine body slowly, particularly around tight curves and inside corners. Stop with the needle down whenever you need to pivot. This prevents gaps in the decorative stitching. When sewing around flowers, work around each petal individually so the shapes remain clearly defined. The leaves can be enhanced with a straight line through the center and short diagonal lines extending outward to suggest natural veins.
Add texture to the flower centers by using closely spaced machine stitching, small spirals, French knots by hand, or another decorative technique you enjoy. The reference image has textured cream centers that contrast beautifully with the smooth red petals. You can imitate this appearance with dense quilting stitches or small circular fabric pieces layered together. Decorative details should remain soft enough that the wall hanging can still be quilted comfortably.
After completing the appliqué, prepare the traditional quilt sandwich. Place the backing fabric wrong side up, position batting over it, and lay the appliquéd top right side up. Smooth each layer carefully from the center outward. The batting and backing should extend approximately 3–5 cm beyond the quilt top on every side. Secure the layers with quilting safety pins, temporary basting spray, or long hand-basting stitches.
Begin machine quilting close to the main appliqué shapes. Echo quilting around the sewing machine and flowers is an effective method because it emphasizes their outlines without covering the decorative fabrics. You can then quilt the background using gentle curves, loops, leaves, meandering lines, or another uncomplicated free-motion design. Keep the quilting density reasonably consistent across the panel so one section does not become noticeably flatter than another.
Finish the quilting by stitching through the decorative base and miniature quilt block. Straight lines can highlight the geometry of the pinwheel, while curved quilting works nicely around the floral sections. When all quilting is finished, lay the project flat and trim the edges square. Check the corners with an acrylic ruler before cutting. Accurate trimming at this stage makes the final binding much easier and gives the machine quilted wall hanging a clean, professional appearance.
FAQ About the Wall Panel for Machine Quilting Pattern
What is a Wall Panel for Machine Quilting Pattern? A Wall Panel for Machine Quilting Pattern is a decorative fabric project designed to be displayed rather than used as a bed quilt. It generally combines a fabric background, batting, backing, appliqué, piecing, and quilting. In this particular design, a vintage sewing machine becomes the central motif while flowers, leaves, a spool, lettering, and a miniature quilt block reinforce the sewing-room theme.
Is this machine quilting project suitable for beginners? Yes, especially when the design is simplified slightly. A beginner can use fusible appliqué, basic blanket stitching, and straight-line quilting instead of complicated free-motion work. The most important beginner technique is to prepare and position all the pieces before permanently attaching them. Working slowly through one section at a time makes a detailed-looking panel surprisingly manageable.
What fabrics work best for this quilted wall panel? Standard 100% cotton quilting fabric is one of the easiest materials to use because it cuts cleanly, presses well, and behaves predictably under the sewing machine. Tonal brown prints work beautifully for the machine body, while red, green, cream, and mustard fabrics create the warm palette shown in the inspiration. Small scraps are particularly useful for flowers, leaves, letters, buds, and the miniature quilt block.
Do I need a special sewing machine for machine quilting? A standard domestic sewing machine can handle a project of this size as long as it can sew basic straight and decorative stitches. A walking foot makes straight quilting easier because it feeds the quilt layers evenly. For free-motion quilting, a darning or free-motion foot is helpful, and the machine should allow the feed dogs to be lowered or covered when required by its design.
How can I prevent the appliqué pieces from shifting? Fusible web is one of the easiest solutions because it temporarily bonds the fabric shapes to the background before stitching. Always follow the temperature recommendations for the specific fusible product being used. If you prefer not to use fusible web, appliqué glue, pins, or hand basting can hold the pieces temporarily. Starting with the largest elements and gradually adding smaller details also reduces accidental movement.
How should I finish and hang the completed wall panel? After quilting, square the panel and finish the outer edge with traditional quilt binding. A binding approximately 6–7 cm wide before folding works well for many small wall quilts. To display the finished project, sew a fabric hanging sleeve across the upper back edge before or after binding. Insert a lightweight wooden dowel through the sleeve so the panel hangs evenly without placing stress on the appliqué or quilting stitches.
Conclusion
The Wall Panel for Machine Quilting Pattern brings together several enjoyable quilting skills in one decorative project: pattern preparation, fabric selection, fusible appliqué, miniature patchwork, blanket stitching, layered construction, and machine quilting. Beginning with a neutral background makes the warm brown sewing machine, bright red flowers, green leaves, cream accents, and small pinwheel block stand out beautifully.
The key to achieving a polished result is to work in stages. Prepare the main sewing machine silhouette first, build the smaller components around it, arrange the flowers and foliage, secure the appliqué edges, and only then assemble the batting and backing for quilting. Taking time with placement and pressing is more valuable than rushing through the decorative details.
EASILY FIND THE FREE PDF FOR THIS PATTERN HERE!
You can also personalize this project by changing the fabric palette, adding your own favorite quilt block, adjusting the floral arrangement, or replacing the lettering with another sewing-related word. These small changes can make every finished quilted sewing machine wall hanging unique while preserving the basic construction methods explained in this tutorial. Whether displayed in a sewing room, craft corner, studio, or creative workspace, the finished panel celebrates the techniques that make quilting so enjoyable. If you make your own version of this Wall Panel for Machine Quilting Pattern, leave your sincere opinion about the project and share any suggestions or creative changes you would make. Your ideas may inspire an entirely new variation of this colorful sewing-room wall panel.