
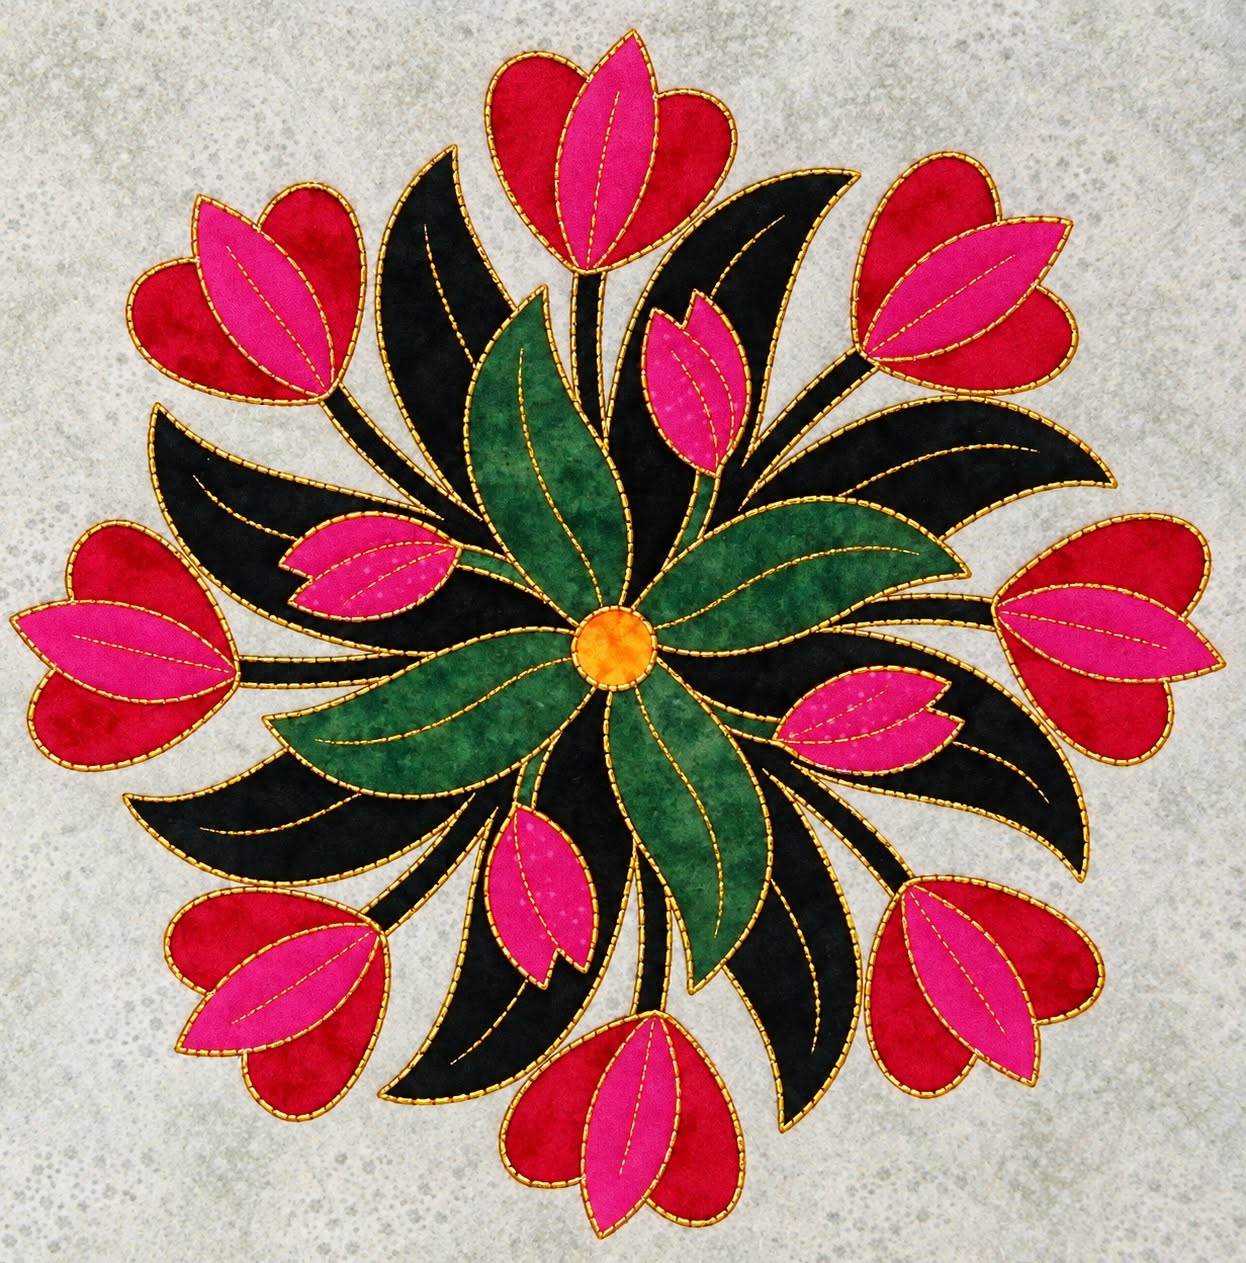
The Quilt Block with Floral Wreath Appliqué Pattern is a beautiful way to combine traditional quilting with the graceful shapes of floral appliqué. Inspired by the project shown in the image, this design creates a circular bouquet filled with tulip-like flowers, curved stems, layered leaves, and small decorative buds. The arrangement has a strong sense of movement because the flowers radiate outward from the center while the leaves overlap in different directions. Although the finished block looks detailed, the individual shapes are pleasantly simple, making this project approachable for quilters who already know basic sewing as well as adventurous beginners who want to practice fabric appliqué. Choosing contrasting fabrics is especially important because the success of the design depends on each petal and leaf remaining clearly visible against the background.
One of the most appealing features of this floral wreath quilt block is the opportunity to personalize it. The inspiration piece uses vivid pink and red flowers, deep leaves, green accents, and a warm center against a light neutral background, but there is no requirement to duplicate those colors exactly. A spring version could combine pastel pink, lavender, yellow, and fresh green fabrics, while a more traditional block could feature burgundy, cream, forest green, and muted gold. Scraps left from previous quilting projects are excellent for many of the smaller appliqué pieces. Because the flowers repeat around the circular arrangement, maintaining consistent shapes and balanced spacing will help the finished Quilt Block with Floral Wreath Appliqué Pattern look polished without losing its handmade personality.
Before beginning, gather quilting cotton for the background and appliqué shapes, coordinating thread, sharp fabric scissors, pins or appliqué glue, an iron, and your preferred appliqué stabilizer or fusible web if you plan to use a fused technique. A practical starting size for the background is approximately 40 cm × 40 cm (15.7 × 15.7 inches), although the design can easily be enlarged or reduced. Leave additional fabric around the edges if the block will later be trimmed to an exact size. Templates can be created for the large leaves, smaller green leaves, flower bases, contrasting inner petals, buds, stems, and center circle. Preparing everything before assembly makes the sewing process considerably easier and allows you to preview the complete composition before committing any pieces to the background.
Preparing the Quilt Block and Floral Appliqué Templates
Begin the Quilt Block with Floral Wreath Appliqué Pattern by pressing the background fabric until it is completely smooth. A flat background is essential because wrinkles can distort the placement of appliqué pieces. If your final block will measure approximately 35 cm square, cut the background slightly larger, perhaps 40 cm square, and trim it only after the appliqué and quilting have been completed. This extra allowance provides room for minor changes caused by stitching and pressing.
DISCOVER MORE FREE PATTERNS HERE!
Next, prepare the paper templates. Looking at the floral arrangement, you will need several basic shapes rather than dozens of completely different pieces. Create one template for the large pointed leaf, another for the medium leaf, a narrow curved stem, a rounded flower base, an elongated inner petal, a small bud, and a circle for the center. Reusing these templates throughout the wreath produces visual consistency and makes cutting much faster.
When tracing templates for fusible appliqué, remember that designs may need to be reversed depending on the fusible product and method you use. Trace the shapes onto the paper side of the fusible web, leaving a little space between them. Rough-cut each piece, fuse it to the wrong side of the corresponding fabric according to the manufacturer’s temperature instructions, and then cut accurately along the traced lines. Avoid overheating the adhesive, since excessive heat can make the appliqué unnecessarily stiff.
If you prefer needle-turn appliqué, add a small seam allowance around each template instead of cutting directly on the finished outline. Approximately 6 mm, or about 1/4 inch, is generally manageable for gentle curves. Clip or carefully manipulate allowances around tighter inward curves so the fabric can turn smoothly. Needle-turn appliqué requires more time, but it produces beautifully soft edges and preserves the traditional hand-sewn character of the block.
Organize the finished pieces into groups before arranging them. Keep large leaves together, smaller leaves together, flower bases together, and inner petals together. This simple preparation prevents accidentally losing small appliqué pieces and makes it easier to check whether you have enough repeated components. You can also number pieces lightly on the backing paper when working with fusible web.
Finally, fold the background gently in half vertically and horizontally and finger-press the folds to identify its center. You can also mark the center with a removable fabric marker. Because this is a wreath appliqué pattern, the center point acts as the visual anchor for the entire composition. Establishing it before positioning the flowers helps maintain balanced spacing around all four sides of the quilt block.
Building the Floral Wreath from the Center Outward
Start arranging the floral wreath appliqué without permanently attaching anything. Place the small circular center first. Around it, position the largest leaves so they spread outward like the spokes of a wheel. Some leaves should point upward, others sideways, and others downward. This changing direction creates the lively circular movement visible in the inspiration while preventing the arrangement from looking overly rigid.
Add the secondary green leaves between the darker large leaves. Their purpose is not simply to fill empty areas; they create depth by introducing another layer to the bouquet. Slight overlaps are desirable because natural foliage rarely appears perfectly separated. Keep the central portion relatively dense while allowing the tips of the leaves to open outward toward the flowers.
Next, position the stems. These narrow elements visually connect the outer flowers with the center of the wreath. Slightly curved stems generally look more natural than perfectly straight ones. Because stems are narrow, they can be challenging to appliqué. Fusible web makes them easier for beginners, while bias-cut fabric strips are another useful option when you want softer curves.
Now place the larger flowers around the outside. The inspiration features approximately eight prominent blossoms arranged around the circular design. Instead of measuring every space mechanically, position flowers at the top, bottom, left, and right first. Then fill the spaces between these four anchor points. This approach makes it easier to create an evenly distributed floral quilt block while retaining a natural handmade appearance.
Build each large blossom in layers. Place the rounded flower base first and add a contrasting elongated petal over it. Pink over red creates the bold look of the inspiration, but countless combinations will work. For example, burgundy and blush, purple and lavender, blue and cream, or yellow and orange can completely transform the character of the same appliqué pattern.
Before fusing or stitching, stand back and examine the entire block. Check that no flower is noticeably closer to the edge than the others and that the visual weight is reasonably balanced. Photographing the arrangement before removing pieces can also be useful. Once satisfied, attach the shapes in logical layers: stems first, background leaves next, foreground leaves after that, and flowers and buds last.
Stitching and Securing the Floral Appliqué Pieces
With the composition established, begin securing the pieces. If you are using fusible appliqué, work in manageable sections rather than attempting to fuse the entire wreath simultaneously. Follow the instructions supplied with your fusible web because heat settings and pressing times vary. Press vertically rather than sliding the iron back and forth, since sliding can shift small petals and narrow stems away from their intended positions.
A blanket stitch is an excellent choice for outlining the flowers and leaves. It provides a decorative handmade appearance while also securing raw edges. A small zigzag stitch is another dependable machine-sewing option, especially when the quilt will be washed frequently. For a cleaner contemporary appearance, a narrow straight stitch close to the edge can work when the fabric has been stabilized appropriately.
Thread color changes the appearance dramatically. Matching thread allows the fabric shapes to remain the main attraction, while contrasting thread emphasizes every outline. Beginners may find matching thread slightly more forgiving because minor irregularities are less noticeable. Whatever method you choose, test the stitch length and tension on scrap fabric before sewing the actual Quilt Block with Floral Wreath Appliqué Pattern.
When stitching curved leaves, slow down as you approach sharp points. Stop with the needle lowered into the fabric, lift the presser foot, rotate the block slightly, lower the foot, and continue. Several small adjustments will produce a smoother curve than trying to force the fabric around the presser foot in one movement. At pointed tips, pivot carefully so the stitching follows the shape accurately.
The smaller buds deserve the same attention as the large flowers. Because they are positioned between substantial leaves, these bright accents help distribute color through the interior of the wreath. Secure each bud carefully and avoid excessive stitching density, which can make small appliqué pieces appear bulky. The orange or golden center can then be outlined to create a strong focal point.
After all appliqué pieces are secured, press the block from the back whenever possible. Place it face down on a clean pressing surface and use moderate heat appropriate for your fabrics. Pressing from the reverse side helps preserve dimensional texture and protects decorative stitches. At this stage, inspect every edge and reinforce any loose sections before moving on to quilting.
Quilting, Finishing, and Creative Variations
To transform the appliqué top into a true quilt block or small panel, prepare a quilt sandwich using the finished top, batting, and backing fabric. Cut the batting and backing slightly larger than the appliqué block. Smooth each layer carefully and baste them together with safety pins, temporary basting spray, or hand-basting stitches. Keeping the layers secure will reduce puckering while quilting around the detailed floral shapes.
For quilting, consider outlining the flowers and leaves approximately 3 to 6 mm from their edges. Echo quilting emphasizes the appliqué silhouettes and makes the wreath stand out from the background. The remaining negative space can be quilted with gentle curves, stippling, or another understated motif. Avoid overly complicated background quilting if you want the colorful appliqué to remain the primary feature.
Once quilting is complete, square the block carefully. Measure from the center outward instead of relying only on the raw outer edges. A quilting ruler and rotary cutter are useful for achieving straight sides and accurate corners. If this block will become part of a larger quilt, confirm the required unfinished dimensions before trimming so that the seam allowance is preserved.
The completed Quilt Block with Floral Wreath Appliqué Pattern can be used in many projects beyond a full bed quilt. It can become the centerpiece of a wall hanging, decorative cushion cover, table topper, tote bag panel, or framed textile decoration. Multiple blocks could also be joined together, with each wreath featuring a different color palette while maintaining the same shapes.
Scrap fabrics are particularly suitable for this project. Small petals and buds require very little material, making this an effective scrap fabric quilting project. However, try to maintain enough contrast between neighboring pieces. Dark leaves against a light background create a strong silhouette, while saturated flowers prevent the design from disappearing among the foliage.
For a final professional touch, remove loose threads and inspect the appliqué under good lighting. Press the finished block gently and allow it to cool completely on a flat surface. The combination of careful preparation, layered fabric shapes, controlled stitching, and balanced placement will give the floral wreath a polished appearance while still celebrating the warmth of handmade quilting.
FAQ – Quilt Block with Floral Wreath Appliqué Pattern
What is a Quilt Block with Floral Wreath Appliqué Pattern?
A Quilt Block with Floral Wreath Appliqué Pattern is a quilting design in which fabric flowers, leaves, stems, and buds are attached to a background block in a circular or wreath-shaped arrangement. The appliqué becomes the decorative focal point, while quilting stitches secure and enhance the finished design.
Is this floral appliqué project suitable for beginners?
Yes. A beginner can make this project successfully, especially with fusible web appliqué. The most important skills are accurate cutting, careful placement, pressing, and slow stitching around curves. Starting with a larger block can make the small details easier to handle.
What fabric works best for floral appliqué?
Good-quality quilting cotton is one of the easiest choices because it presses well, cuts accurately, and is available in many colors and prints. Batiks can also work beautifully because their dense weave and rich color variations add depth to flowers and leaves.
Do I need fusible web for the appliqué?
No. Fusible web is convenient but optional. You can use needle-turn appliqué, raw-edge machine appliqué, turned-edge appliqué, or another method you already enjoy. The best technique depends on the finish you want and whether you prefer hand or machine sewing.
How can I keep the wreath symmetrical?
Mark the horizontal and vertical center lines of the background and begin with four major reference points. Position flowers at the top, bottom, left, and right before adding the remaining blossoms between them. This creates balanced spacing without making the design look unnaturally mechanical.
Can I change the colors from the original design?
Absolutely. Color customization is one of the greatest advantages of fabric appliqué quilting. You can use seasonal colors, coordinate the block with a room, or create flowers entirely from scraps. Prioritize contrast so individual petals and leaves remain recognizable.
What stitches are recommended for the appliqué edges?
Blanket stitch, narrow zigzag, satin stitch, and carefully positioned straight stitching are all possibilities. Blanket stitch gives a decorative traditional appearance, while narrow machine stitching can create a simpler contemporary finish.
How large should the quilt block be?
There is no mandatory size. A background around 40 cm × 40 cm provides comfortable working space for a detailed wreath, but the templates can be scaled for smaller or larger projects. Always include enough extra background fabric for final trimming and seam allowances.
Can this pattern be made by hand instead of machine?
Yes. Hand appliqué is especially attractive for floral designs because it allows excellent control over curves and pointed leaves. Needle-turn appliqué can create soft, nearly invisible edges, while hand blanket stitching produces a more decorative outline.
How should the finished floral block be quilted?
Outline quilting and echo quilting are both effective because they emphasize the wreath. Background areas can then receive simple free-motion quilting, gentle curves, or evenly spaced lines. The quilting should complement the appliqué instead of competing visually with the flowers.
Can several floral wreath blocks be combined into one quilt?
Yes. Repeating the same floral wreath quilt block can create a striking larger quilt. You can use identical colors throughout or make every wreath different while repeating the same background fabric to visually connect the blocks.
How do I prevent appliqué pieces from shifting while sewing?
Fusible web provides strong temporary positioning, while appliqué glue, pins, or basting stitches can be used with other techniques. Secure the center of the arrangement first and work outward, checking frequently that stems, leaves, and petals remain properly aligned.
Conclusion
The Quilt Block with Floral Wreath Appliqué Pattern combines colorful flowers, sweeping foliage, delicate buds, curved stems, and traditional quilting techniques in a design that can become anything from a single decorative panel to the centerpiece of a larger quilt. The process begins with preparing an accurately sized background and reusable appliqué templates, followed by arranging the foliage and flowers around a clearly marked center. Careful layering creates depth, while contrasting fabrics help every component remain distinct.
Throughout this project, we explored how to prepare the fabric, create templates, organize the floral wreath, position stems and leaves, layer the flowers, secure the appliqué, stitch curved edges, assemble the quilt sandwich, quilt the background, and square the finished block. These same techniques can also be applied to many other floral appliqué patterns, making this project useful practice for developing broader quilting skills.
EASILY FIND THE FREE PDF FOR THIS PATTERN HERE!
Most importantly, there is plenty of room for creativity. Change the flower colors, experiment with prints, use treasured fabric scraps, enlarge the wreath, or create several coordinated blocks for a full quilt. The basic structure provides guidance without limiting your personal style. If you make your own Quilt Block with Floral Wreath Appliqué Pattern, leave your sincere opinion about the project and share any suggestions you have. Your ideas about different color combinations, appliqué methods, quilting styles, or creative ways to use the finished block can inspire even more variations of this cheerful floral design.