
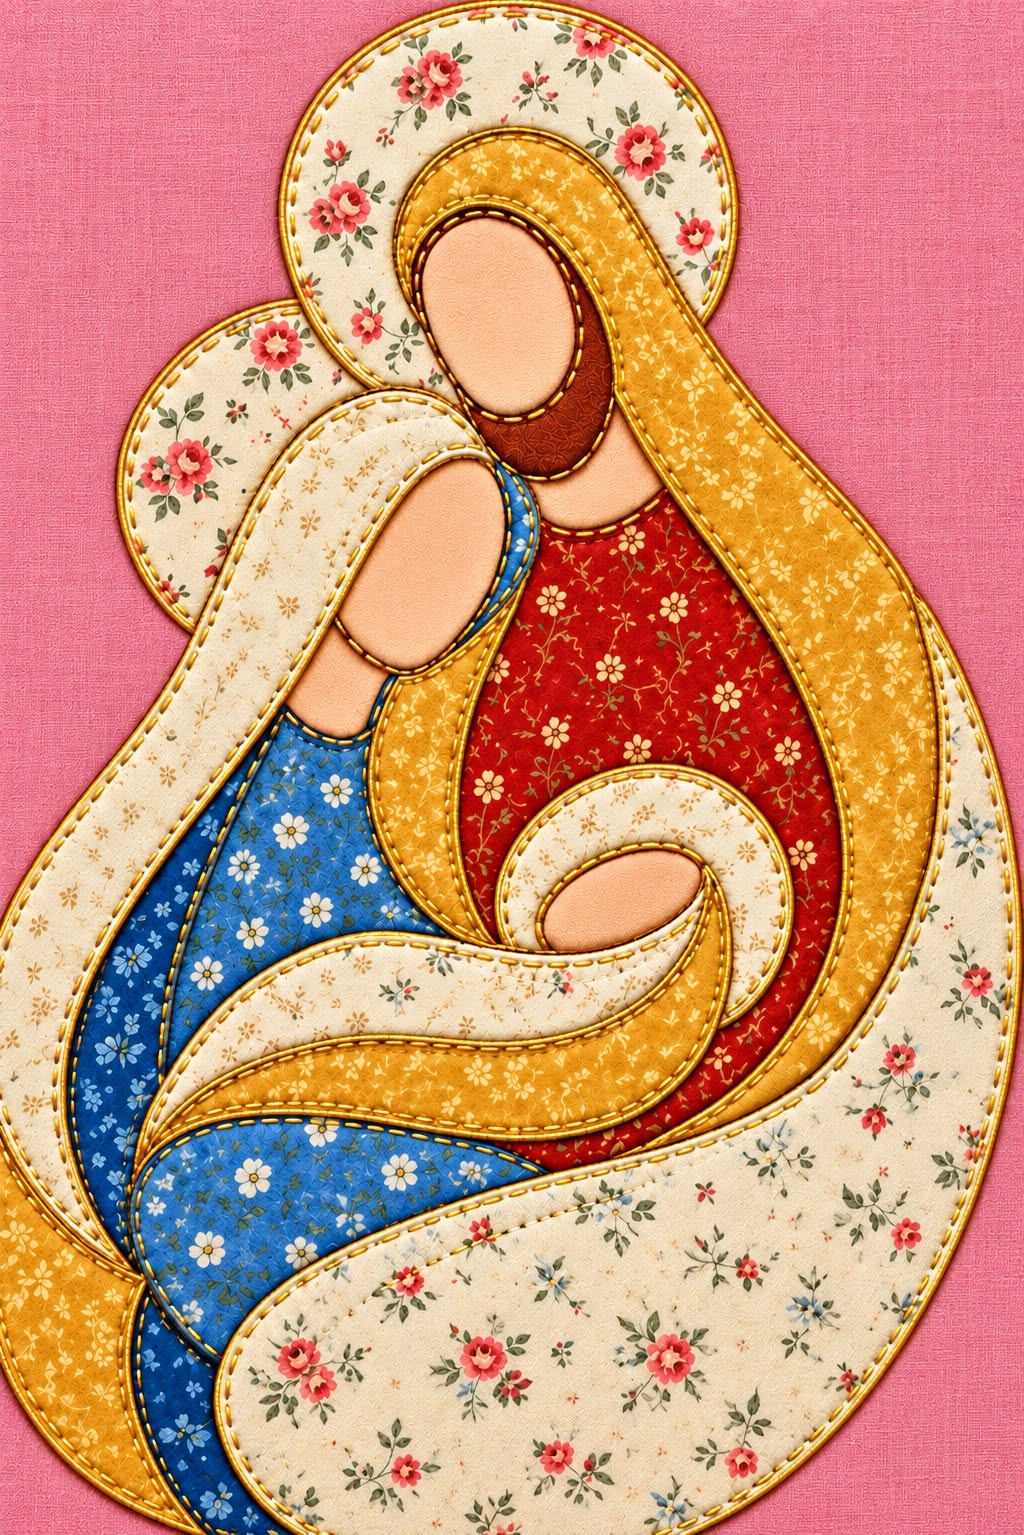
The Holy Family Fabric Panel Pattern is a beautiful sewing and appliqué project that combines traditional symbolism with the warmth and texture of handmade fabric art. Inspired by the panel shown in the reference image, the design features simplified figures arranged in flowing, overlapping shapes, with Mary, Joseph, and the infant forming one unified composition. Floral cottons, warm golden fabrics, rich red, bright blue, cream, peach, and earthy brown give the panel a welcoming handcrafted appearance. The absence of detailed facial features makes the design especially suitable for appliqué because the recognizable silhouettes become the main visual language. Decorative stitching around each fabric section adds definition while emphasizing the graceful curves of the composition. This tutorial explains how to recreate the project from beginning to end while allowing enough flexibility to select fabrics that match your own sewing style.
One of the most attractive characteristics of this Holy Family Fabric Panel Pattern is the way simple pieces of fabric can create a surprisingly detailed finished picture. Instead of relying on complicated embroidery, the project uses carefully shaped appliqué pieces, layered fabrics, curved lines, and visible topstitching to establish the individual figures. The cream floral sections provide softness, while golden yellow creates warmth and movement throughout the panel. Blue helps distinguish Mary, and the deep red section provides a strong visual center behind the infant. Because many of the pieces have large, smooth curves, this project can also be an approachable introduction to fabric appliqué, especially for sewists who want to practice accurate placement and curved stitching.
Before beginning, remember that a handmade fabric panel does not have to reproduce every tiny detail of the reference image to be successful. What matters most is maintaining the overall proportions, recognizable silhouettes, layered arrangement, and harmonious color palette. You can draft the templates on ordinary paper before transferring them to fabric, which makes it easier to experiment without wasting material. Cotton quilting fabric is an excellent choice because it presses cleanly, remains relatively stable while stitching, and is available in countless small-scale prints. A stabilizer or lightweight fusible web can help keep the curved pieces neat during assembly. By preparing each component carefully before sewing, you can create a Holy Family fabric appliqué panel with smooth outlines and a polished, dimensional finish.
Materials, Fabric Selection, and Preparing the Holy Family Fabric Panel Pattern
Begin by studying the major shapes rather than concentrating on tiny decorative details. The composition can be separated into the background, halos, faces, head coverings, garments, the infant, and the large curved foreground section. Drawing these components separately makes the Holy Family Fabric Panel Pattern much easier to manage. Trace each shape onto paper and label it so you know where it belongs during assembly. Mark obvious overlap points as well, because some pieces need to be positioned behind others. A clear numbering system can prevent confusion once you begin cutting several similarly curved pieces.
DISCOVER MORE FREE PATTERNS HERE!
For materials, choose quilting cotton, lightweight fusible web, coordinating sewing thread, backing fabric, and a stabilizer suitable for appliqué. You will also need fabric scissors, paper scissors, an iron, pins or appliqué clips, a fabric marking tool, and a sewing machine capable of a straight stitch or narrow decorative stitch. A pressing cloth is helpful when working with fusible products. If you want a quilted finish, prepare batting and backing after the appliqué top has been assembled. Always follow the manufacturer’s directions for any fusible material you use, particularly regarding iron temperature and pressing time.
The reference design uses a particularly effective palette that can serve as your starting point. Select a warm tan fabric for the background, cream floral cotton for several outer shapes, golden yellow for the flowing garments, blue floral fabric for Mary’s clothing, and red floral cotton for Joseph’s central garment. Peach or light flesh-colored fabric works well for the simplified faces, while brown can provide a small amount of visual contrast around Joseph’s head area. Small floral prints are especially effective because they provide detail without overwhelming the silhouettes. Keeping the prints relatively small also helps the panel remain recognizable from a distance.
Once you have drafted the pattern pieces, test the complete arrangement on a large sheet of paper. This is an important step because the composition depends heavily on overlapping curves. The outer cream and golden sections should form a visually balanced frame around the central family group. Mary’s blue garment should remain clearly visible, while the red and gold areas around Joseph need enough contrast to prevent their outlines from disappearing. The infant should sit naturally within the central curved shapes. Make adjustments to the paper templates now rather than after expensive fabric has been cut.
Transfer the finalized templates to the paper side of your fusible web if you are using raw-edge fusible appliqué. Remember that traced pieces may need to be reversed depending on the transfer method. Leave a little space between shapes when cutting the fusible sheet, then attach each section to the wrong side of its corresponding fabric. After the material has cooled completely, cut precisely along the final outline. Smooth cutting is particularly important around the long golden curves because uneven edges will become more noticeable after topstitching.
Before assembling the panel, prepare a background large enough to provide comfortable working margins around the design. Press it thoroughly so there are no creases beneath the appliqué. Find the vertical and horizontal centers and make temporary reference marks using a removable fabric marker. Position your paper version of the design nearby so you can continuously compare placement. At this stage, avoid permanently attaching everything immediately. A careful dry layout gives you an opportunity to correct spacing, color balance, and overlaps before committing to the final arrangement.
Building the Main Appliqué Shapes Step by Step
Start assembly with the pieces that appear farthest behind the figures. In the reference composition, the large circular floral halo shapes belong toward the back and therefore should be positioned before the foreground garments. Center these elements carefully according to your master layout. Their curves should remain smooth and visually balanced around the upper figures. Once you are satisfied with their position, lightly secure them according to your chosen appliqué technique. Work gradually so the fabric remains flat and does not develop unwanted bubbles or folds.
Next, begin constructing Joseph’s upper figure. Position the peach face shape first in relation to the halo, followed by the brown section and the golden outer covering. The golden fabric creates one of the strongest continuous lines in the entire Holy Family Fabric Panel Pattern, so take extra time with its placement. It should travel naturally from the head area downward through the composition. The red floral garment can then be positioned underneath or beside the gold section according to your drafted templates. Check that enough red remains visible to create the strong central color contrast seen in the inspiration.
Mary can be assembled using the same layered approach. Position the face within the surrounding cream head covering, then introduce the blue floral garment underneath. Blue creates a clear distinction between the two adult figures and provides a beautiful contrast against the neighboring gold. Keep the curves soft rather than angular, especially where the cream head covering moves toward the lower portion of the design. The fabric appliqué pattern gains much of its gentle appearance from these uninterrupted sweeping lines. Step back occasionally and view the panel from a distance to check whether the silhouette reads clearly.
The infant can be constructed after the larger adult shapes have established the center of the composition. Use peach fabric for the visible face and cream for the surrounding curved covering. Because this area is smaller, precise cutting becomes particularly important. Avoid making the facial oval too tiny, since narrow seam allowances or dense stitching can visually reduce the shape even further. Place the infant so the surrounding gold and cream curves appear to cradle the figure. This arrangement helps connect all three figures into one cohesive Holy Family fabric design.
Now add the broad sweeping pieces across the lower half of the panel. These sections visually anchor the entire project and hide some of the raw intersections created by earlier layers. In the reference, cream floral fabric sweeps prominently across the foreground, while blue and gold remain visible beneath and beside it. Follow the overlap order established during your paper layout rather than attaching pieces randomly. Good layering creates depth even though the finished artwork remains essentially flat. Smooth every section carefully before pressing or stitching it permanently.
After all major pieces are positioned, examine the entire panel before moving to decorative stitching. Look for awkward gaps, accidental overlaps, distorted curves, or areas where two similar fabrics blend together too much. Small corrections are considerably easier before the edges have been sewn. Confirm that Mary, Joseph, and the infant remain visually distinct while still appearing connected. The goal of the Holy Family Fabric Panel Pattern is not complicated realism but a clean, graceful composition created through color, silhouette, texture, and thoughtfully arranged layers.
Appliqué Stitching, Curves, and Decorative Finishing Techniques
With the pieces secured, begin stitching around the appliqué edges. A narrow straight stitch close to the edge can recreate the defined appearance visible in the reference, while a small blanket stitch offers a more traditional appliqué finish. Choose one main technique and use it consistently throughout the project. Consistency helps the separate fabric pieces feel like parts of one intentional design. Test your preferred stitch on scrap fabric first, particularly if you are combining cotton, fusible web, and stabilizer.
Curves deserve special attention. Rather than attempting to force a long curve through the sewing machine quickly, sew slowly and adjust the fabric frequently. When necessary, stop with the needle down, raise the presser foot, rotate the fabric slightly, lower the foot, and continue. These small adjustments produce a much smoother line than making several large turns. Gentle curves are an essential feature of this Holy Family Fabric Panel Pattern, so careful stitching here has a significant effect on the final appearance. Avoid pulling the fabric from behind the machine because this can distort the appliqué.
Thread color can either blend with the fabrics or intentionally emphasize their outlines. Golden or warm tan thread works especially well with the palette shown in the reference because it harmonizes with cream, yellow, red, and brown. Blue areas can use coordinating blue thread if you prefer less visible stitching. Another option is using one warm neutral thread throughout the panel to create visual continuity. Whatever you choose, make sure the tension is properly adjusted so the top thread lies smoothly without drawing the fabric inward.
If the fabric begins puckering while you stitch, stop and determine the cause before continuing. Insufficient stabilization, excessive thread tension, or stretching around curves are common reasons. A removable or lightweight stabilizer behind the background can significantly improve the quality of machine appliqué stitching. Press completed areas gently from the reverse side when appropriate, following the care requirements of the fusible web. Avoid aggressively sliding the iron over appliqué because that movement can distort carefully positioned curves.
Once every appliqué edge has been stitched, decide whether you want to quilt the finished panel. For a softly dimensional result, layer the completed top with batting and backing fabric. Baste the layers and add quilting selectively around the main silhouettes. Stitching near the outlines can make the figures rise subtly from the background, giving the project extra depth. You do not need dense quilting; restrained quilting often complements decorative appliqué better because the printed fabrics and graceful shapes remain the main attraction.
Finish the outer edges according to the intended use of the project. A wall panel can be squared and finished with traditional quilt binding, while a decorative fabric panel intended for framing may need only a neat backing. If adding binding, select a fabric that supports rather than competes with the central composition. Warm gold, cream, brown, or a coordinating floral print can all work effectively. Press the completed Holy Family Fabric Panel Pattern carefully, trim loose threads, and inspect every seam before displaying or gifting the finished piece.
Personalizing, Displaying, and Caring for the Finished Fabric Panel
One advantage of making your own Holy Family Fabric Panel Pattern is the freedom to personalize the color palette. You do not have to reproduce the exact fabrics visible in the reference. A traditional Christmas palette could combine burgundy, forest green, cream, and antique gold, while a softer interpretation might use dusty blue, beige, ivory, and muted rose. What matters most is maintaining enough contrast between neighboring pieces. If two fabrics have similar values, their curved boundaries can disappear when viewed from across a room.
Fabric scale also influences the finished appearance. Tiny floral patterns work beautifully for small appliqué sections because the motifs remain visible even after the shapes are cut. Large prints can work, but thoughtful placement becomes more important because a single flower or motif might accidentally dominate a face covering or garment. Before cutting, place the paper template over different sections of the fabric to preview the result. This technique, often called fussy cutting, lets you intentionally select which portion of a print appears within an appliqué shape.
Beginners can simplify the project by reducing the number of separate layers. For example, closely related cream sections can occasionally be treated as one larger template if doing so does not change the recognizable silhouette. More experienced sewists can move in the opposite direction by introducing additional fabric sections, decorative stitching, hand embroidery, or subtle quilting. The basic Holy Family appliqué pattern therefore offers room for different skill levels. The key is to preserve the flowing composition rather than adding details simply for complexity.
The completed project can become a seasonal wall hanging, a centerpiece for a larger quilt, a decorative panel, or a handmade holiday gift. If you plan to hang it, consider adding a fabric sleeve to the upper back edge before completing the binding. A lightweight hanging rod can then support the panel without placing stress on individual appliqué pieces. For framed display, make sure the textile has enough breathing room and is not compressed unnecessarily. Keeping the design flat helps its curved lines and layered shapes remain clearly visible.
Proper care will also help protect your work. Since the project contains multiple appliqué layers and possibly fusible material, frequent machine washing is generally unnecessary for a decorative wall panel. Dust can usually be removed gently, and careful spot cleaning may be appropriate depending on the fabrics and products used. Keep the panel away from prolonged direct sunlight, which can gradually fade richly colored cottons. If storing it for part of the year, keep it clean, dry, and protected from moisture.
Most importantly, allow the finished panel to retain some evidence of handcraftsmanship. Perfectly identical curves and mechanically uniform stitches are not necessary for a beautiful result. Careful construction matters, but the personality of handmade sewing comes partly from fabric choices and individual stitching decisions. By combining accurate templates, thoughtful layering, smooth appliqué, balanced colors, and patient finishing, you can transform simple cotton pieces into a meaningful Holy Family Fabric Panel Pattern that can become part of your seasonal décor for many years.
Frequently Asked Questions About the Holy Family Fabric Panel Pattern
What is a Holy Family Fabric Panel Pattern?
A Holy Family Fabric Panel Pattern is a textile design that uses shaped fabric pieces to create a representation of the Holy Family. In this project, the figures are formed primarily through curved appliqué shapes instead of detailed facial features. The technique combines sewing, fabric layering, decorative topstitching, and optional quilting.
Is this project suitable for beginners?
Yes, although a confident beginner may find it easier after practicing on a few scrap appliqué pieces. The most challenging elements are the long curves, accurate layering, and smooth edge stitching. Creating full-size paper templates and testing the arrangement before sewing can make the project considerably easier.
What type of fabric is best for this appliqué panel?
Quality quilting cotton is an excellent choice. It is relatively stable, easy to cut, widely available in coordinated prints, and responds well to pressing. Small floral prints are particularly attractive for this style because they add visual detail without overpowering the shapes.
Do I need fusible web for the project?
It is not absolutely required, but lightweight fusible web can make assembly easier, particularly for beginners. It temporarily or permanently holds the appliqué shapes in their correct positions while their edges are stitched. Traditional turned-edge or needle-turn appliqué can also be used by sewists who prefer those techniques.
How can I keep curved appliqué edges smooth?
Use sharp scissors when cutting and sew slowly around the curves. At tighter sections, stop with the machine needle in the fabric, lift the presser foot, rotate the project slightly, and continue. Repeating small adjustments produces smoother curves than trying to turn the entire panel at once.
Can I change the colors shown in the reference design?
Absolutely. The combination of blue, red, cream, gold, peach, brown, and floral prints is only one interpretation. You can create a rustic, pastel, traditional Christmas, neutral, or contemporary palette. Maintain strong enough contrast between neighboring shapes so the silhouettes remain easy to recognize.
What stitch should I use around the appliqué?
A close straight stitch works well when you want clean, defined outlines. A narrow zigzag, satin stitch, or blanket stitch can also be used depending on the desired appearance. Testing stitches on scraps containing the same fabric, fusible material, and stabilizer will help you choose the best settings.
Should the finished panel be quilted?
Quilting is optional. Adding batting and backing can give the project more body and allow outline quilting to create gentle dimension. If you simply want a decorative appliqué panel for framing or another sewing project, additional quilting may not be necessary.
How do I prevent the fabric from puckering during appliqué?
Start with a well-pressed background, avoid stretching the fabric while sewing, use appropriate stabilizer, and check the machine tension before working on the actual panel. Sewing slowly around curves is also important. Testing the complete fabric-and-stabilizer combination on scraps can prevent many common problems.
Can I enlarge or reduce the Holy Family Fabric Panel Pattern?
Yes. The templates can be scaled as a complete set as long as every piece is enlarged or reduced by the same percentage. Keeping the proportions consistent ensures that overlapping pieces continue to fit together correctly. Very small versions may require simplifying some narrow sections because detailed curves become harder to sew accurately.
Conclusion
Creating a Holy Family Fabric Panel Pattern is a rewarding way to combine fabric appliqué, quilting cotton, curved stitching, layered construction, and decorative sewing in one cohesive project. The process begins with identifying the major shapes, drafting accurate templates, selecting coordinated fabrics, and planning the correct order of overlapping pieces. From there, careful cutting and positioning establish the recognizable silhouettes of Mary, Joseph, and the infant.
The sewing stage brings those individual pieces together. Smooth curved stitching defines the flowing garments, contrasting fabrics separate the figures, and optional batting and quilting can give the finished artwork additional dimension. Small floral cottons, warm gold, bright blue, rich red, cream, peach, and brown can reproduce the welcoming character of the reference design, while alternative palettes allow every sewist to create a unique interpretation.
EASILY FIND THE FREE PDF FOR THIS PATTERN HERE!
Above all, patience is more valuable than speed when making this project. Prepare the templates carefully, test the complete layout before fusing, stitch the curves gradually, and inspect each layer before adding the next one. Following these steps will help you create a polished Holy Family Fabric Panel Pattern suitable for seasonal decorating, gifting, wall display, or incorporating into a larger textile project. If you make your own version, leave your sincere opinion about the project and share any suggestions you have for colors, fabrics, stitching techniques, or creative variations. Your ideas may inspire new ways to personalize this meaningful fabric panel.