
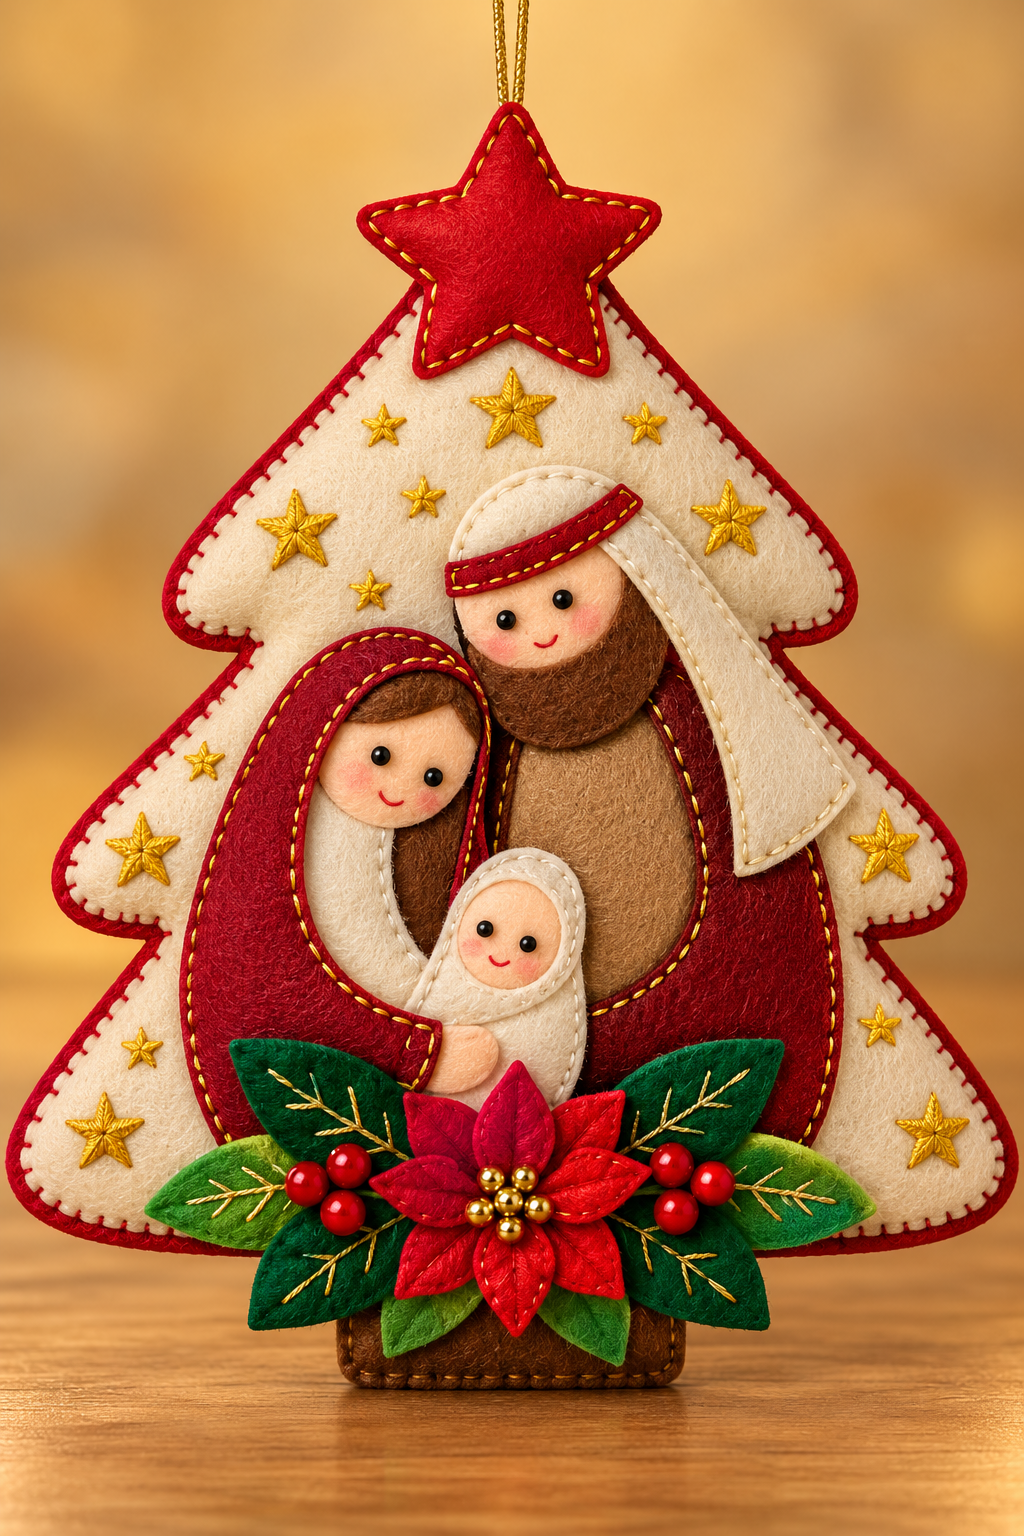
The Felt Christmas Tree Ornament (Nativity Scene) Pattern is a charming handmade Christmas project that combines traditional holiday symbolism with the warm texture of felt, embroidery, and simple appliqué. Inspired by the ornament shown in the reference image, this design features a stylized Christmas tree as the background, a bright star at the top, the Holy Family in the center, embroidered golden stars, and a decorative poinsettia arrangement along the bottom. The layered construction gives the piece dimension while still keeping it practical enough to hang on a Christmas tree, display on a wall, or use as part of a seasonal centerpiece. Because most of the shapes are uncomplicated, this is also an approachable project for crafters who are beginning to explore felt sewing and hand embroidery.
One of the most appealing aspects of this Felt Christmas Tree Ornament (Nativity Scene) Pattern is that you do not need an advanced sewing machine or complicated equipment to recreate the general look. Most of the project can be assembled using basic hand-sewing stitches, embroidery floss, felt, lightweight stuffing, and fabric-safe adhesive when necessary. The visible stitches are actually an important part of the design rather than something that needs to be hidden. Red blanket stitching around the cream tree, golden running stitches around the clothing and star, and delicate embroidered details help create the handcrafted appearance that makes felt Christmas decorations so distinctive.
The finished ornament can also be customized without changing its basic construction. You might choose traditional red, cream, green, brown, and gold felt, as seen in the inspiration image, or adapt the palette to coordinate with your own Christmas decorations. A combination of ivory and champagne can create a softer look, while burgundy and forest green can produce a more traditional finish. The instructions below explain the complete process from preparing the pattern pieces to creating the Nativity figures and adding the final hanging loop, allowing you to make your own version from beginning to end.
Materials and Preparing the Felt Christmas Tree Pattern
Begin by gathering the materials for your felt Nativity Christmas ornament. You will need felt sheets in cream or ivory, deep red, dark brown, medium brown, peach, white or warm cream, dark green, medium green, and bright red. Small scraps are sufficient for many of the appliqué pieces. You will also need embroidery floss in coordinating colors, especially gold, red, cream, brown, and green. Choose embroidery thread with enough contrast that the decorative stitches remain visible.
For a medium-sized ornament, a practical finished size is approximately 24 to 28 cm tall, excluding the hanging cord, and approximately 18 to 22 cm wide at the broadest part of the tree. These dimensions can be adjusted. If you want a smaller Christmas-tree ornament, reduce the entire template proportionally before cutting. Keeping every component at the same scale ensures that Mary, Joseph, Baby Jesus, the star, and the floral decoration remain visually balanced.
Create the main tree template first. Draw a symmetrical Christmas-tree silhouette with approximately three gently rounded tiers and a pointed top. Fold a sheet of paper vertically, draw one half of the tree, and cut through both layers to obtain a symmetrical pattern. Trace this shape twice onto cream felt if you want a stuffed ornament. One layer becomes the decorated front, while the second becomes the backing. Add approximately 5 to 7 mm around the outer edge if you prefer additional room for stitching.
Next, prepare the smaller templates. The red star topper can measure approximately 7 to 8 cm from point to point. The Nativity figures should occupy the central portion of the tree without covering the embroidered stars around them. Simplify each figure into several pieces: an oval face, a body, a head covering or veil, and an outer robe. Baby Jesus can be represented with a small peach face and a cream swaddling shape.
Cut the felt carefully using sharp fabric scissors. Felt does not normally fray like woven fabric, which makes it particularly convenient for Christmas felt appliqué. However, clean cutting is important because nearly every edge remains visible in the completed ornament. Trace templates using a removable fabric marker, tailor’s chalk, or another marking tool suitable for your chosen felt. Keep marks on the reverse whenever possible.
Before beginning any sewing, arrange every piece over the front tree layer. Position the large star near the top, Joseph toward the right, Mary toward the left, and Baby Jesus between them. Place the poinsettia and leaves along the lower portion. This dry-layout step is important because it lets you correct spacing before stitches or adhesive make the arrangement permanent.
Sewing the Nativity Scene and Embroidered Details
Start the assembly of the Felt Christmas Tree Ornament (Nativity Scene) Pattern with the main tree. Place the two cream tree pieces together and align their edges. If you want a dimensional ornament, insert a very thin layer of polyester stuffing between them. Avoid overstuffing because the tree should remain relatively flat. Sew around the perimeter using red blanket stitch, creating the distinctive outlined effect visible in the inspiration.
DISCOVER MORE FREE PATTERNS HERE!
The next stage is the Nativity group. Build Joseph from the bottom layer upward. Position a brown body shape first, followed by the red outer robe. Add a peach-colored oval for the face and a brown felt beard around the lower portion of the face. Finish the head with a cream head covering and a narrow red band. Small running stitches in gold embroidery floss around the red pieces provide an attractive festive accent.
Mary can be constructed in a similar layered manner. Begin with a darker brown inner body or hair area and cover much of it with a rich red veil. Add the peach felt face and a cream inner head covering. A few tiny stitches can secure each piece before you work around the visible edges. Using small, evenly spaced stitches will make the appliqué look more polished and help the individual layers remain flat.
For the faces, simplicity usually produces the most attractive result. Small black beads can create the eyes, or you can use black embroidery knots if the ornament will be around young children and you prefer not to attach tiny beads. Embroider a small curved mouth with red or dark pink thread. A touch of textile blush or a tiny amount of fabric-safe coloring can be used for rosy cheeks, but keep the application subtle.
Baby Jesus forms the visual center of the composition. Cut a small peach circle or oval for the face and place it over a cream swaddling shape. A separate curved cream piece can frame the head. Use cream embroidery floss around the outside to emphasize the layered construction. Position the baby between Mary and Joseph so that all three figures form a compact, balanced group.
Complete this stage by adding embroidered golden stars around the Nativity scene. Use small felt stars, embroidery, or a combination of both. Larger stars can occupy open areas near the outer branches, while tiny stars can fill narrower spaces. Keep the placement slightly varied rather than perfectly symmetrical. The result should feel decorative and handcrafted while maintaining enough empty background for each element to remain clearly visible.
Adding the Star, Poinsettia, Leaves, and Finishing Details
The large red star is one of the strongest visual elements in the Felt Christmas Tree Ornament (Nativity Scene) Pattern. Cut two matching red felt stars and place them together. Add a very small amount of stuffing between the layers if you want a raised effect. Stitch around the perimeter with gold running stitch, keeping the stitches as consistent as possible. Attach the completed star over the upper portion of the tree.
Create the poinsettia at the bottom using several pointed red felt petals. A layered flower generally looks fuller than a single flat shape. Cut approximately six larger petals and five or six smaller petals, depending on the size of your ornament. Arrange the larger petals first and overlap the smaller petals over them. Secure the center using gold beads, embroidered French knots, or small felt circles.
For the foliage, cut several elongated leaves from dark green and medium green felt. Slight variations in size make the arrangement more natural. Embroider a central vein with gold floss and add several diagonal stitches branching from it. Place the darker leaves behind the poinsettia and lighter leaves closer to the center. This creates depth without requiring complicated sewing techniques.
Small red berries can be added between the leaves. You can make them from tiny felt circles, fabric-covered beads, pom-poms, or securely attached decorative beads. If you are making the ornament specifically for a household with very young children, embroidered berries or securely sewn felt circles may be preferable because they eliminate loose decorative pieces.
To create the hanging loop, use gold cord, ribbon, or strong embroidery thread. Fold approximately 15 to 20 cm of cord in half and secure the ends firmly between the front and back layers near the top of the tree. Reinforce this area with several stitches because it will support the ornament’s weight. The loop should emerge neatly behind the upper star without interfering with its shape.
Inspect the entire ornament after assembly. Trim stray threads, correct any loose stitches, and gently reshape the stuffed sections with your fingers. If the felt became slightly distorted during sewing, place the finished ornament beneath a clean cloth and press it very lightly according to the care instructions for your felt. Do not apply excessive heat, especially when working with synthetic felt, beads, adhesive, or polyester filling.
FAQ About the Felt Christmas Tree Ornament (Nativity Scene) Pattern
What type of felt is best for this Christmas ornament? Wool-blend felt is an excellent option because it is dense, attractive, and generally easy to stitch. Quality craft felt can also work well and is usually more economical. For a project with many small pieces, choose felt that maintains its shape after cutting. The cream Christmas tree background may benefit from slightly thicker felt because it supports all of the appliqué layers.
Can beginners make this Felt Christmas Tree Ornament (Nativity Scene) Pattern? Yes. The project looks detailed primarily because many simple components are layered together. A beginner can work slowly and complete one section at a time. Practice running stitch, blanket stitch, and basic embroidery on scrap felt before starting the finished ornament. Consistent stitch length is more important than using complicated techniques.
Does the ornament need to be sewn entirely by hand? No, although hand sewing creates the traditional decorative appearance shown in this style of felt craft. A sewing machine can be used for some structural seams if desired, but small curved appliqué pieces are often easier to control by hand. Fabric adhesive can temporarily hold pieces in place before sewing, although permanent stitching usually creates a more durable finished decoration.
How large should the finished Nativity ornament be? Approximately 24 to 28 cm tall works nicely for a decorative wall or tree ornament with enough room for detailed appliqué. For a standard smaller Christmas-tree decoration, you can scale the pattern down considerably. The important point is to reduce every template piece by the same percentage so that the proportions of the composition remain consistent.
How can I make the ornament look more professional? Accurate cutting, consistent stitching, careful layering, and a limited color palette make a significant difference. Use sharp scissors for smooth felt edges and test the position of every component before sewing. Keep embroidery stitches relatively even and avoid excessive stuffing. Small details such as gold stitching, embroidered leaves, tiny stars, and coordinated thread colors can elevate the design without making construction unnecessarily difficult.
Can this pattern be customized for Christmas gifts or home décor? Absolutely. The same design can become a tree ornament, wall hanging, door decoration, gift embellishment, or centerpiece accent. You can personalize the back with an embroidered year, family name, or short holiday message. Another possibility is to make several versions in different color combinations while retaining the recognizable Nativity scene, Christmas tree silhouette, star, and poinsettia elements.
Conclusion
The Felt Christmas Tree Ornament (Nativity Scene) Pattern combines several accessible crafting techniques into one meaningful Christmas decoration. Beginning with a simple cream felt tree, you can gradually build the design through layered appliqué, decorative blanket stitching, embroidered stars, a dimensional red topper, the Holy Family, green foliage, red berries, and a beautiful felt poinsettia. Working from the largest background pieces toward the smallest decorative details helps keep the project organized and makes even the more intricate sections manageable.
The most important techniques covered in this project are careful template preparation, clean felt cutting, layered appliqué, running stitch, blanket stitch, simple facial embroidery, light stuffing, and decorative embroidery. You can follow the traditional red, cream, green, brown, and gold Christmas palette or personalize the colors to suit your own holiday décor. Because felt is forgiving and does not require finished raw edges in the same way as many woven fabrics, this pattern provides plenty of room for creativity.
EASILY FIND THE FREE PDF FOR THIS PATTERN HERE!
Once finished, your handmade Nativity ornament can become a special part of your Christmas decorations for many seasons. It can also make a thoughtful handmade gift, particularly when personalized with a date or small message on the back. If you make your own version of this Felt Christmas Tree Ornament (Nativity Scene) Pattern, leave your sincere opinion about the project and share any suggestions or creative changes you would make. Your ideas may inspire new color combinations, embellishments, and variations for future handmade Christmas decorations.