
The Felt Teddy Bear with Hearts Wall Decoration Fabric Pattern is a charming handmade sewing project that combines the warmth of a classic teddy bear with layered fabric hearts, decorative stitching, buttons, lace, and country-style details. Inspired by the wall decoration shown in the reference image, this project works beautifully as seasonal décor, nursery decoration, a handmade gift, or a cozy accent for a craft room. The design is especially appealing because it does not require complicated tailoring techniques, yet the finished piece has plenty of texture and personality. The teddy bear is constructed mainly from felt, while contrasting cotton fabrics can be used for the scarf, small heart appliqué, muzzle, and decorative hearts. Visible blanket stitching around the edges gives the project its recognizable handmade character and also helps define every individual shape. Because the decoration is assembled from separate pieces, crafters can easily change the colors, fabrics, buttons, and dimensions to create their own version.
Making a Felt Teddy Bear with Hearts Wall Decoration Fabric Pattern begins with understanding the structure of the project. The bear can be divided into simple pattern pieces such as the head, ears, muzzle, body, belly, arms, legs, and feet, while the heart arrangement can be created from several hearts in different sizes. In the photographed design, warm tan felt is combined with deep red hearts, cream fabric, red gingham, rustic wooden-style buttons, and delicate lace. This color palette produces a traditional country or farmhouse feeling, but it can easily be adapted to pastel colors, Christmas colors, neutral shades, or brighter fabrics. The pattern is also suitable for beginners who already know basic hand sewing because most pieces can be joined using a simple blanket stitch, running stitch, or small whip stitches. Careful preparation is more important than speed, especially when cutting matching pieces and positioning the facial features.
One of the most enjoyable aspects of this fabric pattern is the opportunity to personalize the teddy bear without changing the basic construction. A red gingham scarf can be replaced with floral cotton, tiny polka dots, plaid, or another print that coordinates with the hearts. The layered hearts can feature lace strips, decorative buttons, embroidery, or contrasting fabric patches. The bear’s expression can also be adjusted by changing the position of the eyes, muzzle, nose, and mouth before permanently stitching them in place. Although the reference project has a festive and rustic atmosphere, the same technique can create decorations for birthdays, baby rooms, Valentine’s Day, Christmas, or everyday home décor. The following tutorial explains the materials, pattern preparation, sewing sequence, stuffing, heart construction, and final assembly needed to create a handmade version from beginning to end.
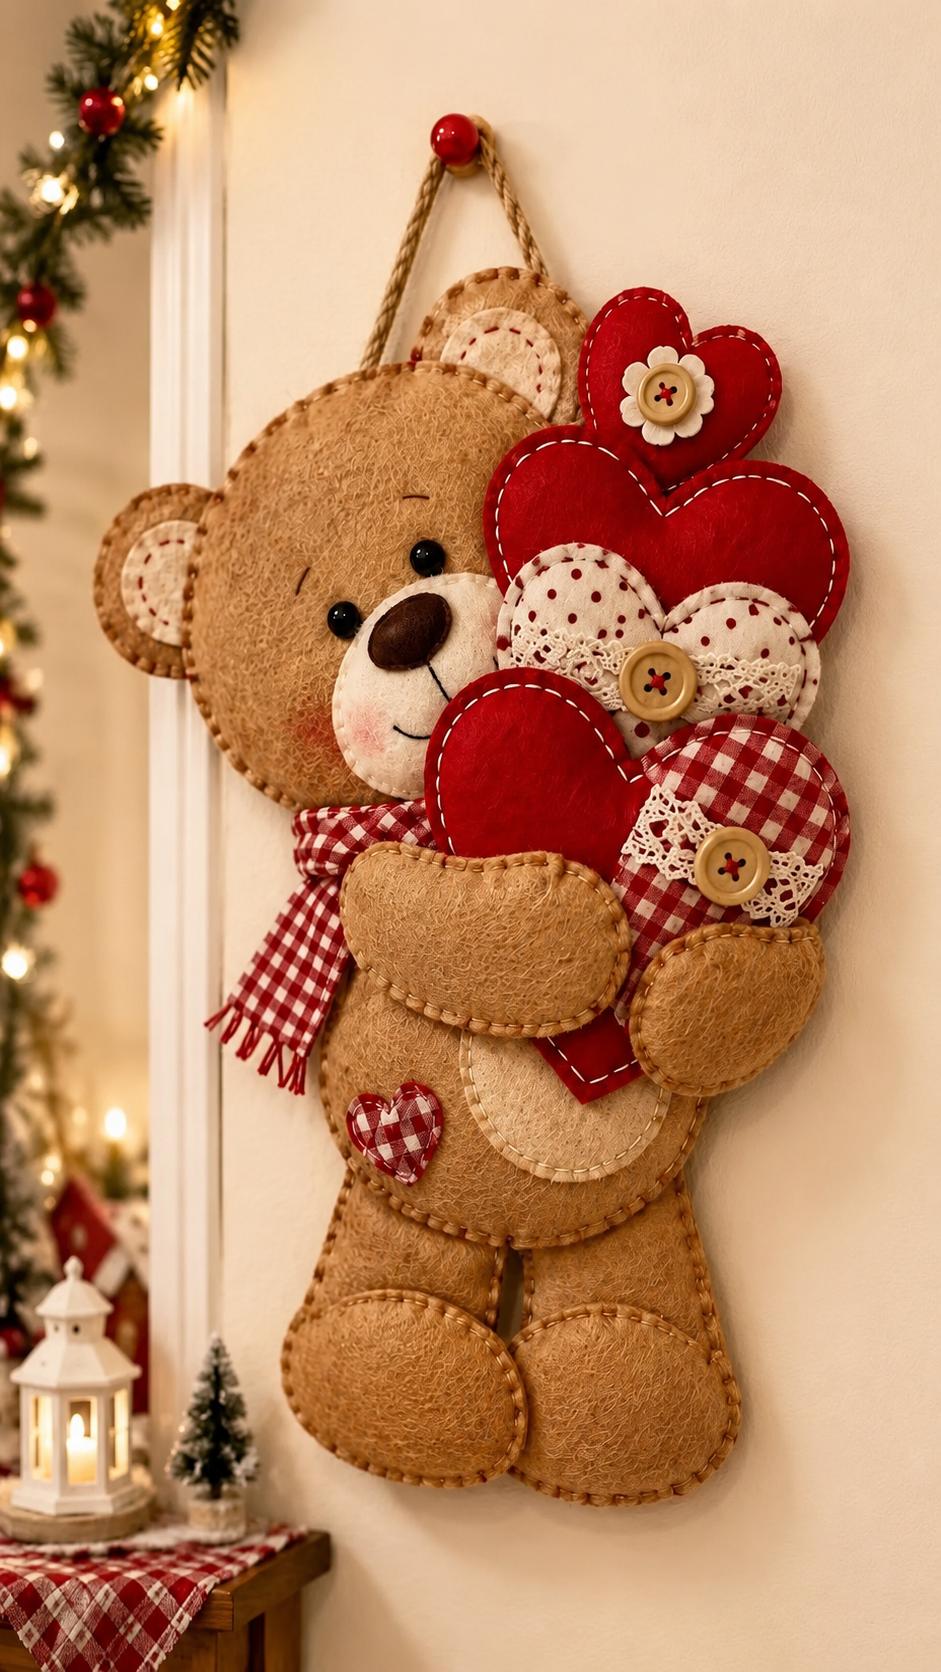
Materials and Pattern Preparation for the Felt Teddy Bear
Start by gathering the materials for your Felt Teddy Bear with Hearts Wall Decoration Fabric Pattern. You will need medium-weight tan or caramel felt for the bear, red felt for several hearts, cream or beige felt for the muzzle, cotton fabric in gingham or another small print, embroidery floss, sewing thread, stuffing, buttons, narrow lace, ribbon or fabric for the scarf, and natural cord for the hanging loop. Small black beads or securely stitched felt circles can be used for the eyes. A dark brown felt oval works well for the nose.
DISCOVER MORE FREE PATTERNS HERE!
For a medium wall decoration, you can make the finished bear approximately 40 to 50 cm tall, although the dimensions are completely adjustable. Sketch the body pieces on paper before cutting the fabric. Create templates for one head, one body, two ears, two arms, two legs, two feet, one muzzle, one belly patch, and several hearts. Remember that most stuffed sections require two matching felt pieces. Adding approximately 0.7 to 1 cm around templates gives you comfortable space for stitching.
When preparing the head, draw a large rounded shape with slightly wider sides where the ears will sit. Cut two identical pieces from tan felt. The ears can be made from smaller rounded shapes and decorated with contrasting inner-ear pieces in cream felt or printed cotton. Pin or lightly baste the inner-ear fabric onto the outer ear before sewing. Using blanket stitch around the inner detail gives the ear a neat decorative finish similar to traditional handmade felt ornaments.
The teddy bear’s body should have a simple rounded silhouette that becomes slightly narrower near the neck. Cut two matching body pieces and prepare a lighter oval patch for the belly. Before joining the front and back body pieces, attach the belly patch to the front layer. Decorative stitching around this patch adds extra texture and prevents it from shifting. You can also add a small gingham heart appliqué near the lower side of the belly to echo the heart arrangement held by the bear.
Prepare the arms and legs separately. Each limb needs a front and back layer if you plan to stuff it. Rounded paws help maintain the soft, friendly appearance of the bear. The feet can be made slightly larger than the legs so they remain visually noticeable once the project is hanging vertically. Mark matching points on the paper templates so that the arms and legs can later be positioned symmetrically on the body.
Before beginning final sewing, arrange all the cut pieces on a flat surface. This simple step is important because it lets you check proportions before anything becomes permanent. Place the head above the body, position the ears, test the length of the arms, and arrange the hearts beside the bear. If one component looks too large or too small, adjust the paper template and recut it now rather than trying to correct the proportion after stuffing.
Sewing the Teddy Bear Head, Face, Body, and Limbs
Begin sewing the face before joining the two head layers. Position the cream muzzle toward the lower center of the face and pin it carefully. Sew around its edge with small blanket stitches or evenly spaced running stitches. Add a dark brown oval nose near the center of the muzzle. The mouth can be embroidered using dark brown or black floss, creating a short vertical line below the nose followed by a gentle curved smile.
Next, position the eyes above the muzzle. The reference design uses small dark eyes placed relatively close to the center, helping create a sweet teddy bear expression. Test several positions before sewing them permanently because even a few millimeters can change the character of the face. If the decoration may be handled by small children, embroidered or felt eyes are generally preferable to loose decorative pieces. For a wall-only ornament, decorative beads may also be used when firmly secured.
A little color on the cheeks gives the bear a warm handmade appearance. You can gently shade the felt using an appropriate textile medium or create very subtle stitched cheek details. Avoid applying excessive color because the rustic character of this felt teddy bear works best when the expression remains soft. Once the face is complete, position the ears between the front and back head layers and temporarily secure them so they remain aligned during stitching.
Stitch around the head using embroidery floss in a coordinating brown or beige shade. Leave a small opening for stuffing. Add polyester filling gradually, distributing it toward the edges before filling the center. The goal is a softly rounded head rather than a firm, overstuffed shape. When you are happy with the volume, close the opening using the same stitch spacing so the seam appears continuous.
Repeat the same construction method for the body, arms, legs, and feet. Sew around the edges, leave an opening, add a light amount of stuffing, and close each piece. Consistent decorative blanket stitching is one of the most important visual elements of this project. Try to keep the distance between stitches similar throughout the bear. Slight irregularities are perfectly natural in a handmade project and often contribute to its character.
Assemble the main teddy bear only after all components have been completed. Attach the head securely to the upper body using strong hidden stitches on the back and reinforcing stitches where necessary. Position the legs at the bottom and the arms at the sides. In the design inspired by the photograph, the arms extend forward to appear as though the teddy bear is hugging the heart arrangement. Do not permanently attach both hands to the front until the hearts have been positioned.
Creating the Layered Fabric Hearts and Decorative Details
The hearts are the centerpiece of the Felt Teddy Bear with Hearts Wall Decoration Fabric Pattern, so preparing several sizes creates the layered appearance seen in the reference project. Make paper heart templates in at least three dimensions. Large hearts can measure approximately 14 to 18 cm tall, medium hearts approximately 10 to 14 cm, and smaller hearts approximately 7 to 10 cm. These are suggested dimensions and can be scaled according to the size of your teddy bear.
Cut several heart shapes from deep red felt. For stuffed hearts, cut two identical pieces for each one. Stitch around the edges with cream or white embroidery floss to create strong visual contrast. Leave a small opening, add a modest amount of stuffing, and close the seam. Avoid overfilling the hearts because flatter pieces are easier to overlap and attach to the teddy bear.
To add variety, create one or two hearts from patterned cotton fabric rather than solid felt. Small red-and-cream gingham is especially effective for a country-style design. Because woven cotton can fray, you may place it over a felt backing before sewing. Another option is to turn the seam allowance inward and stitch the cotton heart onto a felt base. This gives the heart extra stability while preserving the printed fabric surface.
Decorative lace can be placed horizontally across the patterned hearts. Position the lace before assembling or stuffing the heart so the ends can be secured neatly on the back. A button placed over the lace creates a focal point and introduces another layer of texture. Natural wooden-style buttons complement the rustic color palette particularly well, although red, cream, or decorative sewing buttons can be used to match your own fabrics.
Arrange the completed hearts before attaching them. Start with one or two larger hearts at the center and place smaller hearts above and around them. Overlap the edges slightly so the group looks like a bouquet. The arrangement should appear balanced but does not need to be perfectly symmetrical. Alternate solid red felt with patterned fabric to prevent the individual shapes from visually blending together.
Once you like the arrangement, join the hearts from the back with strong hand stitches. Sew through multiple layers at several hidden contact points so the cluster behaves as a single unit. Place the completed heart group over the teddy bear’s chest and adjust the position until the bear appears to be holding it naturally. Secure the hearts to the body, then bring the bear’s arms forward and stitch the paws over or beside the heart cluster.
Final Assembly, Hanging Loop, Finishing, and Display
The scarf is a simple detail that adds personality to the Felt Teddy Bear with Hearts Wall Decoration Fabric Pattern. Cut a strip of red gingham cotton long enough to wrap around the bear’s neck comfortably. For a medium-size decoration, a strip approximately 5 to 7 cm wide usually provides a good proportion. Finish the edges with a narrow hem, pinking shears, or deliberate fringe depending on the rustic effect you prefer.
Wrap the scarf around the neck after the head has been secured to the body. Tie it loosely toward one side rather than directly under the muzzle. This asymmetrical placement keeps the face visible and helps balance the heart cluster. Trim the scarf ends evenly and add small fringe cuts if desired. You can also use ribbon or a soft fabric strip when gingham is unavailable.
Now examine all attachment points from the back. A wall decoration needs to remain stable when hanging vertically, so reinforce the joins between the head and body, arms and body, and hearts and torso. Use matching thread so the additional stitches remain unobtrusive. Avoid relying on glue for structural joints. Hand stitching generally creates a more durable craft piece while preserving the traditional appearance of a handmade felt pattern.
Create the hanging loop with sturdy natural jute cord, cotton cord, or decorative ribbon. Fold the cord into a loop and attach both ends securely to the upper back of the teddy bear’s head. Stitch through several layers of felt rather than attaching the hanger to only one thin section. Test the hanging point gently before placing the decoration on the wall. The teddy bear should hang straight without twisting noticeably to either side.
Complete the project by checking the stuffing distribution and adjusting any pieces that became compressed during assembly. Smooth the ears, arms, feet, and hearts with your fingers. Trim loose threads and inspect every button and decorative element. If you want additional embellishment, small embroidered stitches around the belly patch or ears can enhance the handmade character without making the design look overcrowded.
Your completed Felt Teddy Bear with Hearts Wall Decoration Fabric Pattern can now be displayed on a decorative hook, wall peg, door hanger, or craft-room display. Keep it away from moisture and direct heat so the felt and cotton fabrics maintain their appearance. When storing it, place the decoration flat or loosely supported rather than compressing it beneath heavier objects. With thoughtful materials and careful stitching, this handmade teddy bear can remain an attractive piece of fabric décor for many seasons.
Frequently Asked Questions About the Felt Teddy Bear with Hearts Wall Decoration Fabric Pattern
Is this felt teddy bear project suitable for beginners?
Yes. The project uses mostly simple shapes and basic hand-sewing techniques. Beginners can practice blanket stitch, running stitch, appliqué, light stuffing, and basic assembly without needing advanced garment construction skills.
What type of felt works best for the teddy bear?
A medium-weight craft felt or wool-blend felt generally works well because it is easy to cut and does not fray like many woven fabrics. Felt that is too thin may stretch when stuffed, while very thick felt can make small decorative pieces difficult to sew.
Can I sew this project with a sewing machine?
Some sections can be machine sewn, particularly the cotton fabric details, but hand sewing gives the project the visible decorative stitching that defines its traditional style. Many crafters combine machine sewing for preparation with hand stitching for the final visible edges.
How much stuffing should I use?
Use enough stuffing to create gentle dimension without making the pieces hard. The bear and hearts should remain relatively flat because the project is designed to hang against a wall. Adding small amounts gradually gives you better control.
Can I change the colors of the Felt Teddy Bear with Hearts Wall Decoration Fabric Pattern?
Absolutely. Tan, red, and cream create a rustic look, but gray and pink can create a nursery style, while green and red work well for Christmas. Blue, beige, white, floral fabrics, or pastel tones are also attractive alternatives.
What stitch is best for the visible felt edges?
The blanket stitch is one of the best options because it joins the layers while creating a decorative border. Running stitch can also be used when you want a simpler appearance. Embroidery floss is particularly effective because its thickness makes the stitches more visible.
How can I make the hearts look more decorative?
Combine different textures. Try solid felt, printed cotton, gingham, lace, embroidered details, and buttons. Layering small details over larger hearts creates depth without requiring complicated sewing.
Do I need a seam allowance when cutting the felt?
If the felt pieces are joined with visible stitching close to the edge, a traditional turned seam allowance is not always required. However, leaving a comfortable border between the stitching line and cut edge makes the pieces stronger and easier to handle.
How can I enlarge or reduce the fabric pattern?
Keep the proportions of all pattern pieces consistent when resizing. If the bear body is enlarged by a certain percentage, enlarge the head, limbs, muzzle, and hearts by approximately the same percentage. This maintains the visual balance of the finished project.
Can this project be used as Christmas decoration?
Yes. The warm brown bear, red hearts, gingham scarf, rustic buttons, and visible stitching naturally complement Christmas and winter décor. Changing the heart fabrics to seasonal prints can reinforce the festive appearance.
How do I keep the wall decoration hanging straight?
Position the hanging loop near the upper center of gravity and make sure the heart cluster is not excessively heavy on one side. Before completing the final reinforcement stitches, temporarily hang the piece and adjust the loop if necessary.
Can I personalize the teddy bear as a handmade gift?
Yes. You can embroider a name, date, short message, or initials on the belly patch or on one of the hearts. Personalized fabric choices can also make each felt teddy bear wall decoration unique.
Conclusion
Creating a Felt Teddy Bear with Hearts Wall Decoration Fabric Pattern is a rewarding way to combine felt sewing, appliqué, decorative embroidery, fabric layering, and simple stuffed construction in one handmade project. Throughout this tutorial, you learned how to prepare the teddy bear templates, cut the felt pieces, build the face, sew and stuff the head and body, construct the arms and legs, create layered hearts, add lace and buttons, position the scarf, reinforce the assembly, and install a secure hanging loop. The most important part of the process is not making every stitch perfectly identical, but maintaining good proportions and creating a harmonious combination of textures and colors. This project can also become the starting point for many variations. Once you understand the basic Felt Teddy Bear with Hearts Wall Decoration Fabric Pattern, you can create different teddy bear expressions, seasonal heart arrangements, personalized gifts, nursery decorations, farmhouse ornaments, and coordinated fabric collections. Experiment with felt colors, gingham, floral cotton, lace, embroidery floss, and buttons while keeping the fundamental construction method the same.
EASILY FIND THE PDF FOR THIS PATTERN HERE!
A handmade decoration gains much of its charm from the choices made by the person creating it. Use this tutorial as a practical foundation while adding your own creative details to make the finished teddy bear personal and distinctive. If you make your own version, leave your sincere opinion about the project and share suggestions for colors, fabrics, embellishments, or variations you would like to try. Your ideas can inspire new interpretations of this warm and creative fabric craft.