
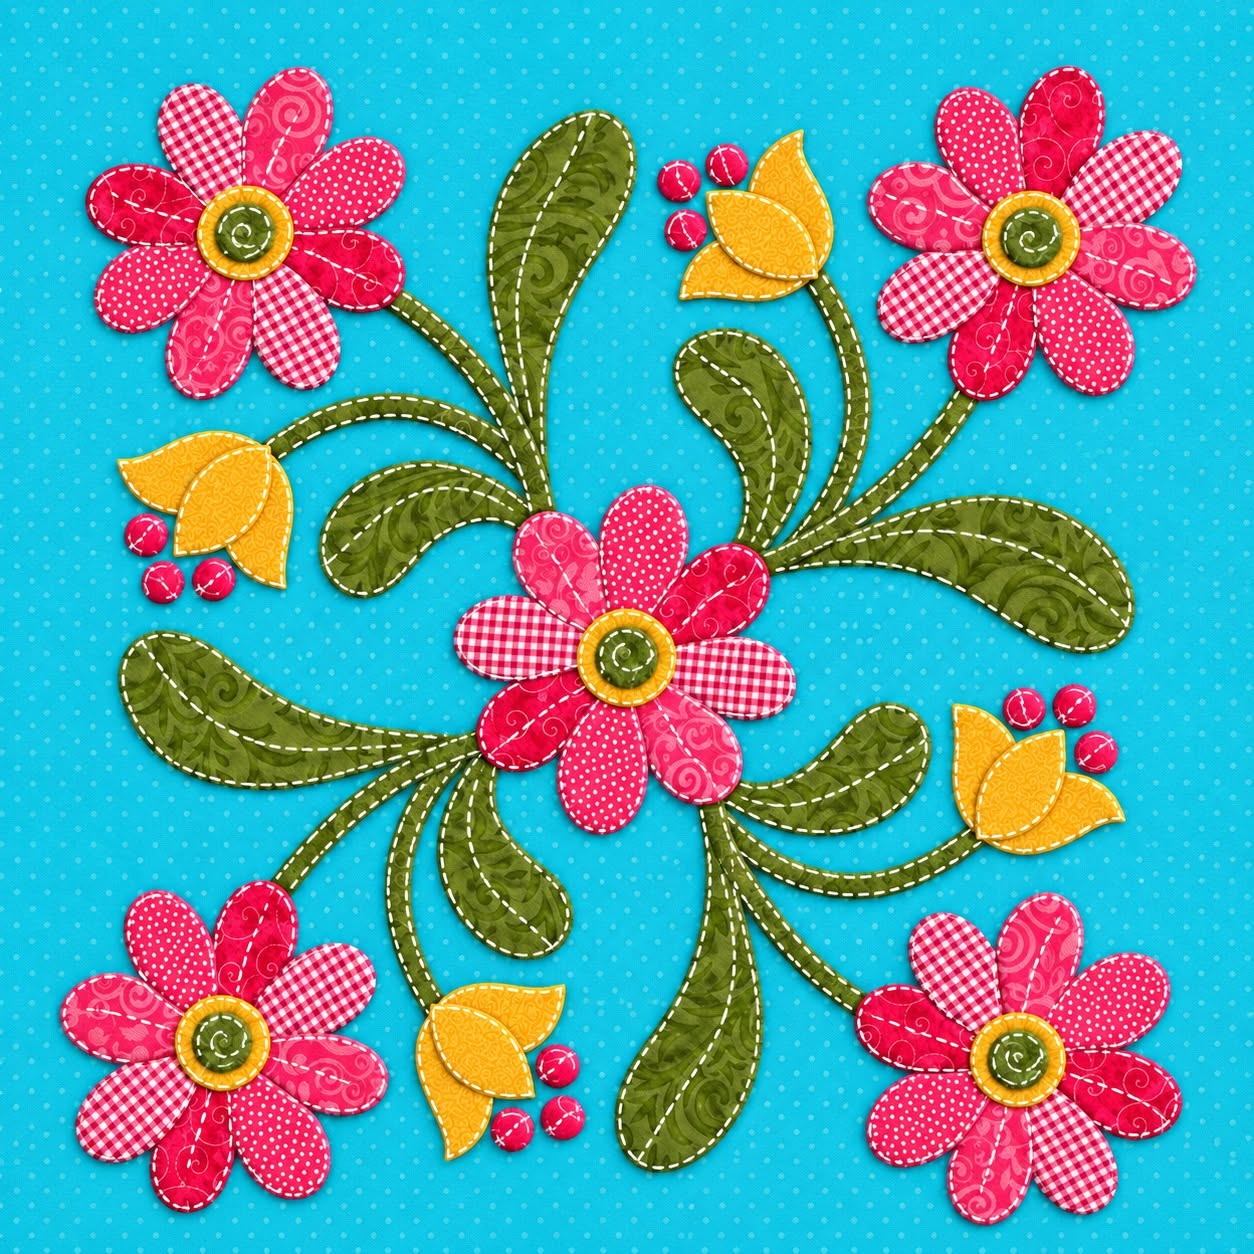
Flower Bouquet Quilt Appliqué Pattern is a charming fabric-art project that combines floral shapes, curved stems, decorative leaves, and colorful appliqué pieces in one balanced quilt block. Inspired by the photographed design, this project works beautifully for wall hangings, cushion covers, table toppers, tote bag panels, and larger quilt compositions. The combination of pink flowers, green foliage, warm yellow buds, and a softly patterned background gives the block a cheerful handmade character. One of the most attractive qualities of this Flower Bouquet Quilt Appliqué Pattern is that each flower can be created from small fabric scraps, making it an excellent project for using leftover quilting cotton. Although the arrangement looks detailed, the construction becomes much easier when the shapes are prepared individually before being positioned on the background. With careful cutting, thoughtful fabric selection, and patient stitching, even quilters who are developing their appliqué skills can create a polished floral block.
The term Flower Bouquet Quilt Appliqué Pattern refers to a decorative quilting pattern in which individual fabric shapes are attached to a foundation fabric to form a bouquet or floral composition. In appliqué quilting, the flowers, leaves, stems, buds, and other decorative elements are normally cut separately and then secured to the quilt background using hand stitching, machine stitching, fusible web, or another appliqué technique. In this project, the bouquet has a circular flowing structure, with several large flowers positioned around a central bloom. Curved stems connect the different flowers while elongated leaves fill the spaces between them. Small berry-like circles and yellow flower buds provide additional detail. Because the design contains repeated shapes, the same templates can be reused several times, which makes the project easier to organize and helps create visual consistency throughout the finished quilt block.
Another important feature of this Flower Bouquet Quilt Appliqué Pattern is the opportunity to experiment with color, pattern, and fabric texture. The photographed project uses several pink prints for the flower petals rather than making every petal identical. This simple technique gives the bouquet much more visual depth. Green fabrics with subtle decorative prints create movement in the leaves, while yellow fabric introduces warm contrast through the flower centers and small buds. A light neutral background allows the brighter appliqué pieces to remain the visual focus. You can follow a similar palette or customize the project using fabrics already available in your sewing room. Red and cream could create a traditional look, blue and white could produce a calm coastal style, and pastel fabrics could make the design suitable for a nursery or spring-inspired quilt. The essential idea is to maintain enough contrast between the appliqué shapes and the background so that the bouquet remains clearly visible.
Materials, Fabric Selection, and Preparation for the Flower Bouquet Quilt Appliqué Pattern
Begin by choosing a good-quality quilting cotton for the background of your Flower Bouquet Quilt Appliqué Pattern. A finished block measuring approximately 45 x 45 cm is a practical size for a decorative panel, although you can enlarge or reduce the templates according to your intended project. Cut the background fabric slightly larger than the final measurement, approximately 50 x 50 cm, so there is extra fabric available for trimming and squaring after the appliqué work is finished.
DISCOVER MORE FREE PATTERNS HERE!
For the large flower petals, prepare several coordinating pink or red fabrics. Using three or four different prints will help reproduce the lively appearance of the reference design. Small-scale gingham, dots, swirls, tiny florals, and tone-on-tone fabrics work especially well because they provide variety without making the flowers look disconnected. Fabric scraps measuring around 15 x 15 cm are usually sufficient for several petals.
Choose two or three green quilting fabrics for the stems and leaves. The design benefits from using slightly different greens because this prevents the foliage from appearing flat. Medium olive green, leafy green, and muted lime shades are particularly suitable. Printed fabrics with subtle vines or scroll patterns can also add texture while maintaining the botanical theme.
Prepare yellow or golden fabric for the small flower buds and the centers of the larger flowers. You will only need a modest amount, so this is another opportunity to use fabric scraps. Small pieces of darker green, beige, or muted gold may also be used for the inner circles of the flower centers if you want additional definition.
You will also need basic quilting tools such as a fabric-safe marking pencil, sharp fabric scissors, an iron, an ironing surface, sewing thread, pins or fabric glue, and your preferred appliqué stabilizer or fusible web. A rotary cutter and quilting ruler are useful for preparing the background square, although the smaller curved appliqué shapes are usually easier to cut with scissors.
Before cutting the final fabrics, make paper or template-plastic patterns for the flowers, leaves, stems, and buds. A typical large flower can have six to eight rounded petals measuring roughly 3.5 to 5 cm long. Leaves may range from approximately 7 to 14 cm depending on their placement. Keeping several sizes available makes it easier to recreate the natural movement seen in the bouquet.
Cutting and Building the Main Flower Appliqué Shapes
Start the construction of the Flower Bouquet Quilt Appliqué Pattern with the central flower because it establishes the visual center of the entire composition. Cut approximately seven rounded petals from several coordinating pink fabrics. Arrange the petals in a circular shape, overlapping their inner edges slightly so that no background fabric appears between them.
Create the flower center using two circles. The larger circle may measure approximately 3 cm in diameter and can be cut from mustard yellow fabric. Place a smaller green or muted olive circle over it. This layered flower center provides contrast and helps visually connect the pink petals with the surrounding green leaves.
Repeat the same general flower construction for the four large flowers positioned around the outside of the bouquet. You do not need to make every flower exactly identical. Slight differences in petal size, fabric print, and rotation will give the project a more natural handmade appearance while still keeping the composition harmonious.
The small yellow buds are made from simple curved appliqué pieces. Cut a rounded teardrop or tulip-like shape approximately 4 to 5 cm tall. If desired, divide the shape into two overlapping sections so the finished bud appears partially opened. Position two or three tiny pink circles beside some of the buds to imitate decorative berries or unopened blossoms.
To create the long decorative leaves, trace elongated curved leaf templates onto the green fabrics. Some leaves should be wide and gently curved, while others can be narrow and pointed. Changing the direction of the printed fabric inside each leaf adds subtle movement to the finished floral quilt appliqué.
Finally, prepare thin curved stems connecting the flowers and buds. For fusible appliqué, stems approximately 0.7 to 1 cm wide are manageable. If you are using bias strips, cut fabric on the bias and press it into narrow folded strips. Bias-cut stems are especially useful because they naturally follow curves without creating excessive wrinkles.
Arranging and Stitching the Flower Bouquet Quilt Appliqué Pattern
Lay the prepared background fabric flat and lightly mark its vertical and horizontal center lines. These temporary guides will help you keep the Flower Bouquet Quilt Appliqué Pattern centered. Place the main central flower near the middle of the square before adding any other pieces.
Position the stems next. The bouquet should feel as though it grows outward from the center in several directions. Create gentle curved lines instead of straight stems. In the photographed inspiration, the composition almost forms a circular wreath, so rotating the stems around the central flower is an effective way to achieve a similar sense of movement.
Add the large outer flowers one at a time. Place one flower near each corner region while maintaining enough space between the appliqué shapes and the edge of the background. Leaving approximately 4 to 6 cm of open background near the outside of the design will make the finished block easier to frame with borders later.
Arrange the green leaves between the stems and flowers. Large leaves can fill wider empty areas, while smaller leaves help connect individual sections of the bouquet. Before fusing or stitching anything permanently, stand back and examine the complete arrangement. Adjust the angles until the floral shapes appear evenly distributed.
Once you are satisfied with the arrangement, attach the appliqué pieces using your preferred method. For fusible appliqué, follow the instructions supplied with the fusible web and press each piece in place with the iron. Avoid sliding the iron over the shapes because this can distort curved petals or narrow stems.
Finish each appliqué edge using a small zigzag stitch, blanket stitch, satin stitch, or straight-edge appliqué stitch. Thread that closely matches each fabric will create a subtle finish, while contrasting thread will emphasize the outline of every shape. Work slowly around curves, stopping with the needle down whenever you need to pivot the fabric.
Quilting, Finishing, FAQ, and Creative Variations
After completing the Flower Bouquet Quilt Appliqué Pattern, press the entire block carefully from the reverse side. Avoid excessive heat if fusible web has been used. Square the block with a quilting ruler so that the flower arrangement remains centered and the edges form accurate right angles.
To transform the appliqué block into a small quilted wall panel, layer the finished top with quilt batting and backing fabric. Smooth all three layers carefully and secure them with quilting pins, clips, or temporary basting spray. The batting will give the flowers additional dimension once the quilting stitches are added.
Quilt around the outside edges of the flowers, leaves, buds, and stems to emphasize their shapes. This technique, sometimes called outline quilting, creates definition and helps the appliqué appear slightly raised above the background. You can also add gentle free-motion quilting in the open background areas.
A simple echo quilting design can work particularly well with this floral pattern. Stitch a line approximately 0.5 to 1 cm outside the main appliqué shapes, following their curves. Additional echo lines can be added if you want a more heavily quilted appearance.
After quilting, trim the edges and add binding using fabric that complements the bouquet. Green binding can visually connect with the leaves, pink binding can emphasize the flowers, while a neutral binding keeps attention focused on the central design. A finished hanging sleeve can be added to the back if the project will be displayed on a wall.
The same Flower Bouquet Quilt Appliqué Pattern can also be adapted for pillow covers, tote bags, table runners, placemats, quilt centers, or decorative bed quilts. For a larger quilt, consider repeating the block several times and rotating each bouquet slightly. This creates an interesting secondary pattern while maintaining the handmade floral theme.
Frequently Asked Questions About the Flower Bouquet Quilt Appliqué Pattern
What is the best fabric for a Flower Bouquet Quilt Appliqué Pattern?
Quilting cotton is one of the easiest fabrics to use because it is stable, easy to cut, widely available, and suitable for both hand and machine appliqué. Cotton fabrics also press well and are available in countless prints, making them ideal for combining several different petal and leaf designs.
Can beginners make this flower appliqué quilt block?
Yes. Although the finished bouquet looks detailed, the project is composed of relatively simple individual shapes. Beginners can work on one flower or leaf at a time. Fusible appliqué is particularly accessible because the fabric pieces can be secured to the background before stitching.
What is appliqué in quilting?
Quilt appliqué is a decorative technique where smaller pieces of fabric are placed on top of a larger background fabric and stitched into position. The smaller shapes can form flowers, animals, geometric motifs, landscapes, letters, or nearly any decorative design.
Should I use fusible web for the flower appliqué?
Fusible web is optional, but it can make construction easier. It temporarily or permanently bonds the appliqué pieces to the background, helping prevent movement during machine stitching. It is especially helpful when working with several small petals and curved leaves.
How can I stop appliqué edges from fraying?
Using a small zigzag stitch, satin stitch, or blanket stitch around the raw edges helps control fraying. Fusible web can also stabilize the fabric. If you prefer completely enclosed edges, consider traditional needle-turn appliqué, where the seam allowance is folded underneath each shape.
How large should the flower petals be?
For a block around 45 x 45 cm, petals measuring approximately 3.5 to 5 cm long provide a good starting point. However, the exact measurement is flexible. It is more important that the flower size remains proportionate to the leaves, buds, stems, and overall background.
Can I change the colors shown in the Flower Bouquet Quilt Appliqué Pattern?
Absolutely. The pink, yellow, and green palette is only one option. You could create purple flowers with sage leaves, blue flowers with navy accents, red flowers with cream backgrounds, or use a collection of colorful fabric scraps for a more playful quilt.
Do all the flower petals need to use the same fabric?
No. Mixing coordinated prints is one of the most attractive features of this design. Different fabrics create visual texture and make the petals easier to distinguish. Try keeping the colors related while changing the print style.
What stitch is best for machine appliqué?
A narrow zigzag stitch or blanket stitch works well for most quilting cotton. A satin stitch provides heavier coverage around raw edges, while a simple straight stitch close to the edge produces a more casual raw-edge appliqué appearance.
Should I quilt before or after completing the appliqué?
The appliqué shapes are normally attached to the quilt top first. After the appliqué stitching is finished, the top is layered with batting and backing and then quilted. Quilting around the appliqué shapes can enhance their definition.
Can this pattern be enlarged for a bed quilt?
Yes. You can enlarge the individual templates or use the floral block as one repeated unit within a larger quilt. Multiple bouquet blocks can be separated with sashing or combined with simple patchwork blocks.
How can I make the bouquet look balanced?
Begin with the central flower and distribute the larger outer flowers around it. Then add stems and leaves to fill empty areas. Avoid concentrating too many large shapes on one side. Rotating the block while arranging the pieces can help you evaluate the composition from different directions.
Conclusion
Creating a Flower Bouquet Quilt Appliqué Pattern is an enjoyable way to combine traditional quilting techniques with colorful floral design. The project begins with a simple background square and gradually develops through individually cut petals, flower centers, curved stems, decorative leaves, small buds, and berry-like accents. By preparing the appliqué templates first and arranging the entire bouquet before stitching, you can achieve a balanced composition without unnecessary difficulty.
Throughout the project, fabric selection plays an important role. Mixing several coordinated pink prints gives the flowers personality, while patterned green fabrics help the foliage feel dynamic and natural. Yellow buds and flower centers provide contrast, and a light background keeps every appliqué shape clearly visible.
The construction process can be adapted to different skill levels. Beginners may prefer fusible appliqué combined with machine blanket stitching, while experienced quilters may choose needle-turn appliqué, decorative machine stitching, or detailed free-motion quilting. There is no single required method as long as the appliqué pieces are securely attached and the finished project has the appearance you want.
After the appliqué is complete, quilting around the flower shapes adds depth and definition. Simple outline quilting or echo quilting is enough to transform the flat fabric arrangement into a textured finished piece. Binding then completes the project and prepares it for use as a wall panel, cushion front, table decoration, bag panel, or part of a larger quilt. The greatest advantage of this Flower Bouquet Quilt Appliqué Pattern is its flexibility. You can reproduce the cheerful pink and green color scheme shown in the inspiration image or create an entirely different palette using your favorite fabrics. Changing the petal prints, background fabric, quilting style, or block size allows the same basic pattern to produce many unique results.
EASILY FIND THE PDF FOR THIS PATTERN HERE!
If you decide to make this project, leave your sincere opinion about the Flower Bouquet Quilt Appliqué Pattern and share any suggestions that could make the design even more creative or practical. Your ideas about color combinations, quilting techniques, fabric choices, and finished uses can inspire new variations of this beautiful floral appliqué project. A useful next step is to prepare printable templates for the petals, leaves, buds, stems, and flower centers before cutting the fabric.