
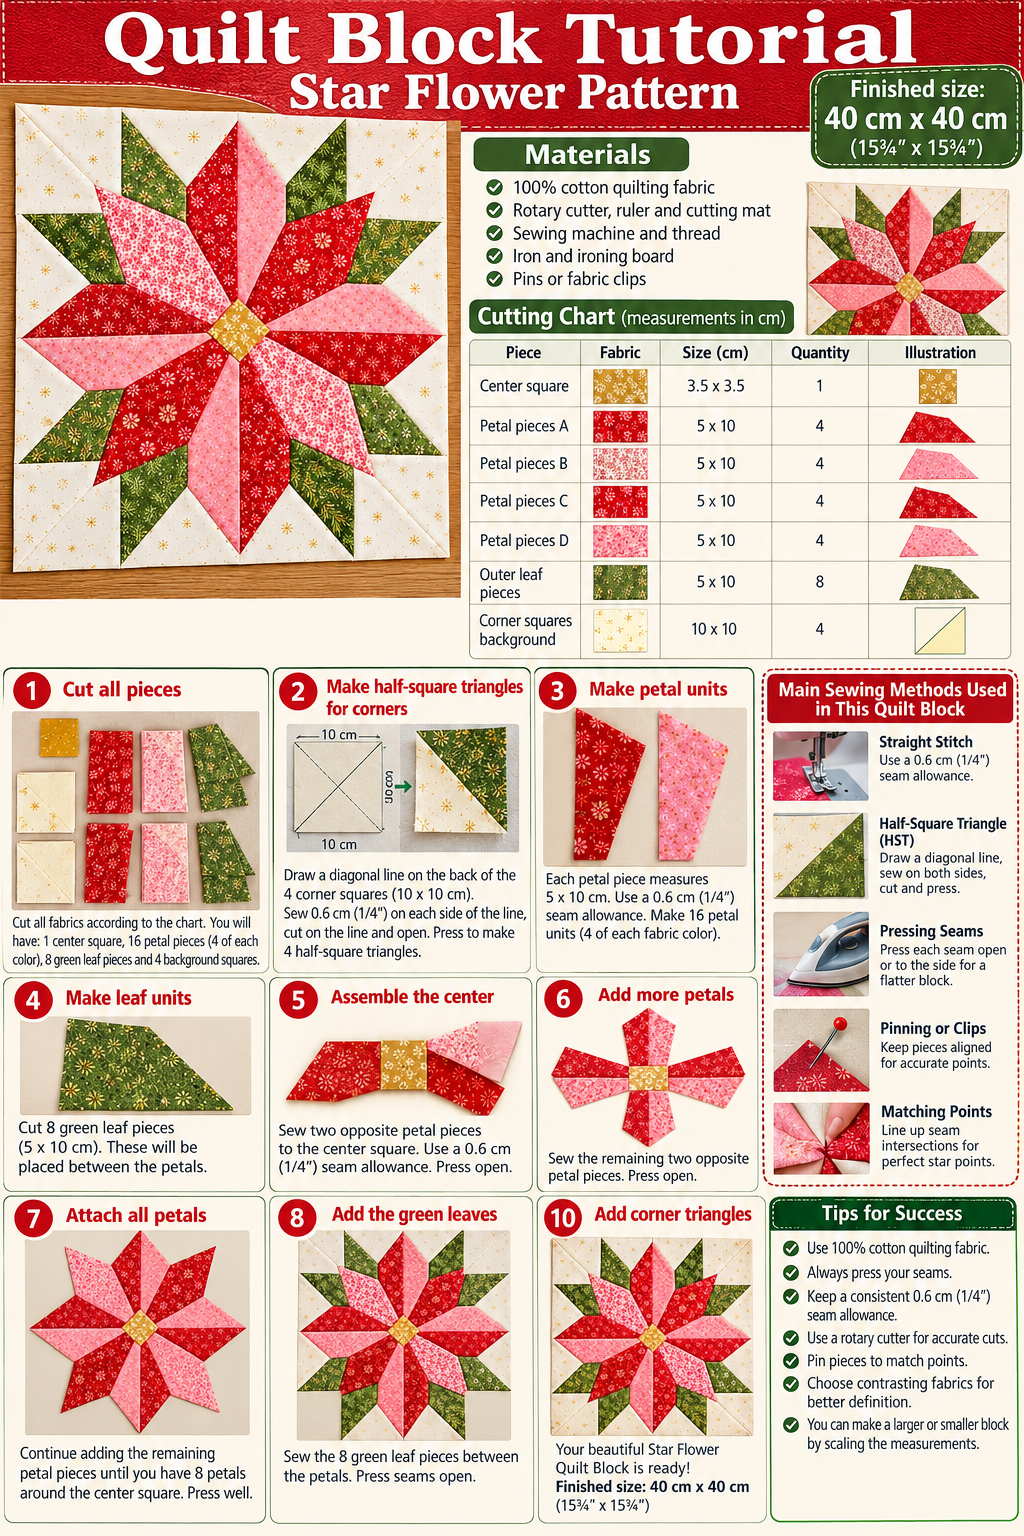
The Star Style Quilt Block Pattern is a beautiful quilting project that combines traditional patchwork techniques with an elegant floral-inspired star design. With its striking pointed petals, carefully arranged fabric pieces, and harmonious colors, this quilt block creates an eye-catching centerpiece for handmade quilts, decorative wall hangings, table toppers, and seasonal home accessories. The design shown in the reference image features vibrant red and soft pink fabrics, rich green accents, a delicate golden center, and a creamy white background decorated with subtle gold motifs. Together, these colors create a festive appearance that is especially suitable for Christmas decorating, although the pattern can easily be adapted for everyday use. Whether you are an experienced quilter or an enthusiastic beginner looking to develop your skills, this star quilt block tutorial offers a rewarding opportunity to explore precision cutting, fabric placement, accurate piecing, and beautiful finishing techniques.
One of the most appealing characteristics of the Star Style Quilt Block Pattern is its combination of geometric accuracy and artistic expression. Unlike simple square patchwork blocks, this design uses elongated diamond-like shapes, triangles, and angled fabric sections to create the impression of a blooming star. The center acts as the focal point, while the surrounding red and pink shapes radiate outward to form a symmetrical arrangement. Green fabric accents between the larger points introduce depth and contrast, allowing each section of the star to stand out against the light background. Although the finished block looks intricate, the construction becomes more manageable when the design is divided into smaller units and assembled systematically. By learning how to prepare templates, maintain consistent seam allowances, and match intersecting seams, quilters can create a professional-looking result without needing expensive specialty equipment or complicated sewing machinery.
Creating a handmade Star Style Quilt Block Pattern is also a wonderful way to use favorite quilting cottons, coordinate seasonal fabric collections, and experiment with color placement. This tutorial explains the complete process, from selecting suitable materials and planning the block dimensions to cutting individual shapes, assembling the star, pressing seams, and preparing the finished project for quilting. The instructions use familiar American quilting terminology, including right sides together, seam allowance, rotary cutting, pressing, chain piecing, and quarter-inch seams, while measurements are provided in centimeters for convenient preparation. The sample project is designed as a square block measuring approximately 40 × 40 cm when finished, making it suitable for a decorative cushion front, a small wall quilt, or a repeated-block quilt layout. The measurements and construction method below provide a practical interpretation of the photographed design rather than an exact reproduction of an unpublished original template. With patience, careful preparation, and a little creativity, you can transform simple fabric pieces into a colorful handmade star that celebrates the timeless beauty of quilting.
1. Materials, Fabric Selection, and Preparation for the Star Style Quilt Block Pattern
The first step in creating your Star Style Quilt Block Pattern is gathering suitable quilting materials. Choose high-quality, 100% cotton quilting fabric because it is easy to cut, press, and sew accurately. For a design inspired by the photograph, select red floral fabric for the dominant star points, light pink and pink floral fabrics for alternating sections, green botanical prints for the secondary points, and cream fabric with subtle golden details for the background. A small piece of golden yellow fabric will complete the center. Using fabrics with similar weight and texture helps the finished block lie flat and makes it easier to achieve precise seams.
DISCOVER MORE FREE PATTERNS HERE!
For a 40 × 40 cm finished quilt block, prepare approximately 35 × 55 cm of red fabric, 25 × 45 cm of light pink fabric, 20 × 35 cm of pink floral fabric, 30 × 45 cm of green fabric, 45 × 55 cm of cream background fabric, and a 12 × 12 cm piece of golden yellow fabric. These quantities are generous estimates that allow room for angled cuts, template positioning, and minor adjustments. You will also need coordinating cotton thread, a sewing machine, fabric scissors, a rotary cutter, a cutting mat, a quilting ruler, straight pins or sewing clips, an iron, and a pressing surface. Optional supplies include lightweight starch, template plastic, and a removable fabric marking pencil.
Before cutting the fabric, decide how you want the colors to appear throughout the patchwork star design. The photographed block uses alternating warm colors to create movement around the center. Red pieces form the most prominent points, while pink sections soften the overall appearance. Green triangles and elongated shapes provide a secondary star effect behind the main design. Arrange your chosen fabrics on a table before cutting, paying attention to print scale and color contrast. Small floral prints work particularly well because they remain visible within narrow geometric sections without overwhelming the composition.
Accurate measurements are essential when sewing a geometric quilt block. For this project, the finished size is 40 × 40 cm, and the unfinished block should measure approximately 41.3 × 41.3 cm before it is joined to other blocks. Use a consistent 0.635 cm (¼-inch) seam allowance throughout construction. Because angled pieces are sensitive to small cutting errors, prepare full-size paper or template-plastic patterns before cutting your final fabrics. Draw the complete 40 × 40 cm design on graph paper, including the central square, radiating star points, secondary green points, and background sections. Add the seam allowance outside every finished sewing line.
To reproduce the visual arrangement more accurately, begin with a 5 × 5 cm finished center square, rotated visually into a diamond. Divide the surrounding star into four matching quadrants, using the photographed arrangement as your guide. Each quadrant contains a combination of red or pink elongated star sections, green accent points, and cream background pieces. Trace the finished outlines from your full-size drawing onto template material, then add the 0.635 cm seam allowance to each edge that will be sewn. Label every template with its fabric color, orientation, and quantity. This method is more reliable for this design than cutting every shape as a standard square or half-square triangle.
Prepare the fabric by pressing it smooth and checking that the edges are straight before cutting. If the cotton has significant sizing or shrinkage concerns, prewash all fabrics consistently and press them before use. Place each template on the appropriate fabric, following the grain direction whenever possible, and cut carefully around the outside seam allowance. For mirrored pieces, turn the template over as needed so the left and right sections match. Keep each group of cut pieces in a labeled pile or small container. Organized preparation reduces confusion during assembly and helps preserve the balanced symmetry that makes this Star Style Quilt Block Pattern so attractive.
2. Cutting and Assembling the Star Quilt Block Step by Step
Begin the construction of the Star Style Quilt Block Pattern by preparing the central focal point. Cut the golden yellow center using your template, remembering that the finished square measures 5 × 5 cm and that seam allowances must be added to its edges. If you prefer to work with a square before rotating it in the design, the basic cut size is approximately 6.3 × 6.3 cm. Mark the seam intersections on the wrong side of the fabric, especially where the surrounding angled sections will connect. These marks are important because several seam lines converge near the center. Avoid sewing beyond the marked intersection points when using traditional set-in seams.
Next, assemble the elongated red and pink star points. The photograph features a repeating arrangement of pointed shapes that extend from the central diamond toward the outer edges of the block. Use the full-size templates to cut each long, angled section. Position red floral pieces next to light pink or pink floral pieces, following the color arrangement in your drawing. When two sections share a straight seam, place them right sides together, align the marked stitching lines, and sew using the quarter-inch seam allowance. Press the seam gently before attaching the next piece. Working with small sections helps prevent distortion along the bias edges.
Construct the green secondary star points separately. These pieces sit behind the larger red and pink shapes and create the appearance of an additional star layer. Cut the green triangles and angled sections using the templates from your full-size pattern. Join each green piece to its corresponding cream background section, matching the sewing lines rather than relying only on the outer raw edges. Sew slowly around sharp points and avoid stretching the fabric. If the edges are cut on the bias, use a shorter stitch length and minimal handling. Press each completed unit carefully so the green points remain crisp and clearly defined.
Once the individual components are prepared, begin forming the four main quadrants. Lay out the pieces exactly as they appear in your design, placing the central square in the middle and arranging the surrounding sections in clockwise order. Each quadrant should contain the appropriate combination of star petals, green accents, and background triangles. Sew straight-edge components into larger units first, then join the remaining angled sections. Some intersections may require partial seams or set-in seams, depending on the exact template geometry. For these seams, sew from one marked intersection to another rather than extending every stitch to the raw edge. This allows the adjoining pieces to fit together without twisting.
Join the completed quadrants around the center, carefully matching the seams that define the star points. Pin through the marked seam intersections to keep the shapes aligned. When necessary, begin with two adjacent quadrants and add the remaining sections one at a time, using the center seam markings to control the fit. Avoid pulling the fabric to force pieces together, since stretching can distort the entire block. After the main star has been assembled, attach any remaining cream background sections to establish the outer square. Check that the star is centered and that its points have approximately equal spacing from the block edges.
Finally, measure the assembled block and prepare it for squaring. The target unfinished measurement is approximately 41.3 × 41.3 cm, which includes the outer seam allowances. If the block is slightly larger, trim evenly from opposite sides while keeping the star centered. If it is smaller, do not cut into the star points to force an exact measurement; instead, check the seam allowances and consider adding a narrow border. The photographed project shows a balanced design with pointed elements extending toward the edges, so preserving those points is more important than aggressive trimming. At this stage, the basic pieced star quilt block is complete and ready for final pressing and quilting preparation.
3. Pressing, Quilting Techniques, and Professional Finishing Methods
Proper pressing makes a remarkable difference in the appearance of a Star Style Quilt Block Pattern. Unlike ironing clothing, pressing quilt blocks involves lifting and lowering the iron rather than sliding it across the fabric. Sliding can stretch bias edges and distort the carefully assembled geometric shapes. After sewing each seam, place the block on the pressing surface and gently set the stitches with the iron. Then open or direct the seam allowance according to the thickness of the fabric and the neighboring seams. For narrow intersections, pressing seams open may reduce bulk, while pressing toward darker fabric can help prevent seam allowances from showing through the cream background.
Pay particular attention to the center of the patchwork star quilt block, where multiple fabric pieces meet. This area can become bulky if all seam allowances are pressed in the same direction. When the construction allows, distribute the seam allowances around the center to create a flatter surface. A small wooden pressing tool or tailor’s clapper can help set seams without excessive heat or pressure. Avoid trimming away structural seam allowances too close to the stitching. The goal is to maintain a strong center that lies smoothly while preserving the decorative golden diamond and the surrounding pointed sections.
Once the top is pressed and squared, decide whether to use the block as part of a larger quilt or as an individual decorative project. For a small wall hanging or cushion-sized quilted panel, cut a piece of batting and a backing fabric approximately 46 × 46 cm each. This provides extra material around the edges during quilting. Place the backing fabric wrong side up, center the batting on top, and position the quilt block right side up. Smooth the layers carefully to remove wrinkles, then secure them with safety pins, basting stitches, or a suitable temporary fabric adhesive. This layered construction is known as a quilt sandwich.
Choose a quilting method that complements the design rather than competing with it. Stitch-in-the-ditch quilting is a traditional option that follows the seams between fabric sections, helping emphasize the star’s geometric structure. Another attractive technique is echo quilting, in which additional stitching lines follow the outline of the star points at a consistent distance. For example, you might stitch approximately 0.5 to 1 cm inside the red and pink shapes. Use a walking foot for straight-line quilting to help the fabric layers feed evenly through the sewing machine. If you enjoy free-motion quilting, delicate loops or small floral motifs can add texture to the cream background.
For a more decorative finish, consider using thread colors that coordinate with the individual fabrics. Cream thread blends into the light background, red thread enhances the dominant star points, and muted green thread complements the secondary shapes. Gold-colored thread can also provide subtle highlights around the center, especially when the fabric contains metallic-looking printed details. Always test decorative stitching on a fabric scrap with batting underneath before quilting the actual block. This allows you to check thread tension, stitch length, and the overall appearance of the quilting design. A balanced quilting pattern helps the finished project remain flat and visually harmonious.
After quilting, trim the excess batting and backing fabric so they align with the quilt top. If you are making a small wall hanging, prepare double-fold binding using fabric strips approximately 6.5 cm wide. Join the strips diagonally, press them in half lengthwise, and sew the raw edges to the front of the quilt using a 0.635 cm seam allowance. Fold the binding over the edges and secure it to the back by hand or machine. For a larger quilt, repeat the Star Style Quilt Block Pattern to create additional blocks, then join them with sashing or borders before quilting and binding the complete project. A carefully finished edge gives the handmade star a polished appearance and helps protect the fabric during regular use.
4. Creative Variations, Common Mistakes, and Ideas for Using the Finished Quilt Block
One of the greatest advantages of the Star Style Quilt Block Pattern is its flexibility. Although the reference design uses traditional Christmas-inspired colors, the same arrangement can be adapted to many different decorating styles. For a spring quilt, replace the red fabrics with lavender, peach, and soft yellow prints while keeping the green secondary points. For a modern quilt, choose solid cotton fabrics in navy blue, teal, white, and mustard yellow. A vintage-inspired version could feature dusty rose, sage green, cream, and small reproduction floral prints. Changing the color palette can transform the entire personality of the block while preserving its distinctive star construction.
The fabric placement also offers creative possibilities. Instead of using identical prints for every red section, alternate several coordinating fabrics to create a scrappy appearance. You can use lighter shades on one side of each star point and darker shades on the other to suggest movement and dimension. For a more controlled design, repeat the same fabric combination in each quadrant. Directional prints require additional attention because flowers, stripes, or other motifs may appear upside down when pieces are rotated. Before cutting, arrange your templates over the fabric to check how the printed design will look in the completed star.
Beginners sometimes encounter difficulties when sewing a pointed star quilt block, particularly around narrow angles and intersecting seams. One common mistake is cutting pieces without including seam allowances, which makes the finished sections too small. Another is sewing with inconsistent seam widths, causing the block to become distorted or preventing the points from meeting correctly. To avoid these problems, test the templates using inexpensive cotton fabric before cutting your favorite prints. Mark stitching lines clearly, use a quarter-inch presser foot when appropriate, and check measurements after completing each unit. Small corrections made early are much easier than repairing the entire block later.
Another challenge involves the delicate bias edges created by angled cutting. Bias-cut fabric stretches more easily than fabric cut along the straight grain, which can cause curved seams or uneven points. Handle these sections gently, avoid unnecessary repositioning, and press without pulling. If a piece becomes distorted, place it on the cutting mat and compare it with the original template before continuing. Light starch can improve stability, but it should be applied consistently and tested on a scrap first. When assembling the central star, pin carefully at the seam intersections and sew slowly. Precision piecing is not about sewing quickly; it is about creating accurate, repeatable seams that produce a balanced finished design.
The completed Star Style Quilt Block Pattern can be used in numerous home decorating projects. A single block makes a lovely seasonal wall hanging, especially when framed with a coordinating border. It can also become the front of a decorative cushion, although you should adjust the final dimensions to fit the pillow insert. Four blocks arranged in a square can create an attractive table topper, while a row of repeated stars can form a festive table runner. For a larger bed quilt, combine multiple star blocks with plain fabric squares or narrow sashing strips. This gives the detailed star design enough visual space to remain the centerpiece of the project.
Caring for the finished quilt is equally important if you want to preserve its colors and stitching. Before washing, check that all seams and binding edges are secure. Use a gentle wash cycle with mild detergent and cool water when the fabric manufacturer’s instructions permit it. If you are uncertain about color bleeding, especially with red fabrics, test the fabric before assembly and consider using a color-catching laundry sheet. Air-drying flat is a gentle option for smaller quilted projects. Store seasonal decorations in a clean, dry location away from direct sunlight. With proper care, your handmade star quilt block can remain a cherished part of your home for many years.
Frequently Asked Questions About the Star Style Quilt Block Pattern
1. Is the Star Style Quilt Block Pattern suitable for beginners?
Yes, although this particular design is best described as a confident-beginner to intermediate quilting project. It contains angled pieces, sharp points, and several seam intersections that require careful alignment. Beginners can successfully complete the block by working slowly, preparing accurate templates, and practicing the more complicated seams on scrap fabric. Experience with straight stitching and basic patchwork is helpful.
2. What is the finished size of this star quilt block?
The sample block described in this tutorial measures approximately 40 × 40 cm when finished. Before being joined to another block or incorporated into a larger quilt, its unfinished size should be approximately 41.3 × 41.3 cm, including seam allowances. The design can be enlarged or reduced by scaling the full-size templates consistently.
3. Can I make this quilt block without a sewing machine?
Yes. The Star Style Quilt Block Pattern can be sewn entirely by hand using traditional English or American hand-piecing techniques. Mark the seam lines accurately and use small, even running stitches. Hand piecing can be especially useful around the center and at intersections where several angled pieces meet. However, hand sewing generally requires more time than machine piecing.
4. What type of fabric works best for this pattern?
100% cotton quilting fabric is the recommended choice because it is stable, easy to press, and available in a wide range of colors and prints. Avoid mixing fabrics with significantly different stretch, thickness, or texture when making your first block. Lightweight cotton fabrics with small floral or geometric prints are particularly effective for this design.
5. Why are my star points not matching correctly?
Misaligned points are usually caused by inaccurate cutting, inconsistent seam allowances, stretched bias edges, or incorrect alignment of the stitching intersections. Check the template dimensions before cutting and mark the exact seam intersection points. When joining pieces, align the stitching lines rather than relying only on the raw edges. Press carefully after each seam to maintain the original shape.
6. Do I need special quilting rulers to make this design?
A standard quilting ruler, rotary cutter, and cutting mat are sufficient when used with accurate templates. Specialty diamond or triangle rulers can be helpful, but they are not essential. Because this particular star includes several different angled shapes, full-size templates are recommended for reproducing the arrangement accurately.
7. Can I use fabric scraps for the Star Style Quilt Block Pattern?
Absolutely. This project is an excellent way to use coordinating fabric scraps, especially for the smaller pink, green, and golden sections. Make sure each scrap is large enough to accommodate the complete template, including seam allowances. Group scraps by color and print intensity to maintain a balanced design.
8. How can I make the star look more dimensional?
Use fabrics with contrasting values rather than relying only on different colors. For example, pair a dark red floral print with a pale pink print to create stronger visual separation. Placing darker greens behind lighter star sections can also enhance the layered appearance. Subtle quilting lines following the pointed shapes provide additional texture and dimension.
9. Can I turn this pattern into a Christmas quilt?
Yes. The red, green, pink, cream, and gold palette shown in the photograph already creates a beautiful seasonal appearance. Repeat the block using coordinating holiday prints, then combine the blocks with cream sashing and a red or green border. The resulting quilt can be displayed during the Christmas season or given as a thoughtful handmade gift.
10. Should I prewash my quilting fabrics?
Prewashing is optional for many modern quilting cottons, but consistency is important. If you decide to prewash, wash all fabrics before cutting. This helps reduce uneven shrinkage and allows you to check for color bleeding. If you prefer working with unwashed quilting cotton, follow the same approach for every fabric in the project.
11. What quilting technique is best for highlighting the star?
Echo quilting and stitch-in-the-ditch quilting are both effective choices. Echo quilting follows the shapes of the star and emphasizes the pointed sections, while stitch-in-the-ditch quilting provides a more subtle finish. A combination of the two can produce attractive results without making the block appear overly busy.
12. How many star blocks do I need for a larger quilt?
The number depends on the desired quilt dimensions and whether you include sashing or borders. For example, arranging 12 finished blocks measuring 40 × 40 cm in three columns and four rows produces a central quilt top measuring approximately 120 × 160 cm, before adding borders. You can adjust the layout to create a throw quilt, wall hanging, or larger bed quilt.
13. How do I keep the center of the star flat?
Mark the seam intersections accurately and avoid sewing beyond them when using set-in seams. Distribute seam allowances to reduce bulk, press gently, and check that no fabric is caught or folded underneath. A flat center improves both the appearance and the durability of the finished block.
14. Can I use this design for a pillow or table runner?
Yes. A single star block can become a cushion front or decorative wall panel, while several blocks arranged in a row can create a beautiful table runner. For items that will be used frequently, choose durable quilting cotton, secure the seams carefully, and use appropriate batting and backing materials.
Conclusion: Create Your Own Beautiful Star Style Quilt Block Pattern
The Star Style Quilt Block Pattern brings together the beauty of traditional patchwork, colorful fabric combinations, and carefully constructed geometric shapes. Throughout this tutorial, you have learned how to select coordinating quilting cottons, prepare templates, cut angled fabric pieces, assemble the central star, add contrasting green points, press delicate seams, and finish the project with quilting and binding. Each stage contributes to the final appearance, from the small golden center to the vibrant red and pink sections that radiate outward.
One of the most enjoyable aspects of this project is the freedom to personalize it. You can follow the warm Christmas-inspired colors shown in the photograph or experiment with a completely different palette. Whether you make one decorative block or combine several into a larger quilt, the result can become a meaningful handmade piece that reflects your creativity and sewing skills.
EASILY FIND THE FREE PDF FOR THIS PATTERN HERE!
Remember that beautiful quilting develops through practice, patience, and attention to detail. Accurate cutting, consistent quarter-inch seam allowances, gentle pressing, and thoughtful fabric placement are the foundations of a successful project. Even if your first star is not perfectly symmetrical, each block offers an opportunity to improve your technique and gain confidence. Now it is your turn to bring this Star Style Quilt Block Pattern to life! Which colors would you choose for your own version? Would you turn it into a Christmas wall hanging, a decorative pillow, or a full patchwork quilt?