
The Felt Owl Pattern is a charming handmade sewing project that combines creativity, colorful fabrics, and simple stitching techniques to create an adorable decorative owl. With its warm autumn colors, oversized expressive eyes, pointed ears, and beautifully patterned wings, this little owl makes a wonderful addition to seasonal home decorations. Whether you enjoy making felt animals, collecting handmade ornaments, or exploring beginner-friendly sewing projects, this design offers an enjoyable opportunity to create something special. The combination of brown felt, orange fabric, cream-colored eyes, and decorative embroidery gives the finished owl a cozy, rustic appearance. One of the most appealing features of this DIY felt owl is its versatility. You can display it on a bookshelf, decorate an autumn centerpiece, place it beside fabric pumpkins, or give it as a thoughtful handmade gift. Best of all, the project can be completed with basic sewing supplies and a little patience, making it accessible to crafters with different levels of experience.
Creating your own Felt Owl Pattern is also a wonderful way to experiment with fabric textures, embroidery stitches, and decorative details. Unlike complicated sewing projects that require specialized equipment, this handmade owl can be assembled almost entirely by hand. The soft felt body provides structure, while the colorful cotton fabric used for the belly and wings adds visual interest. The large circular eyes, finished with small black buttons or safety eyes, give the owl its playful personality. Small embroidered feathers, blanket stitching around the edges, and carefully shaped feet complete the design. Another advantage of working with felt is that its edges do not fray easily, allowing you to cut detailed shapes without worrying about complicated seam finishes. With a few carefully chosen materials and some basic hand-sewing techniques, you can transform ordinary fabric pieces into an attractive felt owl decoration that looks beautiful throughout the fall season.
This detailed Felt Owl Pattern tutorial will guide you through the entire creative process, from selecting materials and preparing the templates to assembling the owl and adding the finishing touches. The instructions are inspired by the owl shown in the reference photograph, featuring a rounded brown body, two pointed ear tufts, large cream-colored eyes, an orange triangular beak, an embroidered orange belly, and patterned fabric wings. The finished owl will measure approximately 20 cm tall, 16 cm wide, and 9 cm deep, depending on your cutting accuracy, stuffing, and fabric thickness. These dimensions are suggested measurements for recreating the photographed design rather than measurements taken from an original printable pattern. You will also learn how to create a balanced body shape, secure decorative pieces, and achieve neat, attractive stitching. By following each stage carefully, you can create a personalized handmade felt owl suitable for autumn decorations, seasonal craft displays, or handmade gift collections.
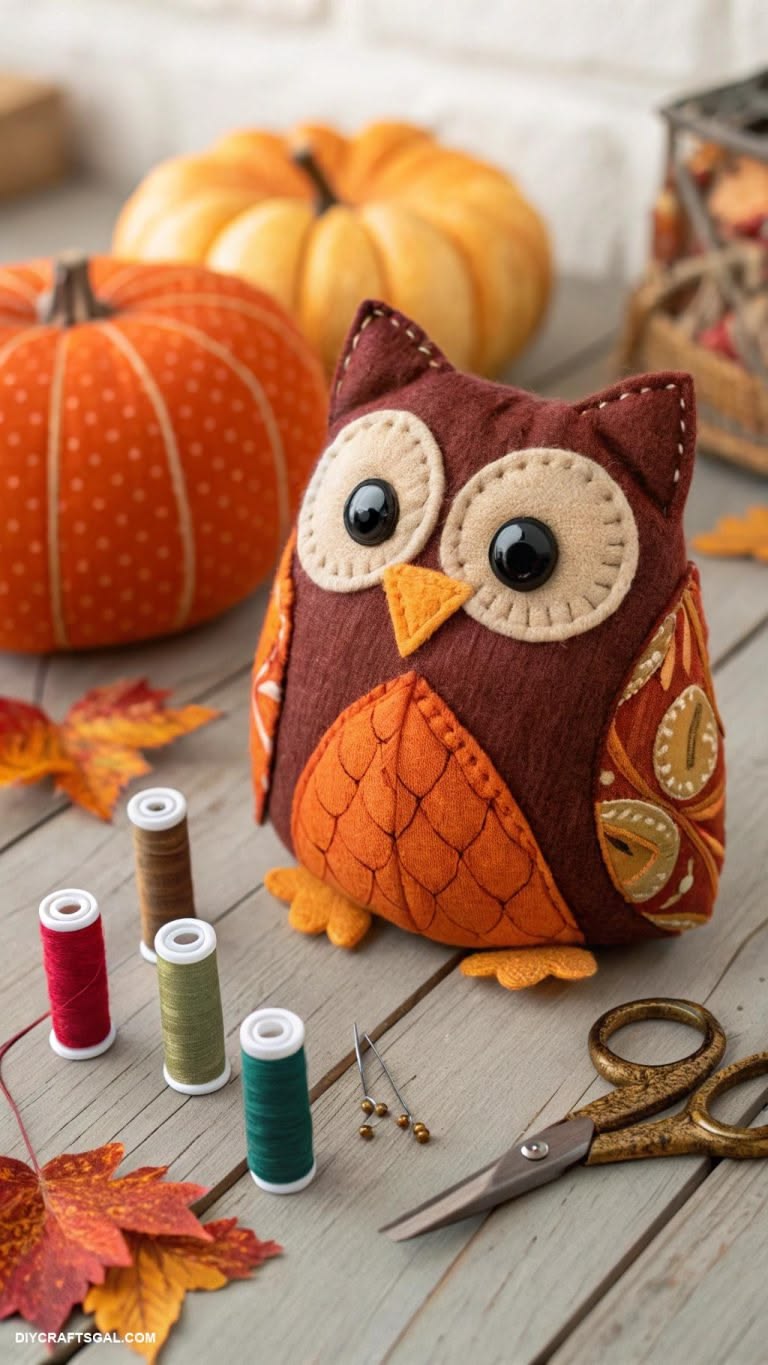
Materials and Supplies for the Felt Owl Pattern
The first step in creating this beautiful Felt Owl Pattern is gathering the necessary materials. For the main body, choose medium-weight brown felt in a warm chocolate, burgundy, or reddish-brown shade. You will need approximately 30 × 40 cm of brown felt, which should be enough to cut the front and back body pieces with a little extra material for adjustments. Select cream or beige felt for the oversized eyes, bright orange felt or cotton fabric for the belly and beak, and golden-yellow felt for the small feet. For the decorative wings, choose autumn-inspired cotton fabric with floral, paisley, or leaf patterns. These contrasting materials help reproduce the colorful, textured appearance of the owl in the photograph.
DISCOVER MORE FREE PATTERNS HERE!
Your basic sewing supplies should include a sharp pair of fabric scissors, embroidery needles, straight pins or sewing clips, a fabric marking pencil, and a measuring tape. You will also need matching sewing thread in brown, cream, orange, and yellow. Embroidery floss in coordinating colors is especially useful for creating visible decorative stitches. For the owl’s eyes, prepare two black buttons measuring approximately 1.5–2 cm in diameter, or another suitable eye embellishment. If the owl will be used around young children, avoid detachable buttons and use securely embroidered eyes instead. A small amount of polyester fiberfill will give the owl its rounded, soft appearance.
Preparing the felt owl sewing template is an important part of achieving a balanced design. Begin by drawing a rounded body shape on a sheet of paper. Make the body approximately 20 cm high and 16 cm wide, including the pointed ears at the top. The lower section should be wide and softly rounded, while the upper corners extend into two triangular ear tufts. Draw the ears approximately 3.5 cm tall and angle them slightly outward. This creates the recognizable owl silhouette. Cut out the paper template and place it against your felt to check that the proportions look similar to the reference image.
Next, prepare the templates for the facial features and belly. Draw two circles approximately 5.5 cm in diameter for the cream-colored eye patches. These should be large enough to dominate the upper half of the face without extending beyond the body edges. Create a small triangular beak measuring approximately 3 cm wide and 3.5 cm high. For the orange belly, draw a rounded, slightly tapered shape approximately 11 cm wide and 9 cm high. The top can form a gentle point between the eyes, while the bottom should curve smoothly toward the lower body. These pieces will create the owl’s distinctive facial expression and colorful front panel.
The wings are another essential feature of this DIY owl sewing project. Draw two elongated oval or leaf-shaped templates measuring approximately 11 cm long and 5 cm wide. Each wing should be slightly narrower toward the top and fuller toward the bottom. The patterned fabric can be cut using these templates, with a small seam allowance if you plan to turn the edges under. For a simpler version, cut the wings from felt and attach patterned cotton fabric as decorative overlays. This combination produces a similar effect while making the pieces easier to handle during assembly.
Before cutting the final materials, arrange all your paper templates on a flat surface and check their proportions. The eyes should sit near the upper center of the owl, the beak should point downward between them, and the belly should begin just below the beak. Position the wings along the sides so they extend slightly toward the front. The feet should be visible beneath the rounded body. For this project, use a 0.7 cm seam allowance around the main body pieces, while decorative felt appliqués can be cut to their finished dimensions. Taking time to organize the templates will make the remaining steps easier and help you achieve a professional-looking result.
How to Cut and Sew the Felt Owl Body
Begin constructing your Felt Owl Pattern by placing the main body template over the brown felt. Trace the outline twice to create one front piece and one back piece, remembering to include the 0.7 cm seam allowance. Cut both shapes carefully, keeping the pointed ears symmetrical and the lower curves smooth. If the felt has a textured surface, position both pieces so the texture runs in the same direction. This small detail helps the finished owl look consistent. Once the pieces are cut, place them together to verify that their edges align correctly. Set the back piece aside while you decorate the front.
The next step is preparing the orange belly appliqué. Place the belly template over orange felt or cotton fabric and cut the shape carefully. If using cotton fabric, apply lightweight fusible interfacing to the back to stabilize the material before cutting. Position the belly in the lower center of the front body piece, leaving enough space around the edges for the side wings and final seam. The upper point should sit approximately 1 cm below the beak’s intended position. Pin or clip the appliqué in place, then secure it using small blanket stitches, whipstitches, or a narrow machine zigzag stitch. Orange embroidery floss will create a decorative handmade finish.
To reproduce the feathered appearance visible in the photograph, add embroidered curved lines across the orange belly. Using brown embroidery floss, begin near the upper center and create overlapping rows of shallow U-shaped curves. Each curve should measure approximately 1.5–2 cm wide, depending on the size of your belly panel. Work from the upper section toward the bottom, staggering the curves so they resemble layered feathers. A simple backstitch works well because it creates continuous, defined lines. Keep the stitches evenly spaced without pulling the fabric too tightly. This decorative embroidery adds texture and gives the felt owl craft its distinctive autumn-inspired character.
Now prepare the feet using golden-yellow or orange felt. Draw two small foot shapes, each approximately 5 cm wide and 3 cm long, with three rounded toes extending toward the front. Cut two pieces for each foot if you want a slightly padded appearance, or use one layer of thick felt for a flatter design. For padded feet, sew each pair together around the edges and insert a very small amount of fiberfill before closing. Position the feet along the lower edge of the front body, with the toes pointing outward and downward. Baste the feet securely inside the seam allowance so they remain correctly positioned when the body is assembled.
After completing the belly and preparing the feet, it is time to assemble the main body. For a rounded, softly structured owl, add a narrow side gusset approximately 6 cm wide, measured before seam allowances, following the body perimeter from one lower side around the bottom to the other lower side. The gusset is optional, but it helps create the plump appearance shown in the photograph. Alternatively, you can sew the front and back pieces directly together for a simpler pillow-style owl. When using a gusset, pin one long edge to the front body and stitch carefully around the curves, then attach the back piece to the opposite edge. Leave an opening of approximately 7 cm along the lower back for stuffing.
Turn the body right side out if you have used conventional seams, gently pushing out the pointed ears with a blunt tool. Insert polyester fiberfill in small portions, beginning with the ears and continuing through the upper body. Gradually fill the lower section until the owl looks rounded and stands with a stable base. Avoid overstuffing because excessive pressure can distort the felt and pull the seams apart. The finished body should feel firm enough to hold its shape while remaining soft to the touch. Once satisfied with the stuffing, close the opening using a ladder stitch, also called an invisible stitch. This technique hides the closing seam and gives your handmade felt owl decoration a neat finish.
Creating the Owl’s Eyes, Beak, Wings, and Decorative Details
The oversized eyes are one of the most recognizable features of this Felt Owl Pattern. Begin by cutting two cream-colored felt circles using the prepared templates. Position them near the upper center of the owl’s face, allowing the circles to sit close together without overlapping excessively. For a design similar to the photograph, place the eyes slightly asymmetrically to create a playful expression. Attach each circle with small, evenly spaced blanket stitches using cream or beige embroidery floss. Work carefully around the edges, keeping the stitches approximately 3–4 mm apart. These visible stitches create a soft decorative border that enhances the handmade appearance.
Once the cream eye patches are attached, add the black pupils. If using buttons, choose smooth black buttons approximately 1.5–2 cm wide and sew them securely near the center of each circle. Slightly offsetting the pupils can make the owl appear curious or expressive. Reinforce the stitching several times, especially if the owl will be handled frequently. For a child-friendly decorative version, embroider black circular pupils using satin stitches instead of buttons. You can also add a tiny white stitch to each pupil to imitate a reflection of light. These simple details bring personality to the DIY felt owl face without requiring complicated techniques.
To create the beak, cut a triangle from orange or golden-yellow felt. The triangle should measure approximately 3 cm across the top and 3.5 cm from top to bottom. For a dimensional appearance, cut two identical triangles, stitch around the edges, and insert a very small amount of stuffing before closing. Alternatively, fold a single felt triangle slightly along its center to create a raised ridge. Position the beak between the lower portions of the eyes, with its pointed tip extending toward the upper belly. Secure it using orange embroidery floss and small stitches around the edges. Make sure the beak sits firmly against the face without covering too much of the eye patches.
The patterned wings add color and texture to the finished felt owl sewing project. Cut two wing shapes from autumn-themed cotton fabric, selecting prints that include shades of orange, rust, gold, brown, or cream. If you want thicker wings, cut matching backing pieces from brown or orange felt. Place each patterned fabric piece over its felt backing, turn the cotton edges under by approximately 0.5 cm, and stitch them in place using small whipstitches. Another option is to sew the cotton and felt right sides together, leaving a small turning opening, then turn and close the opening. This creates a finished fabric wing with smooth edges and a slightly padded appearance.
Attach the wings to the sides of the owl, positioning their upper ends near the lower edges of the eyes and their rounded tips toward the base. The wings should angle slightly backward while remaining visible from the front. Secure the upper and inner edges with small hand stitches, allowing the outer portions to stand away from the body slightly if you prefer a dimensional effect. In the reference photograph, the wings feature warm patterned fabric that contrasts beautifully with the dark brown body. You can recreate this look using paisley cotton, floral prints, or small autumn leaf motifs. A decorative line of blanket stitching around the wing edges will tie the design together.
Finish the owl’s decorative features by adding small embroidered accents wherever they enhance the design. Use cream embroidery floss to outline the pointed ears with short running stitches, following the upper edges without pulling the felt too tightly. You can also add tiny feather details to the wings or a few decorative stitches near the belly. Check the symmetry of the face, adjust any loose threads, and gently shape the stuffed body with your hands. If the owl needs additional stability, redistribute the fiberfill toward the lower section. These final touches transform a simple collection of felt shapes into a charming autumn felt owl ornament with character, texture, and a carefully finished appearance.
Finishing, Decorating, and Personalizing Your Felt Owl Pattern
Once the main construction is complete, inspect your Felt Owl Pattern carefully to ensure that every component is securely attached. Check the eyes, beak, wings, feet, and embroidered details for loose stitches or uneven edges. If necessary, reinforce the seams with matching thread and trim any visible thread ends. Gently press the decorative fabric pieces with your fingers to smooth their surfaces. Avoid placing a hot iron directly on synthetic felt because excessive heat can damage or melt the fibers. If pressing is necessary, use a low temperature, a protective pressing cloth, and test the material on a scrap first. A little extra attention during this stage will help the owl maintain its attractive appearance.
For a more stable decorative owl, consider adding a small weighted fabric pouch inside the bottom of the body before closing the stuffing opening. Fill the pouch with clean plastic craft pellets and sew it securely shut. Position it at the base, surrounding it with fiberfill to prevent hard edges from showing. This optional technique is useful if you plan to display the owl upright on a mantel, shelf, or tabletop. However, avoid weighted fillings if the project may be handled by young children or pets. For an ordinary soft decoration, a carefully shaped base and evenly distributed fiberfill may provide enough stability without additional weight.
Personalizing the Felt Owl Pattern is one of the most enjoyable parts of the project. Although the reference design features a warm autumn palette, you can easily adapt the colors to match different decorating styles. For a rustic farmhouse look, combine beige, cream, soft brown, and muted orange fabrics. For a woodland-inspired design, try moss green wings, chocolate-brown felt, and golden-yellow accents. A Christmas version could feature deep red, forest green, and cream, while a spring owl might use pastel pink, lavender, and light blue. The same basic pattern can produce many different appearances simply by changing the materials.
You can also customize the owl with additional handmade embellishments. A tiny felt bow near one ear, embroidered flowers on the wings, or a small fabric heart on the belly can make each owl unique. If you enjoy hand embroidery, experiment with chain stitches, French knots, and decorative running stitches. These techniques can add texture without overwhelming the original design. Another idea is to create a matching pair of owls using complementary fabrics and slightly different eye positions. This works especially well for seasonal centerpieces, handmade gift sets, or decorative displays. Keep embellishments securely attached and appropriate for the intended recipient.
Displaying your completed handmade felt owl is another opportunity to be creative. The warm colors make it particularly suitable for fall decorating, especially when paired with fabric pumpkins, artificial maple leaves, wooden trays, and neutral-colored linens. Place the owl on a bookshelf beside seasonal decorations or use it as the centerpiece of a small autumn arrangement. You can also create several owls in different sizes by enlarging or reducing the original templates proportionally. Smaller versions can become hanging ornaments with an added fabric loop, while larger versions make attractive decorative cushions. For safety, keep the owl away from open flames, hot surfaces, and unattended candles.
Proper care will help preserve the beauty of your Felt Owl Pattern for many seasons. Dust the finished owl gently using a soft brush or lint roller, taking care not to pull on the embroidery. For small stains, use a slightly damp cloth with mild soap and blot the affected area carefully. Avoid soaking the owl because water can distort the stuffing and decorative materials. Allow it to air-dry completely before returning it to storage or display. When the season ends, store the owl in a clean, dry container away from direct sunlight and moisture. With careful handling and storage, this handmade project can remain a treasured part of your seasonal decorating collection.
Frequently Asked Questions About the Felt Owl Pattern
1. Is the Felt Owl Pattern suitable for beginners?
Yes. This Felt Owl Pattern is suitable for beginners who have basic hand-sewing skills. The main techniques include cutting felt shapes, attaching appliqués, making simple embroidery stitches, and stuffing the body. Beginners can simplify the construction by sewing the front and back body pieces directly together instead of adding a side gusset. Taking time to prepare accurate templates will make the project much easier.
2. What type of felt works best for making a stuffed owl?
Medium-weight craft felt or wool-blend felt works well for this project. Wool-blend felt often provides a soft texture and good durability, while polyester craft felt is affordable and widely available. For a stuffed decorative owl, choose felt that is thick enough to hold its shape without becoming difficult to sew. Very thin felt may stretch or distort when stuffed tightly.
3. Can I make this felt owl without a sewing machine?
Absolutely. The entire DIY felt owl can be sewn by hand using a basic needle and thread. Blanket stitches, whipstitches, backstitches, and ladder stitches are sufficient for most of the construction. Hand sewing also allows you to control the placement of small details and create the visible decorative stitching that makes the owl especially charming.
4. How much fabric do I need for one felt owl?
For an owl measuring approximately 20 cm tall, a piece of brown felt measuring 30 × 40 cm is a useful starting amount for the front and back body panels. Additional material may be needed if you include a wide gusset. You will also need smaller scraps of cream, orange, and yellow felt, along with approximately 20 × 20 cm of patterned cotton fabric for the wings. These quantities may vary depending on your cutting layout.
5. How long does it take to complete the Felt Owl Pattern?
Most crafters can complete a simple version in approximately 3–5 hours. Beginners may need additional time to cut the templates, practice embroidery stitches, and assemble the body. More detailed versions featuring extensive feather embroidery, padded wings, or extra decorative elements can take longer. Working slowly and carefully usually produces better results than rushing through the project.
6. What can I use instead of buttons for the owl’s eyes?
You can replace buttons with embroidered pupils, layered black felt circles, or securely attached fabric appliqués. Embroidered eyes are especially useful when creating decorations intended for households with young children because they eliminate detachable hard eye pieces. However, handmade stuffed objects intended as children’s toys require additional attention to construction strength, materials, and applicable toy safety requirements.
7. Can I wash a handmade felt owl?
Spot cleaning is generally the safest method. Use a damp cloth and a small amount of mild soap to remove surface dirt, then allow the owl to air-dry naturally. Machine washing is not recommended for this design because the stuffing, embroidered features, and decorative cotton fabrics may become distorted. Always check the care recommendations for the specific felt and fabric you use.
8. How can I make the owl stand upright?
A rounded base, evenly distributed stuffing, and properly positioned feet will help the owl remain upright. For additional stability, you can include a securely enclosed weighted pouch inside the lower body if the owl is intended strictly for decorative use. A wider side gusset can also improve the overall shape and stability.
9. Can I resize the Felt Owl Pattern?
Yes. You can enlarge or reduce the paper templates while maintaining the original proportions. For example, increasing all dimensions by 25% will produce a larger owl suitable for a decorative cushion. When resizing, remember to adjust the amount of fabric, stuffing, and embroidery accordingly. Keep the seam allowance consistent rather than enlarging it proportionally.
10. What stitches are most useful for this project?
The most useful stitches include the blanket stitch for decorative felt edges, whipstitch for attaching small pieces, backstitch for feather embroidery, and ladder stitch for closing the stuffing opening. Learning these four techniques will help you complete the project neatly and confidently. They are also useful for many other felt animal patterns and handmade fabric decorations.
11. Can I sell felt owls made using this tutorial?
You can generally sell handmade owls created from your own original templates and designs. If you use a purchased pattern or someone else’s artwork, review the applicable licensing and copyright terms before selling finished items. Creating your own color combinations, embroidery details, and decorative features is a good way to develop a distinctive handmade collection.
12. What makes this Felt Owl Pattern different from other felt animal projects?
This design combines several attractive elements: oversized circular eyes, pointed ear tufts, a richly embroidered orange belly, colorful patterned wings, and a softly rounded stuffed body. These details create a more dimensional and expressive decoration than a simple flat felt ornament. The autumn-inspired color palette also makes it especially appealing for seasonal home décor.
Conclusion: Create Your Own Beautiful Felt Owl Pattern
The Felt Owl Pattern is a delightful sewing project that brings together simple materials, practical stitching techniques, and creative decorative details. Throughout this tutorial, you have learned how to prepare the templates, select suitable felt and cotton fabrics, cut the body pieces, embroider the feathered belly, construct the rounded owl, attach the oversized eyes and beak, and finish the design with patterned wings and small felt feet.
By following these steps, you can create a charming handmade felt owl inspired by the reference photograph while adding your own personality through different colors, textures, and embellishments. Whether you make one owl for an autumn centerpiece or several as handmade gifts, the project offers a rewarding way to practice sewing and enjoy the creativity of felt crafts.
EASILY FIND THE FREE PDF FOR THIS PATTERN HERE!
The beauty of this DIY Felt Owl Pattern lies in its flexibility. Every fabric choice, embroidered feather, and carefully placed stitch contributes to a decoration that feels unique and personal. With patience and attention to detail, even a beginner can produce an attractive finished piece that brings warmth and character to a home. Now I would love to hear your sincere opinion! 🦉🍂 Did you enjoy this Felt Owl Pattern tutorial? Which colors would you choose for your own handmade owl? Leave your honest feedback, creative ideas, and suggestions in the comments. Your experiences and recommendations can inspire other craft lovers to try this beautiful sewing project and discover new ways to make it their own!