
The Quilt Block with Flower Appliqué Pattern is a delightful sewing project that brings together colorful fabrics, traditional quilting techniques, and the timeless beauty of floral designs. Whether you are an experienced quilter or someone discovering the wonderful world of fabric appliqué, this charming pattern offers an opportunity to create something truly special. The design features a large red flower surrounded by smaller blossoms, delicate leaves, and decorative fabric details arranged beautifully on a light-colored background. Each element contributes to a balanced composition that feels cheerful, welcoming, and full of handmade character. The combination of red, green, turquoise, yellow, and soft neutral fabrics creates a vibrant appearance without overwhelming the overall design. Best of all, this floral quilt block can be used in many different projects, including decorative pillows, wall hangings, table runners, and larger patchwork quilts. With patience, accurate cutting, and a few essential sewing techniques, you can recreate this lovely flower appliqué design in your own sewing space.
One of the most appealing characteristics of the Quilt Block with Flower Appliqué Pattern is its combination of simple shapes and intricate-looking details. Although the finished design appears elaborate, the individual components are relatively easy to prepare and assemble. The central flower consists of a scalloped red shape decorated with a smaller pink flower and a circular fabric center. Four smaller red flowers occupy the corners, while green leaves and turquoise decorative stems create movement around the central motif. This arrangement produces a beautiful symmetrical effect that makes the block suitable for traditional and contemporary quilting projects. Another wonderful feature is the freedom to experiment with different fabric prints, textures, and colors. You can use leftover cotton scraps from previous projects or select a coordinated collection of quilting fabrics to achieve a polished result. By understanding the construction process and working carefully through each stage, even beginners can develop the confidence to complete this flower appliqué quilt pattern successfully.
Creating a handmade quilt block is about more than joining pieces of fabric together. It is an opportunity to explore creativity, practice useful sewing skills, and produce a meaningful decorative item that can be enjoyed for years. The Quilt Block with Flower Appliqué Pattern is especially rewarding because it introduces several fundamental techniques used in American quilting, including fabric preparation, appliqué placement, blanket stitching, layering, and decorative quilting. The project also encourages careful attention to color harmony and composition, two important elements in successful patchwork design. Throughout this tutorial, you will learn how to select appropriate materials, prepare the individual flower templates, arrange the appliqué pieces, attach them securely, and finish your quilt block neatly. All measurements are provided in centimeters, and the sewing terminology follows commonly used American quilting conventions. The instructions are designed to help you create a block inspired by the reference image while allowing enough flexibility to add your own personal style.
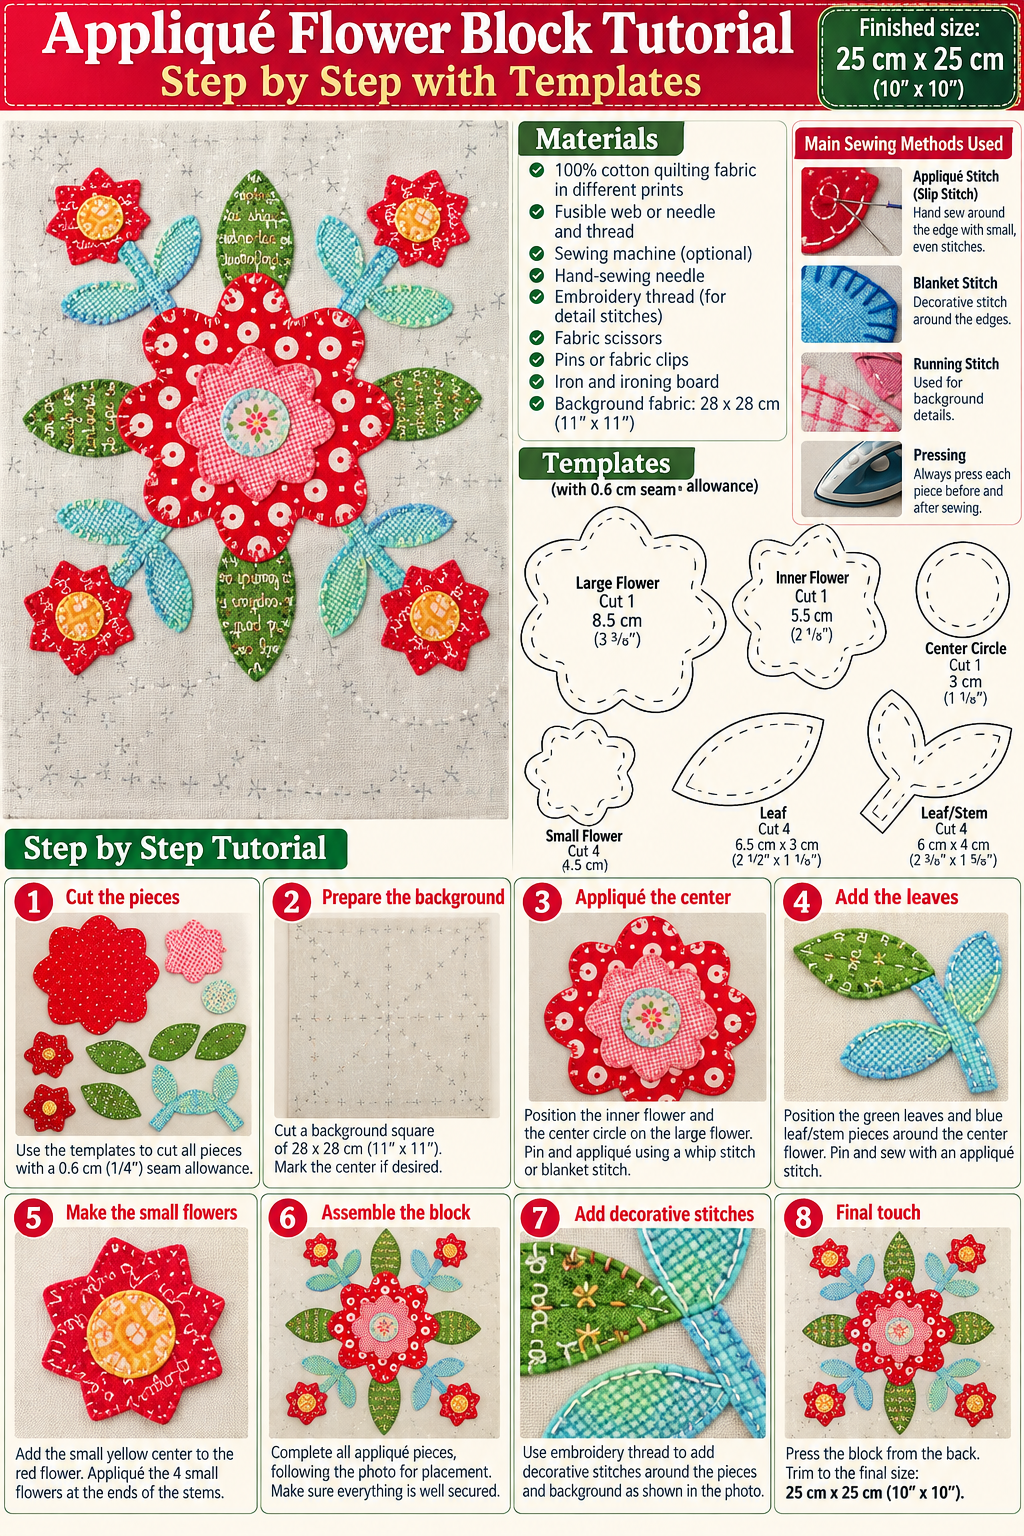
1. Materials and Fabric Preparation for the Quilt Block with Flower Appliqué Pattern
Before beginning your Quilt Block with Flower Appliqué Pattern, gather the necessary sewing materials and prepare a comfortable workspace. For this tutorial, we will create a finished quilt block measuring approximately 40 × 40 cm, with an unfinished measurement of 41.2 × 41.2 cm when using a 0.6 cm seam allowance. The photograph does not provide exact dimensions, so these measurements are a practical adaptation of the design. Choose a light cream, ivory, or pale gray quilting cotton for the background. A subtle printed fabric works particularly well because it adds visual interest without distracting from the colorful flowers. Make sure your background fabric is smooth, clean, and free from wrinkles before cutting.
DISCOVER MORE FREE PATTERNS HERE!
The main flower requires a bright red cotton fabric with a small geometric or circular print. Cut a piece measuring approximately 24 × 24 cm to accommodate the large central flower template, which will measure about 22 cm across. For the smaller decorative flower in the center, choose a contrasting pink or coral fabric with a delicate checked pattern. A piece measuring 12 × 12 cm should be sufficient. You will also need a small circular fabric piece measuring approximately 5 cm in diameter for the central flower detail. These contrasting fabrics create the layered appearance that makes this floral appliqué quilt block so attractive.
For the four smaller flowers positioned near the corners, select additional red printed cotton fabric. Each flower should measure approximately 7 cm across, so prepare four fabric squares measuring 9 × 9 cm. Choose yellow or golden cotton for the flower centers, cutting four circles approximately 2.5 cm in diameter. The green leaves can be made from fabric featuring delicate lettering or botanical prints, similar to the reference image. Prepare four green pieces measuring approximately 9 × 6 cm for the larger leaves and one additional piece measuring 8 × 6 cm for the upper leaf. If necessary, use slightly larger scraps to accommodate your templates comfortably.
The turquoise decorative elements add a beautiful contrast to the red flowers and green leaves. These shapes resemble small branching stems with rounded leaves, giving the quilt block a playful botanical appearance. Choose a pale turquoise, mint, or blue-green cotton with a fine checkered print. Prepare four squares measuring approximately 11 × 11 cm. Each turquoise appliqué will be cut as one connected branching shape, with a narrow central junction and two elongated rounded leaves. Cutting these components as single pieces helps simplify the construction and reduces the number of separate appliqué elements.
You will also need several basic sewing supplies to complete your Quilt Block with Flower Appliqué Pattern. Prepare a sewing machine, matching cotton or polyester thread, fabric scissors, a rotary cutter, a cutting mat, a quilting ruler, fine pins, a fabric marking pencil, and an iron. For the appliqué work, lightweight paper-backed fusible web is particularly useful because it holds the fabric shapes in position before stitching. If you prefer traditional hand appliqué, you may use a needle and fine thread instead. For the final quilt sandwich, prepare cotton batting and backing fabric, each measuring approximately 45 × 45 cm.
Before cutting your fabric, press all materials carefully and check that the cotton is suitable for quilting. Prewashing is optional, but it can be helpful when working with strongly colored fabrics, especially red prints that may release excess dye. If you decide to prewash, wash all fabrics consistently and press them afterward. Use a fabric-safe method to check for color bleeding before combining red and light-colored materials. Proper preparation helps prevent distortion during sewing and ensures that the finished flower appliqué pattern maintains its shape after washing and regular use.
2. Creating the Flower and Leaf Appliqué Templates
The first step in constructing the decorative design is preparing accurate templates for every flower, leaf, and branching element. Begin by drawing a square measuring 40 × 40 cm on a large sheet of paper. This square represents the finished visible area of the quilt block. Mark the center at 20 cm from each side and draw a vertical and horizontal guideline through that point. These reference lines will help you position the large central flower and distribute the surrounding decorative elements evenly. Keep the outer 0.6 cm seam allowance separate from your design area so that the appliqué pieces will not interfere with future block assembly.
To create the large central flower, draw a scalloped flower shape approximately 22 cm in diameter. The reference image features a rounded flower with several broad, softly curved petals. You can achieve a similar appearance by dividing a circle into eight equal sections and drawing a rounded petal around each section. The petals should connect smoothly without sharp corners. Cut the paper template carefully and place it over the red printed fabric to check the proportions. If you are using fusible web, trace the flower shape onto the paper side of the adhesive material, following the manufacturer’s instructions.
Next, prepare the smaller decorative flower that sits inside the large red blossom. Draw a second scalloped flower measuring approximately 11 cm in diameter. This inner flower should have softer, slightly irregular petals to reproduce the layered handmade appearance shown in the photograph. Place a circular template measuring approximately 5 cm in diameter in the center of this smaller flower. The circular piece can feature a tiny floral print, a geometric pattern, or another decorative fabric that coordinates with the surrounding colors. Together, these three layers will create the focal point of the Quilt Block with Flower Appliqué Pattern.
For the four corner flowers, draw a smaller scalloped flower template measuring approximately 7 cm in diameter. Use six or eight rounded petals, depending on your preferred appearance. Cut four identical flowers from the red fabric and prepare four yellow circles measuring approximately 2.5 cm in diameter. The yellow centers will provide contrast and help the smaller flowers stand out against the pale background. You may choose the same red fabric used for the central flower or combine several coordinating red prints for a more scrappy, traditional patchwork effect.
The green leaves should have an elongated oval shape with gently pointed ends. Create four templates measuring approximately 9 × 5 cm and one smaller leaf measuring 8 × 5 cm. These measurements are approximate and can be adjusted to fit the composition. The four larger leaves will be positioned around the central flower, while the additional leaf will sit above the main blossom. For the turquoise branching elements, draw a connected shape measuring approximately 10 × 9 cm, consisting of two rounded leaves extending from a short central stem. Make four copies, reversing the direction of the template when necessary to create a balanced arrangement.
After preparing all the paper templates, transfer the shapes onto your selected fabrics. When using paper-backed fusible web, remember that the adhesive process can reverse directional shapes, so trace mirrored versions when the orientation matters. Cut the fusible web slightly outside the traced lines, fuse it to the wrong side of the corresponding fabric, and then cut precisely along the outlines. Keep the paper backing attached until you are ready to position each piece. This method makes the fabric appliqué tutorial easier to follow and helps prevent the fabric edges from shifting during assembly.
3. Step-by-Step Assembly of the Floral Appliqué Quilt Block
Begin assembling your Quilt Block with Flower Appliqué Pattern by placing the background fabric on a clean, flat surface. Cut the background to 41.2 × 41.2 cm, allowing for the 0.6 cm seam allowance on each side. Fold the fabric gently in half vertically and horizontally, pressing lightly to identify the center without creating permanent creases. Alternatively, use a removable fabric marker to draw the central guidelines. These markings will help you align the flower arrangement accurately. Before attaching anything permanently, lay all the appliqué pieces on the background and evaluate their spacing.
Position the large red flower at the center of the block. Arrange the four green leaves around it, placing one toward the left, one toward the right, one below, and one above the flower. The upper leaf should extend beyond the top petals, while the lower leaf should appear beneath the bottom portion of the flower. In the reference design, the green leaves create a cross-like arrangement that frames the central blossom. Keep the leaf tips several centimeters away from the block’s outer edges to preserve enough background fabric for the surrounding flowers and decorative details.
Next, arrange the four turquoise branching elements diagonally around the large flower. Place one in each corner area, allowing the rounded leaves to point toward the smaller red flowers. These turquoise pieces create visual movement and connect the central motif with the surrounding floral elements. Position the four smaller red flowers near the corners, leaving approximately 3–4 cm between their outer edges and the finished block boundaries whenever the composition allows. Adjust the spacing until the entire design looks balanced. The goal is to recreate the cheerful, symmetrical arrangement shown in the photograph without crowding the background.
Once you are satisfied with the layout, begin fusing the appliqué pieces to the background. Work from the elements that appear underneath toward those that sit on top. First, attach the green leaves and turquoise branching shapes. Remove the paper backing from the fusible web, position each piece carefully, and press according to the adhesive manufacturer’s temperature and timing recommendations. Use a pressing cloth if necessary to protect delicate printed fabrics. Avoid sliding the iron across the pieces because this may cause them to shift. After securing the background elements, fuse the large red flower and the four smaller corner flowers.
Now add the decorative layers to the flowers. Position the pink scalloped flower in the center of the large red blossom, rotating it slightly so the petals create an interesting layered effect. Place the small circular fabric center over the pink flower and fuse both pieces in position. Repeat the process with the four smaller red flowers, attaching a yellow circle to the center of each blossom. At this stage, the flower appliqué quilt block should closely resemble the reference design. Take a moment to check that every piece is securely attached and that the overall arrangement remains centered.
The final assembly step involves stitching around the appliqué edges to reinforce the design. Set your sewing machine to a narrow zigzag stitch or decorative blanket stitch. A narrow zigzag with a width of approximately 2–2.5 mm and a short stitch length is a useful starting point, although settings vary by machine and fabric. Stitch slowly around each flower, leaf, and turquoise element, following the curved outlines carefully. Use coordinating thread colors or a contrasting decorative thread to emphasize the shapes. For a more traditional appearance, you can sew the appliqué edges by hand using small, evenly spaced blanket stitches. Secure the thread ends neatly on the wrong side of the fabric.
4. Quilting, Finishing, and Creative Uses for the Flower Appliqué Block
After completing the appliqué stitching, the next stage is transforming your decorative fabric block into a finished quilted piece. Begin by pressing the entire block gently from the wrong side, using a pressing cloth or towel underneath to protect the raised appliqué stitches. Check that the background remains flat and that the decorative shapes have not distorted during sewing. If necessary, trim stray threads and correct any loose stitching before continuing. A carefully pressed block provides a smooth foundation for quilting and helps the finished Quilt Block with Flower Appliqué Pattern look professional.
Prepare the quilt sandwich by placing the backing fabric wrong side up on a flat surface. Position the batting over the backing, followed by the completed appliqué block right side up. The backing and batting should extend approximately 2 cm beyond each side of the quilt top. Smooth all three layers carefully to remove wrinkles and secure them using quilting safety pins or temporary basting spray. Avoid placing pins directly through thick appliqué intersections whenever possible. Proper basting is essential because it prevents the fabric layers from shifting while you add the quilting stitches.
For the quilting design, consider using simple straight lines, gentle curves, or free-motion stitching around the floral motifs. One attractive option is to quilt closely around the outer edges of the flowers and leaves, a technique commonly called echo quilting. This creates a subtle outline that emphasizes the appliqué shapes. You can also add a small stippling pattern to the background fabric to create texture and make the colorful flowers appear more prominent. If you are new to machine quilting, begin with widely spaced straight lines or gentle curves rather than complicated free-motion designs.
Once the quilting is complete, trim the excess batting and backing so that all layers are even. Square the quilted block carefully using a ruler and rotary cutter, keeping the floral arrangement centered. If the block will become part of a larger quilt, it is usually best to assemble the entire quilt top before adding batting, backing, and quilting. For a standalone wall hanging or decorative panel, finish the edges with a coordinating binding. Cut binding strips approximately 6 cm wide, join them into one continuous strip, fold lengthwise with wrong sides together, and press. Attach the binding using a consistent seam allowance, then fold it over the raw edges and secure it neatly.
The finished Quilt Block with Flower Appliqué Pattern can be incorporated into a variety of creative sewing projects. For example, you can use one block as the decorative front of a cushion, combining it with a coordinating fabric backing. Several matching blocks can be joined together to create a cheerful bed quilt, while a single block surrounded by fabric borders makes a lovely wall hanging. You can also adapt the design for table runners, tote bags, fabric organizers, or seasonal decorations. Changing the flower colors allows you to create different looks for spring, summer, autumn, or special occasions.
To keep your finished quilt block looking beautiful, follow appropriate fabric care practices. Wash handmade quilted items gently using a mild detergent and cool water, especially when the project contains brightly colored fabrics. Avoid harsh bleach or aggressive washing cycles that could damage the appliqué stitching. Lay the piece flat to dry when possible, or use a gentle drying method suitable for the materials. Store decorative quilt blocks away from prolonged direct sunlight to reduce fading. With thoughtful construction and proper care, your handmade floral appliqué quilt can remain a cherished part of your home or become a meaningful handmade gift.
Frequently Asked Questions (FAQ) About the Quilt Block with Flower Appliqué Pattern
1. Is the Quilt Block with Flower Appliqué Pattern suitable for beginners?
Yes. This pattern is suitable for motivated beginners who have basic experience with cutting fabric and operating a sewing machine. Although the design contains several decorative pieces, the individual shapes are simple enough to prepare using paper templates. Beginners may find fusible web appliqué particularly helpful because it holds the fabric pieces securely before stitching. Practicing the blanket stitch or zigzag stitch on fabric scraps before working on the actual block will make the process easier.
2. What is the best fabric for a flower appliqué quilt block?
High-quality 100% quilting cotton is generally the best choice for this project. Cotton is easy to cut, press, sew, and maintain, making it ideal for both traditional patchwork and decorative appliqué. Choose fabrics with a similar weight and weave to prevent uneven stretching or puckering. Small printed designs, checks, dots, and floral motifs work especially well because they add texture without hiding the flower shapes.
3. Can I make this quilt block without a sewing machine?
Absolutely. The Quilt Block with Flower Appliqué Pattern can be completed entirely by hand using traditional appliqué techniques. You can attach the fabric pieces with small blanket stitches or use needle-turn appliqué, which involves folding the raw fabric edges underneath as you sew. Hand sewing requires more time, but it produces a charming finish and allows greater control around small curves and intricate flower petals.
4. What is the difference between appliqué and patchwork?
Appliqué is a sewing technique in which decorative fabric shapes are attached to a larger background fabric. Patchwork, on the other hand, involves sewing separate fabric pieces together along their edges to create a larger surface. This project primarily uses appliqué because the flowers and leaves are placed on top of the background fabric rather than being pieced together to form the block.
5. How do I prevent the appliqué fabric from fraying?
One of the most effective ways to prevent fraying is to use a secure edge-finishing stitch, such as a narrow zigzag or blanket stitch. Fusible web can stabilize the fabric during sewing, but it does not always prevent exposed raw edges from fraying over time. For a more traditional finish, consider using needle-turn appliqué, which hides the raw edges underneath the decorative shapes.
6. What size should I make the finished floral quilt block?
The tutorial uses a finished block size of approximately 40 × 40 cm, but the pattern can be resized according to your project. Smaller versions work beautifully for decorative pillows or fabric accessories, while larger blocks are suitable for wall hangings and bed quilts. When resizing, adjust all flower and leaf templates proportionally to maintain the overall design balance.
7. Can I use fabric scraps for this flower appliqué pattern?
Yes, and using fabric scraps is an excellent way to make the project more economical and environmentally conscious. Small pieces of red, green, turquoise, yellow, and pink cotton can be combined to create the decorative motifs. Scrappy fabrics also give the finished quilt block a traditional handmade appearance, making each project unique.
8. Which stitch is best for attaching the flower appliqué pieces?
The blanket stitch is one of the most popular options for decorative fabric appliqué because it provides a secure finish while adding visible detail around the shapes. A narrow zigzag stitch is another excellent choice, particularly for beginners using a sewing machine. Satin stitching can also be used when you want a dense, polished border, although it requires more practice to maintain smooth curves.
9. Do I need fusible web to make this pattern?
Fusible web is helpful but not essential. It makes positioning and securing the appliqué shapes easier, especially when working with multiple overlapping flowers and leaves. However, you can also use fabric glue designed for temporary sewing placement, small basting stitches, or traditional needle-turn methods. Choose the technique that best matches your experience and preferred sewing style.
10. How can I turn this flower appliqué block into a larger quilt?
To create a larger quilt, make several identical or coordinating floral appliqué quilt blocks and arrange them in rows. You can join the blocks directly or separate them with fabric sashing to create more space between the flower designs. Add borders around the completed quilt top if desired, then layer it with batting and backing before quilting. Repeating the same floral motif in different color combinations can create a beautiful and cohesive patchwork quilt.
11. Why does my background fabric pucker around the appliqué?
Puckering may occur when the fabric stretches during sewing, the thread tension is too tight, or the appliqué pieces are not properly stabilized. To reduce this problem, use a suitable stabilizer when necessary, avoid pulling the fabric while stitching, and test your machine settings on scraps. Press the completed appliqué carefully rather than stretching the fabric with the iron.
12. Can I change the colors of the flowers and leaves?
Definitely. The color palette is completely customizable. For a romantic style, try pastel pink flowers with sage green leaves. For an autumn-inspired design, use orange, burgundy, mustard yellow, and olive green. A modern version might combine navy blue, white, and bright yellow fabrics. The most important consideration is maintaining enough contrast between the background and the appliqué pieces so that the flower shapes remain clearly visible.
13. How long does it take to complete the Quilt Block with Flower Appliqué Pattern?
The completion time depends on your sewing experience and the techniques you choose. A beginner may need approximately 5–8 hours to prepare the templates, cut the fabrics, arrange the design, and stitch the appliqué pieces. Experienced quilters may complete the decorative block more quickly. Additional time will be required if you decide to quilt and bind the finished piece.
14. Can I use this appliqué design for projects other than quilts?
Yes. This floral design can be adapted for cushion covers, tote bags, decorative table mats, fabric wall art, and many other sewing projects. When applying the design to frequently used items, consider using durable fabrics and secure stitching to withstand regular handling and washing.
Conclusion: Create Your Own Beautiful Quilt Block with Flower Appliqué Pattern
The Quilt Block with Flower Appliqué Pattern is a wonderful example of how simple fabric shapes can come together to create a detailed and expressive handmade design. By combining a colorful central flower, smaller decorative blossoms, carefully arranged leaves, and contrasting cotton prints, you can transform an ordinary fabric square into a beautiful piece of textile art. This project also offers an enjoyable way to practice essential quilting techniques while developing your confidence with appliqué sewing.
Throughout this tutorial, we explored the complete process of creating the floral quilt block, beginning with material selection and fabric preparation. We learned how to draw and cut flower templates, arrange the decorative elements, secure the appliqué shapes, and reinforce the design with traditional stitching methods. We also discussed quilting, binding, fabric care, and creative ways to incorporate the finished block into larger sewing projects.
One of the greatest advantages of this handmade flower appliqué quilt pattern is its versatility. You can follow the suggested measurements and colors to create a block inspired by the photograph, or experiment with different fabrics to develop a design that reflects your personality. Every fabric combination offers a new opportunity to make something beautiful, whether you prefer vintage patchwork, cheerful country-style quilting, or modern floral decoration. Most importantly, remember that quilting is a creative journey. Small variations in stitching, fabric placement, and decorative details are part of what makes handmade projects special. Take your time, enjoy the process, and appreciate the skills you develop with every completed piece.
EASILY FIND THE FREE PDF FOR THIS PATTERN HERE!
Now I would love to hear from you! 🌸🧵 Have you ever made a flower appliqué quilt block, or would this be your first attempt? Please leave your honest opinion in the comments and share your suggestions for future quilting tutorials. Your experiences, creative ideas, and feedback can inspire other sewing enthusiasts to discover the joy of making beautiful handmade quilts!