
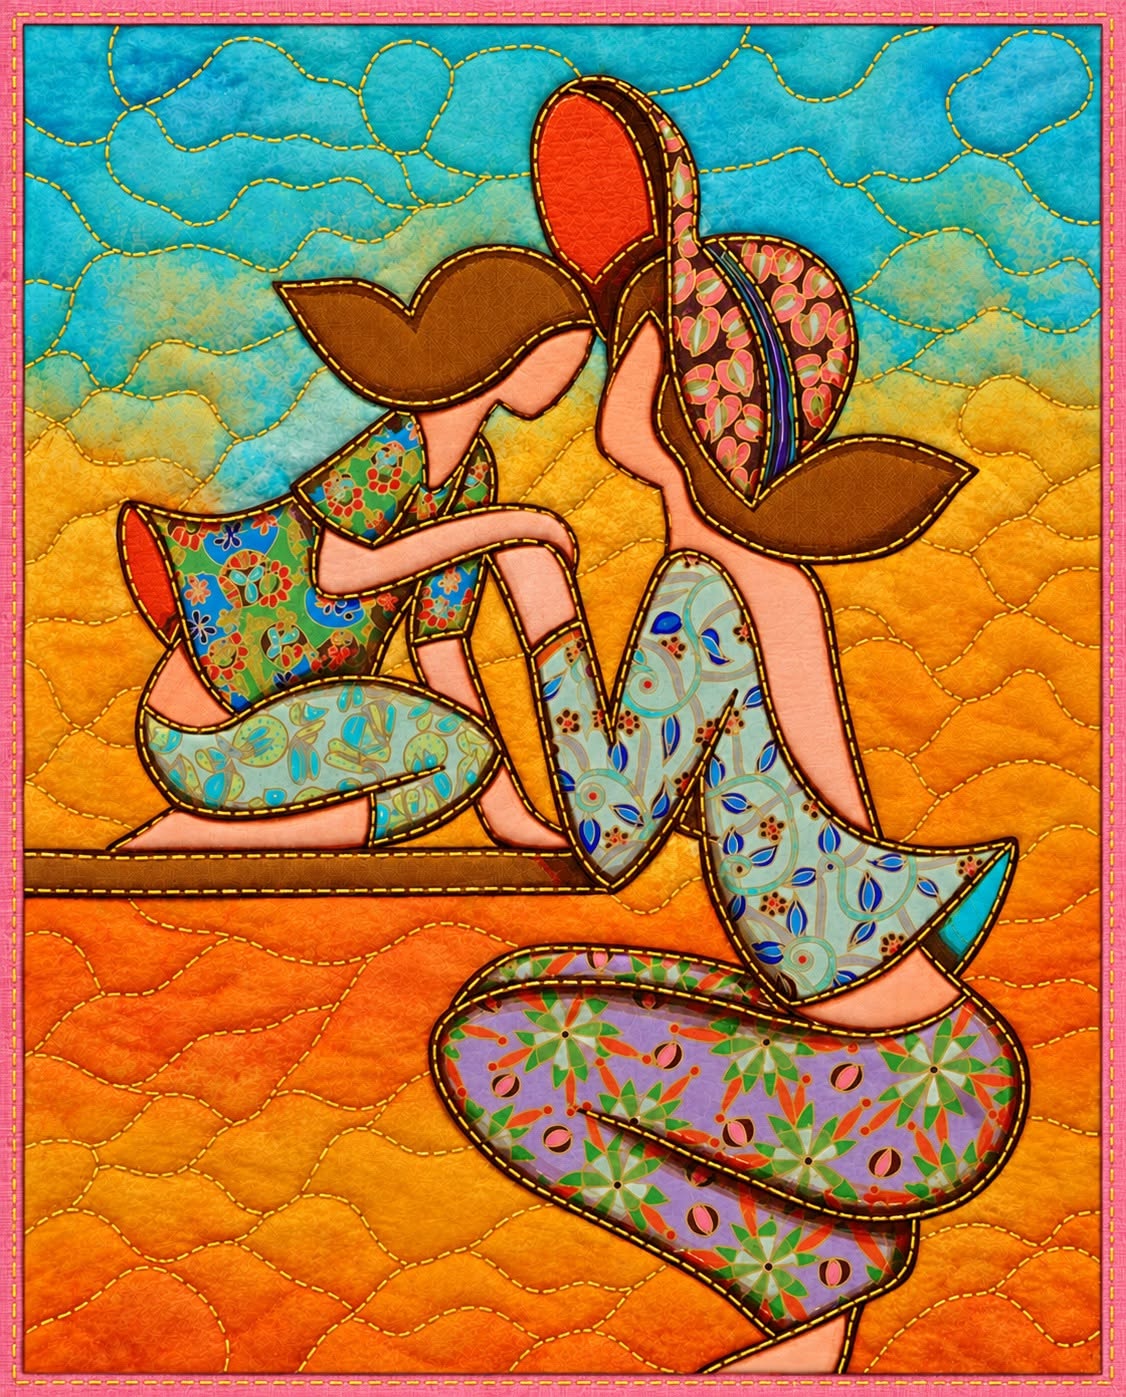
Two Friends at Sunset Appliqué Quilt Pattern is a colorful textile-art project that combines expressive appliqué, curved fabric shapes, decorative stitching, and a warm sunset-inspired background. The design shown in the reference image captures a quiet moment between two stylized friends, using patterned fabrics to create clothing, hats, hair, and graceful body shapes. Instead of depending on tiny traditional patchwork blocks, this project focuses on larger appliqué pieces that behave almost like shapes in a fabric painting. That makes the quilt especially appealing for makers who enjoy art quilting, raw-edge appliqué, and storytelling through fabric. The strong turquoise, golden yellow, orange, brown, peach, and floral prints give the composition depth while keeping it cheerful and handcrafted. Although the finished artwork looks detailed, the project becomes much easier when the construction is divided into background preparation, pattern tracing, fabric selection, appliqué assembly, stitching, quilting, and finishing.
One of the most attractive qualities of the Two Friends at Sunset Appliqué Quilt Pattern is the way contrasting fabrics transform simple silhouettes into recognizable characters. Printed cotton can become a dress, floral fabric can suggest movement in a skirt, rich brown fabric can create flowing hair, and a small piece of turquoise can become the tip of a shoe. This approach is ideal for using favorite scraps because each section requires relatively small pieces of fabric. The project can also be personalized without losing the original character of the composition. Different prints may be substituted for the clothing, the background colors may be softened or intensified, and the quilting texture can be changed according to personal taste. Beginners should work slowly through the curves and overlapping sections, while experienced quilters can experiment with thread painting and decorative details. The result is a distinctive appliqué quilt pattern that can become a wall hanging, decorative textile panel, or meaningful handmade gift.
Before beginning, remember that an image-inspired quilt does not need to reproduce every printed detail perfectly. The goal is to understand the visual structure and build a balanced textile interpretation using accessible quilting techniques. For the Two Friends at Sunset Appliqué Quilt Pattern, start by identifying the major layers: the sunset background, the seated figure on the left, the foreground figure on the right, their hair and hats, their clothing, and the smaller accent pieces. Preparing these layers separately makes assembly much more manageable. Cotton quilting fabric is generally the easiest material to control, although small amounts of batik or tightly woven specialty fabric may provide beautiful texture. A lightweight fusible web can simplify curved appliqué shapes and prevent pieces from shifting during stitching. With careful planning, accurate tracing, consistent pressing, and patient stitching, even a complex-looking composition can be created one section at a time.
Materials, Fabric Choices, and Pattern Preparation
The first step in making the Two Friends at Sunset Appliqué Quilt Pattern is gathering materials that provide both stability and visual variety. You will need quilting cotton for the background and appliqué shapes, lightweight fusible web, batting, backing fabric, coordinating sewing thread, a sewing machine, sharp fabric scissors, an iron, tracing paper, a pencil, pins or clips, and basic quilting tools. A rotary cutter and cutting mat are useful for preparing the background, although curved appliqué pieces are usually easier to cut with small sharp scissors. Choose threads that either blend with the appliqué fabrics or deliberately contrast with them to create strong outlines.
DISCOVER MORE FREE PATTERNS HERE!
Color selection is especially important because the composition relies on the contrast between a bright sky and a glowing sunset landscape. A turquoise or aqua fabric works beautifully for the upper background, while golden yellow, burnt orange, or warm ochre creates the ground. You can use solid fabric, hand-dyed-looking fabric, batiks, or subtle tonal prints. Fabrics with gentle texture help imitate the painterly appearance visible in the original artwork without distracting from the two figures. If possible, audition several pieces next to each other before cutting.
For the figures, select several coordinated patterned fabrics rather than trying to make every piece match. Small florals, abstract prints, geometric motifs, and colorful novelty cottons can give the clothing personality. Brown, rust, or dark chocolate fabric works well for the hair and some outlines, while peach, tan, or soft coral can represent exposed skin. The Two Friends at Sunset Appliqué Quilt Pattern becomes more interesting when prints vary in scale, so combine a few detailed motifs with calmer fabrics.
Create the appliqué templates by studying the major shapes individually instead of treating each figure as one complicated drawing. Trace the torso, arms, legs, hair sections, hat sections, dress or pants pieces, shoes, and major decorative areas separately. Add identifying marks to each template so that you remember where it belongs. Because many appliqué methods require tracing on the paper side of fusible web, remember that the final fabric shape may be reversed after fusing. If directional fabrics are important, plan their orientation before cutting.
For a medium wall hanging, a background measuring approximately 50 × 60 cm is a practical starting point, although the artwork can be enlarged or reduced. Leave several centimeters of extra background fabric around the design because quilting often causes slight shrinkage or distortion. Individual appliqué pieces can then be scaled proportionally to fit your chosen background. Keeping generous margins around the characters prevents the finished composition from looking crowded once the binding is attached.
After tracing the templates, place each shape onto lightweight fusible web and cut roughly around it, leaving a small margin beyond the drawn line. Fuse each piece to the wrong side of the selected fabric according to the fusible product instructions, and allow the fabric to cool completely. Then cut precisely along the traced lines. Organize the prepared appliqué pieces by figure or body section so that small shapes do not become misplaced during assembly.
Creating the Sunset Background and Building the Appliqué Figures
Begin the background of the Two Friends at Sunset Appliqué Quilt Pattern before assembling the figures. Cut the turquoise fabric for the upper section and yellow-orange fabric for the lower landscape. You may join them with a gently curved seam or use appliqué to overlap one color over the other. Avoid creating a perfectly straight horizon if you want the background to retain the flowing artistic quality of the reference design. A slightly irregular transition makes the scene feel more natural.
If you want a blended sunset effect, use several narrow or gently curved fabric sections progressing from turquoise to pale aqua, yellow, golden orange, and deeper orange. They do not need to form obvious stripes. Instead, irregular edges can create a soft transition similar to a painted sky. Press every seam carefully so that the background remains flat before the appliqué figures are attached. This is the foundation of the entire textile artwork, so taking time here improves the final appearance.
Next, lay the background flat and begin arranging the larger pieces of the seated figure on the left. Start with the body and clothing shapes before adding arms, legs, hair, or small accessories. Do not fuse anything immediately. Move the pieces around until their proportions look balanced and the pose feels natural. A photograph taken with your phone can help you remember the arrangement if the pieces need to be moved before final assembly.
Construct the second figure using the same method, but pay special attention to overlapping areas. The foreground figure should appear visually closer, which means some of her shapes may overlap portions of the background figure. Layering is essential in appliqué quilting because it replaces many of the perspective techniques used in drawing or painting. Determine which fabric section belongs underneath another before pressing, especially around the arms, legs, hair, clothing, and shoes.
Once you are satisfied with the positioning, remove the paper backing from the fusible web and press the pieces into place gradually. Begin with the lowest layers and work toward the uppermost details. Use the iron temperature recommended for your fusible material, and avoid sliding the iron because this can move the appliqué pieces. Instead, lift and press the iron from one area to another. Allow each section to cool before checking adhesion.
Small gaps or minor differences from the original picture do not necessarily need correction. Handmade fabric appliqué often looks more expressive when the shapes retain a slightly organic quality. Focus on clear silhouettes, pleasing overlaps, and good color balance. Before stitching, step several feet away from the project and look at the overall composition. The two figures should remain visually dominant against the sunset background, with enough contrast to distinguish their clothing, limbs, hair, and accessories.
Stitching, Outlining, and Quilting the Two Friends Design
After all appliqué pieces have been fused, the next stage of the Two Friends at Sunset Appliqué Quilt Pattern is securing their edges with stitching. A narrow zigzag stitch, blanket stitch, satin stitch, or straight raw-edge appliqué stitch can all be used successfully. The dark outlines visible around the shapes in the inspiration image make a narrow satin stitch or closely worked zigzag particularly suitable. Dark brown or nearly black thread can create a strong illustrated effect.
Test the chosen stitch on scraps before sewing directly on the quilt top. Adjust stitch width and length until curves look smooth and the thread does not overwhelm the fabric print. Small shapes generally require shorter stitches, while longer curves can tolerate a slightly longer stitch length. Sew slowly and stop with the needle down when turning around tight curves. This provides greater control and produces cleaner outlines.
When two appliqué pieces overlap, stitch in an order that reinforces the visual layering. Begin with pieces farther back and gradually move toward those in front. This approach prevents unnecessary stitching lines from crossing visible upper layers. On hair sections, clothing edges, and accessories, additional lines of stitching can create dimension. These decorative details turn ordinary fabric pieces into expressive components of the Two Friends at Sunset Appliqué Quilt Pattern.
Once the appliqué is secure, create the quilt sandwich using the completed quilt top, batting, and backing fabric. Cut the batting and backing several centimeters larger than the top on every side. Smooth the backing fabric with the wrong side facing upward, place the batting on top, and position the quilt top right side up. Baste the three layers using safety pins, temporary basting spray, or your preferred quilting method.
For the background, free-motion quilting with loose loops, gentle curves, meandering lines, or circular motifs can create the richly textured appearance associated with art quilts. Keep the quilting relatively consistent so the background does not compete with the figures. Turquoise thread in the sky and golden or orange thread in the ground can help the texture blend naturally. Alternatively, a neutral thread may be used across the entire piece for a more unified finish.
The appliqué figures can be quilted more selectively. Stitch close to major outlines to emphasize their silhouettes, then add a few interior lines where additional definition is useful. Avoid quilting every printed motif because excessive stitching can make the design visually busy. The strongest effect often comes from combining dense background quilting with simpler quilting inside the characters. This contrast helps the two friends appear to stand forward from the sunset landscape.
Finishing the Quilt, Personalizing the Design, and Display Ideas
After quilting is complete, place the project on a large cutting surface and square the edges carefully. Measure from several points before trimming because dense quilting can slightly change the shape of the textile. A large quilting ruler is useful for creating straight edges. If your original background was approximately 50 × 60 cm, the final dimensions may be slightly smaller after trimming, which is completely normal.
Prepare binding strips from a coordinating fabric that complements both the figures and the sunset background. Brown, dark orange, turquoise, or a small-scale multicolor print can all work well. For a traditional double-fold binding, cut strips approximately 6 to 6.5 cm wide, join them end to end, press them in half lengthwise, and sew the binding around the quilt. Finish the back by hand or machine according to your preferred quilting method.
If the project will be displayed as wall art, consider adding a hanging sleeve to the back before completing the final hand stitching on the binding. A simple fabric sleeve allows a dowel or hanging rod to support the quilt evenly. Because the Two Friends at Sunset Appliqué Quilt Pattern is primarily pictorial, wall display is an excellent way to appreciate the details. The finished textile can work beautifully in a sewing room, reading area, hallway, studio, or creative workspace.
Personalization is one of the greatest advantages of this design. Change the prints in the clothing to coordinate with your favorite fabric collection, alter hair colors, introduce different hat fabrics, or create an entirely different sunset palette. The friends could wear fabrics connected to a meaningful memory, such as scraps left from previous quilts. These choices transform the project from a decorative pattern into a personal piece of textile storytelling.
You can also experiment with embellishment, although restraint usually produces the most polished result. A few hand-embroidered lines can accent clothing seams, hair, or small accessories. Decorative machine stitches may add interest to selected edges. Tiny fabric details can be layered over larger pieces to imitate pockets, cuffs, shoe accents, or hat bands. Always evaluate whether an embellishment contributes to the composition rather than adding decoration simply because space is available.
When the project is finished, inspect the front and back for loose threads, remove remaining marks, and press gently from the back if necessary. Do not aggressively iron dimensional quilting because this can flatten its texture. Allow the quilt to rest flat before hanging or displaying it. Your completed Two Friends at Sunset Appliqué Quilt Pattern should showcase three important elements working together: a vibrant sunset background, expressive layered appliqué, and quilting that enhances rather than overwhelms the artwork.
FAQ About the Two Friends at Sunset Appliqué Quilt Pattern
What is an appliqué quilt pattern?
An appliqué quilt pattern is a design created by placing smaller fabric shapes on top of a larger foundation fabric and securing them with stitching. Unlike traditional patchwork, where pieces are usually sewn edge to edge to create blocks, appliqué allows curved, irregular, and pictorial shapes to be layered freely. This makes appliqué especially useful for creating people, flowers, animals, landscapes, and artistic scenes.
Is the Two Friends at Sunset Appliqué Quilt Pattern suitable for beginners?
Yes, although beginners may want to simplify some of the smaller details. The most important skills are tracing templates, cutting accurately, arranging layers, fusing fabric, and stitching around curved edges. Starting with larger appliqué shapes and using fusible web can make the process significantly easier. The project is also an excellent opportunity to practice curved appliqué stitching without needing complex piecing.
What is the best fabric for this appliqué project?
High-quality quilting cotton is one of the easiest options because it is stable, easy to cut, and available in a wide range of prints. Batiks are another excellent choice because their tight weave helps produce clean appliqué edges. Small floral and geometric prints work particularly well for the clothing in the Two Friends at Sunset Appliqué Quilt Pattern, while tonal fabrics create attractive backgrounds.
Should I use raw-edge or turned-edge appliqué?
Either method is possible, but raw-edge appliqué is particularly practical for this design. The many curved shapes and overlapping pieces can be fused into position quickly before being secured with zigzag, blanket, or satin stitching. Turned-edge appliqué creates a softer traditional finish but requires considerably more preparation around tight curves and narrow sections.
What stitch should I use around the appliqué pieces?
A narrow zigzag, blanket stitch, satin stitch, or straight stitch can all work. If you want the bold illustrated appearance shown in the inspiration design, a dark narrow satin or zigzag stitch creates excellent definition. For a softer modern style, use coordinating thread and a small straight stitch close to the raw edge.
Do I need fusible web?
Fusible web is not absolutely required, but it is highly recommended for a project with numerous curved and overlapping shapes. It temporarily or permanently holds the pieces in position while you stitch them. This reduces shifting and makes complicated arrangements easier to manage. Choose a lightweight product so the finished textile does not become unnecessarily stiff.
How can I keep the appliqué from puckering?
Use lightweight fusible material, press rather than slide the iron, and avoid pulling the fabric while stitching. Stabilizing the quilt top during dense decorative stitching may also help. When sewing around curves, move slowly and pivot frequently with the needle down. Smooth preparation generally produces better results than trying to correct puckering after all the stitching has been completed.
Can I change the colors shown in the original design?
Absolutely. Color customization is one of the most enjoyable parts of the Two Friends at Sunset Appliqué Quilt Pattern. The turquoise and orange background creates strong warm-and-cool contrast, but you could use purple and pink for an evening sky, softer cream and gold for a neutral version, or deeper blue and rust for an autumn-inspired interpretation. Preserve enough contrast between the characters and the background so the silhouettes remain easy to see.
How can I enlarge or reduce the pattern?
Create or trace your templates at the original working size, then enlarge or reduce every piece by the same percentage. Keeping the scale consistent prevents the body parts and clothing pieces from becoming disproportionate. Before cutting fabric, arrange paper versions of the enlarged pieces on the background to confirm that adequate margins remain around the complete composition.
What kind of quilting works best behind appliqué figures?
Free-motion meandering, loops, gentle waves, or irregular circular quilting works beautifully because these patterns add texture without introducing strong geometric lines. The background can be quilted somewhat densely while the characters receive lighter quilting. This difference in density can make the appliqué figures appear slightly raised and more prominent.
Can this pattern be made using fabric scraps?
Yes. In fact, scrap fabrics are ideal for many of the smaller clothing, hat, shoe, and accent pieces. Using scraps can create greater variety and gives leftover fabrics from previous quilting projects another purpose. Try to coordinate the values and colors so that individual body sections remain visually distinct.
How should the finished appliqué quilt be displayed?
A hanging sleeve can be sewn to the back so the project can be displayed as textile wall art. It may also be incorporated into a larger quilt, used as the center of a decorative panel, or adapted into a cushion front if the design is reduced. Because the composition has a clear pictorial orientation, hanging it vertically allows the scene to be appreciated most easily.
Conclusion
Creating the Two Friends at Sunset Appliqué Quilt Pattern is a rewarding way to combine fabric selection, artistic composition, appliqué, decorative stitching, and free-motion quilting in one expressive project. The process begins with preparing a warm sunset background, continues with carefully tracing and arranging the individual shapes of the two friends, and develops through thoughtful layering and edge stitching. Once the appliqué has been secured, background quilting adds texture and dimension while helping the colorful figures stand prominently against the landscape.
The key to achieving a successful result is not rushing the assembly. Organize the templates, test different fabric combinations, check the position of each layer before fusing, and practice your chosen appliqué stitch on scraps. These simple habits can make complicated curves and overlapping shapes much easier to control. Using contrasting prints for clothing and calmer tonal fabrics for the landscape will also help preserve the clear visual hierarchy that makes this design so appealing.
Most importantly, treat the Two Friends at Sunset Appliqué Quilt Pattern as a creative starting point rather than a rigid formula. Your fabric choices, stitching style, quilting texture, and color palette will naturally give the project an individual personality. Whether you create it as wall art, a decorative quilt panel, or a special handmade gift, the finished piece can become a beautiful example of how quilting turns ordinary pieces of fabric into a visual story.
EASILY FIND THE PDF FOR THIS PATTERN HERE!
If you make your own version, leave your sincere opinion about the project and share your suggestions. Which colors would you choose for the sunset, and what kinds of fabric prints would you use for the two friends? Your ideas may inspire new variations of this colorful appliqué quilt pattern and encourage other quilters to create their own interpretation.