
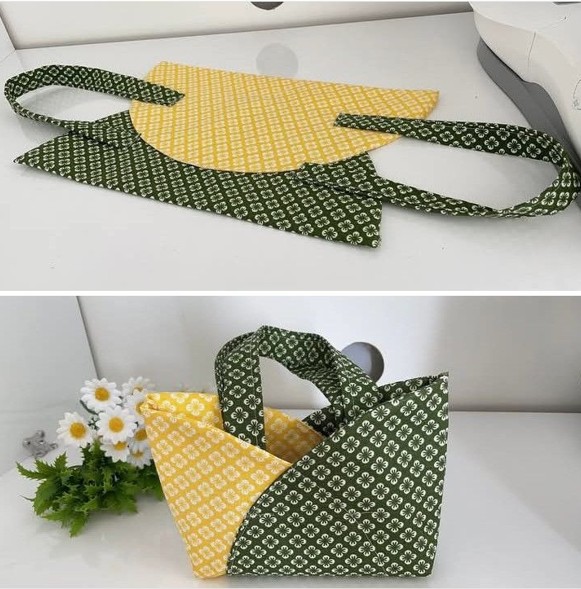
Reversible Fabric Bag Pattern is a practical and charming sewing project for anyone who enjoys creating useful accessories with fabric while exploring color, structure, and simple construction techniques. The bag shown in the reference image combines a warm yellow printed fabric with a contrasting dark green print, creating two coordinated sides that can be turned inside out whenever you want a different look. One of the most appealing details is the integrated fabric handle design, which gives the finished bag a clean handmade appearance without requiring purchased straps or hardware. This style works beautifully as a casual tote, craft bag, lunch bag, small shopping bag, or reusable everyday purse. Because the project is based mainly on curved pieces, straight seams, and careful topstitching, it can also be approachable for confident beginners who want to practice accurate sewing. Throughout this guide, you will learn how to plan, cut, assemble, reinforce, turn, and finish your own Reversible Fabric Bag Pattern from beginning to end.
A successful reversible bag begins with understanding what makes the construction different from an ordinary lined tote. Instead of permanently hiding one layer inside another, both fabric layers become visible finished surfaces, so your seams need to be neatly enclosed between them. The two fabrics should therefore complement each other while still providing enough contrast to make the reversible feature interesting. Quilting cotton is an excellent option because it is easy to cut, press, stitch, and topstitch, although slightly heavier cotton fabrics can also be used when you want more structure. Lightweight interfacing may be added if your chosen fabric feels too soft, but excessive stiffness can make the bag difficult to turn through the opening. Careful pressing during every stage is especially important because smooth curves and crisp handles are what give this fabric bag pattern its polished appearance.
Another benefit of sewing a reversible fabric bag is the opportunity to personalize nearly every detail. You can create a cheerful combination similar to the yellow and green example, choose florals paired with stripes, combine neutral fabrics with bold prints, or even use seasonal designs. The pattern can be enlarged for groceries or reduced for a small handbag, as long as the handle opening remains comfortable for your hand or wrist. You can also add optional pockets between the construction stages, provided that each pocket is positioned on the correct side of the fabric before the layers are assembled. Beginners should make a test version from inexpensive cotton before cutting special fabric, especially when adjusting the pattern dimensions. Once you understand the construction sequence, this project becomes an adaptable sewing pattern that can be recreated in many different styles.
Preparing the Fabric, Pattern Pieces, and Sewing Supplies
For a medium-sized version of the Reversible Fabric Bag Pattern, begin with two coordinating fabrics of approximately 50 × 55 cm each. These measurements provide enough material for a compact tote similar in proportion to the reference photo, although the exact amount will depend on your chosen pattern dimensions. Wash and dry cotton fabric before cutting if you expect the finished bag to be washed later, because natural fibers can shrink. Press both fabrics thoroughly with an iron to remove wrinkles and folds. Smooth fabric makes pattern placement more accurate and helps ensure that matching pieces are identical. If your fabric has a directional print, pay attention to which way the design faces before cutting.
DISCOVER MORE FREE PATTERNS HERE!
You will also need basic sewing supplies such as fabric scissors or a rotary cutter, matching thread, sewing pins or clips, a ruler, tailor’s chalk or a washable fabric marker, an iron, and a sewing machine. A universal sewing-machine needle in a medium size is usually suitable for quilting cotton. If you add interfacing, choose a lightweight fusible variety that supports the bag without making the handles excessively rigid. A seam allowance of approximately 1 cm works well for this project and should remain consistent throughout the construction. Consistency is more important than the exact width because uneven seam allowances can cause the two reversible layers to fit together poorly. Keep your tools nearby before you begin so you can work without interrupting the sewing sequence.
The main pattern piece can be visualized as a bag body with an extended handle rising from the upper section. Looking at the finished example, the lower portion forms the storage area while the narrow upper extension curves upward to create the carrying handle. Draw a paper template approximately 32 to 36 cm wide and 30 to 34 cm high for a small to medium bag, then extend the handle area upward according to your preferred grip size. The central handle opening can be oval, rounded, or softly rectangular, but avoid sharp corners because curves are easier to turn neatly. A comfortable handle opening may measure roughly 14 to 18 cm long and 7 to 10 cm high. Remember that these dimensions can be customized depending on how you plan to use your handmade reversible tote.
Fold the first fabric right sides together or place two layers flat, depending on the shape of your pattern. Position the template carefully and trace around it using a removable fabric marker. Cut two matching body pieces from the first fabric and repeat the process with the contrasting fabric. You should now have four main fabric pieces: two for one reversible side and two for the other. If your design uses asymmetrical front and back sections, make sure you mirror the required pieces rather than cutting four identical orientations. Accurate cutting is one of the most important steps because even a few millimeters of difference can become noticeable around the handles.
If you want a slightly firmer reversible tote bag, cut interfacing pieces using the same body template but trim approximately 5 mm from the outer edges to reduce bulk in the seams. Fuse the interfacing to the wrong side of one fabric set according to the manufacturer’s temperature instructions. Avoid adding heavy interfacing directly around narrow handle curves unless your machine handles multiple layers comfortably. Another option is to interface only the lower body portion of the bag, leaving the handles more flexible. This creates useful structure at the base while preserving a comfortable grip. Always allow the fabric to cool completely after fusing before sewing.
Before moving to assembly, transfer any alignment marks from your paper template onto the wrong side of every piece. Mark the bottom center, side curves, top opening areas, and handle joining points. These reference marks help the two layers align accurately later. If you want pockets, prepare and attach them now because adding them becomes difficult after the reversible layers are joined. Keep each pocket several centimeters away from the seam allowances and handle openings. With all four pieces prepared, you are ready to begin constructing the individual bag layers.
Sewing the Two Reversible Bag Layers
Start by placing the two pieces of your first fabric right sides together. Align the lower edges and side edges carefully while leaving the upper handle areas unsewn according to the construction of your template. Clip or pin around the perimeter, making sure that the fabric does not shift. Sew around the lower bag body using your chosen 1 cm seam allowance. Backstitch at the beginning and end of the seam for reinforcement. Do not sew across openings that will later connect the reversible layers.
Repeat the same process using the two pieces cut from your contrasting fabric. The goal is to create two separate bag shells that are nearly identical in shape. One shell will eventually sit inside the other before being joined around the handles and upper edges. After stitching, compare the shells to make sure their dimensions match. If one appears slightly larger because of inaccurate cutting or seam allowance, correct the difference before continuing. Matching shells produce smoother reversible results and prevent unwanted puckering around the opening.
Curves require special attention in this Reversible Fabric Bag Pattern. After sewing curved edges, carefully clip into the seam allowance without cutting through the stitching line. On outward curves, small notches can remove excess fabric and prevent bulk. On inward curves, short clips allow the seam allowance to spread when the piece is turned. Make your clips approximately 1 to 2 cm apart depending on the tightness of the curve. These small preparation steps make a noticeable difference in the final shape of the bag.
To create more capacity in the bottom, you may form boxed corners if your pattern shape allows it. Pinch one lower corner so the side seam aligns with the bottom seam, creating a small triangle. Measure approximately 3 to 5 cm across the triangle and stitch a straight line. Repeat on the opposite corner and then repeat the process for the second fabric shell. Boxed corners give the fabric tote bag a wider base that can stand more easily when filled.
Press the seams of both shells carefully. Use moderate heat appropriate for your fabric and press rather than dragging the iron aggressively across the material. Pressing the seam allowances to one side can work well for the lower body, while curved areas may benefit from being pressed open when possible. Turn one shell right side out and inspect the shape. Look for puckering, skipped stitches, or uneven curves and correct them before assembling the reversible layers.
At this point, you should have two completed bag bodies that resemble one another but feature different fabrics. The yellow and green combination in the reference image demonstrates how dramatically the appearance can change simply by turning the finished bag inside out. This is why choosing two attractive fabrics is essential for a genuine reversible sewing project. Neither side should look like a traditional lining. Both sides should appear intentional, decorative, and completely finished. Once the shells are prepared, the most interesting construction stage begins: joining them together.
Joining the Handles and Creating the Reversible Finish
Place one bag shell inside the other so the right sides of the two fabrics are facing each other. In other words, the visible surfaces should be touching while the wrong sides remain exposed on the outside and inside of the temporary construction. Align the side seams, upper edges, and handle sections carefully. Use clips around the curved handle openings because clips can be easier to manage than pins in thicker layered sections. Accurate alignment at this stage determines how symmetrical the finished handles will appear. Take your time rather than stretching one fabric to force it into position.
Stitch around the inner handle openings using the same consistent seam allowance used throughout the project. Follow each curve slowly and reduce your machine speed if necessary. Stopping with the needle down while gently rotating the fabric can help maintain a smooth line. After sewing, clip the seam allowance around the curves at close intervals. Do not cut into the stitching itself. Proper clipping allows the curved opening to lie flat after turning.
Depending on the exact construction of your pattern, the outer handle edges may be joined in stages so a turning opening remains accessible. Sew as much of the upper perimeter as possible while leaving approximately 8 to 12 cm unstitched along a relatively straight area. This opening will allow you to pull the entire bag right side out. Avoid placing the turning opening on a tight curve because closing it neatly later becomes more difficult. Mark both ends of the opening so you do not accidentally sew it closed.
Reach through the opening and begin pulling the fabric layers through carefully. This can initially feel awkward because the handles and lower body must pass through a relatively small space. Work gradually rather than pulling forcefully, especially if interfacing has been added. Once the entire reversible fabric bag is turned right side out, use your fingers or a blunt turning tool to gently shape the curves. Never use sharp scissors or pointed tools that could pierce the fabric. Smooth both sides until the bag begins to take its final form.
Press the upper edges and handles thoroughly. Roll the seams gently between your fingers before pressing so the stitching line sits directly on the edge rather than favoring one fabric. This detail is particularly important for reversible projects because both sides remain visible. Fold the seam allowances of the turning opening inward so they match the surrounding seam. Pin or clip the opening closed. A careful press will help hold everything in position before topstitching.
Finish by topstitching around the handle openings and upper edges approximately 2 to 3 mm from the edge. The topstitching closes the turning gap while reinforcing areas that receive frequent handling. Choose a thread color that complements both fabrics, or use different bobbin and needle-thread colors if your machine tension allows them to look balanced on each side. Sew slowly around curves for an even professional finish. After a final press, your Reversible Fabric Bag Pattern should now function beautifully from either side.
Finishing Details, Customization, and Everyday Use
Once the basic construction is complete, examine the bag from both directions. Turn the yellow side outward, then reverse it so the green side becomes the exterior, just as demonstrated by the contrasting fabrics in the reference design. Check whether the handles sit evenly and whether the lower corners remain balanced. If necessary, use additional pressing to refine the shape. Small irregularities can often be corrected simply by reshaping the fabric while it is warm. The finished bag should feel soft enough to reverse without excessive effort.
Topstitching can also be added to selected side seams or decorative areas if you want more definition. Because a reversible bag sewing pattern exposes both sides, decorative stitches should look attractive from the bobbin side as well as the needle side. Test decorative stitching on scrap fabric before applying it to the finished bag. Simple straight stitching is usually the safest and most timeless option. Coordinating thread helps maintain the clean appearance visible in the example. Avoid overly dense stitching that could make the fabric stiff.
You can personalize the project by adding pockets before assembly. A flat rectangular pocket can be sewn onto one or both reversible sides, while a divided pocket can organize keys, sewing tools, or other small objects. Another option is adding a loop for a key ring or a fabric tie near the upper opening. Because the goal is to keep the bag completely reversible, avoid features that make one side obviously look like a lining. Every addition should appear intentional regardless of which fabric faces outward.
Fabric selection can completely transform the personality of this Reversible Fabric Bag Pattern. Floral prints create a romantic handmade look, geometric fabrics feel modern, denim produces a casual result, and coordinated quilting cottons are ideal for colorful patchwork-inspired versions. You can also piece scraps together before cutting the bag shape, creating a sustainable project that uses leftover fabric. When combining scraps, press every pieced seam carefully before placing the bag template. This prevents bulky intersections from interfering with the final assembly.
For cleaning, follow the care requirements of the fabrics used. Prewashed cotton bags can usually tolerate gentle washing, although handmade items tend to last longer when washed in cool water and air-dried. Press the bag after washing if you want to restore crisp edges and handles. If interfacing has been used, avoid excessive heat unless the interfacing manufacturer confirms that high temperatures are safe. Regular care keeps both reversible surfaces looking fresh. Because the bag can be turned inside out, stains or wear on one side do not immediately prevent you from enjoying the other.
This project also makes a thoughtful handmade gift because it offers two styles in one item. You can coordinate fabrics with a recipient’s favorite colors, make seasonal combinations, or create matching bags for family members. Once your pattern is tested, producing additional versions becomes significantly faster. Save the paper template and write your preferred seam allowance and construction notes directly on it. Over time, your Reversible Fabric Bag Pattern can become a reliable handmade project that is easy to customize for many occasions.
Frequently Asked Questions About the Reversible Fabric Bag Pattern
What is a Reversible Fabric Bag Pattern?
A Reversible Fabric Bag Pattern is a sewing design that creates a bag with two fully finished fabric surfaces. Instead of having a traditional exterior fabric and an interior lining that remains hidden, either layer can become the outside of the bag. The seams are enclosed between the layers so the bag looks neat in both configurations. This makes the project especially versatile because one handmade bag can provide two coordinated appearances.
Is this reversible fabric bag suitable for beginners?
Yes, a simplified version can be a very good project for beginners who already know how to operate a sewing machine and sew a consistent seam allowance. The main challenges are stitching smooth curves, clipping curved seam allowances correctly, turning the bag, and topstitching evenly. Practicing these techniques on scrap fabric before sewing the final version can make the process much easier. Beginners should also choose stable cotton fabric because slippery or stretchy fabrics can complicate construction.
What fabric is best for a reversible bag?
Medium-weight quilting cotton is one of the easiest materials for this type of project. It is widely available, easy to press, and offered in countless coordinating prints. Cotton canvas can also work, but using two heavy layers may make turning the handles difficult. Linen blends provide a softer natural look, while lightweight denim can create a durable casual bag. Whatever you choose, consider how the two layers will behave together when reversed.
Does a reversible fabric bag need interfacing?
Not necessarily. Two layers of good-quality cotton may provide enough structure for a small bag. Interfacing is useful when the fabric is lightweight or when you prefer a firmer finished shape. Choose lightweight or medium-light interfacing rather than extremely stiff material. Remember that the bag must be flexible enough to turn completely inside out without creating uncomfortable folds around the handles.
How large should I make the handle opening?
The handle opening should comfortably accommodate your hand and allow the bag to rest naturally when carried. For a small hand-carried tote, an opening around 14 to 18 cm long can be a useful starting point. If you want to carry the bag on your forearm, increase the opening accordingly. Always test your paper template by cutting the handle opening from paper and checking the size before cutting your fabric.
Why do I need to clip curved seam allowances?
Clipping releases tension around curved seams. Without clipping, inward curves may pull and wrinkle after turning, while outward curves can develop bulky edges. Small clips allow the seam allowance to spread or overlap slightly as needed. The important rule is to cut close to the stitching without cutting through it. Careful clipping is one of the easiest ways to achieve smooth professional-looking handles.
How can I make my reversible bag look more professional?
Accurate cutting, consistent seam allowances, frequent pressing, careful clipping, and neat topstitching make the biggest difference. Do not rush through curved sections. Press every major seam before moving to the next stage, and use sewing clips to align the two bag layers accurately. A final row of topstitching around the upper opening also provides structure and creates a clean finished edge.
Can I add pockets to a Reversible Fabric Bag Pattern?
Yes. Pockets should normally be attached before joining the two main bag shells. You can add one pocket to each reversible surface so both sides remain functional. Rectangular patch pockets are particularly easy for beginners because they require minimal construction. Position them far enough below the handles that they remain easy to use and do not interfere with the upper seams.
Can I change the size of the pattern?
Absolutely. One advantage of a simple fabric bag pattern is that it can be resized for different purposes. A larger version may work as a shopping tote or craft bag, while a smaller version can become a lunch bag or casual handbag. When resizing, remember to adjust the handles proportionally rather than enlarging only the lower body. Making a paper or inexpensive fabric test version is helpful whenever you change the original proportions significantly.
What should I do if the two bag layers do not match perfectly?
Small differences can sometimes be eased together while pinning, but significant differences should be corrected before joining the layers. Check your seam allowances and compare the pattern pieces. Trim only when doing so will not distort the overall shape. For future versions, cut both fabrics using the same paper template and avoid lifting or stretching the fabric during cutting. Precision becomes especially important near the handle openings.
How can I keep the handles strong?
Use good-quality thread, backstitch at stress points, and topstitch around the completed handles. If the fabric is especially lightweight, lightweight interfacing can reinforce the handle area. Avoid cutting the handle extensions too narrow because narrow straps place more pressure on the seams. Reinforcement is particularly helpful if you plan to carry heavier items regularly.
Can I use leftover quilting fabric for this project?
Yes, and this can be an excellent scrap-friendly sewing project. Larger scraps can be pieced together to create panels before the bag shapes are cut. Press all patchwork seams flat and consider lightweight interfacing behind the pieced panel for additional stability. Using scraps can make every Reversible Fabric Bag Pattern unique while giving leftover fabric from previous projects a practical new purpose.
Conclusion
Creating a Reversible Fabric Bag Pattern is a satisfying way to combine practical sewing skills with creative fabric selection. From preparing your materials and cutting accurate pieces to constructing two separate shells, joining the handle openings, clipping the curves, turning the bag, and finishing everything with neat topstitching, each stage contributes to a polished handmade result. The reversible construction gives you two coordinated styles in a single project while keeping all raw seams neatly enclosed.
The project can also be adapted easily as your sewing confidence grows. You can experiment with different dimensions, pockets, patchwork panels, interfacing, contrasting threads, and fabric combinations while keeping the same basic construction method. Whether you choose bright yellow and deep green prints similar to the example or create an entirely different combination, the finished bag can become a useful everyday accessory as well as a showcase for your favorite fabrics.
EASILY FIND THE PDF FOR THIS PATTERN HERE!
Now that you know how to complete the Reversible Fabric Bag Pattern from start to finish, you can save your template and use it as the foundation for future handmade bags. Try your own fabric combination, adjust the size to suit your needs, and enjoy seeing how different prints completely change the finished design. If you make this project, leave your sincere opinion about the pattern and share any suggestions, fabric combinations, or creative modifications you would like to try. Your ideas may inspire even more beautiful versions of this versatile reversible bag.