
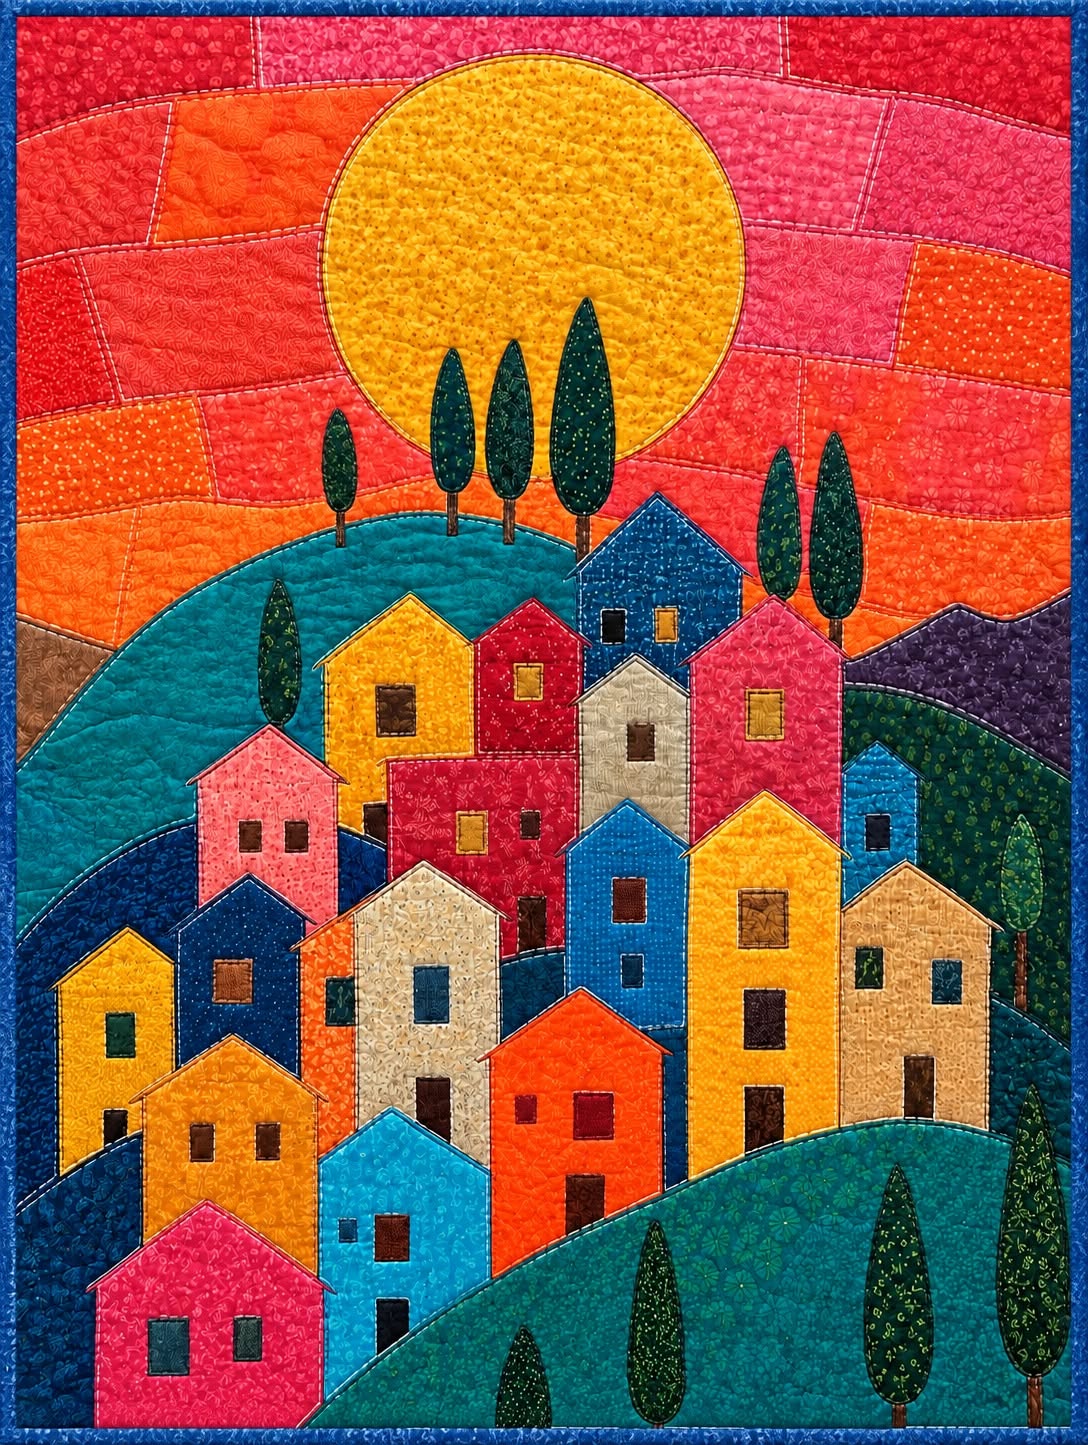
The “Village at Sunset” Patchwork Panel Pattern is a warm, colorful textile project that transforms a simple collection of fabrics into a charming landscape filled with rolling hills, tall trees, small village houses, and a glowing golden sun. Inspired by the panel shown in the reference image, this design combines traditional patchwork, raw-edge appliqué, curved landscape piecing, decorative stitching, and free-motion quilting to create a finished piece with depth and personality. The rich reds, oranges, pinks, blues, greens, and yellows make the scene especially attractive because every fabric contributes to the feeling of a peaceful village at the end of the day.
One of the greatest advantages of the “Village at Sunset” Patchwork Panel Pattern is that it can be adapted to many different fabric collections. You do not need to reproduce every house, tree, hill, or color exactly as shown. Instead, the project works best when you treat the original composition as inspiration and select fabrics that create similar contrasts. Warm fabrics can form the dramatic sunset sky, cool teal and navy fabrics can shape distant hills, and earthy greens can create the foreground. Small-scale prints, batiks, tone-on-tone quilting cottons, and fabric scraps are particularly useful because they add visual texture without making the individual appliqué shapes difficult to recognize.
This project is also an enjoyable way to practice several important quilting techniques in one design. You will learn how to build a background from horizontal fabric sections, create gentle curved seams, prepare appliqué houses and trees, layer overlapping elements, stitch small architectural details, and finish the whole panel with quilting that enhances the landscape. Although the final artwork appears detailed, the construction becomes much easier when the scene is divided into sections. By working from the background toward the foreground, you can gradually build the entire village without needing to assemble everything at once.
Materials, Fabrics, Colors, and Planning the Landscape
Before cutting fabric for the “Village at Sunset” Patchwork Panel Pattern, decide on the approximate finished size of your wall hanging or textile panel. A practical beginner-friendly size is approximately 60 cm wide by 80 cm high, although the proportions can easily be enlarged or reduced. Allow an additional 2 to 3 cm around the outer edges during construction so the panel can be squared accurately after quilting.
DISCOVER MORE FREE PATTERNS HERE!
For the sunset background, collect approximately eight to twelve pieces of quilting cotton in red, coral, orange, raspberry, pink, and deep rose. The reference composition uses different horizontal sections rather than one continuous fabric, which gives the sky a patchwork appearance. Cut irregular strips approximately 8 to 15 cm high, allowing them to curve gently as they cross the panel. Small floral, mottled, or tone-on-tone prints work beautifully because they resemble the changing colors and texture of a painted sunset.
Choose one strong golden yellow fabric for the sun. For a 60 x 80 cm panel, a circle approximately 28 to 32 cm in diameter creates a dramatic focal point. You can trace the circle using a dinner plate, compass, or homemade paper template. A yellow or golden batik fabric is particularly effective because subtle variations in the print create the appearance of glowing light without requiring complicated shading.
For the landscape, gather several blue, teal, turquoise, navy, green, and violet fabrics. These will become overlapping hills that separate the sky from the village and create visual depth. Plan three to five large curved hill shapes, with the highest hills positioned behind the buildings and the darkest or most saturated fabrics placed toward the foreground. Each hill should overlap the previous section slightly so no background fabric is visible between layers.
The houses are an ideal opportunity to use small fabric scraps. Select yellow, orange, red, pink, turquoise, navy, beige, cream, brown, and blue quilting cottons. Most houses can be constructed from simple rectangles measuring approximately 7 to 12 cm wide and 10 to 18 cm high, depending on their position. Smaller houses should be placed farther back, while larger houses should appear toward the front of the composition to strengthen the sense of perspective.
You will also need dark green scraps for the tall narrow trees, brown scraps for trunks and doors, yellow or gold scraps for illuminated windows, lightweight fusible web for appliqué, backing fabric, batting, coordinating thread, fabric scissors or a rotary cutter, an iron, sewing machine, quilting ruler, pins or clips, and optional tear-away stabilizer. Using several thread colors rather than one universal thread can help the stitched outlines blend naturally with each fabric section.
Building the Sunset, Hills, Sun, and Village Background
Begin construction of the “Village at Sunset” Patchwork Panel Pattern with the sky because every other element will eventually overlap it. Arrange your warm-colored strips from the upper edge downward, alternating reds, pinks, oranges, and corals. Avoid making every strip perfectly straight. Gentle curves and slightly angled divisions will make the background feel more organic and visually similar to a hand-crafted landscape.
Sew neighboring sky sections using a standard 6 mm seam allowance when traditional piecing is practical. For strongly curved pieces, you may prefer appliqué construction instead. Place the upper fabric over the lower fabric by approximately 1 cm, secure it temporarily, and stitch close to the curved edge. A narrow satin stitch, blanket stitch, or simple straight stitch can all work depending on the finish you prefer. Press the completed background carefully from the reverse side.
Prepare the large yellow sun using lightweight fusible web. Trace the circle onto the paper side of the fusible material, cut it slightly larger than the drawn line, and fuse it to the wrong side of the yellow fabric according to the manufacturer’s temperature recommendations. Cut accurately on the traced circle, remove the backing paper, and position the sun in the upper central portion of the panel. In the reference-inspired layout, part of the sun disappears behind the hill and trees, which makes the landscape appear more dimensional.
After positioning the sun, add the large distant hills. Begin with the hill that appears farthest away and work forward. Each hill can be cut as a broad curved piece reaching beyond both side edges of the background. Fuse or pin it into position before adding the next layer. A turquoise hill behind the village creates a useful transition between the hot sunset colors and the brightly colored buildings.
Continue adding darker blue, teal, violet, and green hill sections. Do not worry about creating mathematically identical curves. Natural landscapes look more convincing when the slopes differ in height and direction. Leave enough visible area between the hills so the village buildings can be distributed across several levels instead of forming one flat row.
Once you are satisfied with the landscape, secure the major curved edges with stitching. A 2 to 3 mm straight stitch placed close to each raw edge creates a handmade illustrated appearance, while a narrow zigzag or blanket stitch gives additional protection against fraying. If you plan to frame the finished textile behind glass, raw-edge appliqué can remain relatively light. If the panel will be handled frequently, use denser edge stitching for increased durability.
Creating and Appliquéing the Colorful Village Houses and Trees
The houses are the most recognizable feature of the “Village at Sunset” Patchwork Panel Pattern, yet their basic construction is surprisingly simple. Make paper templates consisting of rectangles topped with triangular or slightly sloping roofs. You can combine the roof and house body into one continuous pentagonal shape, which is especially convenient for fusible appliqué. Create at least four template sizes so the village does not look repetitive.
For a panel measuring approximately 60 x 80 cm, small background houses may be around 6 cm wide by 10 cm high, medium houses approximately 8 cm wide by 13 cm high, and large foreground buildings approximately 10 to 12 cm wide by 17 to 20 cm high. Trace each template onto fusible web, fuse it to the chosen fabric, and cut around the final outline. Make more houses than you think you will need so you can experiment with the arrangement before permanently fusing anything.
Arrange the buildings from the back of the village toward the front. The upper houses should be slightly smaller and may overlap the turquoise hill. Add a second level of medium houses below them, followed by larger buildings in the foreground. Overlapping a small part of one building with another helps eliminate empty spaces and creates the impression of a densely built hillside village.
Windows and doors can be made from tiny rectangular scraps. Cut doors approximately 1.5 to 2.5 cm wide and windows approximately 1.5 to 2 cm square, adapting the dimensions to each house. Dark brown and navy windows create contrast, while yellow and gold windows suggest warm interior light. Because these details are small, fusible appliqué is usually easier than traditional turned-edge appliqué.
After the houses have been arranged, fuse each piece securely and stitch around the outer edges. A dark brown, burgundy, navy, or charcoal thread produces the illustrated outlines visible in many contemporary art quilt patterns. Keep the stitching approximately 1 to 2 mm from the raw edge. Small irregularities can actually improve the handmade character of the village, so perfect architectural precision is unnecessary.
Create the trees from long tapered shapes. Cut narrow dark green ovals or cypress-like forms approximately 2 to 4 cm wide and 10 to 18 cm high. Add thin brown trunks approximately 0.5 to 1 cm wide. Place several trees behind the village and several along the foreground hills. Changing their sizes is important because larger foreground trees and smaller distant trees reinforce perspective and make the landscape appear much deeper.
Quilting, Finishing, Binding, and Adding Professional Details
Once all pieces of the “Village at Sunset” Patchwork Panel Pattern are secured, prepare the quilt sandwich. Cut batting and backing fabric approximately 5 cm larger on every side than the patchwork top. Place the backing wrong side upward, center the batting over it, and place the completed village panel right side upward. Smooth the layers carefully and baste with safety pins, temporary spray adhesive, or large hand stitches.
Quilt the sky first. Gentle horizontal or slightly curved lines can follow the shapes of the sunset strips, reinforcing the direction already created by the fabric. You may also use free-motion quilting with small loops, waves, stippling, or irregular textures. The purpose is not only to secure the layers but also to add movement without competing visually with the village.
Quilt around the sun using circular lines or echo quilting. Begin approximately 3 to 5 mm outside the appliqué edge and follow the circle. Additional lines can be stitched inside the sun if you want stronger texture. Dense quilting around the outside of the sun can make the circular shape appear slightly raised, particularly if a medium-loft cotton or cotton-blend batting has been used.
For the hills, follow the curved boundaries with echo quilting or free-motion texture. Use different designs on neighboring hills when desired. For example, one hill may receive gently flowing lines while another is quilted with small loops or pebbles. This subtle variation allows similarly colored fabrics to remain visually distinct even when viewed from several meters away.
Quilt the houses more simply so the tiny doors and windows remain easy to see. Stitch close to the outer building edges and around major architectural details. Vertical lines, small squares, or irregular straight-line quilting can suggest the surfaces of the houses. The trees can be quilted with a single central line or narrow echo stitching that follows their elongated shape.
Finally, square the quilt to the planned finished dimensions. Prepare binding strips approximately 6 to 6.5 cm wide, join them end to end, press the long strip in half, and attach it around the panel using your preferred double-fold binding technique. Hand-stitch or machine-stitch the folded binding to the back. Add a hanging sleeve if the patchwork panel will be displayed as textile wall art.
FAQ About the “Village at Sunset” Patchwork Panel Pattern
Is the “Village at Sunset” Patchwork Panel Pattern suitable for beginners?
Yes. The project looks complex because it contains many individual pieces, but most components are based on basic shapes such as rectangles, circles, curves, and tapered trees. Beginners can simplify the construction by using fusible raw-edge appliqué rather than complicated turned-edge techniques. Completing the project section by section also makes the process much easier to manage.
What is the best fabric for this patchwork landscape?
High-quality quilting cotton is one of the easiest materials to use because it is stable, easy to cut, and available in a huge range of colors and small-scale prints. Batik fabrics are also excellent because their mottled surfaces provide natural texture. Avoid very stretchy fabrics unless they are stabilized before cutting.
Can I make the village panel larger or smaller?
Absolutely. The entire pattern can be resized proportionally. For a smaller wall hanging, reduce the house and landscape templates by the same percentage. For a larger quilt, increase the templates and consider adding more houses, trees, and landscape layers so the design still feels balanced.
Do I need fusible web for the appliqué?
Fusible web is not essential, but it is extremely helpful for a design containing many small pieces. It keeps houses, windows, doors, trees, and the sun stable while you stitch around them. Traditional needle-turn appliqué can also be used, although it will require considerably more time.
What stitch should I use around the appliqué pieces?
A straight stitch approximately 1 to 2 mm inside the edge creates an artistic raw-edge finish. A narrow zigzag offers additional security, while blanket stitch creates a more decorative traditional appearance. The best option depends on whether you prefer a contemporary art quilt style or a more classic appliqué finish.
How can I prevent small windows and doors from moving while sewing?
Fuse them in place before stitching and allow the fabric to cool completely after pressing. For extremely small pieces, use lightweight fusible web and a fine sewing-machine needle. Stitch slowly and shorten the stitch length slightly when turning sharp corners.
How do I choose colors that resemble a sunset?
Begin with deep red and rose near the upper area, then gradually introduce coral, orange, scarlet, and warm pink. The large yellow sun should be noticeably lighter than the surrounding sky. Cool turquoise, navy, teal, and green hills create strong complementary contrast against the warm background.
Can scraps be used for this project?
Yes, and this is one of the best projects for a fabric scrap collection. Small houses, doors, windows, and trees require very little material. Using fabrics from different collections can make the village more lively, provided the overall palette remains coordinated.
Should I quilt before or after applying the houses?
For this design, apply and secure the houses before assembling the quilt sandwich. Then quilt through the completed top, batting, and backing. Quilting around the appliqué shapes will secure the layers while adding dimension to the architecture.
How can I make the houses appear more dimensional?
Use lighter fabrics for buildings you want to emphasize and darker fabrics for recessed areas. Overlap some houses, vary their sizes, and place smaller buildings higher on the landscape. Quilting around the edges can also make the appliqué shapes stand out slightly from the background.
What type of batting works best for a patchwork wall panel?
A thin cotton or cotton-blend batting is usually ideal because it adds enough structure for quilting without making the wall hanging overly bulky. Medium-loft batting can be used when stronger dimensional quilting is desired.
Can the pattern be made without free-motion quilting?
Yes. A walking foot and ordinary straight stitching are completely sufficient. Follow the curved landscape seams, outline the houses, and quilt horizontal or gently waving lines through the sky. Free-motion quilting is an optional decorative technique rather than a requirement.
How should the finished panel be displayed?
A fabric hanging sleeve can be sewn to the upper back edge and fitted over a wooden or metal hanging rod. The piece may also be professionally framed or incorporated into a larger quilt. Keeping it away from prolonged direct sunlight will help preserve the strong fabric colors.
How long does the project usually take?
Construction time depends on the number of houses and the amount of quilting. A simplified version may be completed over a weekend, while a highly detailed version can take several days or longer. Preparing all templates and fabric pieces before beginning assembly can make the process significantly faster.
What makes this design different from a traditional patchwork quilt?
Traditional patchwork often relies heavily on repeated geometric blocks, while the “Village at Sunset” Patchwork Panel Pattern behaves more like textile illustration. Patchwork, appliqué, color placement, perspective, and quilting are combined to create a recognizable landscape rather than a repeating block arrangement.
Conclusion
Creating Your Own “Village at Sunset” Patchwork Panel Pattern
The “Village at Sunset” Patchwork Panel Pattern demonstrates how ordinary pieces of quilting fabric can become an expressive landscape filled with movement, color, and character. By constructing the design in layers—from the warm sunset sky and circular golden sun to the rolling hills, colorful houses, narrow trees, and detailed foreground—you can reproduce the visual richness of the reference while still creating a project that feels completely personal.
The most important lesson is to work gradually. Build the background first, establish the large landscape shapes, position the houses from distant to foreground, add doors and windows only after the main composition feels balanced, and save the final texture for the quilting stage. Following this order prevents the project from becoming confusing and allows you to evaluate the composition after every major step.
You also learned how fusible appliqué, raw-edge appliqué, patchwork piecing, free-motion quilting, echo quilting, color contrast, fabric layering, and perspective can work together inside a single quilted landscape. These methods can later be adapted to countless other scenes, including countryside panels, coastal villages, mountain landscapes, seasonal wall hangings, and personalized fabric art.
EASILY FIND THE PDF FOR THIS PATTERN HERE!
Most importantly, do not feel obligated to copy every detail exactly. Change the colors, add more houses, create different tree shapes, enlarge the sun, alter the hills, or include fabrics that have special meaning to you. The strongest handmade projects often develop their personality through these small creative decisions. If you decide to make your own “Village at Sunset” Patchwork Panel Pattern, I would love to know your sincere opinion about the project. Which part of the landscape would you enjoy creating most: the sunset, the colorful houses, the rolling hills, or the quilting details? Feel free to share your suggestions and ideas for variations that could make this patchwork village even more beautiful and inspiring.