
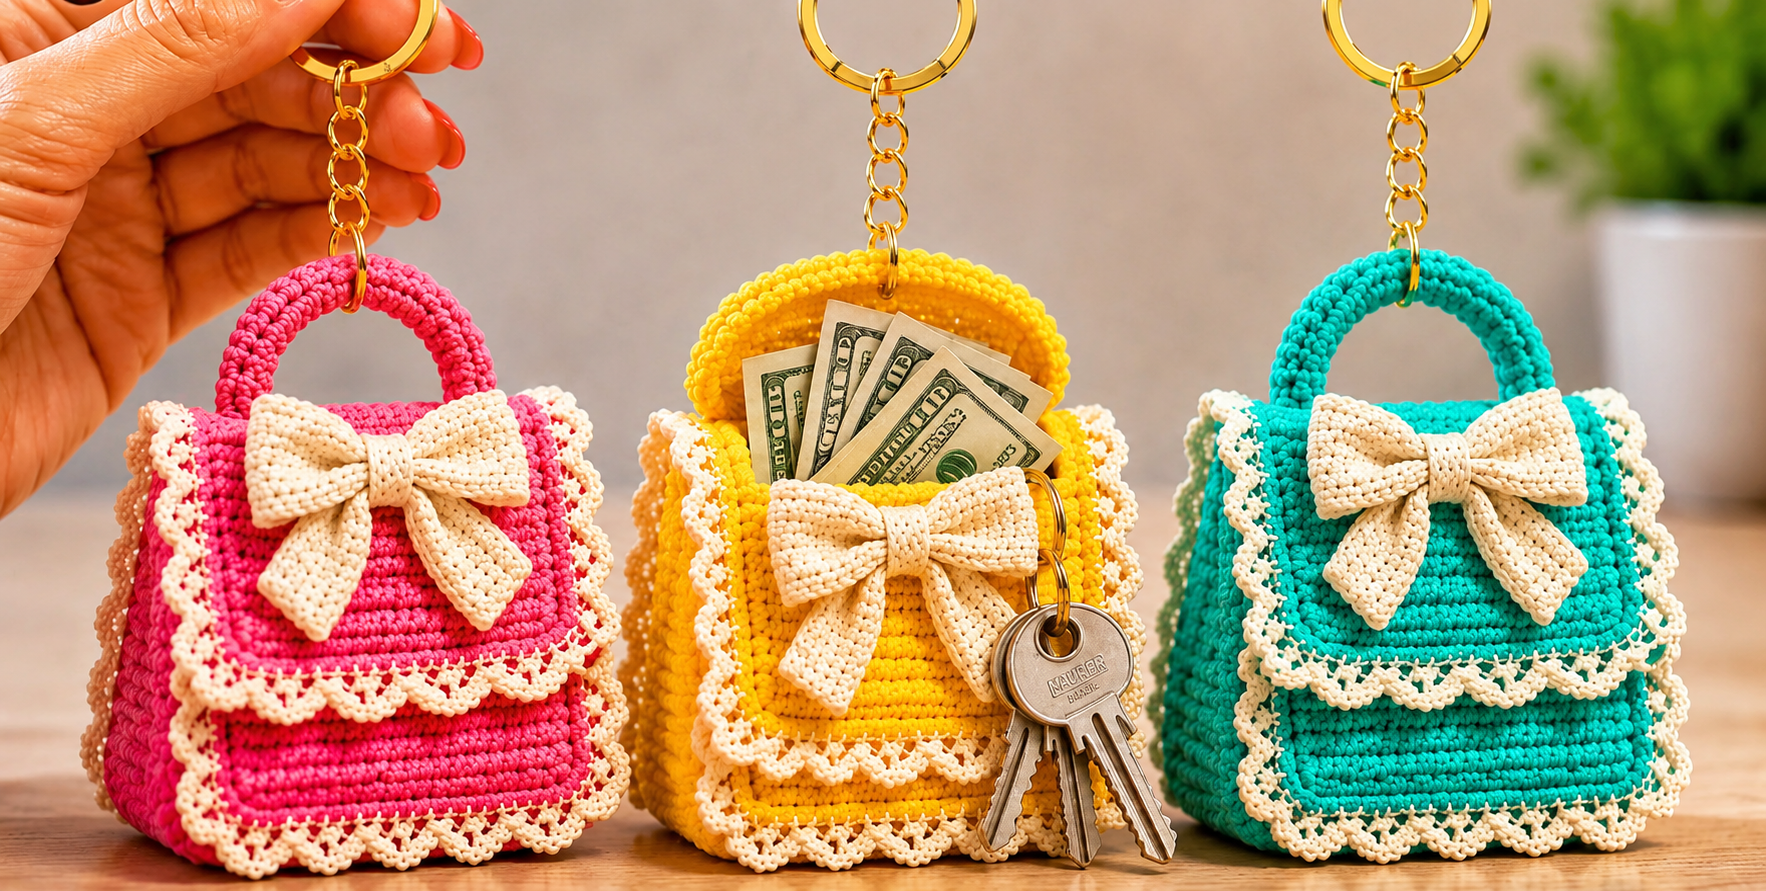
The Mini Crochet Bag Pattern is a charming project for anyone who loves turning simple yarn into a small, practical, and decorative accessory. Inspired by tiny handbag-style crochet pieces, this pattern can be adapted as a keychain pouch, coin holder, gift accessory, miniature purse, or decorative bag. Although the finished piece looks detailed, the construction is based on approachable crochet stitches such as chains, single crochet, slip stitches, increases, and simple decorative edging. By working carefully and keeping an even tension, beginners can create a structured miniature bag that looks polished without needing advanced crochet experience. The project is also an excellent way to practice shaping, counting stitches, joining pieces, and adding finishing details. Because the bag is small, it uses relatively little yarn and can be completed much faster than a full-size handbag.
One of the most appealing features of this Mini Crochet Bag Pattern is the opportunity to customize every detail. You can work the main bag in bright pink, turquoise, yellow, blue, green, cream, or any shade that matches your personal style. A contrasting yarn can be used for the scalloped border, while a neutral shade works beautifully for the crochet bow. The finished design can also be attached to a key ring, lobster clasp, chain, or decorative metal ring. Cotton yarn is especially helpful because it creates defined stitches and holds the shape of a miniature bag well. Beginners should choose a yarn that does not split easily, because this makes it much simpler to see each stitch and maintain consistent rows. As you follow the instructions, remember that careful stitch counting is more important than crocheting quickly.
This guide explains the complete Mini Crochet Bag Pattern from the first foundation chain to the final decorative details. It also introduces the main crochet stitch abbreviations that appear throughout the instructions, so even someone who is still learning crochet terminology can follow the project with confidence. The pattern uses U.S. crochet terminology, while the suggested measurements are provided in centimeters. Because yarn thickness, hook size, and individual tension can slightly change the finished dimensions, the measurements should be considered a practical guide rather than an absolute rule. A finished miniature bag measuring approximately 9 to 11 cm wide and 9 to 12 cm tall works well for a keychain-style accessory. The goal is to create a neat, balanced bag with a firm body, decorative flap, comfortable handle, and beautiful bow.
Materials, Measurements, and Crochet Stitches for the Mini Crochet Bag Pattern
For this Mini Crochet Bag Pattern, prepare approximately 30 to 50 grams of cotton or cotton-blend yarn for the main color and a smaller amount of contrasting yarn for the trim and bow. A medium-fine yarn generally creates a nicely structured miniature purse. You will also need a crochet hook that works comfortably with your chosen yarn, usually between 2.5 mm and 3.5 mm. Other useful supplies include scissors, a yarn needle, stitch markers, a small key ring or metal clasp, and optional decorative hardware. If you want a particularly firm miniature bag, choose a hook slightly smaller than the size normally recommended for the yarn.
DISCOVER MORE FREE PATTERNS HERE!
The main abbreviation used in the pattern is ch, meaning chain stitch. To create a chain, make a slip knot on your hook, yarn over, and pull the yarn through the loop already on the hook. Each repetition creates another chain. The foundation chain determines the width of your crochet piece, so avoid making it too tight. For a bag approximately 9 to 10 cm wide, begin with enough chains to measure about 8 cm before adding the side structure. Depending on your yarn, this may be approximately 18 to 24 chains.
Another important abbreviation is sc, meaning single crochet. Insert the hook into the indicated stitch, yarn over, pull up a loop, yarn over again, and pull through both loops on the hook. Single crochet produces a dense fabric that works particularly well for small bags because it creates stability and reduces large gaps between stitches. Most of the body of this Mini Crochet Bag Pattern can be worked in single crochet. Try to keep every stitch approximately the same height so that the sides remain straight and the finished bag looks symmetrical.
You will also use sl st, which means slip stitch. Insert the hook into the indicated stitch, yarn over, and pull the yarn directly through both the stitch and the loop on the hook. Slip stitches are commonly used for joining rounds, moving the working yarn to another position, and creating neat finishing edges. They can also help attach small decorative crochet pieces. Because slip stitches are shorter than single crochet stitches, avoid pulling them too tightly or the edge may become puckered.
The abbreviation inc refers to an increase. In this project, an increase usually means working two single crochet stitches into the same stitch. Increases are helpful when crocheting around a foundation chain because they allow the work to curve naturally around the ends. They can also be used when shaping the flap or decorative trim. If the pattern needs a decrease, commonly written as dec or sc2tog, two stitches are combined into one. However, the basic miniature bag can often be completed without complicated decreases.
For the decorative edging, you may use combinations of sc, ch, sl st, and occasionally dc, meaning double crochet. To make a double crochet, yarn over before inserting the hook, pull up a loop, yarn over and pull through two loops, then yarn over again and pull through the remaining two loops. Double crochet creates a taller stitch than single crochet and is helpful for making tiny scallops or lace-inspired borders. These basic techniques give the bag its handmade texture while keeping the pattern accessible to beginners.
Crocheting the Base and Body of the Mini Bag Step by Step
Begin the Mini Crochet Bag Pattern by making a foundation chain approximately 8 cm long. A useful starting point is ch 20, although the exact number can be adjusted according to yarn thickness. Make one additional chain for turning. Starting in the second chain from the hook, work 1 sc in each chain across. At the last chain, work 3 sc into the same stitch. These extra stitches create the curve needed to continue around the opposite side of the foundation chain.
Instead of turning your work, rotate the foundation chain and crochet along the unused loops on the opposite side. Work 1 sc in each stitch until you reach the beginning. Work additional stitches at the final end if needed to keep the shape smooth, then join with 1 sl st. You should now have a narrow oval foundation. This becomes the bottom of the miniature bag. Measure the base before continuing; approximately 8 to 9 cm long and 2 to 3 cm wide is a practical size for this project.
For the next round, work 1 ch, then crochet 1 sc in each stitch around, working through both loops normally. Do not add increases unless the base begins pulling inward. Join with sl st at the end of the round. This begins raising the walls vertically. If you want the base to look more sharply defined, you can work the first body round through the back loops only. This creates a visible ridge around the bottom and gives the bag a structured appearance.
Continue working rounds of single crochet until the body measures approximately 6 to 7 cm from the base. Count your stitches after every few rounds. Accidentally adding stitches near the joining point can make the bag flare outward, while missing stitches can cause the opening to become too narrow. A stitch marker placed in the first stitch of each round makes counting much easier. For a smooth appearance, move the marker upward as each new round begins.
Once the body reaches the desired height, fasten off the main yarn if you plan to make the flap separately. To fasten off, cut the yarn leaving a tail of approximately 10 to 15 cm. Pull the tail completely through the final loop and tighten gently. Thread the tail through a yarn needle and weave it through several stitches on the inside. Change direction once or twice while weaving the end to help prevent it from working loose.
If you prefer a slightly more structured bag, you can crochet two flat rectangular panels instead of working continuously in rounds. Crochet each panel to approximately 9 cm wide by 8 cm tall, place the panels with the right sides facing outward, and join the sides and bottom with single crochet. This method creates visible seams that can become part of the decorative design. Either construction method works well for the Mini Crochet Bag Pattern, so choose the technique that feels most comfortable for your skill level.
Creating the Flap, Handle, Bow, and Decorative Crochet Border
The flap is one of the most recognizable details of this Mini Crochet Bag Pattern. To make it, attach yarn to approximately half of the stitches along the back edge of the bag opening. Work 1 ch, then 1 sc in each selected stitch. Turn the work, chain 1, and crochet another row of single crochet. Continue until the flap measures approximately 4 to 5 cm. The flap should cover most of the front without extending all the way to the bottom.
To soften the lower corners of the flap, work a simple decrease near both ends of the final two or three rows. For example, begin with sc2tog, work single crochet across, then finish with another sc2tog. Repeat if additional shaping is desired. This creates a gently rounded or tapered flap instead of a perfectly square shape. Finish the main flap with a final row of single crochet before adding the contrasting border.
For the decorative scalloped edging, join cream or contrasting yarn to one corner of the flap. Work 1 sc, skip approximately one stitch if necessary, then work a small shell such as 5 dc in the next stitch, skip one stitch, and work 1 sc in the following stitch. Repeat this sequence around the flap edge. Depending on your stitch count, you may need to adjust the spacing slightly so that the shells lie flat. Decorative edging can also be added around the sides and bottom of the entire miniature bag.
To crochet the handle, make a chain approximately 12 to 15 cm long. Starting in the second chain from the hook, work single crochet across. Turn, ch 1, and work another row of single crochet. Two or three rows usually provide enough thickness for a miniature handle. Fasten off, leaving long yarn tails. Shape the strip into an arch and sew each end securely to the upper edge of the bag. Reinforce the attachment with several stitches because this section may support the key ring.
The decorative bow can be made from a small crochet rectangle. Begin with approximately ch 13 to ch 17, depending on the desired size. Work sc across, turn, and repeat for approximately 6 to 8 rows. Fasten off and weave in the ends. Pinch the rectangle in the center, then wrap a separate strand of yarn tightly around the middle several times. Secure the yarn at the back. Crochet two small narrow strips for the bow tails and sew them behind the center section. The finished bow can measure approximately 6 to 8 cm across.
Finally, position the bow in the center of the flap and sew it securely using matching yarn. Attach the metal key ring or chain to the top center of the handle. If desired, add a magnetic snap, button, crochet loop, or small zipper to help keep the bag closed. Check the entire Mini Crochet Bag Pattern for loose yarn ends and uneven stitches. Gently reshape the bag with your fingers. For cotton yarn, light blocking can help straighten the flap and decorative edging, but avoid excessive heat or moisture when metal hardware is attached.
Mini Crochet Bag Pattern FAQ, Finishing Tips, and Common Questions
Is the Mini Crochet Bag Pattern suitable for beginners? Yes. The design is beginner-friendly because most of the construction uses chain stitches, single crochet, slip stitches, and simple increases. The decorative scalloped border introduces double crochet, but it can be replaced with a basic single crochet border if you prefer an easier version. Beginners should focus on maintaining consistent tension and counting stitches carefully rather than trying to crochet quickly.
What yarn is best for a mini crochet bag? Cotton yarn is one of the best choices because it creates clearly defined stitches and a firm fabric. A cotton blend can also work well. Very soft or fuzzy yarn may make small details harder to see, while extremely thick yarn can make the bag larger than expected. For a neat mini crochet keychain bag, choose smooth yarn that works comfortably with a 2.5 mm to 3.5 mm crochet hook.
How big should the finished crochet bag be? A useful finished size is approximately 9 to 11 cm wide and 9 to 12 cm tall, excluding the key ring. However, there is no single mandatory size. The Mini Crochet Bag Pattern can easily be enlarged or reduced by changing the number of foundation chains, the number of rows, or the yarn thickness. Always measure your work during construction rather than relying only on stitch counts.
How can I make the miniature crochet bag hold its shape? Use tightly worked single crochet and select a hook that creates a dense fabric. Cotton yarn generally provides more structure than very soft acrylic yarn. You can also insert a small piece of flexible craft stabilizer between a crochet lining and a fabric lining, although this is optional. Avoid overstuffing the bag, because miniature crochet pieces can stretch if too much weight is placed inside.
Can I add a lining to this Mini Crochet Bag Pattern? Yes. A lightweight cotton fabric lining can make the interior look more finished and help protect the crochet fabric. Cut two fabric pieces slightly smaller than the interior dimensions, allowing approximately 0.5 to 1 cm for seams. Sew the fabric pieces together along the sides and bottom, fold the upper raw edge inward, and hand-sew the lining inside the crochet bag using small stitches.
What can I use the finished mini crochet bag for? These miniature bags work beautifully as crochet keychains, small coin pouches, bag charms, gift decorations, tiny storage cases, party favors, or handmade accessories. Depending on the final dimensions, they can hold coins, folded notes, small jewelry pieces, lip balm, or other lightweight items. When using the bag as a keychain, make sure the handle and metal ring are attached securely.
Conclusion
Completing this Mini Crochet Bag Pattern is a wonderful way to practice essential crochet techniques while producing a project that looks detailed and decorative. The process begins with a simple foundation chain, followed by a sturdy single crochet base, structured body rounds, and a separately shaped or integrated flap. From there, the design becomes more personalized through the addition of a scalloped crochet border, miniature handle, contrasting bow, and optional metal keychain hardware.
Throughout the project, you learned how ch, sc, sl st, dc, inc, and sc2tog can work together to create a complete three-dimensional crochet accessory. These are fundamental crochet techniques that can later be applied to larger bags, pouches, baskets, decorative accessories, and many other handmade projects. Understanding what each stitch does is more valuable than simply memorizing a sequence because it helps you adjust the pattern confidently when using different yarns or hook sizes.
Remember that small variations in size are completely normal in handmade crochet. Your personal tension, chosen yarn, hook size, border style, and number of rows will all influence the finished result. Measure as you work, keep your stitch count consistent, and adjust the proportions whenever necessary. A well-balanced miniature bag is more important than matching an exact number of stitches.
You can also use this Mini Crochet Bag Pattern as the foundation for many creative variations. Try a pink body with cream trim for a romantic look, turquoise with white edging for a fresh style, or yellow with ivory details for a cheerful finish. Small flowers, buttons, beads, appliqués, initials, or different bow styles can make every bag unique without changing the basic construction.
Most importantly, enjoy the process of creating something by hand. Crochet projects do not need to be perfectly identical to be beautiful. Small differences in stitch tension and shaping are part of what gives handmade work its personality. With practice, your stitches will become more consistent, your finishing will become cleaner, and you will find it easier to customize future versions of this Mini Crochet Bag Pattern. If you make this project, leave your sincere opinion about the pattern and share your suggestions. Which color combination would you choose for your miniature crochet bag? Your ideas and experiences can inspire new variations, improvements, and creative ways to use this lovely crochet mini bag pattern.