
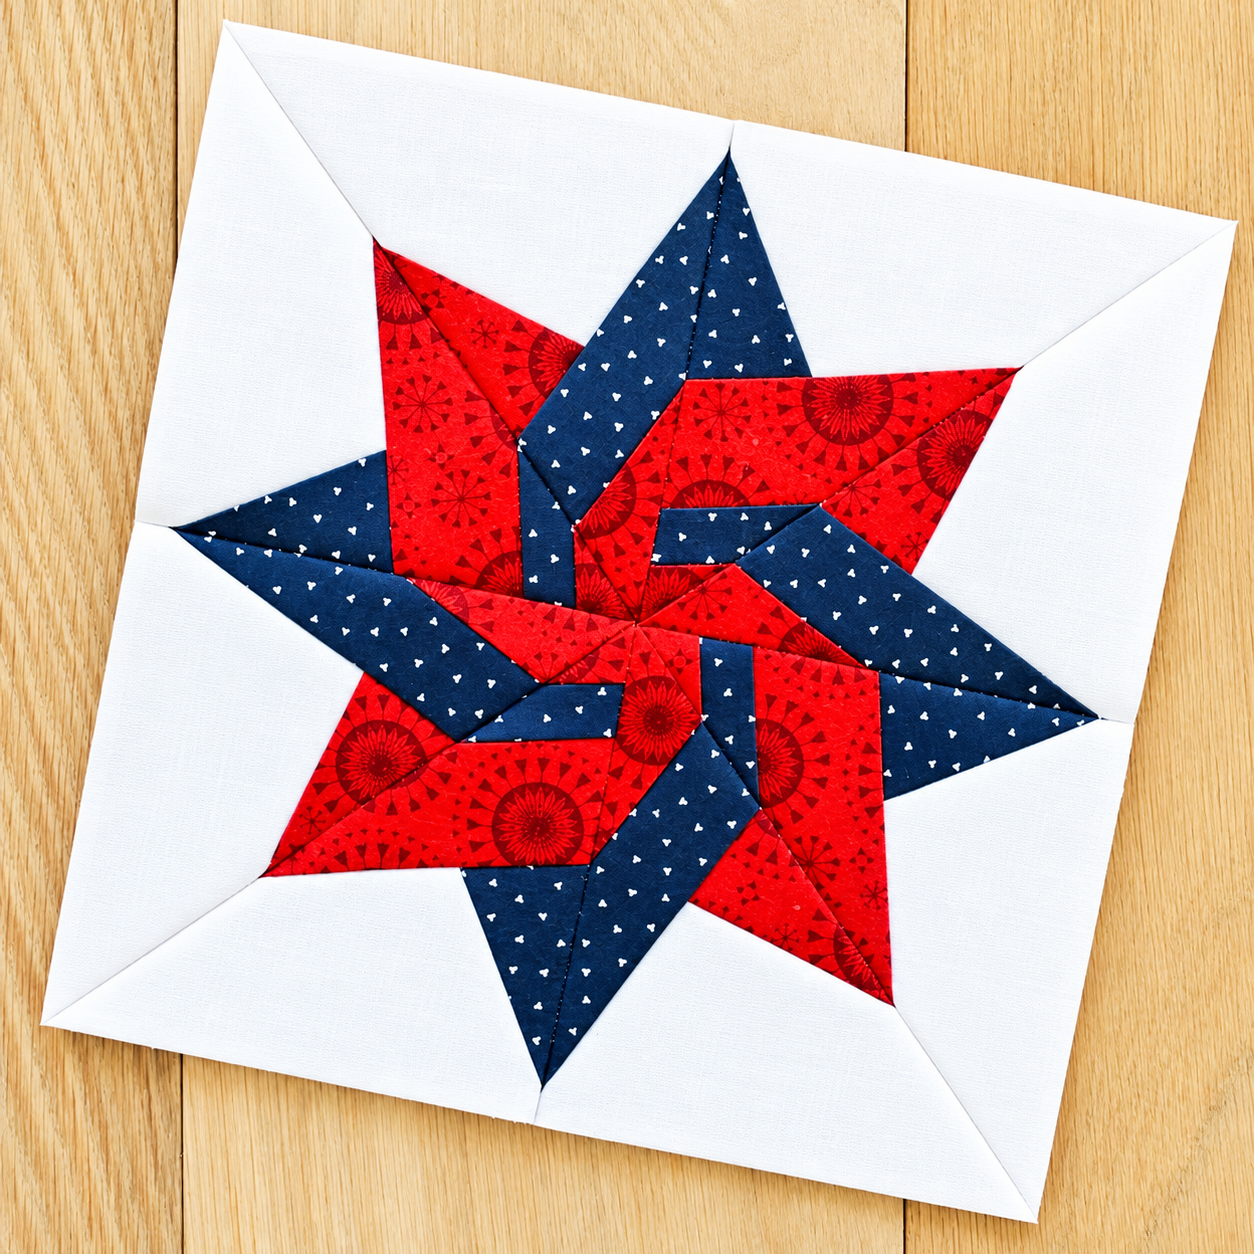
The “Twisted Star” Quilt Block Pattern is a striking quilting design that combines sharp star points, rotating geometric sections, and carefully selected fabrics to create the impression that the entire block is spinning around its center. The project shown in the reference image uses a bold combination of red printed fabric, navy blue fabric, and a clean white background, producing strong contrast and making every point of the star easy to see. Although the finished block appears complex, it can be approached as a series of manageable units that are pieced, pressed, trimmed, and finally joined together. The key to succeeding with this pattern is not speed, but accuracy. Consistent cutting, an even seam allowance, careful pressing, and frequent alignment checks will help the twisted star develop naturally as the sections come together. This is a wonderful project for quilters who already understand basic patchwork construction and want to practice more precise geometric piecing while creating a block with dramatic visual movement.
One of the most interesting characteristics of the “Twisted Star” Quilt Block Pattern is the illusion created by alternating colors and directional shapes. Instead of looking like a flat traditional star, the colored strips seem to overlap, rotate, and weave through one another. In the photographed example, the red sections provide warmth and visual energy, while the navy sections create depth and help define the twisting direction. The white fabric surrounding the star acts as negative space, allowing the complicated center to remain the main focal point. Fabric choice therefore plays an important role in this design. Quilters can reproduce the red, blue, and white combination or develop their own palette using contrasting solids, small-scale prints, batiks, or coordinated scraps. What matters most is maintaining enough contrast between the fabrics so the twisted construction remains visible after the block is assembled.
Before beginning the “Twisted Star” Quilt Block Pattern, prepare a comfortable cutting and sewing area and gather quilting cotton, a rotary cutter, cutting mat, acrylic ruler, quilting pins or clips, coordinating thread, an iron, and a sewing machine capable of producing a consistent straight stitch. A standard ¼-inch quilting seam allowance, approximately 0.64 cm, is commonly used for patchwork construction. Because this block contains several angled seams and pointed units, test your seam allowance on scrap fabric before sewing the actual pieces. Press the fabrics before cutting so every measurement is taken from a smooth surface. It is also useful to label pieces as you cut them, particularly when working with similar triangles or strips. Staying organized from the beginning reduces confusion later and helps preserve the rotational direction that makes this twisted star design so distinctive.
Choosing Fabrics and Preparing the Pieces
Begin by selecting three fabrics with noticeably different values. For a result inspired by the photograph, use a bright red quilting cotton, a dark navy blue print, and white background fabric. The red and blue fabrics should contrast with one another, while the white should be light enough to frame the star clearly. Small prints work especially well because they add texture without hiding the geometric structure.
DISCOVER MORE FREE PATTERNS HERE!
Prewash the fabric only if that is part of your normal quilting routine. More importantly, make sure all pieces are treated consistently. Press each fabric flat using an iron and avoid stretching it while ironing. Straight, wrinkle-free material is easier to measure, and accurate measurements are especially important when making a geometric Twisted Star quilt block.
For a practice block, consider starting with a finished block approximately 30 to 35 cm square. The exact dimensions can be adapted, but a slightly larger block is easier to handle when learning the construction. You will need several elongated red and blue units for the rotating star, smaller central pieces, and larger white triangles or background sections to complete the square.
Rather than cutting every angled piece independently, many quilters find it easier to construct sections from fabric strips and then trim them into the required triangular or diamond-like shapes. For example, strips approximately 4 to 5 cm wide provide enough room for piecing and later trimming in a medium-sized practice block. Always add seam allowance when calculating unfinished dimensions.
As you prepare the pieces, organize them into groups representing each portion of the star. Lay the pieces on a table or design board before sewing. The blue pieces should appear to travel through the red sections in a repeating direction. If one unit is accidentally reversed, the twisting effect may be interrupted, so this dry layout is an important part of the process.
The large white background pieces can be prepared after the center units have been assembled, particularly if you want to trim the finished star before adding the outer sections. Keeping the background slightly oversized at first can provide useful flexibility. Once the center is accurate and square, the white sections can be trimmed to create a clean, balanced outer edge.
Sewing the Rotating Star Sections
Start with one repeated star unit rather than attempting to sew the entire block at once. Place a red section and a blue section with right sides together, aligning their edges carefully. Sew with an accurate ¼-inch seam allowance. After stitching, open the unit and press the seam gently to one side or open, depending on your preferred quilting method.
Continue adding the next contrasting piece to the same unit. The goal is to build a narrow angular section in which red and blue fabrics appear to change direction. Because many edges may be cut on or near the bias, handle them carefully. Pulling or aggressively ironing these pieces can distort the angles and cause alignment problems later.
Make several matching units using the same sequence. The “Twisted Star” Quilt Block Pattern relies heavily on repetition, so each section should be constructed in the same order. After completing one successful unit, keep it beside the sewing machine as a visual reference while assembling the remaining pieces.
Trim each completed section before joining it to another. Place an acrylic ruler over the unit and confirm that important diagonal lines and seam intersections are located where expected. Trimming small irregularities now will make the final star easier to assemble. However, avoid cutting away too much fabric simply to force a unit into shape.
Arrange the completed star sections around a central point. Rotate each unit rather than flipping it. This is where the characteristic twisted star effect becomes visible. The red areas should seem to spiral in one direction while the blue areas travel through or around them. Spend time adjusting the arrangement before sewing because orientation is essential to the final appearance.
Join neighboring units in pairs, carefully matching the most visible intersections. Pinning directly through corresponding seam points can improve accuracy. Sew slowly as you approach bulky intersections, and avoid pulling the fabric from behind the presser foot. Once pairs are completed, combine them gradually until the center of the star is fully assembled.
Completing the White Background and Squaring the Block
After the central star is assembled, press it carefully on a flat ironing surface. Use an up-and-down pressing motion instead of sliding the iron aggressively across the fabric. Your goal is to flatten the seams without stretching the block. A well-pressed center makes the addition of the white background fabric much easier.
Lay the star flat and examine every outer point. In the photographed project, the white pieces create a large, clean frame around the colored star. Depending on your construction method, these sections may be made from triangles, angled quadrilaterals, or larger background units that are trimmed after sewing. Keep the outer pieces slightly generous if necessary.
Attach one white section at a time, sewing from the center area toward the outer edge. Before stitching, confirm that the colored star point will not disappear into the seam allowance. The visible tip does not need to touch the raw edge because a small seam allowance must remain beyond it. This helps preserve the point when the next section is attached.
Continue working around the block in a consistent order. After each white piece is added, press the seam and return the block to your design surface. This simple habit helps identify distortion early. If the block starts to curve or twist, check the seam allowance and make sure the fabric has not been stretched during pressing.
Once all background pieces are attached, allow the block to cool completely after pressing. Then place it on the cutting mat and measure the height, width, and both diagonals. A properly squared quilt block should have matching side measurements, and the diagonals should also be similar. The central star should appear visually balanced rather than leaning toward one edge.
Trim the outer edges using a large square quilting ruler whenever possible. Preserve a ¼-inch seam allowance beyond the important star points around the perimeter. This extra space is essential if the block will later be joined to other blocks, sashing, or borders. After trimming, the “Twisted Star” Quilt Block Pattern is ready to become part of a larger quilt project.
Finishing, Quilting, and Customizing the Twisted Star
A single Twisted Star block can be used for much more than a bed quilt. It can become the center of a wall hanging, decorative cushion, table topper, tote bag panel, or framed textile piece. Because the block contains so much visual movement, even one star can create a complete-looking project with only a simple border around it.
If you plan to make a full quilt, sew several blocks using identical fabrics for a traditional coordinated look. Another option is to keep the white background constant while changing the two star colors from block to block. This creates a scrap quilt effect while maintaining a consistent overall structure.
After completing the quilt top, prepare the typical three-layer quilt sandwich consisting of the patchwork top, batting, and backing fabric. Smooth each layer carefully before basting. Straight-line quilting is an accessible finishing choice because it complements the strong geometry of the star and can emphasize the directional movement already present in the piecing.
For a more decorative finish, quilt around individual red and blue sections, following the angular seams. Echo quilting inside the white background can make the central star appear slightly raised. Keep quilting density relatively balanced across the entire block so one area does not become significantly flatter than another.
Binding can repeat one of the star colors. A navy binding creates a strong outer frame, while red adds extra warmth. White or neutral binding produces a lighter finish. When choosing the final border or binding fabric, place a small sample beside the completed block so you can evaluate how it interacts with the existing colors.
Most importantly, remember that handmade quilting does not require every intersection to be mathematically perfect. Precision improves the result, but the personality of the finished piece comes from the fabrics, the quilting choices, and the maker’s individual touch. With careful construction and patient pressing, the “Twisted Star” Quilt Block Pattern becomes both an enjoyable technical exercise and a beautiful patchwork project.
FAQ – Frequently Asked Questions About the “Twisted Star” Quilt Block Pattern
Is the “Twisted Star” Quilt Block Pattern suitable for beginners?
It is most comfortable for a confident beginner or intermediate quilter because it involves angled seams, multiple intersections, and careful orientation. However, a motivated beginner who already understands rotary cutting, straight stitching, pressing, and the ¼-inch seam allowance can certainly practice the design. Making a larger sample block first can make the process easier.
What fabrics work best for a Twisted Star quilt block?
Standard 100% quilting cotton is an excellent choice because it is stable, easy to cut, and responds well to pressing. Solids, small-scale prints, batiks, and tone-on-tone fabrics can all work beautifully. Avoid using several extremely busy prints together because the twisted geometry may become difficult to see.
Why is color contrast so important in this block?
The design depends on visual separation between the rotating sections. In the reference project, red, navy, and white have clearly different values. This contrast allows the viewer to immediately recognize both the star and its twisting movement. If all fabrics have a similar value, the shape can appear flatter and less defined.
How can I keep the center of the star from becoming bulky?
Avoid stitching repeatedly across the same intersection when possible and press seams carefully as construction progresses. Some quilters prefer pressing center seams open because this distributes the fabric more evenly. Others alternate seam directions so adjoining seams nest together. Both approaches can work when the block is handled carefully.
How do I avoid cutting off the star points?
Make sure there is approximately a ¼-inch seam allowance extending beyond every point that will eventually be enclosed in another seam. When joining units, do not sew directly through the visible tip of the star. Leaving the correct amount of fabric beyond the point helps it remain sharp after the seam is opened.
What should I do if my block is not perfectly square?
First press it thoroughly and allow it to cool on a flat surface. Then measure the block in several directions. Minor differences can often be corrected during final trimming. If the distortion is significant, check whether one or more seams were sewn with an inconsistent allowance or whether a bias edge was stretched.
Can I make this pattern using scraps?
Yes. A scrappy Twisted Star quilt can be especially attractive. Try keeping one background color consistent while using related scraps for the rotating sections. For example, several shades of red could replace the single red fabric, while multiple dark blues could form the contrasting sections.
Can the Twisted Star block be enlarged?
Yes. The block can be scaled up by increasing the dimensions of every component proportionally. Larger versions are often easier to sew because individual sections provide more room for alignment. Remember that seam allowances normally remain the same even when the overall block size changes.
What is the best way to press the seams?
Use a hot iron appropriate for cotton and press rather than scrub the surface. Some seams can be pressed toward the darker fabric, while complicated intersections may benefit from being pressed open. The best option is the one that keeps the block flat and prevents excessive bulk.
How can I make several Twisted Star blocks look consistent?
Cut all pieces for multiple blocks at the same time, maintain the same seam allowance, and use the first finished section as a guide for every subsequent unit. Measuring and trimming each repeated component before final assembly also improves consistency across an entire quilt.
What can I make with just one Twisted Star quilt block?
One finished block can become a pillow cover, mini quilt, table mat, wall hanging, tote bag panel, or decorative centerpiece. Adding a simple border around the block is often enough to turn it into a standalone project.
Does the block have to use red, blue, and white fabrics?
No. Those colors simply reproduce the visual character of the photographed example. You could use turquoise and coral, green and gold, purple and pink, black and white, seasonal colors, or even a coordinated collection of fabric scraps. Strong contrast is more important than any particular color combination.
Conclusion
The “Twisted Star” Quilt Block Pattern is an eye-catching patchwork design that transforms straightforward sewing techniques into a block filled with motion and personality. Throughout this tutorial, you learned how to choose contrasting fabrics, prepare and organize the pieces, construct repeating angular units, arrange the sections to create the rotating illusion, join the star accurately, add the white background, press the seams correctly, square the finished block, and prepare it for quilting or another creative sewing project.
The most important lessons are accurate cutting, a consistent ¼-inch seam allowance, careful pressing, correct orientation of the star sections, and patience when matching important points. Once those fundamentals are under control, the design becomes much easier to understand. You can also customize the project with different colors, prints, quilting styles, borders, and block sizes while preserving the distinctive movement of the original Twisted Star quilt block.
EASILY FIND THE FREE PDF FOR THIS PATTERN HERE!
Whether you use your finished block in a full quilt, cushion, wall hanging, table decoration, or another handmade project, the “Twisted Star” Quilt Block Pattern offers plenty of opportunities to experiment with color and improve precision piecing skills. Try making your first block slowly, evaluate each step before moving forward, and then use what you learned to create additional stars with greater confidence. If you make your own version, leave your sincere opinion about the pattern and share your suggestions. Which colors would you choose for your Twisted Star quilt, and what would you make with the finished block?