
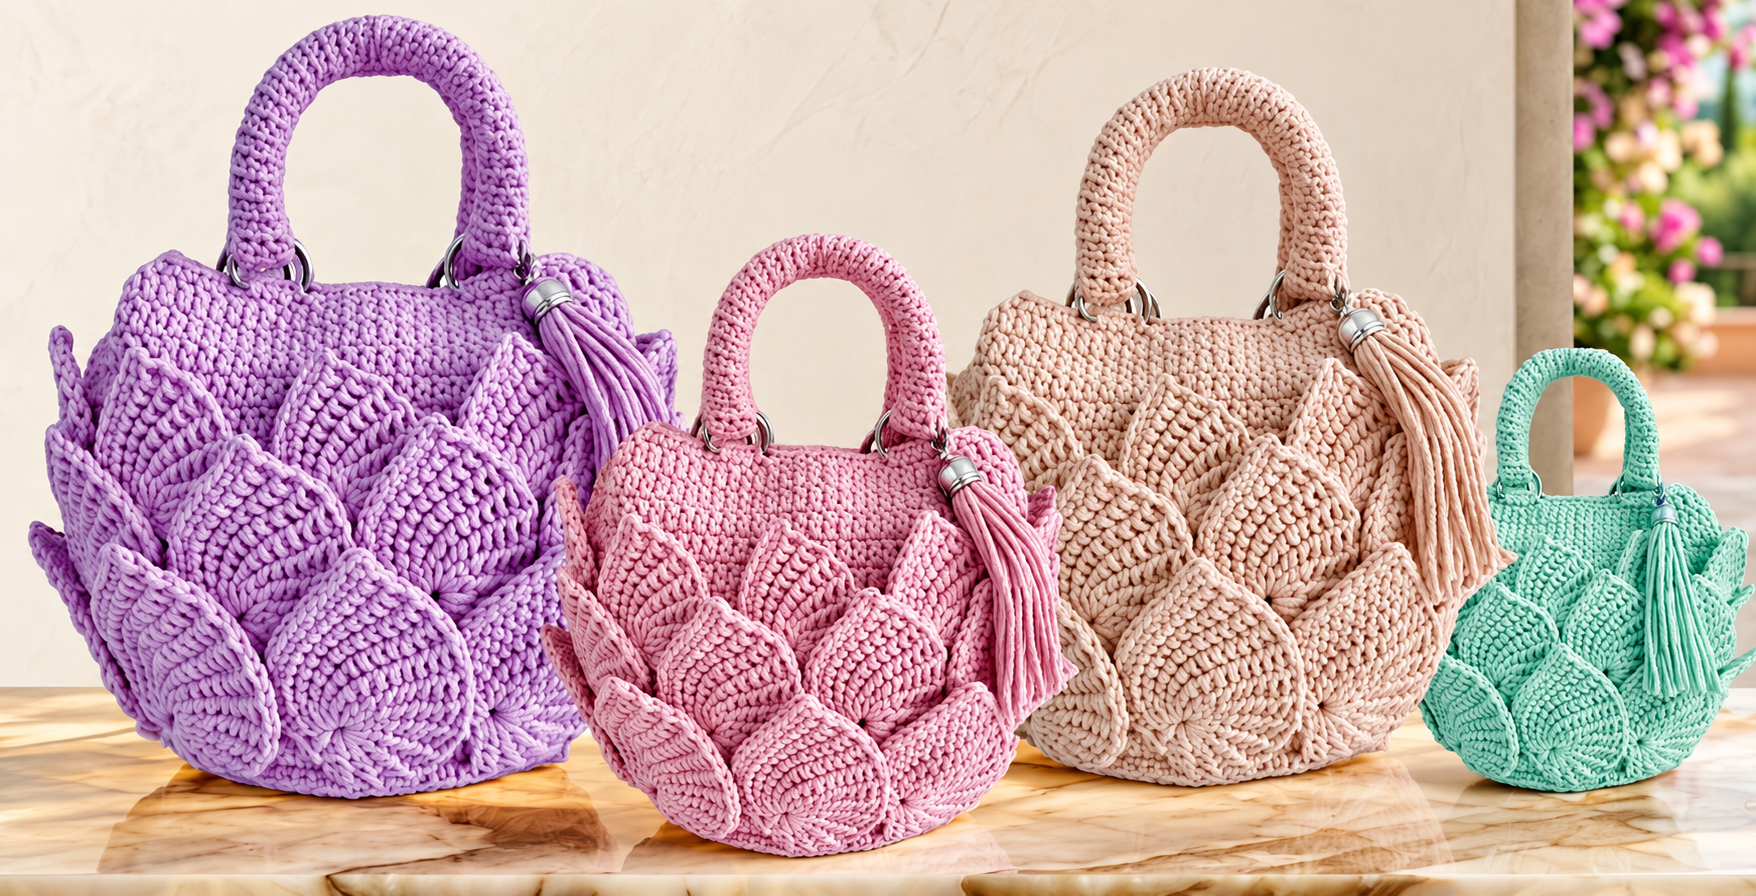
The Crochet leaf bag Pattern is a beautiful way to combine practical crochet skills with a three-dimensional botanical design that instantly makes a handmade bag stand out. Instead of relying only on a flat crochet fabric, this project uses individually formed crochet leaves, textured stitches, and carefully planned placement to create a bag inspired by layered petals and foliage. The finished piece can be made as a small handbag, a medium everyday purse, or a larger statement tote simply by adjusting the base measurements. Although the design looks detailed, it can be completed by crocheters who understand basic stitches such as chain, single crochet, half double crochet, double crochet, and slip stitch. The key is working slowly, keeping the stitch tension consistent, and assembling the leaves in balanced rows.
One of the most attractive features of a Crochet leaf bag Pattern is the opportunity to personalize practically every detail. You can make the entire bag in one elegant color or combine several coordinating shades to create a more playful result. Cotton yarn gives the bag excellent stitch definition, while a cotton-blend or sturdy synthetic yarn can offer additional structure and durability. The layered crochet leaf motif is also a wonderful way to practice shaping because increases and decreases naturally create the pointed leaf silhouette. Once you understand how the leaves are constructed, the same technique can be used for cushions, baskets, appliqués, wall decorations, and many other crochet projects.
This tutorial explains how to make the bag from the beginning, including the base, body, decorative leaves, handles, and finishing details. The measurements are flexible because yarn thickness and individual crochet tension can change the final size. For a medium handbag, a finished width of approximately 30 to 34 cm, a height of 25 to 28 cm, and a base depth of around 8 to 10 cm works well. Before starting, crochet a small gauge sample and measure it so you can adjust the number of foundation chains if necessary. Understanding your gauge before working the full Crochet leaf bag Pattern helps prevent a bag that is unexpectedly too small, too wide, or too soft.
Materials, Crochet Stitches, and Preparation for the Crochet leaf bag Pattern
For this Crochet leaf bag Pattern, choose a medium or bulky yarn that holds its shape without becoming excessively stiff. Approximately 500 to 750 grams of yarn may be needed for a medium bag, depending on the yarn weight, the number of decorative leaves, and the size of the handles. A thicker yarn will produce larger stitches and a more sculptural appearance, while medium yarn allows more detailed leaves. Cotton cord, recycled cotton yarn, ribbon yarn, and firm acrylic blends can all work well. Always check the yarn label before choosing your crochet hook.
DISCOVER MORE FREE PATTERNS HERE!
The main crochet hook should match the yarn, but using a slightly smaller hook than normally recommended can help create a firm fabric. For example, if the yarn recommends a 6 mm hook, you might test a 5 mm or 5.5 mm hook. The goal is to create stitches with enough density that the bag does not stretch too much when filled. You will also need scissors, a yarn needle, stitch markers, optional metal rings, and material for a lining if you want additional strength.
Several common crochet stitches are used throughout the project. A chain stitch (ch) creates the foundation and starting loops. A single crochet (sc) is a short, compact stitch that is excellent for strengthening the base and handles. A half double crochet (hdc) is slightly taller and creates a flexible but dense fabric. A double crochet (dc) adds height quickly and may be used when shaping larger leaves. A slip stitch (sl st) joins rounds or allows you to move across stitches without adding significant height.
Before beginning the complete bag, make a test leaf. This small sample helps you understand the shaping technique and shows how your chosen yarn behaves. If the leaf curls excessively, the tension may be too tight or the increase rate may be too high. If the leaf looks loose and floppy, try a smaller crochet hook. The decorative elements should remain flexible enough to overlap naturally but structured enough to maintain their pointed leaf shape.
Color selection can completely change the personality of the project. A monochromatic Crochet leaf bag Pattern in lavender, dusty rose, beige, cream, or mint creates a soft and sophisticated appearance. For a more vibrant version, use contrasting leaf colors over a neutral bag body. Another attractive option is using one primary color in several shades, placing darker leaves toward the bottom and lighter leaves near the top for a gentle gradient effect.
It is also helpful to plan the number of leaves before assembling the bag. Depending on their size, approximately 20 to 40 crochet leaves may be required to cover the front, back, and sides. You do not need to crochet all of them before starting the bag body, but preparing several leaves in advance can make it easier to visualize the final arrangement. Place them on a flat surface and experiment with overlapping rows until you find a layout that looks balanced.
How to Crochet the Base and Main Body of the Bag
Begin the Crochet leaf bag Pattern by creating an oval or rectangular base. For a medium handbag, chain approximately 25 to 30 stitches, depending on your gauge. Work one single crochet into the second chain from the hook and continue across. At the final chain, work several single crochets into the same stitch so you can turn around the opposite side of the foundation chain. Crochet back along the remaining loops, forming an oval. Join with a slip stitch or work continuously in spirals.
Continue increasing at both curved ends until the base reaches approximately 28 to 32 cm long and 8 to 10 cm wide. If you prefer a completely round bag, begin with a magic ring and increase evenly around each round. For a structured handbag similar to a bucket shape, however, an oval base generally provides more usable interior space. Place stitch markers at both ends of the oval so you can easily identify the increase points.
Once the base reaches the desired size, stop increasing. Work one full round of single crochet through the back loops only. This creates a subtle ridge that separates the bottom from the sides and encourages the fabric to turn upward. Continue working evenly around the bag using single crochet or half double crochet. Keep checking your stitch count because accidental increases may cause the bag to flare outward.
Work the main body until it reaches approximately 20 to 24 cm in height, or slightly shorter if the decorative leaves will extend above the crocheted body. Keep the main structure simple because much of it will eventually be covered by the leaf motifs. A dense single crochet fabric gives excellent support, while half double crochet makes the project grow faster. If you use half double crochet, consider using a hook half a size smaller to reduce excessive stretching.
As you approach the upper edge, add one or two rounds of tight single crochet stitches. These reinforcing rounds help prevent the opening from losing its shape. If you plan to attach handles using metal rings, mark the attachment positions before finishing the upper border. The two handle connection points should be positioned symmetrically so the finished crochet handbag hangs evenly.
At this stage, try gently filling the bag with folded fabric or towels to evaluate its shape. If the sides collapse more than you like, you can later add a fabric lining or plastic canvas between the crochet and lining. Avoid making the structure excessively rigid because the leaf design looks best when the bag retains a slightly soft handmade character. Once the body is completed, weave in loose ends before attaching the decorative pieces.
Step-by-Step Crochet Leaf Motifs and Assembly
The signature feature of the Crochet leaf bag Pattern is the layered leaf motif. Start by making a chain of approximately 10 to 14 stitches. The exact number determines the leaf length. Beginning in the second chain from the hook, work a slip stitch, then a single crochet, half double crochet, several double crochets, half double crochet, and single crochet as you approach the opposite end. This gradual increase and decrease in stitch height forms one curved side of the leaf.
At the final chain, work approximately 3 single crochet stitches into the same space so you can rotate around the tip. Now work along the opposite side of the foundation chain, reversing the sequence: single crochet, half double crochet, double crochet stitches through the center section, half double crochet, single crochet, and finally a slip stitch. The result should resemble an elongated oval with gently pointed ends.
To create a stronger central vein, you can work a row of surface slip stitches along the original foundation chain. Insert the hook from the front, pull the yarn through, and continue following the center of the leaf. Another option is to leave the foundation chain naturally visible. A defined center line makes each leaf appear more dimensional and gives the finished bag a beautifully textured handcrafted look.
For larger leaves, increase the starting chain to 15 or 16 stitches and add treble crochet stitches in the widest portion. For smaller leaves, reduce the chain to approximately 8 or 9 stitches. Mixing two or three leaf sizes can create a more organic composition. However, if you prefer a highly symmetrical crochet leaf bag, use leaves of identical size and carefully align them in repeated rows.
Begin attaching the leaves at the bottom of the bag. Position the first row so the pointed tips extend slightly below or directly along the lower edge of the body. Stitch only the upper portion of each leaf to the bag using matching yarn and a yarn needle. Leaving the lower portion free creates the layered three-dimensional effect. Place each new leaf slightly over the edge of the previous one so there are no large gaps between motifs.
Add the second row above the first, positioning each leaf between two leaves from the row below. Continue building upward using this staggered arrangement. This technique resembles overlapping flower petals, feathers, or botanical scales and gives the Crochet leaf bag Pattern its distinctive appearance. Periodically place the bag upright to check the distribution from different angles. Adjust the spacing before permanently sewing each motif, especially around the sides where the bag curves.
Handles, Tassels, Finishing Details, and Care
A sturdy handle is essential because the Crochet leaf bag Pattern may become heavier once all the motifs are attached. One simple method is to crochet a long chain to the required handle length, then work several rounds of single crochet around the chain. For a medium handbag, a handle measuring approximately 35 to 45 cm works well for hand or forearm carrying. Longer handles can be made if you want the bag to fit comfortably over the shoulder.
For a thicker rounded handle, crochet a narrow tube using single crochet in continuous rounds and insert cotton cord or soft rope inside. This creates a firm professional-looking handle that coordinates naturally with the bag. Attach each end securely with multiple passes of strong yarn. Metal rings can also be placed between the crocheted handle and the bag body, adding both reinforcement and a decorative accent.
A crochet tassel provides an elegant finishing touch. Cut multiple strands of yarn approximately 25 to 30 cm long, gather them together, fold the bundle in half, and tie securely near the folded section. Wrap another strand several times around the bundle approximately 2 cm below the top, tie firmly, and trim the bottom evenly. Attach the tassel directly to the handle or connect it with a metal ring.
Adding a lining is optional but highly recommended for a frequently used crochet handbag. Cut fabric slightly larger than the internal dimensions of the bag, sew the side and bottom seams, fold the upper edge inward, and hand-stitch the lining along the crochet opening. A lining protects the crochet stitches from objects such as keys, cosmetics, pens, and small accessories. You can also add an internal pocket before inserting the lining.
The bag can be closed using a magnetic snap, zipper, button loop, or drawstring depending on your preferred style. If installing a magnetic closure, attach it to the lining before sewing the lining permanently into the bag. For a handmade crochet closure, create a small chain loop on one side of the opening and sew a large decorative button on the opposite side. Keep closures lightweight so they do not distort the upper edge.
To care for the finished Crochet leaf bag Pattern, follow the washing recommendations provided for your yarn. Hand washing is generally a gentle choice for a highly textured project. Use cool or lukewarm water, mild detergent, and avoid aggressive twisting. Press excess water out carefully with a towel, reshape the leaves while damp, and allow the bag to dry flat or supported in its natural shape. Proper storage will help protect the three-dimensional leaf motifs.
FAQ About the Crochet leaf bag Pattern
Is the Crochet leaf bag Pattern suitable for beginners?
Yes, an adventurous beginner can complete this pattern if they already understand basic crochet stitches such as chain, single crochet, half double crochet, double crochet, and slip stitch. The bag is constructed in manageable stages, so you can practice the leaves separately before assembling the complete project.
What yarn is best for a crochet leaf bag?
A firm cotton yarn, cotton cord, ribbon yarn, recycled cotton, or durable cotton blend works particularly well. These yarns usually provide enough structure to highlight the leaf texture. Very soft yarn can be used, but the finished bag may require a lining or internal reinforcement.
How many crochet leaves do I need for one bag?
The number varies according to the bag size and the leaf dimensions. A medium bag may require approximately 20 to 40 leaves. Larger motifs require fewer pieces, while smaller motifs create a denser layered surface and require more.
Can I make the Crochet leaf bag Pattern without a lining?
Yes. A lining is not mandatory, especially if the bag body is crocheted tightly with sturdy yarn. However, a fabric lining can reduce stretching, protect the stitches, and keep small objects from slipping through the crochet fabric.
How can I make the bag more structured?
Use a slightly smaller crochet hook, select firm yarn, crochet the base tightly, and reinforce the top edge. You can also add plastic canvas, felt, interfacing, or a strong fabric lining inside the bag. Reinforced handles are helpful when the bag will carry heavier items.
Can I change the size of the crochet leaves?
Absolutely. Increase or decrease the length of the starting chain. You can also change the tallest stitch used in the center of the leaf. Longer chains and taller stitches make larger leaves, while shorter chains create compact motifs.
Why are my crochet leaves curling?
A small amount of natural curvature can actually add dimension. Excessive curling usually indicates that the tension is too tight or too many stitches have been placed along the foundation chain. Try using a slightly larger crochet hook or adjusting the number of stitches.
Can several colors be used in the same bag?
Yes. The Crochet leaf bag Pattern looks beautiful in monochromatic shades, contrasting colors, gradients, or seasonal palettes. You could combine pink and cream, mint and beige, lilac and white, or several shades from the same color family.
How do I keep the leaves securely attached?
Sew the upper third or upper half of each leaf firmly to the bag body using strong matching yarn. Make several small stitches around the attachment points while leaving the lower section free. This keeps the motif secure while preserving its dimensional appearance.
Can this pattern be adapted into a shoulder bag?
Yes. Replace the short handles with a longer crocheted strap measuring approximately 90 to 120 cm, depending on the desired fit. Reinforce the strap attachment points carefully because a longer strap concentrates more weight on those areas.
Conclusion
The Crochet leaf bag Pattern combines basic crochet construction with creative three-dimensional decoration, making it a rewarding project for anyone who enjoys distinctive handmade accessories. You learned how to choose suitable yarn, understand the main crochet stitches, create an oval base, build a structured bag body, crochet pointed leaf motifs, arrange overlapping rows, make handles, add a tassel, and finish the interior with an optional lining.
The most important part of this project is taking time with the details. Consistent stitches create a strong foundation, while carefully shaped and positioned crochet leaves give the design its characteristic layered appearance. Once you become comfortable with the basic leaf construction, you can experiment with different sizes, colors, textures, handles, closures, and bag dimensions to create your own version of the Crochet leaf bag Pattern.
This pattern can be adapted to many styles, from soft pastel handbags to colorful statement pieces. Whether you crochet it for yourself, make it as a handmade gift, or use the technique to develop other creative projects, the layered leaf design offers plenty of possibilities for customization.If you try this Crochet leaf bag Pattern, leave your sincere opinion about the project and share your suggestions. Tell us which yarn, colors, handle style, or finishing details you would choose for your own crochet leaf bag.