
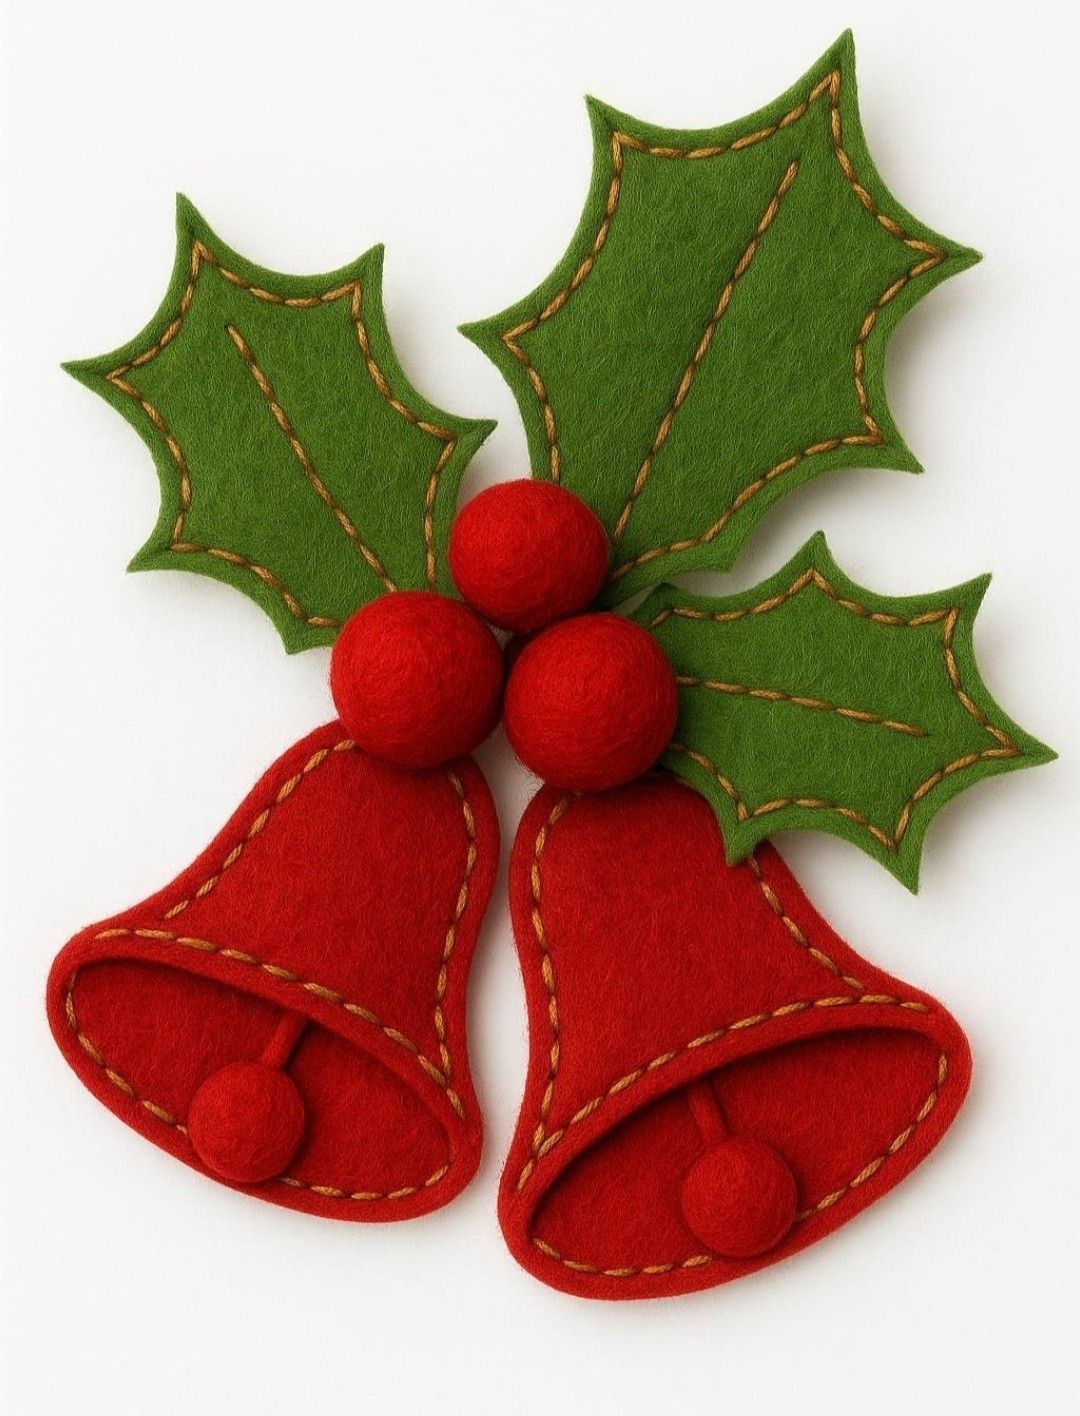
The Felt Christmas Bells with Holly Leaves Pattern is a charming Christmas craft that combines traditional holiday colors with the warm, handmade appearance of felt. Inspired by the project shown in the reference image, this decoration features two bright red bells, three green holly leaves, and a small cluster of red berries that brings the entire composition together. Decorative stitching adds definition to the shapes and gives the ornament a handcrafted finish that works beautifully for rustic, country, farmhouse, and traditional Christmas décor. One of the best things about this project is that it does not require complicated sewing techniques or expensive equipment. With basic felt, embroidery thread, scissors, a needle, and a simple printable template, you can reproduce the main elements at home. The finished decoration can be used on wreaths, Christmas trees, gift packages, wall hangings, table arrangements, or other seasonal crafts.
Creating your own Felt Christmas Bells with Holly Leaves Pattern is also an excellent way to practice basic felt appliqué and hand-stitching techniques. Felt is especially suitable for beginners because the material does not fray easily after cutting, which makes it possible to create clean decorative edges without finishing every raw side. In this design, the red bells are slightly dimensional, while the holly leaves remain flatter and are emphasized with decorative stitches around their edges and through their centers. The red berries add another layer of texture and make the decoration look fuller. Although the traditional combination of red felt, green felt, and golden or brown embroidery thread works wonderfully, the pattern can easily be personalized. Burgundy, forest green, white, gold, silver, or even pastel colors can create completely different Christmas styles while preserving the recognizable bell-and-holly composition.
This tutorial explains how to recreate the project from beginning to end while keeping the process simple enough for someone who may be making a felt Christmas ornament for the first time. You will learn how to prepare the bell and leaf templates, cut accurate felt pieces, create the decorative stitching, assemble the dimensional bells, make the berries, and arrange all the components into a balanced Christmas decoration. Measurements can be adjusted depending on where you intend to display the finished piece, so the project works equally well as a small tree ornament or as a larger decorative appliqué. Throughout the tutorial, the main focus remains on the Felt Christmas Bells with Holly Leaves Pattern, because understanding how its individual shapes work together makes the final assembly much easier. Take your time during the cutting and positioning stages, since careful preparation often makes the biggest difference in the appearance of the completed craft.
Materials and Preparing the Felt Christmas Bells with Holly Leaves Pattern
Begin by gathering your materials before cutting anything. For the Felt Christmas Bells with Holly Leaves Pattern, you will need red felt, green felt, matching or contrasting embroidery thread, a hand-sewing needle, sharp fabric scissors, pins or fabric clips, a washable fabric marker or tailor’s chalk, and a small amount of polyester filling if you want the bells and berries to have a soft three-dimensional appearance. Craft glue can also be useful for temporarily holding small components in position, although the project can be completed entirely with hand stitching.
DISCOVER MORE FREE PATTERNS HERE!
For a decoration similar in proportion to the photograph, make each finished bell approximately 10 to 12 cm tall and about 8 to 10 cm wide across the lower opening. The holly leaves can measure approximately 9 to 13 cm long, with three leaves in slightly different sizes for a more natural arrangement. The berries can be approximately 2.5 to 3.5 cm in diameter. These dimensions are suggestions rather than strict requirements, so feel free to enlarge or reduce the shapes depending on your intended use.
Create the bell pattern on paper first. Draw a gently curved bell body that becomes wider toward the bottom. Instead of making the bottom completely straight, use a slightly curved opening because this helps achieve the rounded appearance seen in the reference project. Add approximately 0.5 cm of seam allowance if you plan to join layered pieces. You can also create a separate curved lower strip if you want the opening of the bell to look thicker and more dimensional.
Next, prepare the holly leaf pattern. Traditional holly leaves have pointed tips and several sharp or softly curved points along both sides. Draw a central guideline from the bottom stem area to the upper tip. This center line will later become the decorative stitched vein. Making three leaves rather than two creates a fuller arrangement behind the bells and helps reproduce the balanced Christmas composition of the original inspiration.
Transfer the templates onto the felt using a removable fabric marker. Trace carefully so that the edges remain smooth and symmetrical. When cutting felt craft patterns, use long, controlled movements with sharp scissors rather than many short cuts. Clean cutting is especially important around the pointed edges of the holly leaves because uneven points can become more noticeable once the decorative stitching is added.
Before starting the assembly, arrange all the cut pieces on a flat surface. Place the green leaves at the top and position the two red bells underneath them so they angle slightly away from each other. Add three berries between the bells and leaves. This simple test arrangement allows you to evaluate proportions and make adjustments before sewing. Photographing the arrangement with your phone can also help you remember your preferred positioning during final assembly.
Cutting, Stitching, and Shaping the Red Felt Christmas Bells
To create the two main red felt bells, cut two matching bell shapes for each bell if you want a lightly stuffed decoration. Using two layers creates a stronger piece and provides room for a small amount of filling. If you prefer a completely flat appliqué, one layer can be used instead. However, the slightly dimensional version gives the Felt Christmas Bells with Holly Leaves Pattern more depth and closely resembles a handmade ornament rather than a simple flat cutout.
Choose embroidery thread that provides visible contrast. The example uses a warm golden-brown stitch, which looks beautiful against bright red felt. Gold, cream, white, dark red, or green thread can also work well. A simple running stitch is one of the easiest options. Keep the stitches reasonably even and position them approximately 0.4 to 0.6 cm from the outer edge of the bell. Consistency matters more than making every individual stitch perfectly identical.
Begin stitching around most of the bell perimeter while leaving a small opening. Add a tiny amount of polyester filling through the opening, spreading it evenly with your fingers. Avoid overstuffing because the bell should remain relatively flat rather than becoming pillow-like. Once you are satisfied with the thickness, close the opening with the same decorative stitch so the entire outline looks continuous.
The curved opening at the bottom gives the bell its most distinctive shape. You can create this effect by adding an extra curved felt strip over the lower section or by folding the lower edge slightly forward and securing it with small hidden stitches. The goal is to produce a gentle opening that suggests the hollow interior of a real bell. This small dimensional detail can significantly improve the finished appearance.
For the bell clapper, make a narrow felt strip approximately 1 cm wide and 4 to 5 cm long. Attach a small red felt circle or lightly stuffed felt ball to the lower end. Position the upper end inside the bell so that the small round clapper hangs just below the curved opening. Repeat the process for the second bell, checking that the two clappers are similar in size.
Place both completed bells side by side before permanently joining them to the leaves. One bell can angle slightly toward the left and the second slightly toward the right. This creates movement and prevents the arrangement from appearing rigid. The bells do not have to be perfectly symmetrical. Slight variations are part of the appeal of handmade Christmas decorations and can make the finished project feel warmer and more personal.
Creating the Holly Leaves and Red Felt Berries
The holly leaves provide strong visual contrast against the red bells. For each leaf, cut two green felt pieces if you want additional thickness, or use a single layer for a lighter decoration. Dark green or traditional Christmas green works especially well, but olive, sage, or forest green can also create attractive results. If two layers are used, align them carefully before beginning the decorative stitching.
Use the same embroidery thread used on the bells to stitch around the outer edges of each leaf. Follow every curve and point carefully, maintaining approximately the same distance from the edge. A running stitch gives the project a rustic handmade character, while a blanket stitch can create a more defined border. Either technique works well for the Felt Christmas Bells with Holly Leaves Pattern, so choose the one you feel most comfortable sewing.
After outlining the leaf, add the central vein. Stitch a gently curved line from the lower center toward the upper point. Additional smaller side veins are optional, but keeping the design simple can make the leaves look cleaner and more similar to the reference image. The stitched line also helps visually divide the felt surface and makes the shape immediately recognizable as a holly leaf.
Repeat the process for all three leaves. Make one leaf slightly larger and place it near the upper center of the finished arrangement. The other two can extend toward the left and right sides. Varying their direction creates a natural fan-shaped composition. When arranging them, allow some overlap because layered leaves make the decoration appear fuller without requiring additional components.
The red felt berries can be created in several ways. One simple method is to cut small felt circles, place a tiny amount of polyester filling in the middle, gather the edges with running stitches, and pull the thread tightly to form a round ball. Secure the thread with several knots. Create three berries of approximately the same size, although minor differences will not negatively affect the design.
Once the berries are complete, position them where the leaves and bells meet. This central cluster serves two purposes: it reinforces the Christmas holly theme and helps hide some of the joining stitches used during assembly. Before sewing them permanently, move the berries around until they form a pleasing triangular grouping. The berries should look connected to the leaves without completely covering the upper portions of the bells.
Final Assembly, Finishing Details, and Decorating Ideas
Start the final assembly of your Felt Christmas Bells with Holly Leaves Pattern by joining the three holly leaves. Arrange the largest leaf toward the upper center and the two remaining leaves toward each side. Allow their lower ends to overlap in the middle. Use strong hand-sewing thread and several secure stitches through the overlapping areas. Keep these structural stitches concentrated near the center so they will eventually be concealed by the berries.
Position the two bells over the bottom portion of the leaf arrangement. Their upper edges should meet near the central berry cluster, while the lower bell openings angle outward. Sew each bell securely through the hidden upper section. Check the front of the project several times while stitching to make sure the bells remain balanced and that one does not unintentionally sit much higher than the other.
Attach the three berries last. Sew directly through the lower portions of the berries and into the layered felt beneath them. Because the berries cover the central assembly area, they can disguise many of the structural stitches. After attaching each berry, gently shape it with your fingers so it remains round. This finishing step creates the recognizable centerpiece of the Christmas bells with holly leaves design.
If you intend to hang the project, add a loop to the back before completing the final stitches. A narrow ribbon, decorative cord, or sturdy thread can work. Position the loop near the upper center behind the largest holly leaf so the ornament hangs evenly. Test the balance before securing the loop permanently, especially if your bells contain filling because additional weight may cause the decoration to tilt.
There are many ways to personalize this felt Christmas craft. White bells with gold stitches can create an elegant winter theme, while burgundy bells and deep forest-green leaves produce a more traditional vintage appearance. You could also add tiny beads, embroidered stars, miniature bows, or small fabric accents. Keep embellishments moderate so the recognizable bell and holly shapes remain the central focus of the design.
The completed decoration is versatile enough for many seasonal applications. Add it to a Christmas wreath, attach it to a handmade gift bag, use it as a wall decoration, incorporate it into a holiday table centerpiece, or sew it onto a decorative cushion cover. Smaller versions can become tree ornaments, while enlarged versions can decorate doors and Christmas banners. Once you understand the basic Felt Christmas Bells with Holly Leaves Pattern, resizing and customizing the design becomes very easy.
FAQ – Frequently Asked Questions About Felt Christmas Bells with Holly Leaves Pattern
What type of felt is best for the Felt Christmas Bells with Holly Leaves Pattern?
Craft felt works well for decorative projects, especially if the ornament will be displayed indoors. Wool-blend felt generally has a softer, denser texture and can provide a more refined finish. Choose felt that is firm enough to maintain the pointed shape of the holly leaves without becoming excessively stiff.
Can a beginner make these felt Christmas bells?
Yes. This is a beginner-friendly Christmas sewing project because the main techniques involve tracing, cutting, running stitches, light stuffing, and simple hand assembly. Beginners may want to practice several running stitches on a scrap of felt before working on the final pieces.
Do I need a sewing machine?
No. The entire Felt Christmas Bells with Holly Leaves Pattern can be made by hand. In fact, visible hand stitching is one of the decorative features that gives this project its traditional handcrafted appearance.
What stitch should I use around the bells and leaves?
A running stitch closely reproduces the simple decorative lines seen in the reference design. Blanket stitch is another excellent option if you want a more pronounced edge. Whichever stitch you choose, keeping the spacing consistent will help the project look polished.
How large should the finished decoration be?
There is no mandatory size. Bells measuring approximately 10 to 12 cm tall create a versatile ornament, but you can enlarge the templates for door decorations or reduce them for Christmas tree ornaments. Maintain the same proportions when resizing all components.
Can I make the bells without stuffing them?
Absolutely. A flat version works especially well for appliqué, cards, banners, gift decorations, or wall panels. Stuffing is mainly useful when you want additional dimension and a softer decorative appearance.
How can I make the holly leaves hold their shape?
Choose medium-weight felt and avoid stretching it while cutting. Using two layers can provide additional firmness. Decorative stitching around the edges can also stabilize the pointed areas and help the leaves maintain their shape.
Can I use glue instead of sewing?
Fabric glue can be used for some areas, particularly when attaching small decorative details. However, stitching usually provides greater durability and contributes significantly to the handmade appearance of this felt Christmas ornament.
Which colors work best for this Christmas pattern?
Traditional red and green are instantly recognizable and closely match the reference design. Alternatives such as burgundy, dark green, white, gold, cream, silver, or muted farmhouse tones can create a more personalized style.
How can I turn the project into a Christmas tree ornament?
Reduce the pattern dimensions, use only a small amount of filling, and sew a ribbon loop behind the upper holly leaf. Make sure the finished piece remains lightweight enough to hang comfortably from a tree branch.
Can I reuse the pattern for other Christmas crafts?
Yes. The bell, leaf, and berry templates can be reused for garlands, gift tags, table decorations, wreath embellishments, appliqué projects, stockings, pillows, and fabric panels. You can also use each component separately when designing other holiday crafts.
How do I keep my stitches evenly spaced?
Mark tiny guide points with a removable fabric pen before sewing. For example, placing marks approximately 0.5 cm apart can help establish a consistent rhythm. After some practice, you will probably be able to estimate the spacing without marking every stitch.
Conclusion
The Felt Christmas Bells with Holly Leaves Pattern is a wonderful project for anyone who enjoys creating warm and traditional handmade Christmas decorations. By combining simple red felt bells, decorative hand stitching, pointed green holly leaves, and three soft red berries, you can transform inexpensive craft materials into an attractive seasonal ornament. The process begins with preparing accurate templates, continues through careful cutting and decorative stitching, and finishes by assembling the leaves, bells, clappers, and berries into one balanced design.
Throughout this tutorial, you learned how to choose suitable materials, determine practical measurements, create dimensional bell shapes, stitch decorative leaf veins, make stuffed felt berries, assemble the individual components, and add a hanging loop when needed. You also learned several ways to customize the pattern through alternative colors, sizes, stitches, and decorative details.
EASILY FIND THE FREE PDF FOR THIS PATTERN HERE!
One of the greatest advantages of this Felt Christmas Bells with Holly Leaves Pattern is its flexibility. You can keep the project close to the traditional red-and-green version shown in the inspiration image or transform it into something completely personal. Whether you use the finished piece on a Christmas tree, wreath, gift, wall hanging, cushion, or seasonal table arrangement, the handcrafted texture of felt and visible stitching can bring a welcoming handmade character to your holiday décor. If you make this project, leave your sincere opinion about the tutorial and share your suggestions. Your ideas about colors, stitches, sizes, and creative variations can inspire even more beautiful versions of these felt Christmas bells with holly leaves.