
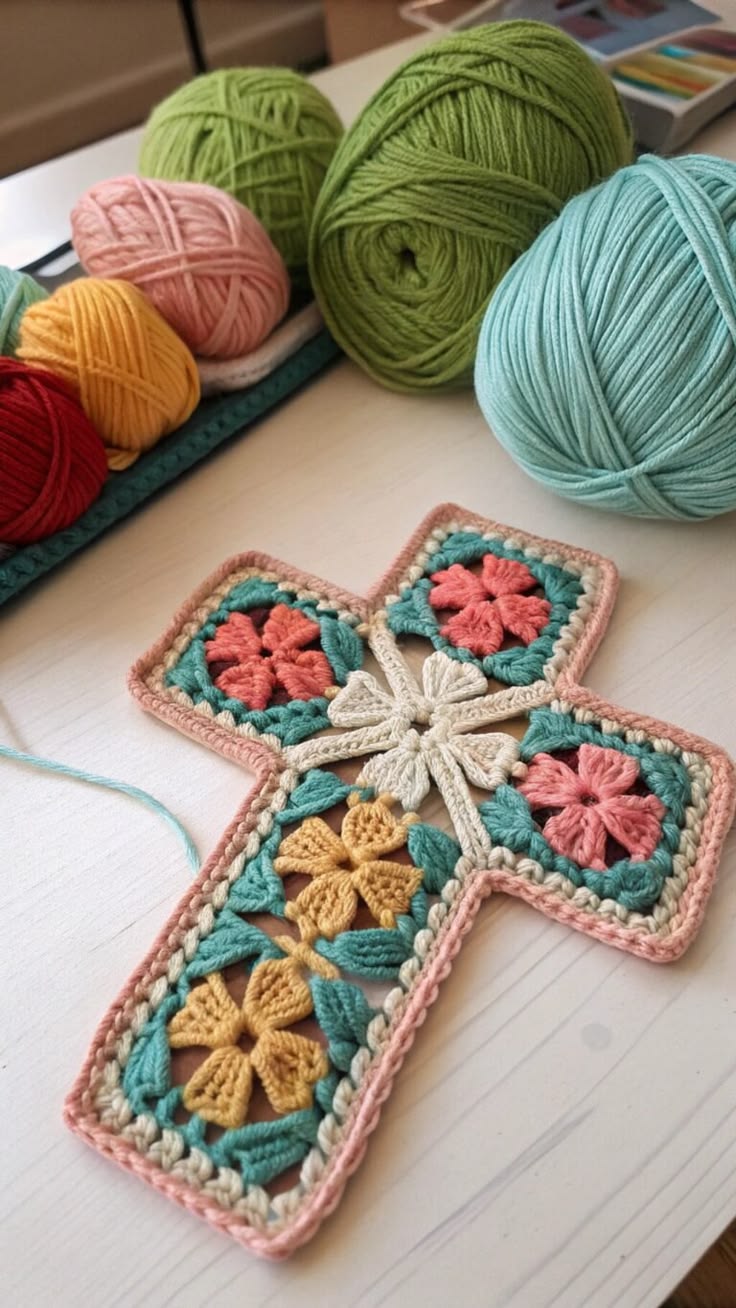
The Crochet Flower Cross Pattern is a beautiful way to combine the symbolic shape of a cross with the warmth, texture, and color of handmade crochet flowers. This project works especially well as a decorative piece for a wall, prayer corner, handmade gift, table display, or meaningful home accent. The design can be created from several joined floral motifs, allowing the crocheter to play with shades such as soft pink, turquoise, cream, mustard yellow, sage green, or any palette that suits the intended décor. One of the most attractive details of this pattern is the contrast between dimensional petals and structured crochet borders. Although the finished piece looks detailed, the construction becomes much easier when it is divided into individual motifs. In this guide, you will learn how to build a crochet flower cross, understand the main crochet stitches, join the sections, and finish the project neatly.
A handmade Crochet Flower Cross Pattern can also be an excellent project for crocheters who want to practice working in rounds. The individual flower sections use familiar techniques such as the chain stitch, slip stitch, single crochet, half double crochet, and double crochet. Depending on the desired texture, puff stitches or grouped double crochets can also be used to give the flowers more dimension. Because each motif is made separately before assembly, you can correct the size or color of one section without needing to unravel the entire project. This construction method also makes it easy to use small amounts of leftover yarn from previous projects. The result is a decorative cross filled with handmade character while still being practical enough for confident beginners.
Before starting the Crochet Flower Cross Pattern, it is helpful to remember that handmade crochet naturally varies according to yarn weight, hook size, stitch tension, and personal technique. For that reason, the measurements in this tutorial should be treated as a practical guide rather than an absolute rule. The most important goal is to keep all square motifs approximately the same size so they can be joined evenly. A smooth cotton or cotton-blend yarn is particularly suitable because it gives the flowers clear definition and helps the cross hold its shape. Medium-weight yarn creates a substantial decorative piece, while thinner yarn produces a more delicate result. Always make a small test motif first if the final dimensions are important.
Materials, Crochet Abbreviations, and Preparation
For this Crochet Flower Cross Pattern, prepare medium-weight cotton or cotton-blend yarn in approximately four or five coordinating colors. A practical palette could include dusty pink, turquoise, cream, mustard yellow, and a neutral border shade. You will also need a crochet hook suitable for your chosen yarn, usually around 3.5 mm to 4.5 mm for medium-weight cotton. Keep a yarn needle nearby for weaving in ends and joining motifs when necessary. Small scissors and a few stitch markers can also make assembly easier.
DISCOVER MORE FREE PATTERNS HERE!
The most important crochet abbreviations used throughout the project are ch = chain, sl st = slip stitch, sc = single crochet, hdc = half double crochet, dc = double crochet, and sp = space. If you prefer UK terminology, remember that stitch names differ, so this tutorial follows standard US crochet terms. Understanding these basic crochet stitches before beginning will make the pattern much easier to follow. Beginners may wish to practice each stitch on a small sample first.
Start by making the chain stitch. Create a slip knot, insert the crochet hook through the loop, yarn over, and pull the yarn through. Repeat the movement to create additional chains. Chains are commonly used to begin rounds, create spaces, and form decorative openings between sections of a flower. Try not to make the starting chains too tight because you will often need to insert the hook into them later.
To work a single crochet, insert the hook into the designated stitch or space, yarn over, and pull up a loop. You should now have two loops on the hook. Yarn over again and pull through both loops. Single crochet stitches are useful for reinforcing edges and creating firm borders around each flower square. They can also help stabilize the final cross.
For a double crochet, yarn over before inserting the hook into the stitch or chain space. Yarn over again and pull up a loop, leaving three loops on the hook. Yarn over and pull through two loops, then yarn over once more and pull through the final two loops. Double crochet produces a taller stitch and is especially useful for petals and granny-style backgrounds in the Crochet Flower Cross Pattern.
The finished size will depend on your yarn and hook, but a useful target is approximately 8 to 10 cm for each flower square. When several squares are joined, the completed cross may measure around 25 to 35 cm wide and 35 to 45 cm tall. These measurements can easily be changed by using thicker or thinner yarn. The key is consistency: each individual square should closely match the others before assembly.
Crocheting the Flower Motifs Step by Step
Begin the first flower by making a magic ring or chaining four and joining the first chain with a slip stitch to create a small ring. Chain three, which can count as the first double crochet, then work enough double crochet stitches into the ring to establish the flower center. A simple center of 12 double crochet stitches works well. Join the round with a slip stitch and gently tighten the starting ring. This central circle becomes the foundation for the petals.
Change to the color you want for the first group of petals. Attach the yarn to any stitch, chain two, and work several double crochet stitches into the same stitch or space. A basic petal can be formed with three double crochets worked together, followed by a short chain and slip stitch. Repeat evenly around the center. Five or six petals create a balanced flower, although you can adjust the petal count according to the appearance you prefer.
For a fuller flower similar to dimensional floral crochet designs, replace ordinary double crochets with a puff stitch. Yarn over, insert the hook into the stitch, pull up a loop, and repeat this movement several times in the same location. Yarn over and pull through the collected loops carefully. Close the puff with a chain stitch. Puff stitches give the crochet flower motif a raised, soft texture that stands out beautifully from the background.
Once the petals are complete, introduce the background color. Attach the yarn between two petals and begin creating a round that changes the circular flower into a square. Work combinations such as 3 dc, ch 2, 3 dc in the locations selected for the four corners. Between corners, use shorter groups of double crochet stitches. The objective is to gradually establish four clear sides around the central flower without pulling or distorting the petals.
Continue with another background round, working into the chain spaces from the previous round. In each corner space, work 3 dc, ch 2, 3 dc. Along the sides, work groups of three double crochet stitches separated by short chains if required. This structure resembles a traditional granny square, but the raised flower in the center gives it a more decorative appearance. Keep checking that the square remains flat.
Finish each motif with a firm border. A round of single crochet works particularly well because it creates a clean edge for joining. Work one single crochet into each stitch and approximately three single crochets into each corner space. Fasten off and weave in the yarn ends securely. Repeat the entire process until you have enough flower squares to construct the cross, keeping their dimensions as consistent as possible.
Building and Joining the Crochet Cross
Lay your completed flower squares on a flat surface before joining them. For a compact Crochet Flower Cross Pattern, position motifs so that they form a clear traditional cross shape. You can place one motif at the top, one on each side, and continue additional motifs vertically downward. Depending on the design you want, you may use five, six, seven, or more squares. Rearrange them until the flower colors look balanced.
A particularly attractive arrangement is to alternate flower colors rather than placing identical colors beside one another. For example, use pink flowers on the upper and side sections and mustard or cream flowers along the lower section. A turquoise or green background can connect the entire project visually. A soft pink outer border adds warmth and creates a polished frame around the motifs.
One simple joining method is the slip stitch join. Place two motifs with the appropriate edges together and insert the hook through corresponding stitches on both squares. Pull the yarn through and make a slip stitch. Continue along the edge, matching every stitch carefully. Keep the joining tension slightly loose so the seam does not become rigid or cause the squares to curl.
Another option is the single crochet join, which creates a visible decorative ridge. Hold the motifs together and work single crochet stitches through both layers. This technique can become an intentional design feature, particularly if you choose a contrasting yarn color. Cream, dusty pink, or turquoise can work beautifully depending on the other shades in your crochet cross.
As each square is attached, place the work flat and check the overall alignment. The vertical portion should remain straight, and the side arms should be positioned at approximately the same height. If one motif appears slightly larger, gently shape it with your hands or lightly block it before continuing. Taking a few moments to correct alignment during assembly usually produces a much cleaner final project.
If you want the center of the cross to have extra detail, crochet a small separate flower and sew it over the joining point. Start with a magic ring, create five or six petals, and fasten off with a long tail. Position the flower in the center and sew it securely without flattening the petals. This additional crochet flower can hide joining seams while making the center of the Crochet Flower Cross Pattern more visually striking.
Border, Blocking, Finishing, and Creative Variations
After all the motifs are connected, add an outer border around the complete cross. Attach your border yarn at any convenient corner and work single crochet evenly around the perimeter. When reaching an outside corner, work three single crochets into the same stitch so the border can turn naturally. At inside corners where two sections meet, you may need to decrease or skip a stitch to prevent excess fabric from gathering.
For a decorative second border round, you can use half double crochet, reverse single crochet, or a simple picot edge. A soft contrasting color works especially well. If the flowers are pink and mustard with turquoise leaves or background sections, a pale blush or cream border creates a gentle finish. A darker border produces stronger definition and may make the silhouette of the cross more noticeable.
Once the crochet is finished, blocking helps improve the shape. Lay the cross on a clean blocking mat or other suitable surface and gently stretch each section until the squares and edges appear even. Pin the outer corners into position. Lightly dampen the crochet according to the care instructions for your yarn and allow it to dry completely before removing the pins. Never use excessive heat on yarn that may be sensitive to high temperatures.
Weave in every yarn end carefully with a yarn needle. Pass each tail through several stitches on the reverse side, change direction, and pass through additional stitches before trimming the excess. This reduces the chance of the ends working loose. Because the Crochet Flower Cross Pattern contains several color changes, taking time to secure each tail is an important part of producing a durable handmade piece.
You can personalize this pattern in many ways. A pastel crochet cross using blush pink, mint, cream, and pale blue can create a soft decorative style. For a more rustic appearance, consider mustard, sage, terracotta, beige, and brown. Bright rainbow flowers can make the design cheerful and playful, while a white and gold-inspired palette offers an elegant look. The basic construction remains the same regardless of the colors you choose.
The pattern can also be adapted for different purposes. Add a small hanging loop at the top to create crochet wall décor, attach the piece to fabric for a decorative appliqué panel, or make a smaller version using fine cotton thread. You can even use the individual flower squares separately as coasters or decorative motifs. Learning the construction of the Crochet Flower Cross Pattern therefore gives you techniques that can be reused in many other crochet projects.
FAQ – Frequently Asked Questions About the Crochet Flower Cross Pattern
Is the Crochet Flower Cross Pattern suitable for beginners?
Yes. A beginner who already understands basic stitches can successfully make this project. The main techniques are chain stitches, slip stitches, single crochet, and double crochet. The flower construction may require a little practice, but making the project one motif at a time keeps the process manageable.
What yarn is best for a crochet flower cross?
Cotton and cotton-blend yarns are excellent choices because they provide good stitch definition and help decorative pieces keep their shape. Acrylic yarn can also be used, especially for a softer and lighter project. The most important consideration is using approximately the same yarn weight throughout all motifs.
What crochet hook size should I use?
A hook between approximately 3.5 mm and 4.5 mm works well with many medium-weight cotton yarns. However, always consider the recommendation on the yarn label and your personal tension. If your stitches are very tight, moving up one hook size may help.
How many flower squares are required?
The number depends on the cross design. A small version can be created from approximately five motifs, while a longer decorative cross may require six, seven, or more. Arrange the squares on a flat surface before joining them so you can decide which proportion looks best.
Can I make every flower a different color?
Absolutely. Using different flowers is one of the easiest ways to personalize a Crochet Flower Cross Pattern. You can create a coordinated palette, a rainbow arrangement, seasonal colors, or use leftover yarn. Keeping one background or border color consistent can help unite a multicolored design.
Why is my crochet square curling?
Curling often happens when stitch tension is too tight or when there are not enough stitches in the outer rounds. Check the corner spaces and make sure they contain enough stitches to turn naturally. Blocking can correct mild curling, but severe distortion may require reworking the affected round.
How do I keep all the motifs the same size?
Use the same yarn weight, hook size, stitch count, and tension for every square. Measure the first finished motif and compare the others to it as you work. Blocking the motifs before assembly can also help bring small variations into alignment.
Can I use granny squares for the cross instead of raised flowers?
Yes. The construction method is very flexible. Traditional granny squares, solid granny squares, sunflower squares, daisy motifs, and many other square designs can be arranged into a cross. The flower-centered version simply adds more texture and dimension.
How can I hang the finished crochet cross?
You can crochet a small chain loop at the upper edge and reinforce it with slip stitches or single crochet. Make sure the loop is securely attached to several stitches rather than only one stitch. Lightweight decorative crochet pieces generally do not require heavy hanging hardware.
Can the finished cross be washed?
That depends on the yarn. Always follow the care recommendations for the fiber you used. Cotton crochet is often washable, but handmade decorative pieces usually benefit from gentle washing and flat drying to preserve their shape and prevent stretching.
How can I make the flowers more dimensional?
Try using puff stitches, popcorn stitches, cluster stitches, or layered petals. You can also crochet a small second flower and sew it over the first one. Avoid making the center excessively heavy, especially if the project will be hung vertically.
Can I change the size of the Crochet Flower Cross Pattern?
Yes. Use thicker yarn and a larger hook for a larger cross, or fine cotton and a smaller hook for a delicate version. You can also add extra rounds around each flower square or increase the number of motifs used in the construction.
Conclusion
The Crochet Flower Cross Pattern combines basic crochet techniques with beautiful floral details to create a meaningful and highly customizable handmade decoration. Throughout this tutorial, you learned how to select yarn and hook sizes, understand essential crochet abbreviations, create flower centers and textured petals, transform the motifs into squares, join them into a cross shape, and finish the project with a neat outer border.
One of the greatest advantages of this project is its flexibility. The flowers can be simple or dimensional, the colors can range from soft pastels to bright combinations, and the finished size can be adapted to suit almost any decorative purpose. Once you understand the basic construction, you can create many variations of the Crochet Flower Cross Pattern while using leftover yarn and experimenting with new stitch combinations.
EASILY FIND THE FREE PDF FOR THIS PATTERN HERE!
Careful joining, consistent tension, secure yarn ends, and proper blocking will make a noticeable difference in the finished appearance. Take your time with each flower motif and enjoy seeing the separate pieces gradually become a complete crochet cross. Handmade projects are often most beautiful when small individual details come together to create something distinctive. If you make your own Crochet Flower Cross Pattern, feel free to leave your sincere opinion about the tutorial. Share which colors or stitches you would choose, and leave your suggestions for future crochet patterns and step-by-step projects. Your ideas can inspire new creative variations and help other crochet lovers discover different ways to enjoy this beautiful handmade design.