
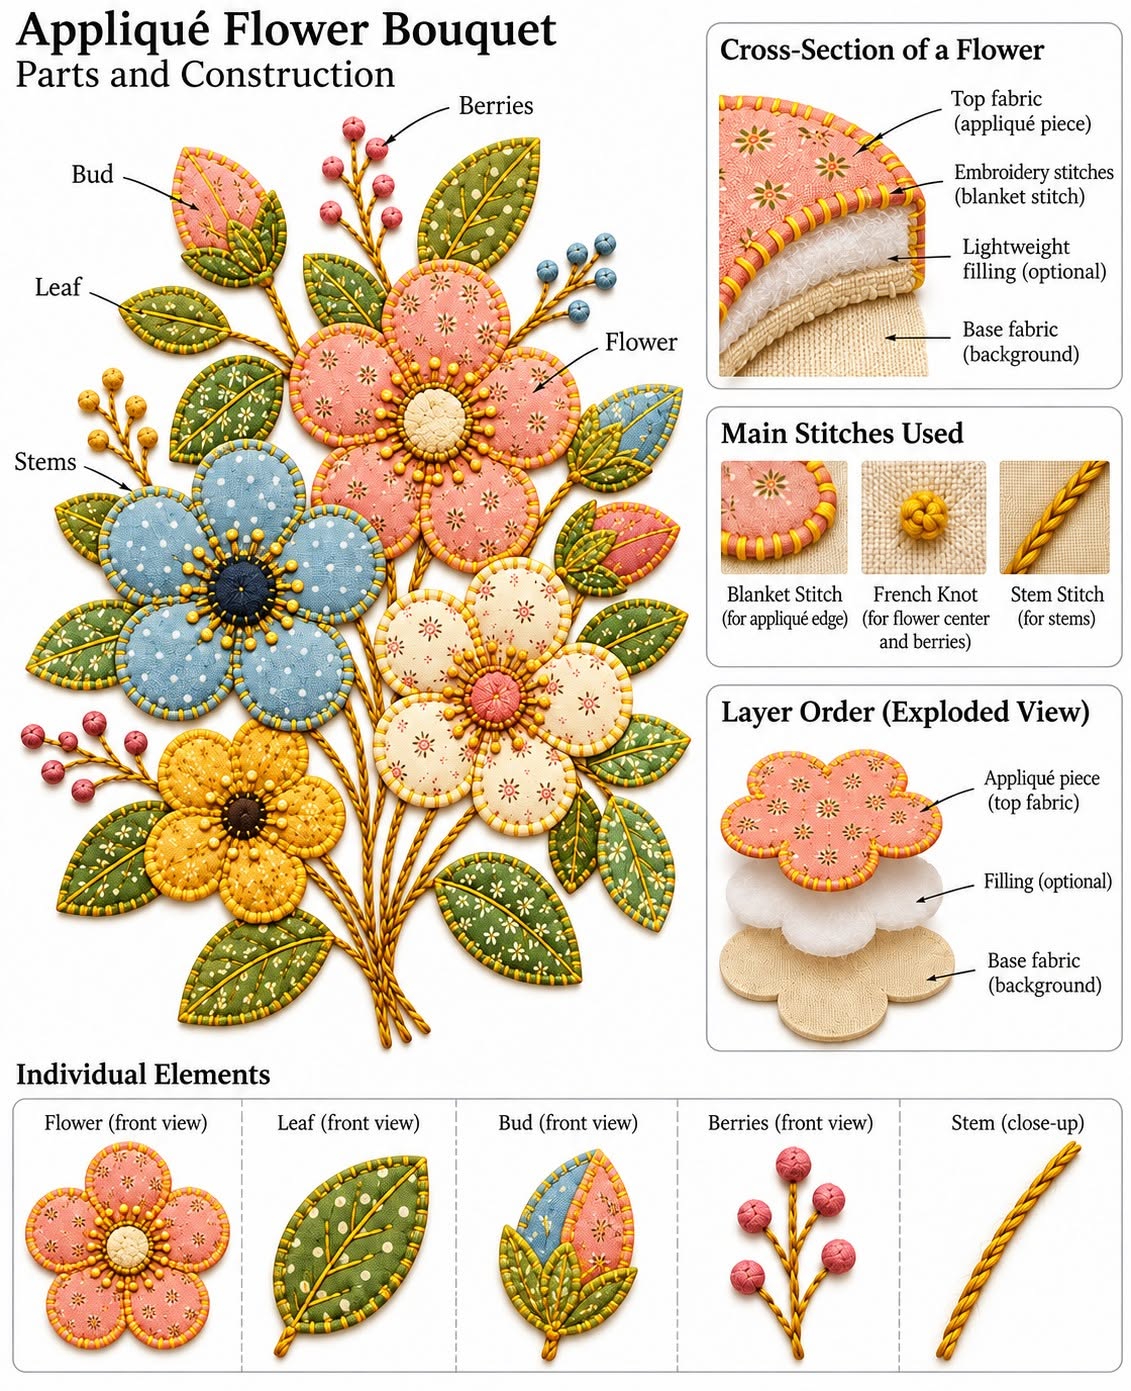
The Sewing and Quilting Flower Bouquet Appliqué Pattern is a charming fabric-art project that combines traditional appliqué, hand stitching, quilting, embroidery, and floral composition in one decorative design. Inspired by the bouquet shown in the reference image, this project features several layered flowers in soft blue, dusty pink, cream, and warm mustard tones, surrounded by an assortment of green leaves, small buds, and embroidered stems. The different fabrics give every flower its own personality while maintaining a harmonious handmade appearance. Decorative stitching around the petals and leaves creates the slightly raised, dimensional finish that makes this style so appealing. Although the finished bouquet looks detailed, the construction can be divided into manageable stages that make the project suitable for patient beginners as well as experienced quilters. By preparing the pieces carefully and building the arrangement gradually, you can create a beautiful fabric flower appliqué that looks polished without relying on complicated sewing techniques.
One of the strengths of the Sewing and Quilting Flower Bouquet Appliqué Pattern is the freedom it gives you to combine fabrics that might already be available in your sewing collection. Small floral prints, polka dots, subtle geometric patterns, linen-look cottons, and muted solid fabrics can all work beautifully in this design. Because most of the individual appliqué components are relatively small, the project is also an excellent way to use fabric scraps that would otherwise remain unused. The bouquet can be adapted for a wall hanging, cushion cover, tote bag panel, framed textile artwork, quilt block, table decoration, or the center panel of a larger quilt. Hand stitching adds warmth and character, while machine appliqué can provide a cleaner and faster alternative if that is your preferred sewing method. The most important goal is to preserve the layered floral appearance while allowing your own fabric choices and stitching style to become part of the finished design.
Creating a successful quilted flower bouquet appliqué begins with planning rather than immediately sewing pieces to the background. Studying the visual balance of the arrangement will help you understand how the large flowers, medium flowers, leaves, branches, and tiny buds work together. In the photographed design, the bouquet grows upward from a narrow cluster of stems, with flowers positioned at different heights to create a natural shape rather than a perfectly symmetrical layout. Large flowers provide focal points, while leaves and smaller branches fill empty spaces and visually connect the composition. Texture is equally important, because blanket stitching, running stitches, French knots, seed-like embroidery, and quilted details transform simple pieces of fabric into dimensional botanical elements. The following guide explains how to recreate this Sewing and Quilting Flower Bouquet Appliqué Pattern step by step while maintaining the handcrafted appearance of the original inspiration.
Preparing Fabrics, Templates, and the Bouquet Background
Begin by selecting a stable fabric for the background of your Sewing and Quilting Flower Bouquet Appliqué Pattern. A light cream, ivory, natural linen, or softly textured cotton works especially well because it provides contrast without competing with the colorful flowers. Cut the background slightly larger than your intended finished project so that you have enough space for trimming and finishing later.
DISCOVER MORE FREE PATTERNS HERE!
Choose quilting cottons in several coordinated colors for the flowers. A balanced palette might include dusty pink fabric, light blue, cream, mustard yellow, sage green, olive green, muted teal, and small touches of brown or dark navy. Combining tiny floral prints, dots, and subtle patterns helps achieve the layered vintage appearance visible in the inspiration.
Create paper templates for the flower petals before cutting your fabric. Most flowers in this design can be constructed with five rounded petals, although slight variations in shape will make the bouquet appear more natural. Depending on the size of your finished panel, large petals can measure approximately 5 to 7 cm long, while smaller flower petals can measure around 3 to 5 cm.
Prepare several leaf templates in different sizes and shapes. Some leaves should be long and pointed, while others can be smaller and rounder. Using two or three leaf shapes will prevent the appliqué flower bouquet from appearing repetitive and will make the composition resemble a naturally growing arrangement.
If you prefer turned-edge appliqué, add approximately 0.5 to 0.7 cm of seam allowance around every flower and leaf template. For raw-edge appliqué, the shapes can usually be cut close to the finished outline after applying fusible web. Both approaches can create excellent results, although turned edges tend to produce a softer traditional quilt appearance.
Before sewing anything permanently, place all major pieces on the background fabric. Start with the largest flowers, then position the smaller flower, and finally arrange the leaves around them. Taking a photograph of this temporary layout can be useful because you can refer to it while assembling the Sewing and Quilting Flower Bouquet Appliqué Pattern.
Building the Fabric Flowers and Creating Dimensional Centers
Start with the largest flower, which can become the main focal point of your bouquet. Arrange five petals in a circular formation and allow them to overlap slightly toward the center. A muted pink print works beautifully here, but any coordinated fabric can be used to personalize your flower appliqué pattern.
Secure each petal to the background with small stitches. Blanket stitch is particularly effective because it outlines each shape while adding a decorative handcrafted border. You can use thread that matches the fabric for a subtle appearance or contrasting embroidery thread when you want the stitching to become part of the design.
Create the light blue flower in the same way, using five broad rounded petals. Add decorative quilting or running stitches across each petal before completing the center. Tiny dots, floral motifs, or small printed designs in the fabric will provide additional detail without requiring complicated embroidery.
For the cream flower, consider using a delicate floral cotton. Pale fabric creates a beautiful contrast beside darker greenery and stronger flower colors. Add fine stitching around every petal and introduce several small quilting lines inside the petals to emphasize the soft hand-sewn appliqué effect.
The small mustard flower can be positioned lower in the arrangement to balance the larger blossoms. Because this flower is smaller, use slightly narrower petals and a dark brown or deep neutral center. This contrast makes the flower visually distinct even though it occupies less space than the other blossoms.
Flower centers are where you can add extra dimension to the Sewing and Quilting Flower Bouquet Appliqué Pattern. Circular fabric centers can be lightly padded with a small amount of batting, while French knots, seed stitches, small straight stitches, or clustered embroidery knots can radiate outward. These simple details imitate stamens and give the finished bouquet its beautiful tactile character.
Adding Leaves, Stems, Buds, and Decorative Quilting
Once the flowers are established, begin placing the larger leaves around them. Use several shades of green quilting fabric, such as sage, olive, moss, and muted blue-green. Changing the leaf colors creates depth and prevents the foliage from appearing flat.
Position leaves in small groups rather than spacing every leaf evenly. Some can appear behind the flowers while others extend outward from the bouquet. Overlapping elements are particularly effective because they make the quilted floral appliqué look like a genuine arrangement rather than separate shapes attached to fabric.
Outline the leaves with blanket stitching or a closely spaced whip stitch. Add a central vein with a running stitch, backstitch, or stem stitch, then sew smaller diagonal lines toward the sides. These simple details give each fabric leaf structure and make even plain cotton look richly textured.
The stems can be embroidered directly onto the background after the basic layout has been established. Brown embroidery floss works well because it resembles slender natural branches. Use stem stitch, backstitch, or several closely placed running stitches to create lines that connect the flowers, leaves, and buds.
Small fabric buds help fill narrow spaces between the larger elements. Cut tiny circular or oval shapes in pink, blue, cream, or mustard fabric, then attach them near the ends of embroidered branches. A small French knot can also function as a miniature bud when the space is too small for another fabric piece.
Continue adding quilted details gradually, checking the overall balance after every few additions. Decorative stitches should enhance the bouquet rather than cover the printed fabrics completely. The most attractive Sewing and Quilting Flower Bouquet Appliqué Pattern designs usually combine visible fabric patterns with restrained embroidery so both materials remain visually important.
Assembling, Quilting, Finishing, and Personalizing the Project
After all flowers, leaves, stems, and buds are attached, place batting behind the background fabric if you want a quilted finish. Add a backing fabric beneath the batting to form a traditional three-layer quilt sandwich. Baste the layers together carefully so that the appliqué remains smooth and centered.
Quilt around the outside edges of the flower shapes to emphasize their silhouettes. This technique helps lift the appliqué slightly from the background and increases its dimensional appearance. You can also add subtle background quilting between the branches if you want the entire panel to feel more structured.
Inspect the flower centers again after quilting. Sometimes the layers of batting reduce the prominence of earlier embroidery, so a few additional French knots or straight stitches may improve the final texture. Avoid making every center identical because variation gives the fabric bouquet design more personality.
Trim the completed panel only after all quilting has been finished. Measure carefully from the bouquet rather than automatically trimming equal amounts from every side. Leaving slightly more open space around the highest branches can make the composition feel balanced and prevent the floral arrangement from looking crowded.
The completed Sewing and Quilting Flower Bouquet Appliqué Pattern can be finished in many ways. Add binding to make a wall hanging, incorporate the panel into a cushion, place it inside a larger patchwork layout, or use it as the decorative front of a handmade bag. A simple surrounding border can also turn the appliqué into attractive textile artwork.
Personalization is one of the most enjoyable parts of this project. You can replace the muted palette with bright spring colors, use scrap quilting fabrics from meaningful previous projects, embroider initials discreetly among the stems, or adjust the number of flowers. The goal is not to reproduce every detail perfectly but to use the basic bouquet structure as a foundation for your own creative interpretation.
FAQ – Sewing and Quilting Flower Bouquet Appliqué Pattern
What fabric is best for a flower bouquet appliqué?
Quilting cotton is usually one of the easiest materials to work with because it cuts cleanly, holds its shape well, and is available in many prints and colors. Linen blends can be attractive for backgrounds, while small cotton scraps are excellent for petals and leaves.
Can beginners make the Sewing and Quilting Flower Bouquet Appliqué Pattern?
Yes. Beginners can complete this project successfully by working one component at a time. Start with larger flowers and simple leaves before adding embroidery details. Practicing blanket stitch on a fabric scrap first can also make the final project easier.
Should I use hand appliqué or machine appliqué?
Either method works. Hand appliqué produces a soft traditional appearance and allows detailed control around small shapes. Machine appliqué is faster and can create very neat edges. Many quilters combine machine construction with hand embroidery for a mixed-technique finish.
Do I need fusible web for this project?
Fusible web is optional. It is helpful for raw-edge appliqué because it keeps the fabric pieces stable while they are stitched. Traditional turned-edge appliqué can be completed without fusible material by folding the seam allowance under the shape before sewing.
How can I stop appliqué pieces from fraying?
Turned-edge appliqué naturally hides the raw fabric edges. If you choose raw-edge appliqué, fusible web and closely spaced stitching can reduce fraying. A secure blanket stitch or satin-style machine stitch can also protect exposed edges.
How do I make the flower centers look dimensional?
Use small circles of fabric combined with a thin layer of batting, embroidery knots, straight stitches, or clustered seed stitches. The contrast between a raised center and flatter petals is one of the key features that gives a quilted flower appliqué its handcrafted depth.
What stitches are useful for a floral appliqué project?
Blanket stitch, running stitch, backstitch, stem stitch, French knots, and simple straight stitches are all useful. You do not need advanced embroidery skills. A few basic stitches used consistently can create an impressive amount of texture.
Can I change the colors in the original bouquet design?
Absolutely. The Sewing and Quilting Flower Bouquet Appliqué Pattern works with many color combinations. Soft vintage shades create a romantic appearance, while brighter reds, blues, yellows, and greens can produce a cheerful contemporary version.
Can this flower appliqué be used on a quilt?
Yes. The completed panel can serve as a central quilt block or decorative feature in a larger quilt. Just make sure you leave enough fabric around the appliqué for seams before assembling it with other quilt blocks.
How can I make my appliqué bouquet look more natural?
Avoid perfect symmetry. Use different leaf sizes, change the direction of the branches, overlap some shapes, vary the flower sizes, and place small buds in open areas. Natural variation is what gives a flower bouquet quilt pattern its flowing organic appearance.
How should I care for the finished appliqué project?
Gentle care is recommended, especially when the project contains hand embroidery and dimensional details. Avoid aggressive washing or twisting. For decorative wall pieces, occasional light dusting may be all that is necessary.
Can I use leftover fabric scraps for the whole bouquet?
Yes, and this is actually one of the best projects for using small pieces of fabric. Coordinating scraps can produce a charming patchwork appearance while giving leftover quilting materials a practical new purpose.
Conclusion
The Sewing and Quilting Flower Bouquet Appliqué Pattern brings together some of the most enjoyable elements of sewing, quilting, appliqué, and embroidery. By beginning with a neutral background, preparing flower and leaf templates, assembling layered petals, adding textured centers, embroidering stems, and carefully arranging the foliage, you can gradually build a detailed bouquet similar to the project shown in the inspiration image.
The most important lesson is to build the composition in stages. Large flowers establish the focal points, fabric leaves create movement, embroidered branches connect the individual elements, and small buds fill the spaces that need additional detail. Decorative stitching then brings everything together while adding the dimensional handcrafted appearance that makes this style so distinctive.
EASILY FIND THE FREE PDF FOR THIS PATTERN HERE!
You can follow the suggested palette closely or adapt the project with your favorite quilting fabrics and colors. Whether you turn the completed design into a wall hanging, cushion, quilt panel, bag, or framed textile piece, the same basic techniques can be reused in countless future projects. The result is a timeless floral appliqué sewing project that celebrates fabric, texture, and creative handwork. If you make your own version of the Sewing and Quilting Flower Bouquet Appliqué Pattern, leave your sincere opinion about the project and share your suggestions. Which flower colors would you choose, and what other details would you add to make this bouquet uniquely yours?