
The Tutorial for a Quilt Panel with Tulip Appliqué Pattern is a creative sewing project that combines traditional quilting techniques with the beauty of floral appliqué. A tulip design works especially well for a decorative fabric panel because its recognizable petals, stems, and leaves can be created from relatively simple fabric shapes. Even if you are still developing your quilting skills, this project offers an approachable way to practice fabric appliqué, accurate cutting, layering, stitching, pressing, and finishing. The result can become a wall hanging, decorative panel, pillow front, table decoration, or even the centerpiece of a larger quilt. The most important part is to work patiently and build the design one layer at a time.
When following this Tutorial for a Quilt Panel with Tulip Appliqué Pattern, you do not need an enormous collection of specialized supplies. Good-quality cotton fabric, coordinating scraps, batting, backing fabric, thread, basic sewing tools, and a sewing machine are enough for most versions of the project. The tulips can be made in red, pink, yellow, purple, orange, or any combination that fits your décor. Green fabrics naturally work beautifully for the leaves and stems, while a neutral background helps the floral elements stand out. Because appliqué is highly customizable, your finished tulip quilt panel can remain faithful to the original concept while still reflecting your personal choice of fabrics, colors, stitching, and quilting details.
This project is also an excellent introduction to the relationship between patchwork, quilting, and appliqué. Patchwork generally involves joining individual pieces of fabric to form a larger surface, while appliqué places decorative fabric shapes onto a background. Quilting then joins the decorative quilt top, batting, and backing with stitches. In this project, these methods work together to create a dimensional handmade panel with clearly defined tulips. Throughout the process, accurate preparation is more important than speed. Carefully cutting the pieces, checking the arrangement before sewing, and pressing at appropriate stages will help you create a cleaner and more professional-looking result.
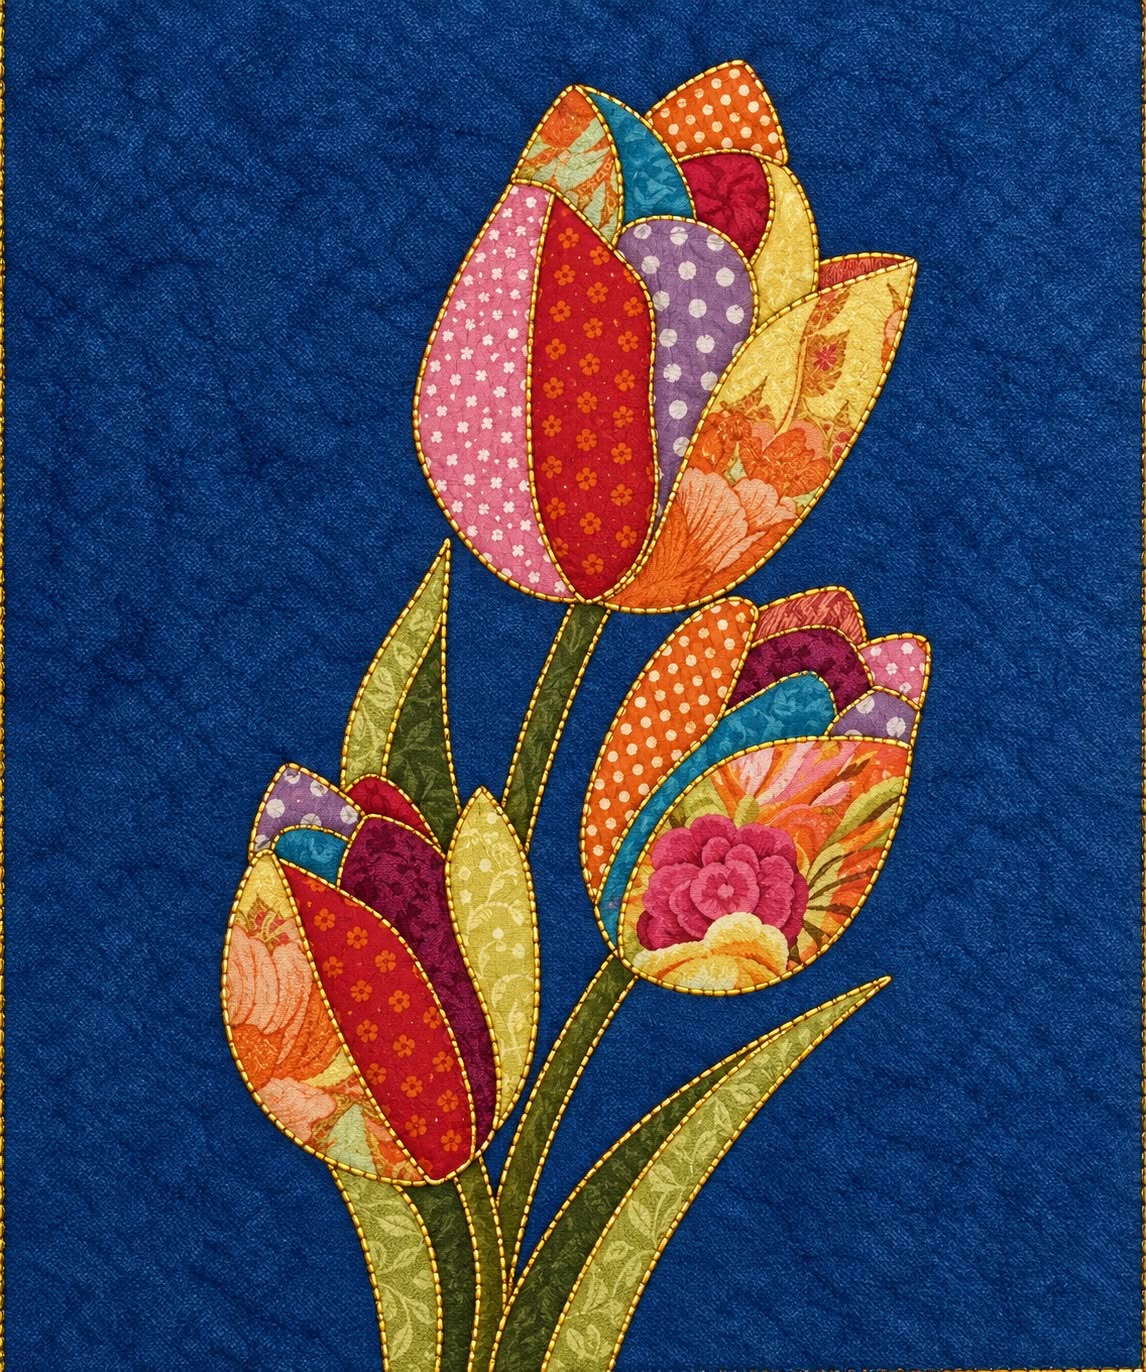
Step 1: Prepare the Fabric, Tools, and Tulip Appliqué Pieces
Begin your Tutorial for a Quilt Panel with Tulip Appliqué Pattern by gathering all of the necessary materials before cutting anything. You will need quilting cotton for the background, several fabric scraps for the tulip flowers, green fabric for stems and leaves, lightweight fusible web if you prefer fused appliqué, batting, backing fabric, binding fabric, coordinating thread, scissors or a rotary cutter, an iron, pins or clips, and a sewing machine. A removable fabric-marking tool can also be useful for positioning the flowers accurately.
DISCOVER MORE FREE PATTERNS HERE!
Choose the background fabric carefully because it creates the visual foundation for the entire panel. A light neutral fabric can make colorful tulips appear bright and cheerful, while a darker background creates stronger contrast. Before cutting, press the fabric to remove folds and wrinkles. If your cotton is likely to shrink significantly, prewashing may also be useful. Whatever preparation method you choose, keep it consistent for the fabrics used throughout the quilt panel.
Next, prepare the tulip appliqué pattern. Each flower can be divided into simple components: the flower head or petals, a narrow stem, and one or more leaves. If several tulips appear in the composition, make individual templates so that the flowers can vary slightly in height, orientation, or size. Labeling the templates in English with names such as “Tulip,” “Stem,” “Left Leaf,” and “Right Leaf” makes organization easier while assembling the project.
Transfer the pattern pieces to your selected fabrics. When using fusible appliqué, trace the shapes onto the paper side of the fusible web according to the manufacturer’s directions, remembering that some methods reverse the final shape. Cut roughly around each traced shape, fuse it to the wrong side of the appropriate fabric, and then cut accurately along the drawn outline. Avoid unnecessarily thick fusible products because a softer stabilizer usually produces a more flexible finished panel.
For traditional turned-edge appliqué, add a small seam allowance around the template rather than cutting directly on the finished line. Approximately 0.6 cm is a practical starting point for many turned-edge shapes, although tighter curves may need trimming or clipping during preparation. Fold the allowance toward the wrong side and press or baste it into position. This technique takes more time than raw-edge appliqué but creates beautifully finished edges.
Before sewing, place every tulip component on the background. Begin with stems because they establish the height and spacing of the flowers. Position the leaves next, followed by the tulip heads. Move the pieces around until the composition feels balanced. Check that important elements are not too close to the future binding area. Once you are satisfied, take a quick reference photo or make positioning marks before securing the appliqué pieces.
Step 2: Assemble and Stitch the Tulip Appliqué Design
Start assembling the tulip appliqué from the pieces that visually sit behind other elements. In most arrangements, this means positioning the stems first. Keep them straight or introduce a gentle natural curve depending on the design. Secure them with the chosen appliqué method, but avoid permanently attaching every piece until you have checked the entire composition one final time. Small adjustments at this stage can greatly improve the finished appearance.
Add the leaves around the stems. Tulip leaves are naturally long and slightly pointed, so alternating their direction can make the composition more interesting. Some leaves can lean toward the left and others toward the right. If several flowers are included, avoid making every plant perfectly identical. Small differences in height and angle create the charming handmade appearance associated with floral quilt appliqué.
Position the flower heads above the stems and check their relationship to the leaves. When using fusible web, follow its specific pressing instructions rather than applying excessive heat. Protect the iron and ironing surface from exposed adhesive. Press instead of aggressively sliding the iron across the fabric, since sliding can shift small appliqué components. Allow the fused area to cool before handling it extensively.
Now stitch around the appliqué edges. A blanket stitch, narrow zigzag stitch, or straight stitch close to the raw edge can all work well for machine appliqué. Blanket stitch produces a traditional decorative appearance, while a small zigzag can provide secure coverage around curves. Straight stitching gives a more relaxed raw-edge style that may develop a slightly frayed appearance after washing. Choose one method and use it consistently throughout the main design.
Sew slowly around the tulip petals and pointed leaves. Curves become easier when you stop with the needle down, lift the presser foot, rotate the fabric slightly, lower the foot, and continue stitching. Instead of trying to sew an entire curve in one movement, think of it as a sequence of very small directional changes. This technique provides significantly better control around the characteristic shapes of a Tulip Appliqué Pattern.
Once all pieces are stitched, inspect the panel from both the front and back. Trim loose thread tails and correct any edges that have not been secured properly. Press the panel carefully from the back whenever appropriate for your fabric and appliqué method. At this stage, the main floral artwork of the Tutorial for a Quilt Panel with Tulip Appliqué Pattern should be complete, giving you a clear preview of how the finished project will look.
Step 3: Create the Quilt Sandwich and Add Quilting Details
The next stage transforms the appliquéd fabric into a true quilted panel. Cut the batting and backing slightly larger than the quilt top. Place the backing fabric wrong side up on a clean, flat surface. Position the batting over it, followed by the appliqué panel right side up. Smooth each layer carefully from the center outward to eliminate wrinkles without stretching the fabric.
Secure the three layers using quilting pins, safety pins, temporary basting methods, or another quilting technique with which you are comfortable. The goal is to prevent the layers from shifting while they pass through the sewing machine. Pay special attention around the appliqué because the additional layers of fabric can create slightly thicker areas. A well-basted quilt sandwich makes the quilting process much more manageable.
Decide how densely you want to quilt the background. Simple straight-line quilting is an excellent choice for beginners because it provides structure without competing visually with the tulips. Gentle curves, echo quilting, or free-motion quilting can add more texture if you have experience with those techniques. Always follow the spacing recommendations appropriate for the batting you are using, as different batting products can have different quilting requirements.
One attractive technique is echo quilting, where stitched lines follow the outside contours of the tulip shapes. The repeated outlines emphasize the floral motif and make the appliqué appear slightly raised. Begin a comfortable distance from the appliqué edge and maintain relatively consistent spacing. The lines do not have to look mechanically perfect; subtle variations can complement the handmade character of the project.
You can also add selective quilting inside larger appliqué shapes if desired. A few carefully positioned lines on the leaves can suggest natural veins, while restrained stitching inside the flower can emphasize the petal structure. Avoid excessive stitching that makes small pieces stiff or visually crowded. The goal is to enhance the tulip quilt design, not hide the colorful fabrics beneath dense threadwork.
After quilting, lay the project flat and inspect the entire surface. Make sure no major wrinkles or puckers have developed. Square the panel by trimming the excess backing and batting while keeping the corners as close to 90 degrees as possible. Measure carefully before trimming because this step establishes the final shape of your Quilt Panel with Tulip Appliqué Pattern and prepares it for a neat binding.
Step 4: Bind, Finish, and Personalize the Tulip Quilt Panel
Binding gives the panel a clean, durable outer edge. Cut fabric strips and join them into one continuous length long enough to surround the project. A finished binding around 0.6 to 1 cm wide works nicely for many decorative panels, although the exact width can be adjusted to suit the project. Fold and press the binding consistently before attaching it so that the edges remain even.
Attach the binding around the perimeter of the quilt panel, taking particular care at the corners. Mitered corners create a tidy diagonal fold and are widely used in quilting. Sew slowly as you approach each corner and maintain a consistent seam allowance. When the binding returns to the starting area, join or overlap the ends neatly according to your preferred binding method.
Fold the binding over the raw edge toward the opposite side. It can be finished by hand for a subtle traditional appearance or secured by machine for a faster, durable result. Check frequently that your stitching catches the binding consistently. When finished, press the edges gently and inspect all four corners. A well-made binding should frame the tulips without overpowering the central floral composition.
If you intend to display the project as a quilted wall hanging, consider adding a hanging sleeve to the back. A fabric sleeve allows a small rod or hanging system to support the panel without visible hardware on the front. Alternatively, small corner pockets can work for lightweight projects. Make sure any hanging method supports the panel evenly so that it does not sag or distort over time.
Personalization is one of the most enjoyable parts of this Tutorial for a Quilt Panel with Tulip Appliqué Pattern. Try using several shades of one color for a coordinated flower garden, or combine multiple colors for a cheerful spring-inspired panel. Printed fabrics can add additional visual interest to petals, while tonal green fabrics give leaves subtle depth. Decorative stitching can also become part of the design when used intentionally.
Finally, give the completed project a careful inspection. Remove loose threads, check the binding, and make sure the appliqué remains secure. Press only as appropriate for the materials you used, especially if fusible products are present. Your completed tulip appliqué quilt panel should now combine a clean background, recognizable floral shapes, secure stitching, dimensional quilting, and a finished border into one cohesive handmade piece.
FAQ About the Tutorial for a Quilt Panel with Tulip Appliqué Pattern
What is a tulip appliqué quilt panel?
A tulip appliqué quilt panel is a layered textile project featuring tulip-shaped pieces of fabric attached to a background. The decorative top is combined with batting and backing, quilted together, and usually finished with binding. It can be displayed as textile art or incorporated into another sewing project.
Is this project suitable for beginners?
Yes. Beginners can simplify the project by using fusible appliqué, basic shapes, and straight-line quilting. More experienced quilters can use turned-edge appliqué, decorative machine stitching, free-motion quilting, or hand quilting to create additional detail.
What fabric works best for tulip appliqué?
Quality quilting cotton is a dependable option because it is easy to cut, press, stitch, and combine with other quilting fabrics. Fabric scraps are especially useful for the petals and leaves, making this project a practical way to use leftover material from previous sewing projects.
Should I use fusible web for the appliqué?
Fusible web is optional, but it can make positioning and securing appliqué pieces much easier. It temporarily or permanently holds the fabric shapes against the background before edge stitching. Always follow the instructions supplied with the specific fusible product because heat and pressing requirements can vary.
Which stitch is best around tulip appliqué?
There is no single mandatory stitch. Blanket stitch gives the design a decorative traditional finish, while zigzag stitching provides secure edge coverage. A straight stitch near the edge is useful for raw-edge appliqué. Turned-edge appliqué can also be sewn by hand using small, discreet stitches.
How can I make appliqué curves look smoother?
Sew slowly and use a shorter stitch length when necessary. On curves, stop periodically with the needle in the fabric, lift the presser foot, rotate the work slightly, and continue. Frequent small adjustments generally create smoother curves than making large turns.
Do I need batting for a decorative quilt panel?
If you want the project to have the structure and texture of a traditional quilt, batting is recommended. It creates dimension between the quilt top and backing and allows the quilting stitches to become more visible. For an extremely lightweight decorative textile, another construction method may be possible, but the result will feel different.
Can I make the tulips in different colors?
Absolutely. Tulip appliqué patterns are ideal for experimenting with color. Red, pink, yellow, orange, purple, white, and multicolored flowers can all work beautifully. Coordinating rather than perfectly matching fabrics often gives a handmade quilt greater depth and personality.
How do I prevent the quilt panel from puckering?
Press the fabrics before assembly, avoid stretching the background, secure the quilt sandwich carefully, and quilt from controlled areas outward when appropriate. Consistent thread tension and an appropriate needle also help. Testing your machine settings on a fabric-and-batting sample before quilting the actual panel is especially useful.
Can this tulip pattern be used for projects other than wall panels?
Yes. The same Tulip Appliqué Pattern concept can be adapted for pillow covers, tote bags, table runners, placemats, quilt blocks, fabric organizers, and larger quilts. Scale the templates appropriately and consider how much wear the finished item will receive when choosing the appliqué and quilting method.
How should a finished appliqué quilt panel be cared for?
Care depends on the fabrics, threads, batting, adhesives, and embellishments used. In general, gentle handling helps preserve decorative quilting. Before washing, check the care recommendations for every important material in the project, particularly fusible products or specialty fabrics.
How can I make my tulip panel look more professional?
Accuracy and consistency make the biggest difference. Press your fabrics carefully, cut clean shapes, test the arrangement before attaching anything, stitch slowly around curves, maintain balanced quilting, square the finished panel accurately, and give special attention to the binding and corners. These details can significantly improve the overall finish.
Conclusion
The Tutorial for a Quilt Panel with Tulip Appliqué Pattern brings together several rewarding sewing skills in one beautiful floral project. You begin by preparing the background and tulip appliqué pieces, arrange the flowers carefully, secure and stitch each component, create a layered quilt sandwich, add quilting for texture, square the project, and finish everything with a neat binding.
More importantly, this project provides room for creativity. Changing the flower colors, leaf fabrics, background, quilting style, thread, or border can produce an entirely different interpretation while keeping the same basic Tutorial for a Quilt Panel with Tulip Appliqué Pattern. Once you understand the construction process, you can also adapt the technique to other flowers and decorative appliqué projects.
EASILY FIND THE FREE PDF FOR THIS PATTERN HERE!
Take your time with each stage, particularly positioning, appliqué stitching, quilting, and binding. Small details contribute greatly to the final appearance of handmade work. With careful preparation and patient sewing, the finished quilt panel, tulip appliqué, and floral quilt pattern can become a charming piece that showcases both traditional quilting techniques and your individual creativity. If you make your own Quilt Panel with Tulip Appliqué Pattern, leave your sincere opinion about the tutorial and share your suggestions. Tell us which colors, fabrics, appliqué stitches, or quilting details you would choose for your version. Your ideas can inspire new variations and help other quilting enthusiasts discover creative ways to make this cheerful tulip project their own.