
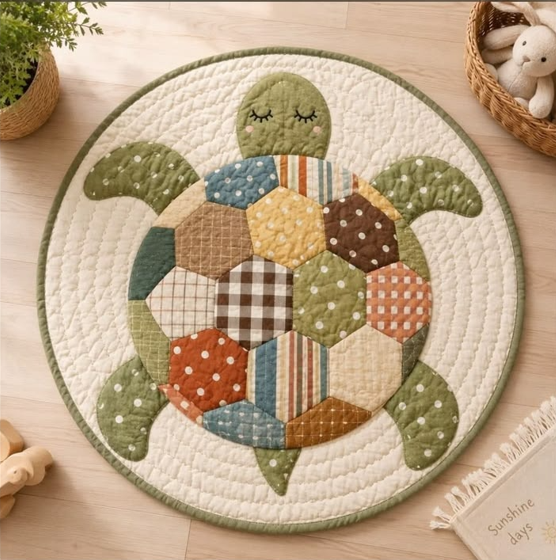
The Turtle Shaped Quilted Patchwork Rug Pattern is a charming sewing project that combines the visual appeal of traditional patchwork with the playful shape of a turtle. Inspired by the photographed design, this project features a softly rounded rug with a quilted cream background, a green fabric turtle body, and a shell made from colorful geometric patchwork pieces. The mix of checks, stripes, dots, solids, and softly textured prints gives the shell a warm handmade character without making the composition feel overly busy. It is an excellent project for anyone who enjoys quilting, patchwork sewing, fabric appliqué, scrap-friendly projects, and decorative handmade rugs. Because the pattern is assembled from relatively simple shapes, the finished result can look sophisticated while still being approachable for an enthusiastic beginner who already knows how to operate a sewing machine.
One of the most attractive characteristics of this Turtle Shaped Quilted Patchwork Rug Pattern is the way practical quilting techniques become part of the decoration. The cream-colored circular or softly oval foundation is quilted with repeated curved lines, giving the background texture and helping the layers stay securely together. Above that surface sits the turtle appliqué, with its olive-green head, four flippers, and small tail extending around the shell. The shell itself is the focal point: several polygon-shaped fabric pieces are joined together like a patchwork mosaic. Earthy colors such as moss green, rust orange, muted blue, beige, cream, brown, and soft gray create a cozy palette that works especially well for nurseries, children’s rooms, reading corners, craft spaces, or relaxed country-style interiors.
Another advantage of making a quilted turtle rug is the opportunity to use small pieces from your fabric collection. Many of the shell sections require only modest fabric cuts, making this a practical fabric scrap project. You can reproduce the calm vintage-inspired palette seen in the reference image or create your own combination using floral prints, gingham, stripes, polka dots, solids, or modern geometric fabrics. The tutorial below explains the construction from beginning to end, including fabric selection, pattern preparation, patchwork assembly, appliqué placement, quilting, binding, and finishing. Exact dimensions may be customized because the photograph does not provide a printed scale, but a finished size of approximately 85 to 95 cm across creates a useful decorative rug while preserving the proportions of the original inspiration.
Materials and Pattern Preparation for the Turtle Quilt Rug
Begin your Turtle Shaped Quilted Patchwork Rug Pattern by choosing fabrics that provide enough contrast to distinguish the turtle from its background. For the main rug foundation, approximately 1 meter of cream or ivory cotton fabric is a practical starting amount. Choose quilting cotton, linen-blend quilting fabric, or another stable woven fabric that can withstand regular sewing and gentle use. You will also need backing fabric of a similar size, plus batting slightly larger than the intended finished rug. Cotton batting works beautifully because it provides a soft texture without making the rug excessively bulky.
DISCOVER MORE FREE PATTERNS HERE!
For the turtle body, select approximately 50 to 70 cm of muted green cotton fabric. Using several closely related green prints can make the head, flippers, and tail appear more dimensional. In the reference design, the green fabrics include subtle patterns and small light-colored details, which add personality while still allowing the turtle silhouette to remain easy to recognize. Fabric appliqué works best when the fabrics are pressed before cutting, because wrinkles can distort curved pattern pieces.
The patchwork shell requires several coordinated scraps. Try combining gingham fabric, striped quilting cotton, polka-dot fabric, textured solids, and small-scale prints. Prepare at least 12 to 18 different scraps measuring roughly 15 × 15 cm each. You may use fewer fabrics and repeat them, but varying the prints creates the attractive mosaic effect visible in the design. When choosing colors, distribute darker fabrics around the shell instead of placing all strong colors in one area. This helps the completed patchwork turtle look balanced.
Next, create your paper templates. The rug foundation can be drafted as a circle or a slightly elongated oval measuring around 90 cm wide. Draw the shape on large paper by joining sheets with tape if necessary. For the turtle, sketch an oval shell approximately 48 to 55 cm wide and about 55 to 62 cm tall. Draw a rounded head extending above the shell, four broad curved flippers positioned diagonally around it, and a small triangular or leaf-shaped tail beneath the shell. These measurements are suggestions rather than fixed dimensions, so maintaining attractive proportions is more important than following an exact number.
For the patchwork shell, create a group of irregular hexagons or softly geometric polygon pieces. Most can measure approximately 12 to 16 cm across before seam allowances. Arrange them on your paper shell template before cutting fabric. The sections should fit together like a mosaic and completely cover the shell area. Add approximately 0.7 cm seam allowance around every patchwork piece. Labeling each template with a number or letter will make assembly considerably easier.
Before cutting your final fabrics, make a quick paper layout of the entire turtle rug pattern. Position the head, shell, flippers, and tail on the large foundation template. Check that the flippers remain safely inside the finished rug edge and that the turtle is centered. This preparation prevents difficult corrections later and allows you to change the scale before cutting valuable fabric. Once you are satisfied, trace the templates onto the wrong side of the appropriate fabrics and cut them carefully with fabric scissors or a rotary cutter.
Cutting and Sewing the Patchwork Turtle Shell
The shell is the visual centerpiece of the Turtle Shaped Quilted Patchwork Rug Pattern, so take a little extra time when arranging your fabric pieces. Lay all the cut polygons on a flat surface in approximately the same arrangement they will occupy in the finished shell. Alternate prints, colors, and values. For example, place a dark brown piece near a pale beige section, or a muted blue print beside orange or olive green. Avoid allowing several nearly identical fabrics to touch unless you intentionally want a quieter section.
Once the arrangement looks balanced, photograph or number the layout before beginning to sew. This simple step is extremely useful because patchwork pieces can easily become rearranged while they are being joined. Start by sewing two neighboring polygons right sides together using approximately a 0.7 cm seam allowance. Backstitch briefly at the beginning and end if necessary, then press the seam to one side. Continue joining neighboring pieces into manageable rows or small sections.
When several pieces have been connected, begin joining the sections together. Match seam intersections as accurately as possible, but remember that this project is decorative and handmade; tiny variations will not ruin the result. Pinning or using sewing clips can help prevent the fabrics from shifting. Press the shell frequently while assembling it. Pressing patchwork seams is important because flat seams improve the final appearance and reduce bulk when the shell is appliquéd to the turtle body.
After all geometric pieces have been joined, place the patchwork unit over your shell template. The sewn panel will probably have an irregular outer edge at this stage. Trace the shell outline onto the patchwork, making sure attractive areas remain visible and that no critical seam intersection is too close to the cutting line. Cut the patchwork shell to its final oval shape, leaving the required allowance depending on your chosen appliqué method.
There are several ways to finish the outer shell edge. For a clean appliqué quilt appearance, you may turn approximately 0.7 cm of the raw edge underneath and press it carefully. Another option is to use lightweight fusible web on the reverse side and secure the shell with machine appliqué stitching. A narrow zigzag, blanket stitch, or straight topstitch can all work well. The photographed project has a soft handmade appearance, so visible decorative stitching is completely suitable.
For additional dimension, you can lightly quilt individual shell polygons after the turtle has been layered with batting. Straight lines, gentle diagonal quilting, or simple outlines positioned a few millimeters inside each polygon will emphasize the patchwork construction. However, avoid excessive stitching if you are using many patterned fabrics. The goal is to preserve the distinct personality of each fabric while giving the entire shell enough structural stability for regular handling.
Finally, press the completed shell carefully from the reverse side using a suitable temperature for your fabrics. Do not aggressively flatten batting if any has already been added. At this stage, your patchwork turtle shell should resemble a colorful fabric mosaic with approximately 15 to 20 visible sections. The mixture of checks, dots, stripes, and solids is what gives this design its distinctive handcrafted personality.
Creating the Turtle Body and Building the Quilted Rug Layers
With the shell prepared, begin constructing the turtle body. Cut the head, four flippers, and tail from your chosen green fabrics. You may cut these as individual appliqué pieces or create a single large turtle silhouette that will sit underneath the shell. The second option is often easier because the patchwork shell will cover the central section. If making one silhouette, join paper templates for the head, limbs, tail, and hidden body before tracing them onto fabric.
To reproduce the friendly appearance of the photographed Turtle Shaped Quilted Patchwork Rug Pattern, shape the head like a soft vertical oval. The top should be gently rounded rather than pointed. The flippers should be wide where they connect to the body and gradually narrow toward their tips. Avoid making them perfectly symmetrical. Slightly different angles create a more natural and whimsical character, while still keeping the overall composition visually balanced.
The facial details can be created with embroidery. Lightly mark two curved closed eyes on the head using a removable fabric marker. Stitch each eye with dark embroidery floss using backstitch or stem stitch, then add several tiny lashes. Small circles of pale pink fabric or carefully applied textile-safe details can represent the cheeks. Simple facial features are particularly effective because they complement the calm sleeping expression without competing with the colorful shell.
Now prepare the rug sandwich. Cut your backing fabric and batting approximately 5 cm larger on every side than the cream top fabric. Place the backing right side down on a clean surface, position the batting above it, and place the cream quilt top right side up. Smooth the layers from the center outward and secure them using curved safety pins, quilting pins, or temporary basting according to your preferred method. A smooth sandwich is essential for preventing wrinkles during machine quilting.
Quilt the background before attaching or finalizing the turtle appliqué if you want continuous decorative quilting similar to the reference image. Curved echo lines work especially well. Begin near the center and sew gently flowing concentric curves around the foundation. The spacing does not need to be mathematically exact; approximately 1.5 to 2.5 cm between lines creates visible texture without making the surface excessively stiff. Alternatively, simple spiral quilting can create an attractive handcrafted effect.
Once the background quilting is complete, position the turtle in the center. Measure from several points around the outer rug edge to ensure the appliqué is not accidentally tilted. Temporarily secure the head, flippers, tail, and shell using pins, washable fabric glue, or fusible web. Stitch around every outer shape slowly, especially along the rounded edges. This stage transforms separate fabric components into one recognizable quilted turtle rug and is worth completing patiently.
Appliqué, Quilting, Binding, Finishing, FAQ, and Final Care
When stitching the turtle body to the quilted foundation, start with any elements that need to sit underneath the shell. Attach the head, four flippers, and tail first. Use a short straight stitch, narrow zigzag, or decorative blanket stitch around each shape. Keep the stitching close to the edge so the appliqué remains secure. A matching green thread produces a subtle result, while a slightly contrasting thread can emphasize the handmade outlines.
Place the finished patchwork shell over the center of the turtle body. Carefully cover the inner ends of the head, flippers, and tail so that the shell appears naturally connected to them. Pin or fuse the shell in place and sew completely around its perimeter. If desired, add a second line of stitching just inside the first one. This provides additional durability and creates a defined boundary between the shell and the green turtle body.
At this point, inspect the entire Turtle Shaped Quilted Patchwork Rug Pattern and decide whether more quilting is necessary. Areas inside the shell can be secured by stitching along selected patchwork seams, a technique often described as stitching in the ditch. You can also quilt some individual polygon pieces with simple straight or diagonal lines. The goal is to prevent loose areas while maintaining the soft, slightly puffy appearance that makes a quilted rug inviting.
Trim the rug sandwich to the intended final shape, removing excess batting and backing. Work gradually around the curve to obtain a smooth edge. Prepare approximately 6 to 7 cm wide bias binding strips from coordinating green fabric and join them into one continuous length. Bias-cut binding is especially useful for this design because it bends much more easily around the rounded outer perimeter than straight-grain strips.
Sew the binding to the rug edge with right sides together, gently easing it around curves without stretching the rug itself. Fold the binding over the raw edge and secure it to the back by hand or machine. Take extra care around any tighter curves. When properly applied, the quilt binding creates a neat green frame that visually connects the outside edge with the turtle body and gives the project a professional finish.
After the final pressing, examine every seam and appliqué edge for loose threads. Trim them and reinforce any area that appears vulnerable. If the rug will be placed on a smooth floor, consider using an appropriate non-slip layer underneath rather than modifying the decorative front. Because handmade quilted items vary according to fabric, batting, and construction method, gentle cleaning is generally preferable. With thoughtful care, this patchwork turtle project can remain a cheerful decorative piece for years.
Frequently Asked Questions
What is a Turtle Shaped Quilted Patchwork Rug Pattern?
A Turtle Shaped Quilted Patchwork Rug Pattern is a sewing design that combines quilting, patchwork, and appliqué techniques to create a decorative rug featuring a turtle motif. In this version, the turtle is positioned on a quilted rounded background, while its shell is constructed from multiple geometric fabric pieces. The result combines the look of a small quilt with the practical form of a decorative floor mat.
Is this turtle quilt rug suitable for beginners?
Yes, a confident beginner can complete the project, although some patience is required. The easiest skills involved are straight sewing, fabric cutting, basic quilting, and simple appliqué. Curved binding and assembling irregular shell polygons may require additional attention. Beginners can simplify the design by using larger shell pieces and a basic straight-stitch appliqué method.
What fabrics are best for making a patchwork turtle rug?
Quilting cotton is one of the most convenient choices because it is stable, widely available, and easy to sew. Cotton-linen blends can also provide attractive texture. For the shell, combining gingham, stripes, dots, solids, and small prints creates the distinctive patchwork look. Very stretchy or extremely lightweight fabrics are less convenient unless they are stabilized first.
How large should the finished turtle rug be?
The size can be customized. For a project inspired by the photographed design, approximately 85 to 95 cm across is a practical range. A smaller version around 60 cm can become a decorative mat or wall quilt, while a larger version can serve as a nursery or playroom accent. When enlarging the pattern, remember to increase every turtle component proportionally.
Do all the shell pieces need to be hexagons?
No. Although many pieces can resemble hexagons, the shell is essentially a geometric patchwork mosaic. Pentagons, irregular polygons, and modified hexagons may be combined as long as the pieces fit together accurately. Using slightly irregular shapes can actually make the finished shell look more organic and handmade.
Can I make the turtle shell from leftover fabric scraps?
Absolutely. This is one of the best features of the project. The shell is ideal for using quilting scraps because each geometric section requires only a small amount of fabric. Scraps from previous quilts, cushions, bags, and sewing projects can be coordinated by color to create a completely unique turtle.
Should I quilt the background before or after attaching the turtle?
Either method is possible, but quilting the main background first can make it easier to create uninterrupted curved lines. The turtle can then be appliquéd over the quilted surface. Additional quilting can be added through the shell afterward to secure the patchwork and integrate the layers.
What type of batting works best?
A medium or low-loft cotton or cotton-blend batting is a practical option for a quilted patchwork rug. Very thick batting can make curved binding difficult and may cause the rug to feel overly bulky. The ideal batting should provide enough body to highlight the quilting while allowing the project to remain relatively flat.
How can I make the shell colors look balanced?
Before sewing, arrange every fabric piece on a flat surface and take a photograph of your chosen layout. Spread dark, medium, and light fabrics throughout the shell. Avoid clustering all the orange, brown, green, or blue pieces in one location. Repeating a few colors in different areas helps create visual continuity.
What stitch should I use for the appliqué edges?
A narrow zigzag stitch, blanket stitch, or small straight stitch can all work. Blanket stitching creates a traditional appliqué appearance, while straight stitching gives the project a simpler contemporary finish. The best option depends on the fabric and the visual style you prefer.
Can this pattern be turned into a wall hanging instead of a rug?
Yes. The same Turtle Shaped Quilted Patchwork Rug Pattern can easily become a wall hanging. Use lighter batting, add a hanging sleeve to the back, and reduce the dimensions if desired. Because the patchwork shell contains many colors and textures, the turtle also works beautifully as fabric wall art.
Can the design be personalized?
Personalization is one of the most enjoyable parts of this project. You can change the turtle’s colors, enlarge or reduce the shell pieces, add floral prints, use children’s fabrics, embroider a name, or choose an entirely different background color. The construction method remains essentially the same even when the aesthetic changes.
How do I prevent the rug from becoming wavy around the edge?
Avoid stretching either the quilt top or the binding while sewing. Use true bias binding around curved areas and press it gently before final stitching. Even quilting distribution is also important. If one area contains significantly more quilting than another, the fabric can contract unevenly and affect the final shape.
How should a handmade quilted rug be cleaned?
Cleaning depends on the fabrics and batting used. Prewashing washable cotton fabrics before construction can reduce unexpected shrinkage later. For a finished handmade piece, gentle washing and careful drying are usually kinder than aggressive treatment. Always consider the recommendations for the specific materials used in your project.
Conclusion
The Turtle Shaped Quilted Patchwork Rug Pattern brings together several enjoyable sewing techniques in one creative project. You begin by choosing coordinating quilting fabrics, preparing the large rounded foundation, drafting the turtle body, and cutting the geometric pieces that form the distinctive patchwork shell. By combining fabric scraps, appliqué, patchwork piecing, machine quilting, embroidery, and curved binding, you can create a decorative item that feels both playful and beautifully handcrafted.
The most important part of achieving a balanced result is careful preparation. Arrange your shell fabrics before sewing, press each patchwork seam, position the turtle accurately on the quilted background, and take your time around curved appliqué and binding edges. These small details make a noticeable difference in the completed project. At the same time, do not feel that every polygon or quilting line must be perfectly identical. The slight variations found in handmade work are part of what gives a patchwork turtle rug its warmth and character.
EASILY FIND THE FREE PDF FOR THIS PATTERN HERE!
You can follow the earthy green, blue, brown, beige, orange, cream, striped, checked, and dotted palette shown in the inspiration image, or use the Turtle Shaped Quilted Patchwork Rug Pattern as a starting point for your own color story. Whether made as a decorative rug, nursery accent, playroom mat, or wall quilt, this turtle design offers an enjoyable way to turn small pieces of fabric into something distinctive and useful. If you decide to make this project, leave your sincere opinion about the pattern and share your suggestions. It would be wonderful to know which colors, prints, quilting style, or shell arrangement you would choose for your own version of this Turtle Shaped Quilted Patchwork Rug Pattern.