
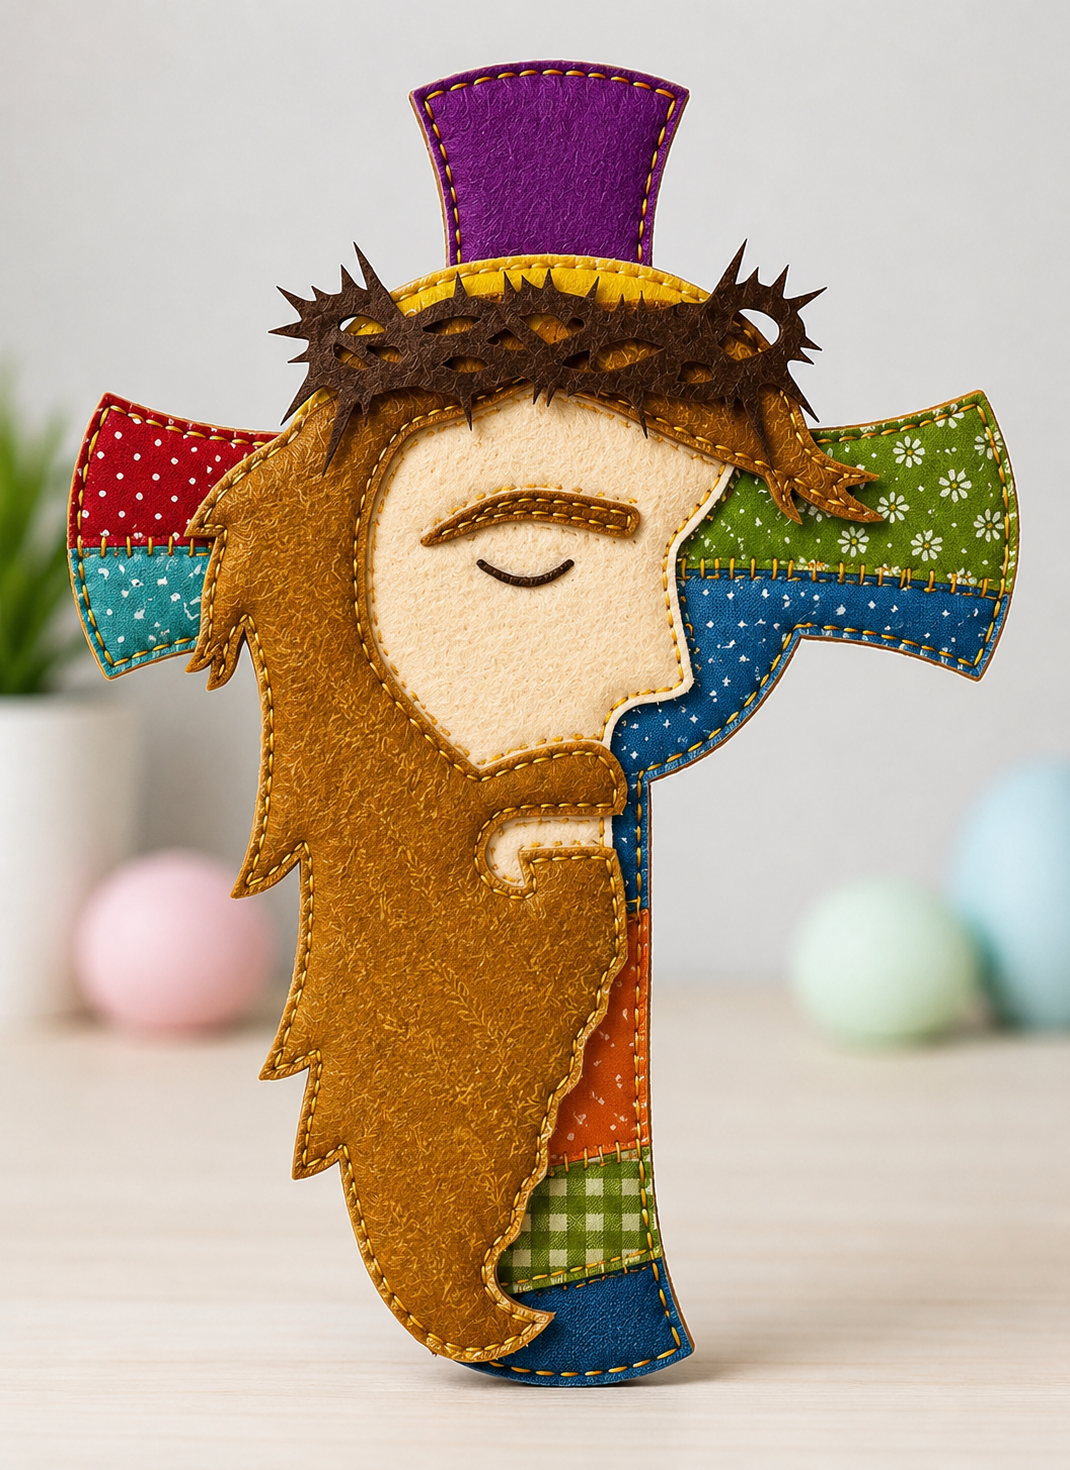
Fabric Cross with Jesus Appliqué Pattern is a meaningful sewing project that combines traditional fabric appliqué, decorative hand stitching, patchwork details, and a faith-inspired design in one colorful handmade piece. Inspired by the project shown in the reference image, this fabric cross features a stylized representation of Jesus layered over a patchwork cross, with carefully shaped facial features, flowing hair, a crown of thorns, and contrasting fabrics that create depth and personality. The combination of warm brown, cream, blue, green, red, turquoise, purple, and golden tones makes the finished piece visually interesting without losing its spiritual character. Although the design may initially look complex, it can be divided into manageable fabric pieces and assembled gradually. Beginners with basic appliqué experience can approach the project successfully by working slowly and preparing accurate templates. More experienced sewists can personalize the project with embroidery, quilting, decorative threads, and additional fabric textures.
The main concept behind the Fabric Cross with Jesus Appliqué Pattern is layered fabric appliqué, a technique in which individually cut fabric shapes are positioned over a foundation and stitched in place. In this design, the cross works as the structural background while the appliqué of Jesus becomes the primary focal point. The patchwork sections of the cross introduce different prints and colors, while the neutral face fabric separates the portrait visually from the stronger colors surrounding it. Decorative stitching around the edges helps define every shape and gives the project the charming handmade appearance visible in the reference design. Instead of treating the project as one complicated illustration, think of it as a collection of simple components: the cross, hair, face, nose, eyebrow, mouth, hand, crown, and clothing or background sections. Once these components are prepared separately, arranging and sewing them becomes much easier.
Another advantage of making a Fabric Cross with Jesus Appliqué Pattern is the amount of creative freedom available to the maker. You do not need to reproduce every fabric exactly as shown in the inspiration image, because the same basic pattern can look beautiful in country fabrics, modern cotton prints, batiks, solids, linen blends, or fabric scraps from previous sewing projects. The cross can be made as a wall hanging, framed textile artwork, church decoration, handmade gift, seasonal display, or decorative panel. Colors can also be adapted to match a particular room or personal preference while maintaining the recognizable composition of the design. Careful fabric selection, accurate cutting, good stabilization, and controlled stitching will have a greater impact on the finished result than using any particular brand of material. By understanding these basic principles, you can create a durable project that feels personal while remaining faithful to the visual structure of the original inspiration.
Materials, Fabric Selection, and Pattern Preparation
Begin your Fabric Cross with Jesus Appliqué Pattern by choosing a firm base fabric for the cross. Medium-weight quilting cotton is one of the easiest choices because it cuts cleanly, accepts fusible web well, and works comfortably with both hand and machine stitching. The inspiration design uses several colorful sections rather than one single fabric, so gather small pieces in colors such as red, turquoise, green, blue, orange, and purple. Printed fabrics with dots, flowers, checks, or tiny geometric motifs can add the appealing patchwork effect seen in the reference piece.
DISCOVER MORE FREE PATTERNS HERE!
For the Jesus appliqué, select a warm cream or light beige fabric for the face and hand. Choose a golden brown or medium brown fabric for the hair appliqué, and use a darker brown fabric for the crown of thorns. A small amount of dark brown or black fabric, embroidery floss, or thread can be used for the mouth and other fine facial details. Keeping the face relatively neutral allows the surrounding patchwork colors to remain decorative without competing with the central expression.
You will also need lightweight fusible web designed for fabric appliqué, sharp fabric scissors, paper scissors, an iron, an ironing surface, matching or contrasting thread, straight pins or appliqué pins, and basic sewing supplies. A fabric marking pen with removable ink is helpful for positioning. If you prefer the visible handmade appearance of the example, prepare embroidery floss or heavier decorative thread in gold, mustard, or another contrasting shade. A stabilizer behind the project can also improve the quality of decorative stitching.
To create the templates, sketch the main cross shape first and then divide the illustration into separate appliqué elements. A practical pattern should contain individual templates for the cross, face, hair, nose, hand, crown, eyebrow, mouth, and any additional decorative sections. Trace each element onto paper and mark its placement relationship to neighboring pieces. Numbering the templates can be extremely helpful, especially where multiple shapes overlap around the hair and crown.
When preparing an appliqué pattern, remember that overlapping pieces need a small amount of hidden fabric underneath neighboring shapes. For example, the edge of the face should extend slightly beneath the hair, and the crown should overlap the upper portion of the hair. These hidden extensions prevent small gaps from appearing after stitching. They also make assembly easier because each new piece can be positioned securely over the previous layer.
Before cutting your best fabrics, make a quick paper arrangement of the entire Fabric Cross with Jesus Appliqué Pattern. Place the paper components together and check the proportions, especially the size of the head compared with the cross. The cross should remain clearly visible on both sides and above the portrait, while the hair should flow naturally down the vertical section. Making these adjustments with paper is much easier than correcting fabric after fusible adhesive has already been applied.
Building the Patchwork Fabric Cross
Start construction with the fabric cross because it forms the foundation of the entire composition. You may create one solid cross or reproduce the patchwork appearance by dividing the shape into several sections. For a design similar to the photograph, use contrasting fabric pieces across the horizontal arms and along the vertical stem. The mixture of prints makes the background more playful and emphasizes the handmade patchwork character of the project.
Cut the cross pieces with enough accuracy that they fit together neatly. If you are piecing them traditionally, sew neighboring sections right sides together using a consistent seam allowance, then press the seams carefully. Another method is to create a full cross from one foundation fabric and fuse smaller decorative fabric sections directly onto it. The second approach is particularly convenient for beginners because it eliminates several small construction seams.
The horizontal section can feature two different colors on each arm, while the lower part can contain a sequence of orange, green, and blue fabrics similar to the visual arrangement in the reference image. The top section can include a brighter fabric such as purple to create contrast behind the head. These colors do not need to match exactly. The important design principle is to distribute colors so no single print overwhelms the central Jesus appliqué.
Once the cross is assembled, press it from the back using the temperature appropriate for your fabrics. Apply interfacing or stabilizer if the cross feels too flexible. Stabilizing this foundation is especially useful when using dense decorative stitches because unsupported cotton may wrinkle around the stitching. A smooth and stable base will make every later appliqué layer easier to position.
Finish the outside edge of the cross using an appliqué stitch, blanket stitch, satin stitch, or decorative running stitch. The sample has a prominent handcrafted edge that visually outlines the entire cross. You can imitate this appearance with contrasting golden thread. Keep the stitch spacing reasonably consistent, particularly around corners and curves, but remember that slight variations can contribute to the handmade charm of the finished textile artwork.
At this point, place the prepared face and hair templates temporarily over the cross without fusing them. This test placement is important because much of the center will eventually be covered by the Jesus fabric appliqué. Make sure enough colored patchwork remains visible at the top, sides, and bottom. Adjust the portrait slightly before permanently attaching anything if the cross appears visually unbalanced.
Creating and Layering the Jesus Fabric Appliqué
The next stage of the Fabric Cross with Jesus Appliqué Pattern is constructing the portrait. Begin by tracing the face template onto fusible web according to the manufacturer’s directions. Remember that many fusible appliqué methods reverse the image during transfer, so check the orientation before cutting. Fuse the adhesive to the wrong side of your cream fabric and cut the face carefully with smooth, controlled movements.
Prepare the hair using the same method. The hairstyle is one of the most distinctive elements in the reference design, extending around the face and continuing downward along the cross. Instead of cutting every tiny detail into one fragile fabric piece, simplify the outer silhouette where necessary. Larger shapes are easier to fuse and stitch, while a few carefully placed points along the edge can still suggest flowing strands of hair.
Position the face first, following the center of your paper pattern. Once you are satisfied with the position, fuse it according to the adhesive instructions. Add the brown hair around and partially over the face, paying attention to the forehead, side profile, and lower flowing section. This layered construction creates the dimensional appearance that makes fabric appliqué more expressive than simply printing an illustration onto fabric.
Next, create the smaller facial components. The long curved nose can be cut from brown or golden-brown fabric and positioned across the center of the face. The eyebrow may be created with a narrow fabric strip or dense embroidery. For the small curved mouth, embroidery is often easier than trying to cut an extremely thin piece of fabric. These details should remain simple so the calm expression stays readable from a distance.
The hand can be cut from the same cream fabric used for the face. Place it over the lower portion of the hair where it appears in the reference composition. A small brown or gold fabric outline can help separate the hand from the surrounding colors. When appliqué pieces of similar values overlap, this type of stitched outline is particularly useful because it prevents shapes from visually blending together.
After all major pieces are fused, stitch around every appliqué component. A narrow blanket stitch works especially well for this sewing appliqué project because it secures the edges while still preserving a handcrafted look. Machine stitching is faster, but hand stitching can create additional texture and character. Work slowly around the face and hand because these areas contain tighter curves where uneven stitching will be more noticeable.
Adding the Crown of Thorns, Decorative Stitching, and Finishing Details
The crown of thorns appliqué is positioned across the upper part of the head and becomes one of the strongest visual details in the project. Cut it from dark brown fabric so it contrasts clearly against the golden hair. A simplified continuous shape is generally more durable than many tiny independent thorns. Create an irregular organic silhouette with pointed extensions, while avoiding extremely narrow sections that could fray easily during handling.
Fuse the crown over the hair only after confirming the position. It should cross the forehead area and extend beyond the sides of the head, similar to the composition visible in the inspiration piece. Once attached, stitch carefully around the perimeter. Dark matching thread creates a subtle finish, while golden contrasting thread connects the crown visually with the decorative stitching used throughout the rest of the design.
Decorative stitching is an essential characteristic of this Fabric Cross with Jesus Appliqué Pattern. Use it around the face, hair, nose, hand, crown, patchwork sections, and outer cross edge. A warm gold or mustard thread works beautifully with the brown hair while remaining visible against blues, greens, reds, and purples. Maintain similar stitch length throughout the project to give all the separate pieces a unified appearance.
After the appliqué is completely secured, inspect the surface carefully. Trim loose threads and reinforce any sharp corners or narrow points that appear vulnerable. Press the project gently from the back rather than placing a hot iron directly over heavy decorative stitching. If fusible adhesive was used, follow its recommended pressing temperature so the layers remain firmly attached without scorching or distorting the fabric.
The finished piece can be mounted in several ways depending on its intended purpose. For a fabric wall hanging, add batting and a backing layer before quilting around the main silhouette. For framed textile art, mount the completed appliqué securely over a firm fabric-covered backing. You could also attach a hanging loop to the top or add a clean fabric binding around a rectangular background if you prefer a more traditional quilted presentation.
Finally, personalize the Fabric Cross with Jesus Appliqué Pattern while preserving its central structure. Small changes in fabric prints, stitch colors, hair tones, or cross colors can make each version unique. You may use fabric scraps from meaningful projects or select colors connected with a particular celebration or décor style. The goal is not mechanical perfection but careful craftsmanship, balanced color placement, secure construction, and a respectful handmade interpretation of the faith-inspired subject.
Frequently Asked Questions About the Fabric Cross with Jesus Appliqué Pattern
What is a Fabric Cross with Jesus Appliqué Pattern?
A Fabric Cross with Jesus Appliqué Pattern is a sewing design in which fabric shapes are layered and stitched to create a cross featuring a representation of Jesus. The cross normally acts as the background or foundation, while the portrait is created from separate appliqué pieces such as the face, hair, crown, and hand. Decorative stitching can be added to outline the components and provide texture.
Is this project suitable for beginners?
A confident beginner can make this project, although some small curved areas require patience. If you are new to fabric appliqué, simplify the hair and crown shapes and use fusible web to hold everything securely before stitching. Practicing blanket stitch on scrap fabric first can also improve your results.
What is the best fabric for appliqué?
Quilting cotton is an excellent choice because it is easy to cut, press, fuse, and sew. Fabrics that are extremely stretchy or loosely woven can be more difficult to control. Using cotton for both the foundation and most appliqué pieces creates predictable results and makes the appliqué pattern easier to assemble.
Do I need fusible web for this pattern?
Fusible web is not absolutely required, but it makes construction much easier. It temporarily or permanently holds appliqué pieces in position while you stitch around their edges. Traditional needle-turn appliqué is another option for experienced hand sewists, although it produces a softer edge and a slightly different appearance from the project shown.
Can I sew the appliqué by hand?
Yes. Hand stitching is an excellent option for this design and can enhance its handcrafted appearance. Blanket stitch, whip stitch, running stitch, and backstitch can all be used. Decorative embroidery can also be particularly effective for the eyebrow, mouth, and small facial details.
Can I make the project with a sewing machine?
Yes. A sewing machine with an appliqué, blanket, zigzag, or satin stitch can secure most shapes efficiently. Reduce the sewing speed around tight curves and stop with the needle down when turning the fabric. This technique helps maintain smooth outlines around the face, nose, crown, and hair.
How can I prevent the appliqué from puckering?
Use a stable foundation, avoid stretching the fabric while sewing, and consider placing lightweight stabilizer behind the work. Excessive thread tension can also cause puckering. Test your chosen stitch, tension, and stabilizer on scrap fabric before sewing the actual Fabric Cross with Jesus Appliqué Pattern.
Can I change the colors shown in the design?
Absolutely. The patchwork cross is especially suitable for personalization. You might create a traditional palette with burgundy, cream, brown, and gold or choose brighter blues, greens, reds, and purples. Keeping good contrast between the face, hair, crown, and cross is more important than copying specific colors.
How can I enlarge or reduce the pattern?
If you create or print templates, they can be enlarged or reduced proportionally before being transferred to fabric. Avoid changing individual pieces independently because they may no longer fit correctly. Resize the entire Jesus appliqué pattern at the same percentage so the relationship between the face, hair, crown, hand, and cross remains consistent.
What can I make with the completed appliqué?
The finished design can become a wall hanging, fabric panel, framed decoration, quilt block, banner, handmade gift, or decorative centerpiece. If the project will be handled frequently, reinforce the edges carefully and consider adding batting and backing for additional strength.
How do I make the crown of thorns easier to sew?
Avoid cutting extremely thin thorn points. Slightly wider points are easier to fuse and stitch and are less likely to fray. You can also simplify some of the interior spaces and use decorative stitching to suggest additional thorn details instead of cutting every detail from fabric.
What stitch works best around the appliqué pieces?
Blanket stitch is particularly attractive for this design because it provides both security and decoration. A narrow zigzag is another dependable option, while straight stitching close to the raw edge creates a more rustic appearance. The best choice depends on whether you want the edges to appear polished, traditional, or deliberately handmade.
Conclusion
Creating a Fabric Cross with Jesus Appliqué Pattern is a rewarding way to combine patchwork, appliqué, decorative stitching, and textile art in one cohesive handmade project. The process begins with choosing coordinated fabrics and preparing accurate templates, followed by constructing the colorful fabric cross that supports the entire composition. By working from the largest shapes toward the smallest details, the project becomes much easier to manage.
The central portrait is created by layering the cream face, golden-brown hair, hand, facial details, and dark crown of thorns appliqué over the patchwork background. Fusible web can keep these pieces stable, while blanket stitching or another decorative stitch provides both reinforcement and definition. Careful positioning is especially important because the relationship between these overlapping shapes determines how clearly the final illustration can be recognized.
The colorful fabrics shown in the inspiration image also demonstrate how effective small scraps can be in a fabric cross project. Instead of relying on expensive or specialized materials, carefully selected cotton remnants can create rich contrast and visual texture. Floral prints, dots, checks, small geometric designs, and solid fabrics can all work together when their colors are distributed thoughtfully.
EASILY FIND THE FREE PDF FOR THIS PATTERN HERE!
Most importantly, this project offers plenty of room for personal interpretation. Whether you transform it into wall art, a quilted panel, a handmade gift, or a decorative faith-inspired piece, the basic techniques learned here can also be applied to many future fabric appliqué patterns. Accurate preparation, patient stitching, stable fabric layers, and thoughtful color choices are the key elements that will help produce a clean and attractive result. If you make your own Fabric Cross with Jesus Appliqué Pattern, leave your sincere opinion about the project and share your suggestions. Which fabric colors or decorative stitches would you choose for your version? Your ideas can inspire new variations and creative ways to personalize this meaningful appliqué design.