
The Crochet Santa Claus Sofa Organizer Pattern is a festive and practical crochet project designed to bring Christmas charm to a living room while keeping everyday objects organized. Inspired by the Santa-shaped sofa organizer shown in the reference image, this project combines a sturdy rectangular base with dimensional appliqué, storage pockets, a decorative belt, dangling legs, and soft boots. The finished organizer can hold items such as remote controls, reading glasses, small craft supplies, notebooks, or other lightweight accessories that tend to disappear between sofa cushions. Because the design combines decorative crochet with useful storage, it can become part of your holiday décor instead of being something you need to hide. This tutorial uses US crochet terminology and explains the construction in manageable sections so intermediate beginners can follow the process confidently. Rather than depending on one fixed commercial pattern, the instructions show you how to recreate the look using standard crochet techniques and adjustable measurements.
One of the most appealing things about a Crochet Santa Claus Sofa Organizer Pattern is the opportunity to combine several crochet techniques in a single project. You will work with single crochet, half double crochet, double crochet, increases, decreases, working in rounds, surface assembly, appliqué, and simple shaping. The main colors are classic Christmas red, white, black, peach or skin tone, and a small amount of gold or mustard yarn for Santa’s buckle. A dense yarn produces the structured appearance seen in the photo, although medium-weight yarn can also be used when worked with a smaller hook and tighter tension. The organizer does not need to match an exact number of stitches because sofas and armrests vary considerably in width. Instead, the most reliable approach is to crochet to measurements and adjust the foundation chain to your own furniture. This makes the project more useful while preserving the recognizable Santa Claus design.
Before starting the Crochet Santa Claus Sofa Organizer Pattern, choose washable yarn that can tolerate regular handling because organizers are touched much more frequently than decorative wall pieces. For a plush and substantial result, bulky yarn is an excellent option, while worsted-weight yarn creates a lighter organizer. You will also need an appropriate crochet hook, a yarn needle, scissors, stitch markers, optional fiberfill for dimensional features, and safety eyes or embroidered eyes. If the organizer will be accessible to small children, embroidered eyes are generally the more practical choice because they avoid detachable components. Gauge is not extremely strict for this home décor project, but consistent tension is important so the pockets remain firm and the main panel does not stretch excessively. As you crochet, periodically place the panel over the sofa arm to confirm that the size and drape are appropriate.
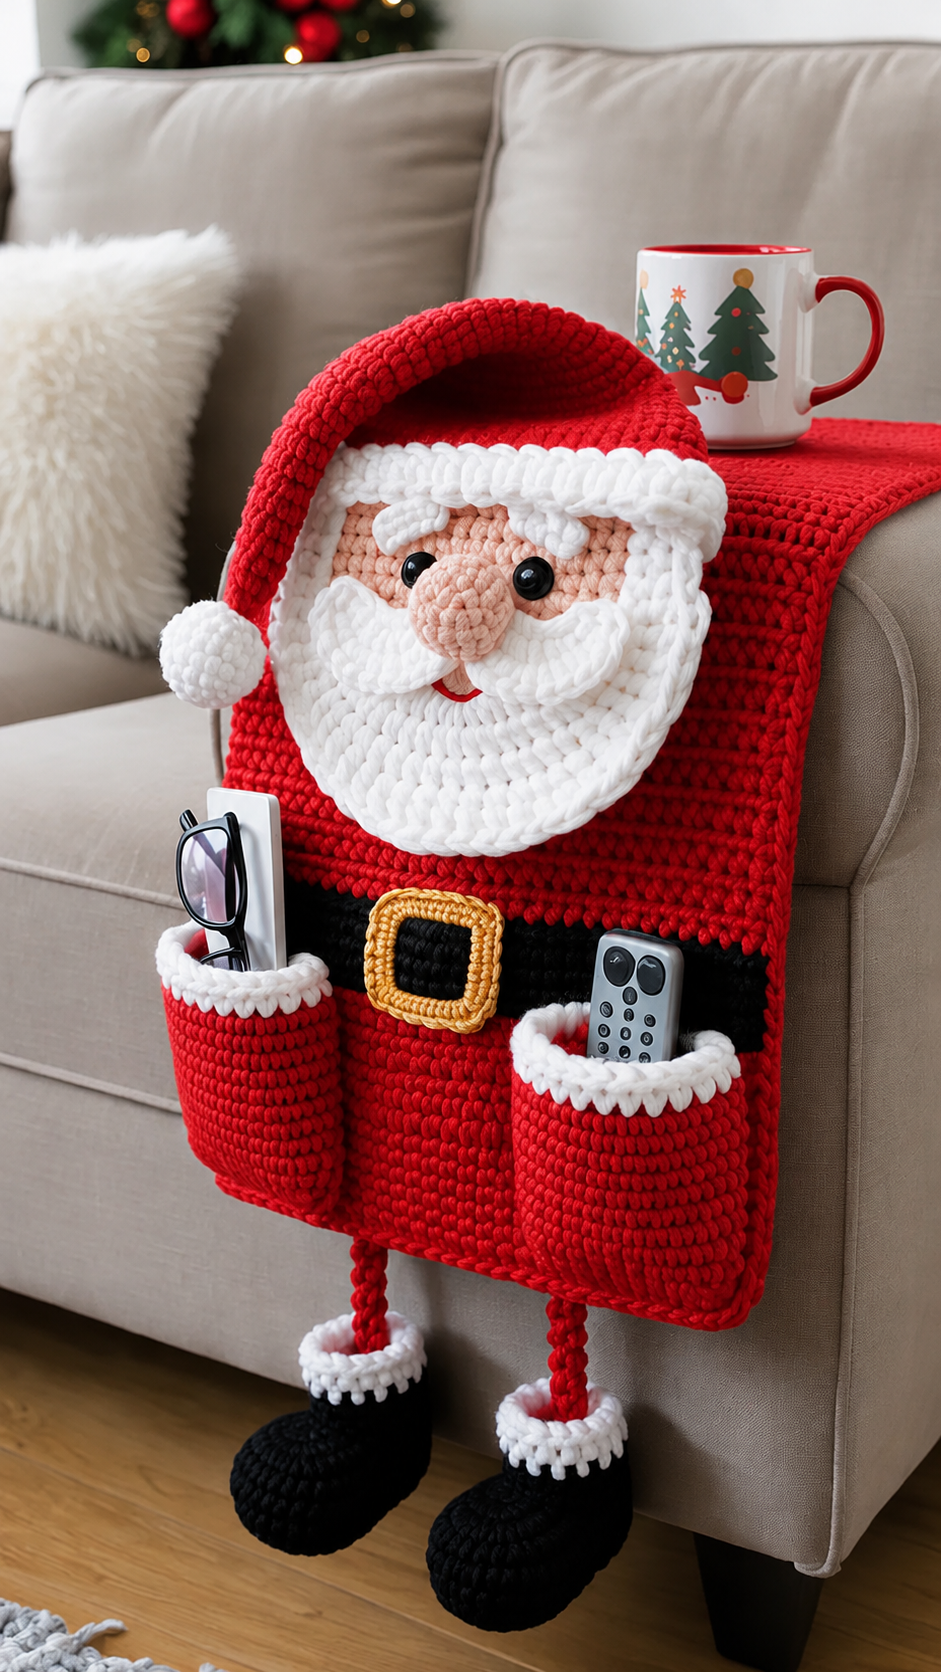
Materials, Crochet Abbreviations, and Preparing the Main Organizer Panel
For this Crochet Santa Claus Sofa Organizer Pattern, prepare red yarn for the body and hat, white yarn for Santa’s beard and trim, black yarn for the belt and boots, peach or beige yarn for the face and nose, and gold or mustard yarn for the buckle. A bulky yarn with approximately a 6–8 mm crochet hook creates a thick organizer similar to the reference, but always select the hook recommended for your yarn and adjust downward slightly if the fabric feels too loose. You will also need stitch markers, a tapestry needle, scissors, and a small quantity of stuffing for Santa’s nose if you want it to appear three-dimensional.
DISCOVER MORE FREE PATTERNS HERE!
The main US crochet abbreviations used throughout this project are ch = chain, sl st = slip stitch, sc = single crochet, hdc = half double crochet, dc = double crochet, inc = increase, dec = decrease, st = stitch, sts = stitches, BLO = back loop only, and FO = fasten off. An increase normally means placing two stitches into the same stitch. A decrease means combining two stitches into one. Learning these basic crochet keys makes the construction much easier to understand.
Begin the main organizer panel in red. Make a foundation chain approximately 2–3 cm wider than the sofa arm so the organizer can sit comfortably without being pulled tightly. For many sofas, a finished width of approximately 35–45 cm works well, although you should measure your own furniture before beginning. Row 1: Sc in the second ch from the hook and in every ch across, ch 1, turn. Row 2: Sc in every st across, ch 1, turn.
Continue repeating Row 2 until the red panel reaches approximately 75–95 cm long. This length allows one section to hang down the outside of the arm while another section extends over the armrest and slightly toward the inside of the sofa. If your furniture has an especially wide arm, simply continue crocheting additional rows. Keep your edges straight by counting the stitches every few rows and placing markers in the first and last stitch.
To create the thicker upper section visible in the reference design, you may use hdc instead of sc for the portion that lies across the top of the sofa arm. A useful transition is to crochet the lower front section in sc for firmness and then work approximately 25–35 cm in hdc for greater flexibility. The basic formula is simple: ch 1, hdc in each st across, turn, then repeat until the top section reaches the desired depth.
Finish the main panel by crocheting one round of sc evenly around the entire outer edge. Work approximately one sc into each stitch along the top and bottom edges and distribute stitches evenly along the row ends. Place 3 sc in each corner to prevent curling. This edging strengthens the organizer, creates a cleaner outline, and provides an excellent foundation for attaching pockets or decorative elements later.
Crochet the Storage Pockets, Santa Belt, Buckle, and Body Details
The organizer in the reference image features several practical pockets across the lower portion. Start by crocheting two smaller side pockets. For each pocket, make a chain approximately 13–16 cm wide. Row 1: Sc in the second ch from the hook and each ch across. Rows 2 onward: Ch 1, turn, sc across until the rectangle reaches approximately 16–20 cm tall. Leave a long yarn tail for sewing.
For the larger center pocket, create a rectangle approximately 15–20 cm wide and about 18–22 cm tall. Use the same simple formula of sc in every st, turning after each row. These dimensions are suggestions rather than strict requirements because your pocket size should correspond to the finished width of your organizer. Before attaching anything, position all three pockets on the red panel and make sure there is comfortable spacing between them.
Add white trim to the side pockets to reproduce Santa’s festive suit details. Join white yarn at one upper corner and crochet 1 row of sc across the top. For a slightly more decorative edge, work the next row as [sc, ch 1, skip 1 st] across, or use a simple shell variation such as 5 dc in one st, skip 2 sts, sl st in next st. Keep this decoration relatively shallow so remote controls and glasses can still slide easily into the pockets.
Position the pockets on the lower front portion of the organizer. Using matching red yarn and a yarn needle, sew around the left side, bottom edge, and right side, leaving the top completely open. Reinforce the upper corners with several extra stitches because these areas receive the most stress. For better durability, avoid storing extremely heavy objects because the piece is intended as a soft crochet organizer rather than a rigid container.
Next, crochet Santa’s black belt. Chain enough stitches to match the full width of the organizer and work approximately 5–8 rows of sc, depending on your yarn thickness. Position the strip horizontally behind or just above the storage pockets and sew it securely to the red panel. The strong black stripe creates visual contrast and immediately makes the organizer resemble Santa’s traditional red suit.
For the buckle, use gold or mustard yarn. Crochet a small rectangular frame by making a chain large enough to surround the center of the belt, joining it carefully, and working sc around the shape. Another easy method is to crochet a solid gold rectangle and then attach a smaller black rectangle over its center, creating the illusion of an open buckle. Sew the finished buckle to the center of the black belt and weave all ends securely into the back of the work.
Creating Santa’s Face, Hat, Beard, Mustache, Nose, Legs, and Boots
The face is the centerpiece of the Crochet Santa Claus Sofa Organizer Pattern. Using peach or beige yarn, begin with a magic ring. Round 1: Work 6 sc into the ring. Round 2: Inc in every st for 12 sts. Round 3: [Sc 1, inc] around. Round 4: [Sc 2, inc] around. Continue increasing in this sequence until the circle measures approximately 19–24 cm across, then work one or two rounds without increases to stabilize the shape.
Create the nose separately for a dimensional result. With peach yarn, make a magic ring and crochet 6 sc into it. Increase around for one or two rounds, then work several rounds evenly before adding a tiny amount of fiberfill. Crochet a few decreases to close the back and leave a long tail. Sew the nose to the center of the face, positioning it slightly below eye level.
For the eyes, attach black safety eyes before sewing the face to the organizer, or embroider round eyes with black yarn. To make the eyebrows, crochet two short white chains and work sc back across each chain. Position them above the eyes with a gentle curve. Small details are particularly important in an appliqué design because slightly changing the position of the eyes or eyebrows can dramatically change Santa’s expression.
Crochet the beard using white yarn. You can make a large semicircle separately by beginning with a magic ring and increasing across successive rows, or create individual beard sections using small oval or teardrop shapes. For the mustache, crochet two matching pieces: ch 7–10, sc back across, then increase near the outer end to create a fuller curve. Sew the two pieces below the nose so their inner ends meet in the center.
The hat can be worked as a large red triangle or tapered panel. Begin with a row wide enough to cover the upper portion of Santa’s head, then gradually decrease by working sc2tog near both edges every few rows. Continue until only a few stitches remain. Add a broad white band along the bottom with several rows of sc, then make a white pom-pom either from yarn strands or by crocheting a stuffed sphere using the same basic increase-and-decrease method used for the nose.
Finally, create two red legs and two black boots. For each leg, ch 4–6 and join with sl st, then work sc in continuous rounds until the cord-like leg reaches approximately 15–20 cm. Add a short white cuff. Crochet each boot as an oval beginning around a foundation chain: work sc along one side, several sc into the final chain, and continue around the opposite side. Increase near the toe for several rounds, work even rounds to build height, lightly stuff if desired, and sew each boot securely to a leg before attaching both legs to the bottom edge of the organizer.
Assembly, Finishing Tips, FAQ, and Care for the Finished Organizer
Before final assembly, lay every component on the main panel without sewing it in place. Position Santa’s face above the black belt and center it carefully from left to right. Arrange the hat so it overlaps the upper section of the face, then place the eyebrows, eyes, nose, mustache, beard, and white hat trim. Taking a photo at this stage can help you remember the arrangement while you sew the individual pieces in place.
Sew the largest components first. Attach the face using peach yarn or a neutral matching color, stitching around the outer edge with small, consistent stitches. Add the beard over the lower portion of the face, followed by the hat and its white band. After these main layers are stable, sew down the smaller facial details. Hide yarn tails on the back of the appliqué whenever possible to keep the front neat.
Check every storage pocket again after assembly. Slide a lightweight remote or similar object inside each one and make sure the pocket opening does not collapse inward. If a pocket feels too loose, crochet or sew an additional reinforcement row around its side and bottom edges. If the top edge stretches excessively, a row of tight sl st can provide extra stability without significantly changing the appearance.
The finished organizer should sit over the sofa arm with the Santa section facing outward and the longer upper panel extending across the armrest. Depending on the sofa, you can increase stability by extending the back portion farther down the inside edge. Another option is to add a non-slip fabric backing, although this is completely optional. Always test the organizer carefully before filling the pockets.
For cleaning, follow the washing instructions provided for the specific yarn you selected. In general, gentle washing is preferable because the project contains several sewn-on crochet components. Avoid aggressive wringing, which can distort the face and pockets. Reshape the organizer while damp and allow it to dry flat whenever possible so the rectangular body maintains its original proportions.
The beauty of the Crochet Santa Claus Sofa Organizer Pattern is its adaptability. Once you understand the construction, you can change the dimensions, number of pockets, facial expression, yarn texture, beard style, buckle size, or even the length of Santa’s legs. The project can therefore be personalized without changing the essential formula: a sturdy red organizer panel, functional pockets, Santa appliqué, black belt, festive white details, and playful dangling boots.
FAQ – Frequently Asked Questions
Is the Crochet Santa Claus Sofa Organizer Pattern suitable for beginners? Yes, an adventurous beginner who already understands chain, single crochet, slip stitch, increases, and decreases should be able to complete the project. Most components use simple stitches. The main challenge is assembly and positioning rather than complicated stitch combinations.
What yarn is best for a Crochet Santa Claus Sofa Organizer Pattern? Bulky acrylic or cotton-blend yarn works particularly well when you want a firm and substantial organizer. Worsted-weight yarn is also suitable, although you may need more stitches and rows to reach the same measurements. Choose a yarn that produces a dense fabric and is easy to clean.
How large should the finished sofa organizer be? There is no universal size because sofa arms vary. A practical starting point is approximately 35–45 cm wide and 75–95 cm long, but the best method is to measure your own sofa before crocheting. Add a few centimeters of ease so the panel drapes naturally over the arm.
Can I make the organizer with only single crochet? Absolutely. Single crochet (sc) creates a dense, sturdy fabric that is ideal for pockets and home organizers. Using only sc also makes the project easier for beginners. Half double crochet is suggested mainly when you want the section over the armrest to have a softer drape.
How do I make the pockets stronger? Use a slightly smaller crochet hook than you would normally use for the selected yarn, maintain firm tension, and reinforce the pocket corners when sewing. You can also crochet the pocket pieces in BLO or use two strands of yarn together if additional structure is needed.
Can I change the number of storage pockets? Yes. The three-pocket arrangement is inspired by the reference design, but you can easily make two large pockets, four narrow pockets, or a combination of different sizes. Arrange them before sewing and leave enough space between pockets to prevent overcrowding.
How can I keep Santa’s face flat? Make sure your increase pattern remains evenly distributed while crocheting the face circle. If the circle becomes wavy, you may have too many increases. If it begins forming a bowl, you may have too few increases. Blocking the finished piece before assembly can also improve its shape.
Can the Santa face be crocheted directly onto the organizer? It is possible, but separate appliqué pieces are easier to position and adjust. Crocheting the face, beard, hat, and other features independently allows you to experiment with placement before sewing them permanently to the panel.
Are safety eyes necessary? No. Black yarn can be used to embroider the eyes, which creates a completely crocheted and sewn finish. Embroidery is especially useful when you want to avoid detachable plastic components.
How do I resize the Crochet Santa Claus Sofa Organizer Pattern? Measure the width of your sofa arm and adjust the foundation chain until the organizer reaches the desired width. Then crochet additional or fewer rows to control the total length. Resize the face, pockets, belt, and decorative pieces proportionally so the overall design remains balanced.
Can I make the pattern with leftover yarn? Many decorative pieces are ideal for leftovers. The eyebrows, mustache, nose, buckle, cuffs, and facial details require relatively small quantities. The main red panel, however, uses significantly more yarn, so having enough yarn from the same dye lot is helpful for a consistent appearance.
How can I make the Santa boots more dimensional? Crochet the boots in continuous rounds instead of making flat appliqués and add a small amount of fiberfill. Do not overstuff them. A lightly stuffed boot keeps its shape while remaining soft enough to hang naturally from the bottom of the organizer.
Can this design be used somewhere other than a sofa? Yes. With dimensional adjustments, the basic organizer can hang over a chair arm, recliner, bedside rail, or other suitable furniture surface. Always make sure it hangs securely and does not interfere with the safe use or movement of the furniture.
Conclusion
The Crochet Santa Claus Sofa Organizer Pattern combines Christmas decoration and everyday organization in one creative handmade project. Throughout this tutorial, you learned how to build a sturdy red foundation panel, crochet functional storage pockets, create Santa’s black belt and gold buckle, construct his face and dimensional nose, add the beard and mustache, shape the Christmas hat, and finish the design with dangling legs and black boots.
You also learned essential US crochet terms such as ch, sc, hdc, dc, sl st, inc, dec, BLO, st, and FO, along with practical ways to resize the project for different sofa arms. Instead of relying on a rigid stitch count, the project can be adjusted according to actual measurements, making it easier to obtain an organizer that fits your furniture properly.
EASILY FIND THE FREE PDF FOR THIS PATTERN HERE!
Most importantly, this design leaves plenty of room for creativity. You can make Santa traditional or whimsical, enlarge the pockets for remote controls, create smaller sections for glasses, add extra white trim, change the buckle design, or personalize the facial expression. A handmade Crochet Santa Claus Sofa Organizer Pattern can become both a useful Christmas accessory and a memorable seasonal crochet project. If you make your own version, leave your sincere opinion about the project and share your suggestions. What would you change, add, or personalize in this Santa sofa organizer? Your ideas can inspire new variations and make the pattern even more creative for other crochet lovers.