
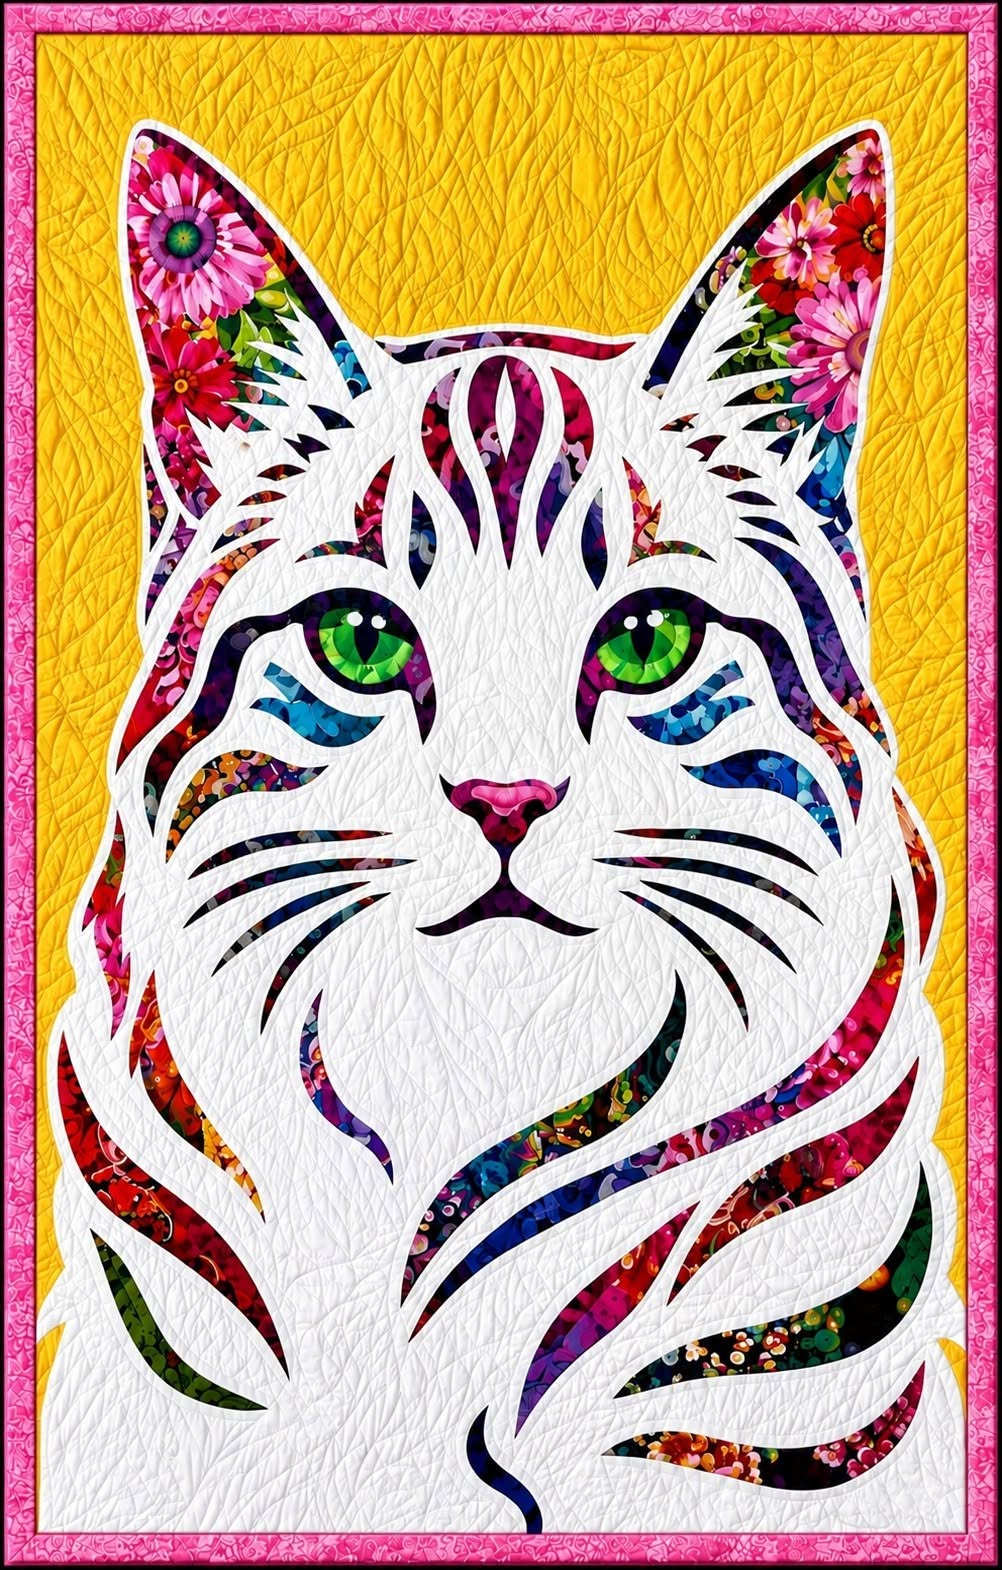
Colorful Cat Portrait Quilt Panel Pattern is a striking textile project that combines artistic appliqué, patchwork fabrics, careful layering, and expressive quilting to transform a simple fabric background into a dramatic feline portrait. Inspired by the project shown in the reference image, this design uses a mostly light-colored cat silhouette while allowing narrow sections of vivid floral and multicolored fabrics to appear through the ears, forehead, eyes, cheeks, body, and sweeping fur lines. The result feels almost like stained glass made from fabric. Although the finished piece looks highly detailed, it becomes much easier to approach when the cat is divided into individual shapes and assembled gradually. This project is especially rewarding for quilters who enjoy fabric appliqué, scrap quilting, portrait designs, and decorative wall panels.
One of the most appealing characteristics of this Colorful Cat Portrait Quilt Panel Pattern is the contrast between the calm white or ivory background and the energetic prints hidden inside the cat portrait. Instead of creating the entire animal from realistic gray, black, or brown fabrics, the design treats the cat as an artistic canvas. Floral scraps, jewel tones, reds, purples, greens, blues, and oranges form accents beneath curved white sections representing the facial markings and fur. Bright green eyes immediately attract attention, while the small pink nose gives the face an expressive focal point. This balance between neutral fabric and vibrant color makes the project suitable for a sewing room, living room, craft studio, hallway, or handmade gift.
The term Colorful Cat Portrait Quilt Panel Pattern describes more than an ordinary animal appliqué. A quilt panel is a textile composition designed as one main visual scene rather than a repeating collection of traditional blocks. A portrait quilt focuses on a recognizable subject, while a pattern provides the shapes and construction plan needed to reproduce that subject. In this project, those ideas come together through layered pieces that create the cat’s ears, eyes, forehead markings, muzzle, whiskers, neck, and chest. You do not need to reproduce every tiny fabric curve perfectly to achieve a beautiful result. What matters most is maintaining the overall symmetry of the face, the recognizable feline proportions, and the colorful flowing shapes that give the portrait its distinctive personality.
Materials, Fabric Selection, and Preparing the Cat Pattern
Begin by selecting a sturdy light-colored cotton for the background of your cat quilt panel. White, ivory, cream, or very pale gray can work especially well because these shades emphasize the colorful appliqué fabrics. Quilting cotton is an excellent choice because it is easy to cut, press, fuse, and stitch. Cut the background several centimeters larger than your intended finished panel so that you have enough room for trimming after quilting. For example, if you want a medium wall panel, you might begin with a background approximately 50 × 70 cm, although the design can be enlarged or reduced according to your preferred display space.
DISCOVER MORE FREE PATTERNS HERE!
Next, gather colorful scraps for the decorative areas. The reference design demonstrates how beautifully floral fabric scraps can work in the ears and larger accent sections. Look for fabrics containing magenta, burgundy, purple, turquoise, orange, green, navy, and red. Small-scale prints are particularly useful because several colors remain visible even inside narrow appliqué pieces. You do not need a large amount of any single print, making this an excellent scrap quilt project for using leftover fabrics from previous sewing projects.
For the main cat overlay, choose white or very light fabric that closely coordinates with your background. The subtle difference between the background and the cat pieces can be created through stitching and shadows rather than strong color contrast. This is one of the most interesting aspects of the Colorful Cat Portrait Quilt Panel Pattern. The colorful prints become the strongest graphic elements, while the pale fabric forms the face around them. If you prefer a bolder appearance, you may use cream for the cat and pure white for the background.
You will also need fusible web suitable for appliqué, sharp fabric scissors, small embroidery scissors, an iron, an ironing surface, quilting pins or clips, coordinating sewing thread, batting, and backing fabric. A fine permanent fabric marker or removable marking pen is helpful for transferring complicated shapes. Because the design contains narrow curves around the eyes, whiskers, and forehead, small scissors are extremely useful. A sewing machine with a free-motion quilting foot can make the final quilting stage easier, although standard straight-stitch quilting can also be used.
Before cutting your fabrics, create a full-size paper template of the cat. Divide the drawing into recognizable sections: outer ears, inner ear accents, eyes, forehead markings, cheek markings, nose, mouth, whiskers, face curves, neck, and chest. Maintaining symmetry is especially important around the eyes and muzzle. One simple method is to draw half of the face first, fold the paper along the center line, and trace the opposite side. Some artistic asymmetry can remain in the decorative fur sections because these flowing shapes are meant to feel organic.
When preparing a fusible appliqué pattern, remember that shapes traced onto the paper side of fusible web may need to be reversed depending on your chosen technique. Label every template before cutting it apart. Marks such as “left ear,” “right eye,” “forehead,” and “chest” can prevent confusion later. Numbering complicated curved pieces is also useful. Taking extra time during preparation will make assembly far more enjoyable and will help preserve the recognizable structure of the Colorful Cat Portrait Quilt Panel Pattern.
Creating the Colorful Appliqué and Building the Cat Face
Start the appliqué process with the largest colorful areas. The inner ears are an excellent place to begin because their triangular forms help establish the size and position of the head. Cut two colorful fabric sections slightly larger than the visible ear openings. Floral fabric is ideal here because it creates the rich mosaic appearance seen in the inspiration piece. Fuse these sections into position according to the manufacturer’s instructions for your fusible product, making sure the fabrics remain smooth and free from wrinkles.
Next, create the colorful markings running down the forehead. Rather than using identical pieces, vary the fabric colors while maintaining a roughly symmetrical arrangement. The central markings can include elongated teardrops, curved flames, or narrow leaf-like shapes. Purple, magenta, navy, red, and floral prints work especially well. These small shapes are important because they visually connect the colorful ears with the eyes and lower facial markings.
The eyes deserve special attention because they establish the cat’s expression. Cut almond-shaped eye openings or appliqué pieces with dark outlines. Use bright green fabric for the irises, adding darker green or black sections to create depth. Small black pupils provide definition, while tiny light accents can suggest reflected light. When making a cat portrait appliqué, positioning the pupils evenly is essential. Even a slight difference in direction can dramatically change the expression of the animal.
Continue with the cheek and eye markings. In the reference-inspired composition, curved bands of blue, purple, turquoise, floral, and reddish fabric extend outward from the eyes. Cut these pieces individually and test their positions before permanently fusing them. Think of them as painted brushstrokes made from fabric. Some should curve upward toward the temples, while others can sweep toward the sides of the muzzle. This layered arrangement helps the Colorful Cat Portrait Quilt Panel Pattern feel dynamic rather than flat.
For the nose, choose pink, raspberry, burgundy, or another contrasting fabric. A small triangular shape with gently rounded corners works well. Add a narrow dark line beneath the nose and form two graceful curves to suggest the mouth. These details can be created with narrow appliqué strips, machine stitching, or embroidery. Keeping the mouth understated allows the green eyes and colorful fur accents to remain the primary focal points.
Finally, arrange the larger pale cat sections over the colorful foundation. This creates the characteristic cutout effect in which brilliant fabric appears between white fur shapes. Work slowly around the forehead, cheeks, muzzle, and neck. Before pressing permanently, step back and examine the composition from a distance. The cat should remain recognizable even before the stitching begins. Adjust any curves that look too heavy or too narrow, especially around the eyes, because this stage determines the overall appearance of your fabric cat wall art.
Stitching, Quilting, and Finishing the Portrait Panel
Once every appliqué section is correctly positioned, secure the edges with stitching. A narrow zigzag stitch, satin stitch, blanket stitch, or small straight stitch can all work successfully for raw-edge appliqué. The best choice depends on the finish you want. A satin stitch produces a strong graphic border, while a fine straight stitch gives the project a more organic handmade appearance. Test your stitch on fabric scraps before sewing the portrait itself.
Begin stitching the smallest internal details before moving to the larger outer shapes. Sew around the eyes, pupils, forehead markings, and cheek accents first. Then secure the ears and larger body pieces. Working from the center outward reduces fabric distortion. When sewing around tight curves, lower the needle into the fabric, lift the presser foot, rotate slightly, lower the foot, and continue. Frequent small adjustments usually create smoother curves than trying to force the fabric around the needle.
The whiskers are one of the most delicate features of the Colorful Cat Portrait Quilt Panel Pattern. Instead of cutting extremely thin strips of fabric, you may stitch them directly onto the face. Use dark thread or thread that coordinates with the colorful accents. Begin close to the muzzle and gradually sweep the lines outward. Vary their lengths slightly to produce a natural appearance. Several additional curved lines around the cheeks can suggest fur and create more movement.
After completing the appliqué, prepare the quilt sandwich. Place the backing fabric wrong side up, position batting over it, and place the finished cat panel right side up. Smooth all three layers carefully. Baste them using safety pins, temporary adhesive designed for quilting, or long temporary stitches. Proper basting is important because the quilted cat portrait contains many narrow appliqué elements that can shift if the layers are not firmly secured.
For quilting, use free-motion lines that resemble flowing fur. The inspiration image contains irregular, organic stitching across the light background and inside the pale areas of the cat. This type of free-motion quilting adds texture without competing with the colorful appliqué. You can quilt gentle curves, loops, waves, and overlapping lines. There is no need for every line to be identical. Slight variations reinforce the handmade character of the finished panel.
Once quilting is complete, square the edges with a ruler and rotary cutter. Add binding in white, cream, a coordinating floral print, or one of the stronger colors used in the portrait. A narrow binding keeps attention on the cat, while a colorful border can frame the composition more dramatically. If the project will be displayed on a wall, sew a hanging sleeve onto the back. Press the finished quilt carefully, avoiding excessive heat over fusible areas, and your Colorful Cat Portrait Quilt Panel Pattern is ready to become decorative textile art.
Colorful Cat Portrait Quilt Panel Pattern FAQ
What is the best fabric for a Colorful Cat Portrait Quilt Panel Pattern? High-quality quilting cotton is one of the easiest materials to use because it presses neatly, accepts fusible web well, and remains stable during stitching. Light cotton works beautifully for the background and main cat silhouette, while floral and multicolored cotton scraps are ideal for the decorative openings. Very stretchy fabrics are generally more difficult for beginners because they can distort around narrow appliqué shapes.
Can a beginner make this cat portrait quilt? An adventurous beginner can make this project, although the narrow curved shapes require patience. If you are new to appliqué quilting, simplify some of the smallest details. Use slightly wider forehead markings, larger cheek shapes, and stitched whiskers instead of extremely narrow fabric strips. The artistic character of the design means small differences will not ruin the portrait. Working section by section is much easier than trying to assemble the entire cat at once.
Do I need fusible web for the appliqué? Fusible web is not mandatory, but it is very helpful for a project containing many small pieces. It temporarily or permanently holds the fabric shapes in place while you stitch around them, reducing movement and distortion. Traditional needle-turn appliqué could also be used by experienced quilters, but the fusible appliqué technique is typically faster and especially practical for the complex curves of the ears, eyes, forehead, and chest.
How can I enlarge or reduce the cat quilt pattern? Resize the complete template rather than changing individual pieces separately. When every element is scaled by the same percentage, the facial proportions remain consistent. After resizing, verify that the smallest pieces are still practical to cut and sew. Very small versions may require simplifying some decorative areas, while larger versions offer more space for detailed floral prints and intricate machine quilting.
What quilting design works best behind the cat portrait? Organic free-motion quilting is particularly effective because it complements the flowing shapes of the fur. Gentle waves, irregular curves, loops, and subtle texture can fill the background without distracting from the face. Dense quilting also makes the colorful appliqué areas appear slightly raised, giving the panel additional dimension. Beginners can use simple wavy lines rather than complicated free-motion motifs and still achieve an attractive result.
How can I personalize a Colorful Cat Portrait Quilt Panel Pattern? Change the eye color, nose fabric, floral prints, background shade, binding, or decorative markings. Green eyes create a vivid contrast similar to the reference project, but amber, blue, turquoise, or golden eyes could produce an entirely different personality. You could also use scraps from meaningful garments or previous quilts, turning the cat portrait quilt into a memory project. The basic silhouette can remain consistent while the fabric selection makes every finished panel completely individual.
Conclusion
The Colorful Cat Portrait Quilt Panel Pattern demonstrates how traditional quilting techniques can be transformed into expressive fabric artwork. By starting with a light background, preparing a balanced cat template, selecting colorful floral scraps, assembling the ears and facial markings, creating expressive eyes, securing the design with appliqué stitching, and finishing everything with textured quilting, you can gradually build a sophisticated portrait without approaching it as one overwhelming project.
The most important lesson is to work patiently from large shapes toward smaller details. Establish the ears and general face first, then develop the forehead, eyes, cheeks, muzzle, whiskers, neck, and chest. Allow colorful fabrics to appear strategically between pale sections instead of trying to fill every part of the animal with color. This contrast is what gives the Colorful Cat Portrait Quilt Panel Pattern its distinctive stained-glass-inspired character and keeps the face visually clear.
Your finished project does not need to be an exact copy of the reference image to be successful. Fabric availability, stitching style, quilting density, and personal color choices naturally make every handmade version different. Those variations are part of what makes patchwork, appliqué, and art quilting so enjoyable. Use the construction techniques in this guide as a foundation while allowing your own fabric collection and creative preferences to influence the final portrait.
EASILY FIND THE FREE PDF FOR THIS PATTERN HERE!
Whether you turn it into a wall hanging, decorative quilt panel, special handmade gift, or centerpiece for a larger quilt, this project offers an excellent opportunity to combine scrap quilting, raw-edge appliqué, fabric portrait techniques, and free-motion quilting in one memorable design. If you create your own version of the Colorful Cat Portrait Quilt Panel Pattern, leave your sincere opinion about the project and share your suggestions. Your ideas about colors, fabrics, quilting styles, or possible variations can inspire even more creative versions of this colorful cat portrait.