
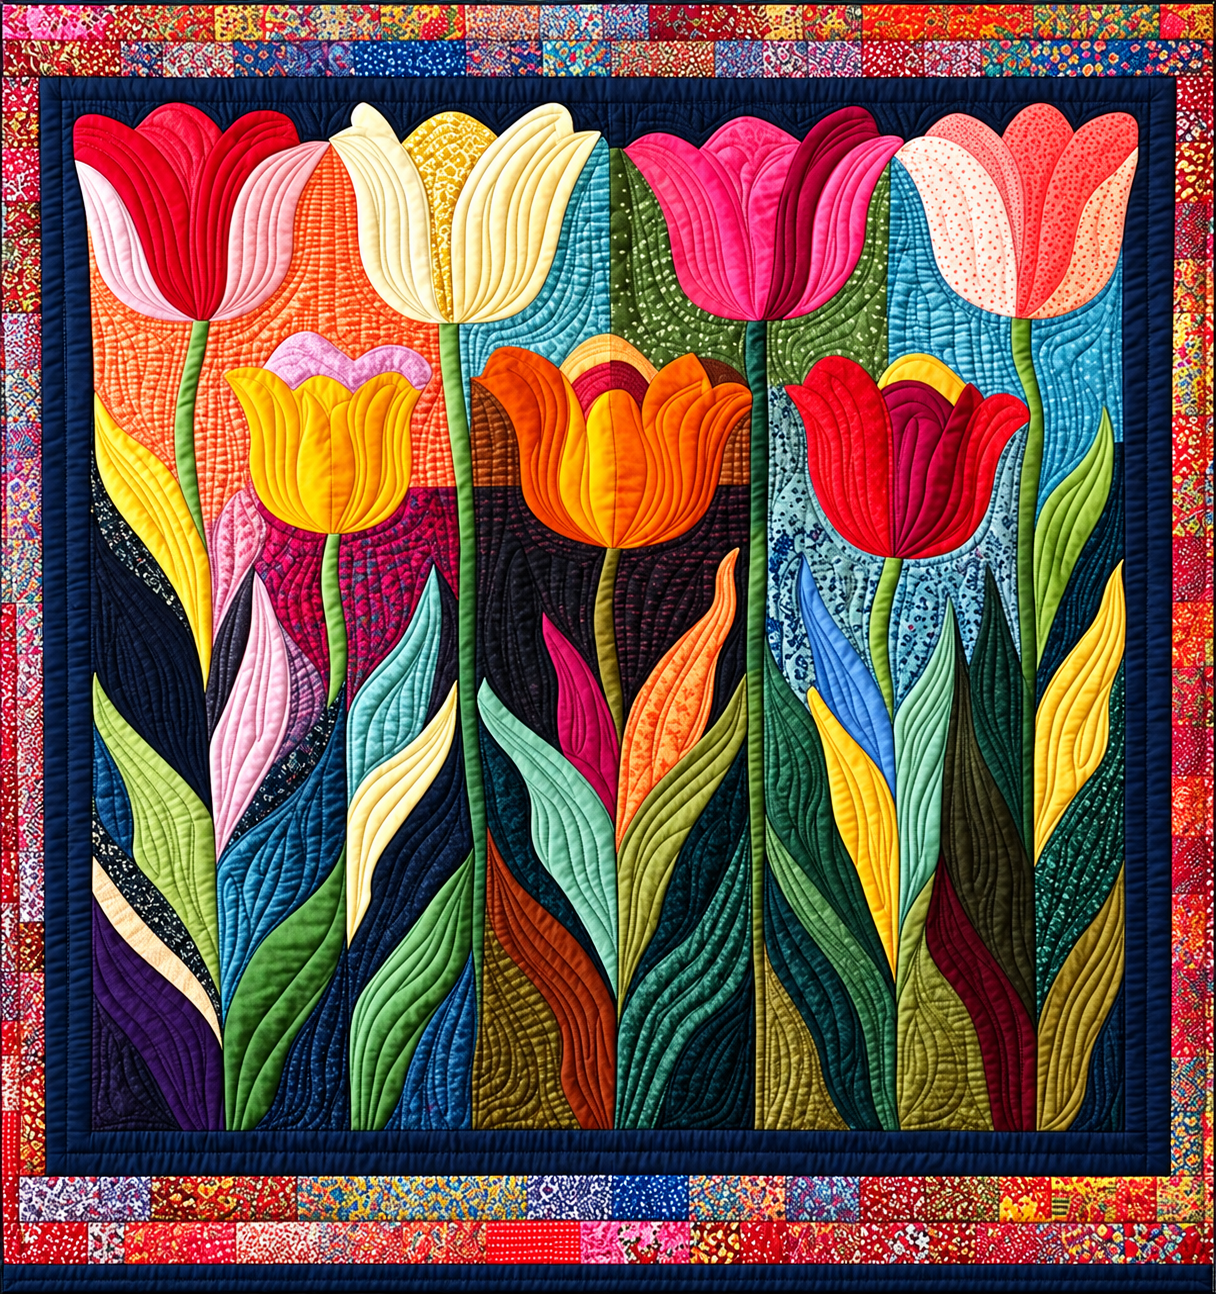
The “Tulip Garden” Patchwork Panel Pattern is a striking textile project that combines the charm of spring flowers with the rich visual depth of patchwork, appliqué, quilting, and fabric art. Inspired by the colorful panel shown in the reference image, this design features tall tulips arranged across a dark background, surrounded by flowing leaves, curved stems, decorative quilting, and a vibrant pieced border. The contrast between the deep navy background and the intense reds, pinks, oranges, yellows, greens, and blues makes every flower stand out beautifully. Although the finished panel appears detailed, the project becomes much easier to understand when it is separated into individual shapes and construction stages. Instead of treating the entire composition as one complicated design, you can build it flower by flower, leaf by leaf, and section by section. This approach makes the pattern suitable for experienced quilters while also giving confident beginners an opportunity to practice curved shapes, layered appliqué, and decorative stitching.
One of the most attractive qualities of the “Tulip Garden” Patchwork Panel Pattern is the freedom it gives you to work with different fabrics. The tulips do not need to be made from identical materials, and using several prints and shades actually helps reproduce the lively appearance of the inspiration panel. Small floral prints, batiks, tone-on-tone cotton, solids, scraps, and textured quilting fabrics can all work together. The project is also an excellent way to organize leftover pieces from previous sewing projects because many petals and leaves require only small sections of fabric. A dark background is especially effective because it visually separates the bright appliqué shapes and gives the panel a dramatic stained-glass feeling. The surrounding patchwork border can then repeat colors from the flowers, creating a coordinated frame without requiring every piece to match perfectly. The result is a handmade wall panel with personality, movement, and plenty of visual interest.
Creating this patchwork tulip panel is also a useful way to develop several quilting skills in one project. You will practice choosing coordinating colors, preparing appliqué templates, arranging fabric pieces, sewing curved shapes, building flower heads, forming stems, adding leaves, quilting the background, and finishing a layered border. The most important part of the process is working patiently and checking the composition before permanent stitching begins. Tulips have naturally curved petals, so slight differences in shape can actually make the flowers look more organic instead of incorrect. You can follow the same general composition as the image while still changing fabric colors, flower positions, or leaf sizes to create your own version. The goal of this tutorial is to explain a practical step-by-step method for turning the visual inspiration into a finished Tulip Garden quilted wall hanging that looks carefully planned while preserving the warmth and individuality of handmade patchwork.
Choosing Fabrics and Preparing the “Tulip Garden” Patchwork Panel Pattern
Begin by deciding the final size of your “Tulip Garden” Patchwork Panel Pattern. A medium or large wall hanging works especially well because the long tulip stems need enough vertical space to create the elegant garden effect. You can adjust the dimensions according to the wall, table, hallway, sewing room, or decorative space where the finished quilt will be displayed. Add extra fabric around the outside of the working area so you can square the quilt accurately after quilting.
DISCOVER MORE FREE PATTERNS HERE!
For the main background, choose a dark cotton fabric such as navy blue, midnight blue, charcoal, or very dark teal. The reference panel uses a deep blue tone that creates strong contrast with the flowers. Cut one large background rectangle slightly larger than the planned finished center. Press it carefully so it lies completely flat before you begin arranging the appliqué pieces.
Next, collect colorful cotton fabrics for the tulip petals. Look for red, coral, pink, burgundy, orange, yellow, cream, turquoise, blue, and magenta fabrics. Combining solid colors with small prints can make the petals appear more dimensional. You can also use different shades within a single flower so the inner and outer petals are clearly visible.
For the stems and leaves, prepare several greens rather than using only one color. Olive, lime, moss, emerald, sage, forest green, and blue-green fabrics can all appear in the same garden. The changing colors create the impression of light and shadow and prevent the lower part of the patchwork panel from looking repetitive.
You will also need materials for appliqué and quilting, including batting, backing fabric, coordinating thread, pins or fabric clips, fabric scissors, a marking tool, an iron, and your preferred appliqué stabilizer if you use one. For a traditional appearance, cotton batting is an excellent choice because it produces a soft texture after quilting and allows decorative stitching to remain visible.
Before cutting the final fabrics, make paper templates for the main shapes. Prepare templates for several tulip petals, narrow stems, long pointed leaves, and smaller curved leaves. Label each template in English if you plan to keep the pattern for future use, for example Outer Petal, Center Petal, Side Petal, Stem, Large Leaf, and Small Leaf. Remember to add your preferred seam allowance if you are using turned-edge appliqué.
Cutting, Arranging, and Building the Tulip Flowers
The flowers are the focal point of the “Tulip Garden” Patchwork Panel Pattern, so begin construction with the largest tulips. Each flower can be divided into several elongated petal shapes that overlap slightly. Instead of cutting one complete tulip silhouette, creating separate petals gives you more control over color placement and allows decorative quilting lines to emphasize the curved structure of the flower.
Trace the petal templates onto the selected fabrics and cut them carefully. For a dimensional look, combine two or three related colors inside each tulip. A red flower, for example, might contain deep crimson outer petals, bright red center petals, and burgundy side sections. A pink tulip might combine pale blush fabric with hot pink and raspberry tones.
Lay the background fabric on a large flat surface and begin arranging the tallest tulips across the upper portion of the panel. The inspiration image uses several large flowers at different heights, which creates a natural rhythm. Avoid placing every flower on exactly the same horizontal line. Small differences in height will make your fabric tulip garden feel much more realistic.
Add smaller tulips between the taller flowers. Yellow, orange, and red flowers work particularly well in the middle area because their warm tones stand out strongly against dark blue. Before sewing anything permanently, step away from the arrangement and examine the entire panel. Look for areas that feel too crowded or sections where the same color appears too many times.
Once you are satisfied with the placement, secure the petal pieces according to your chosen appliqué technique. Fusible appliqué is convenient for beginners, while needle-turn or turned-edge appliqué can produce a softer traditional finish. Sew around each petal carefully, keeping curves smooth and allowing neighboring petals to overlap naturally.
After attaching the petals, consider adding curved lines of stitching inside each flower. These lines imitate the natural direction of tulip petals and create the distinctive quilted texture visible in the reference image. Follow the shape of each petal rather than sewing straight lines. The resulting decorative quilting adds depth and helps separate fabrics that have similar colors.
Creating Stems, Leaves, Quilting, and Garden Movement
With the flower heads positioned, begin adding the stems. Cut long, narrow strips of green fabric and shape them into gentle curves rather than perfectly straight vertical lines. The stems in the “Tulip Garden” Patchwork Panel Pattern guide the viewer’s eye from the bottom of the panel toward the colorful flowers, so their placement is an important part of the composition.
Position each stem so that it appears to connect naturally to the center of a tulip. Some stems can lean slightly to the left or right. If you are using fusible appliqué, press them into place carefully before stitching. For turned appliqué, baste or pin the strips securely so they remain smooth while you sew along both sides.
Now begin filling the lower portion with patchwork leaves. Create long pointed leaf shapes in multiple sizes and colors. Some leaves should rise almost to the flowers, while others can remain near the bottom. Allow a few leaves to overlap stems or neighboring leaves because layering creates the dense garden appearance seen in the inspiration.
The color distribution of the leaves is just as important as their shape. Alternate light and dark greens with occasional blue, teal, yellow-green, rust, cream, or burgundy accents. The original visual effect is highly artistic rather than botanically strict, so you do not need to limit yourself to realistic leaf colors. Creative color choices are part of what gives this art quilt pattern its character.
After all appliqué pieces are secured, assemble the quilt sandwich using the backing, batting, and finished panel top. Smooth each layer carefully and baste thoroughly. Quilt around the outlines of the flowers, stems, and leaves first. This technique helps define the appliqué pieces and prevents them from visually blending into the background.
Complete the quilting by adding flowing lines inside the leaves and petals and denser stitching in the background. Curved lines work particularly well because they repeat the shapes of the tulips. You can use free-motion quilting, a walking foot, or simple controlled curves depending on your experience. Consistent spacing is helpful, but perfectly identical quilting lines are not necessary; slight variations reinforce the handmade appearance.
Adding the Patchwork Border and Finishing the Panel
The border is one of the defining features of the “Tulip Garden” Patchwork Panel Pattern because it introduces many small fabric prints around the more controlled central composition. Begin by squaring the quilted center carefully. Measure the top, bottom, and sides instead of relying only on the original cutting measurements, since quilting may slightly change the dimensions.
Add a narrow dark inner border around the tulip garden. Using the same navy or a similar dark fabric creates a visual pause between the flowers and the colorful outer border. This dark frame also helps the bright central appliqué remain the main focal point rather than competing with the surrounding patchwork.
For the decorative outer section, cut many small patchwork fabric rectangles or squares from colorful scraps. Choose prints that repeat the reds, blues, oranges, yellows, pinks, and greens found inside the tulips. Sew the pieces into strips long enough to fit each side of the panel, pressing the seams carefully as you work.
Attach the patchwork border strips to the sides first and then to the top and bottom, or use your preferred border construction method. Check that the panel remains square after each addition. If you want a richer frame similar to the inspiration, you can combine two rows of small patchwork pieces with another narrow dark strip between them.
Once the outer borders are finished, complete any additional quilting needed to secure the layers. Quilting through the border can be simple because the small fabric pieces already provide substantial visual detail. Straight stitching, gentle curves, or stitching close to the seams are all effective choices for this area.
Finish the project with quilt binding around all four edges. A dark blue binding can connect visually with the inner background, while red or multicolored binding creates a brighter finish. Add a hanging sleeve to the back if the project will be displayed on a wall. After a final press and inspection, your Tulip Garden patchwork panel is ready to become a colorful handmade feature in your home.
FAQ – Frequently Asked Questions About the “Tulip Garden” Patchwork Panel Pattern
What is the “Tulip Garden” Patchwork Panel Pattern?
The “Tulip Garden” Patchwork Panel Pattern is a decorative quilt-style project featuring appliquéd tulip flowers, stems, leaves, detailed quilting, and colorful patchwork borders. It is designed mainly as a wall panel or textile decoration, although the same concept can be adapted for other projects.
Is this tulip patchwork project suitable for beginners?
A determined beginner can make it, especially when using fusible appliqué. However, the project contains many curved pieces and layered shapes, so it is best approached slowly. Practicing a few petals and leaves on scrap fabric before beginning the complete panel can help build confidence.
What fabric is best for a tulip quilt panel?
100% quilting cotton is one of the easiest materials to use because it is stable, easy to cut, easy to press, and available in many colors and prints. Batiks and tightly woven cotton scraps are also excellent options for creating varied petals and leaves.
Can I make the “Tulip Garden” Patchwork Panel Pattern from fabric scraps?
Yes. In fact, this project is ideal for using fabric scraps because petals, leaves, and border pieces can be cut from relatively small sections. Using many different fabrics can make the finished garden look even more interesting.
Do all the tulips need to be the same size?
No. Different flower sizes make the design more natural and dynamic. Large tulips can form the upper focal area, while smaller flowers can fill the spaces between them.
How can I make the petals look dimensional?
Use multiple shades within each flower and position darker fabrics near overlapping areas. Curved quilting lines inside each petal also help create depth. Combining fabric color, layering, and stitching is one of the most effective ways to produce a dimensional appearance.
Should I appliqué before quilting?
Usually, yes. First construct the panel top and attach the flowers, stems, and leaves. Afterward, create the quilt sandwich with batting and backing. Quilting around and inside the appliqué shapes will then add texture while securing the entire project.
What colors work best for the background?
Dark colors such as navy blue, charcoal, black, deep teal, or midnight blue make bright tulips stand out dramatically. A lighter background can also work, but the overall appearance will be softer and less dramatic.
How can I enlarge or reduce the pattern?
Resize all templates using the same percentage so their proportions remain consistent. If you enlarge the flowers considerably, also increase the size of the leaves, stems, background, and border so the garden remains visually balanced.
Can this design be turned into a bed quilt?
Yes. You could create several individual tulip patchwork panels and join them into a larger quilt, or enlarge the central design to fit a lap quilt or bed quilt. Remember that a larger project will require more batting, backing, appliqué pieces, and quilting time.
What type of quilting suits a tulip garden design?
Curved echo quilting, free-motion lines, leaf veins, petal contours, and flowing background quilting all complement floral designs. The objective is to reinforce the direction of each shape instead of covering the appliqué with unrelated patterns.
How do I prevent the panel from becoming visually too busy?
Balance strong colors with a dark or relatively simple background. Repeating a few dominant colors throughout the flowers and border also creates unity. The “Tulip Garden” Patchwork Panel Pattern can contain many fabrics while still appearing organized when color repetition is used intentionally.
Conclusion
The “Tulip Garden” Patchwork Panel Pattern transforms colorful fabrics into a lively textile garden filled with layered tulips, graceful stems, expressive leaves, detailed quilting, and a cheerful scrap-fabric border. By dividing the project into manageable stages—fabric selection, template preparation, petal construction, flower arrangement, stem and leaf appliqué, quilting, border assembly, and binding—you can recreate the essential look of the reference image without feeling overwhelmed by its detail.
Throughout the project, the most important ideas are color balance, careful appliqué placement, curved quilting, fabric variety, and thoughtful layering. The flowers become more realistic when several shades are combined, while the dark background provides enough contrast to highlight every colorful shape. Meanwhile, the patchwork border connects the entire palette and gives the finished wall hanging a polished handmade frame.
EASILY FIND THE FREE PDF FOR THIS PATTERN HERE!
This project also demonstrates why patchwork and appliqué quilting offer so much creative freedom. You can follow the general structure of the “Tulip Garden” Patchwork Panel Pattern while changing the colors, fabrics, number of flowers, quilting style, or border arrangement. Each variation can become a unique handmade garden that reflects the maker’s personal style. If you create your own version, leave your sincere opinion about the project and share your suggestions. Which tulip colors would you choose, and what would you change to make your Tulip Garden patchwork panel completely unique?