
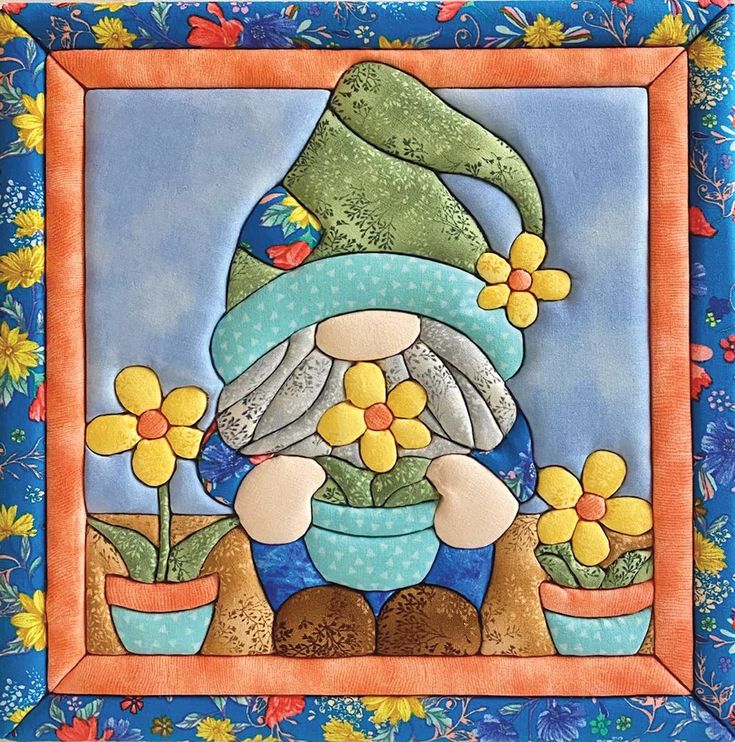
The Padded Wall Panel with Gnome and Flowers Pattern is a charming fabric art project that combines appliqué, patchwork, dimensional padding, decorative stitching, and cheerful floral details in one colorful wall hanging. The design shown in the reference image features a friendly gnome sitting in the center while holding a small flowerpot, surrounded by bright yellow flowers and framed with coordinating fabrics. One of the most attractive features of this project is the soft, raised appearance of the individual pieces, which gives the panel a handcrafted three-dimensional effect. The oversized green hat, turquoise brim, layered gray beard, rounded nose, blue clothing, flowerpots, and floral border work together to create a warm country-style composition. Although the finished panel looks detailed, it can be constructed gradually by dividing the picture into simple fabric shapes. With careful cutting, light padding, accurate positioning, and patient stitching, even someone relatively new to fabric appliqué can work through the project successfully.
Making a Padded Wall Panel with Gnome and Flowers Pattern is also a wonderful opportunity to use small pieces of fabric left from previous sewing and quilting projects. Floral prints, tiny botanical motifs, tone-on-tone cottons, scraps of blue fabric, soft greens, yellows, oranges, browns, and turquoise can all become useful elements of the composition. Rather than trying to copy every fabric exactly, focus on maintaining the same general color balance seen in the inspiration: a cool blue background, warm orange inner frame, darker floral outer border, green hat, turquoise accents, bright yellow flowers, and neutral shades for the face and beard. Using several prints instead of solid colors gives the panel additional movement and visual interest. The technique can also be personalized without losing the recognizable structure of the original design. Most importantly, choose fabrics that work well together and have enough contrast so that the gnome appliqué, flowers, pots, clothing, and border remain clearly visible.
Before starting the sewing process, remember that this project is best approached as a layered textile picture rather than a traditional pieced quilt block. The basic idea is to build a stable background, create individual appliqué templates, add a small amount of batting or padding behind selected shapes, and assemble those shapes in the correct overlapping order. The result should look softly sculpted rather than heavily stuffed. Good preparation will make the later stages much easier, so take time to trace the shapes, test their positions, select your fabrics, and decide which pieces should appear in front of others. Basic supplies include quilting cotton, lightweight batting, backing fabric, fusible web if desired, matching or contrasting sewing thread, paper for templates, fabric scissors, an iron, pins or fabric clips, a sewing machine, and a hand-sewing needle. With these materials ready, you can begin building the Padded Wall Panel with Gnome and Flowers Pattern from the background forward.
Preparing the Fabrics, Templates, Background, and Frame
Begin by deciding the final size of your padded wall panel. You can reproduce the proportions of the photograph at almost any practical size, but a square format works especially well because the design is centered and symmetrical. For an easy-to-manage wall hanging, a finished size of approximately 45 to 55 cm square provides enough space for the details without making the appliqué pieces excessively small. Add seam allowances wherever the frame pieces will be sewn together. The appliqué shapes themselves may be prepared with raw edges, turned edges, or a combination of both depending on your preferred sewing technique.
DISCOVER MORE FREE PATTERNS HERE!
Create the background from a piece of light blue quilting cotton. This central square functions almost like the canvas of a painting, so choose a fabric that is relatively quiet rather than highly patterned. Press it carefully before working. If you want the entire panel to have a softly quilted appearance, place thin batting beneath the background fabric at this stage. A pale blue, blue-gray, or dusty sky-blue fabric is particularly suitable because it creates contrast behind the green hat, yellow flowers, turquoise pots, and darker clothing.
Next, prepare the orange inner frame. The reference design uses a warm orange or coral fabric that immediately separates the central picture from the floral outer border. Cut four strips wide enough to create a visible frame after sewing. Mitered corners will produce a polished picture-frame effect, but straight seams can also be used if you prefer a simpler construction method. Press the seams carefully so that the orange strips remain flat and square around the blue center.
Outside the orange frame, add a wider dark blue floral border. A fabric containing yellow, orange, red, green, and blue botanical motifs closely recreates the lively appearance of the inspiration. This floral fabric border plays an important role because it repeats the colors found inside the appliqué. Cut two side strips and two top-and-bottom strips or use mitered corners for a continuous framed appearance. Check the panel with a ruler before moving forward to ensure that all corners remain approximately 90 degrees.
Now make paper templates for every major appliqué element. Separate the gnome into individual shapes: hat tip, hat body, contrasting hat patch, turquoise brim, oval nose, several beard sections, sleeves, hands, body, legs or lower clothing, shoes, flowerpot, leaves, flower centers, and flower petals. Also make templates for the two side flowerpots, stems, leaves, side background landscape pieces, and decorative flowers. Numbering the templates can help enormously when assembling the design later.
Before cutting your final fabrics, place all paper templates directly on the background to test the composition. The gnome should remain centered, with the hat extending upward and the shoes positioned near the bottom. The side flowers should balance the central character without competing with it. Leave enough space between the appliqué and orange frame so that the picture does not feel crowded. Take a quick reference photo of your arrangement before removing the paper pieces; this can serve as a useful guide throughout the construction of your Padded Wall Panel with Gnome and Flowers Pattern.
Creating the Padded Gnome Appliqué Step by Step
Start the gnome appliqué with the larger shapes that sit farthest behind the other elements. The body and lower clothing can be cut from medium or dark blue fabric, preferably using more than one shade for additional depth. Trace each template on the reverse side of the selected fabric and cut carefully. If using fusible web, follow the manufacturer’s instructions to attach it to the fabric before cutting. Do not permanently fuse every layer immediately; first confirm how the overlapping pieces will fit together.
The large green hat is one of the most recognizable parts of the Padded Wall Panel with Gnome and Flowers Pattern. Use two coordinating green fabrics if possible: one for the main hat and another for the folded upper section or decorative patch. Place a very thin layer of batting behind the main hat piece to create gentle dimension. The padding should stop just inside the edge of the fabric so that the perimeter can be stitched neatly. Shape the curved hat carefully and allow the pointed tip to bend naturally toward one side.
Prepare the wide turquoise brim separately because it overlaps both the lower portion of the hat and the upper beard area. A turquoise fabric with a small tonal print creates the soft handcrafted appearance visible in the photograph. Add thin batting behind the brim if you want it to stand slightly forward. Position it only after checking the placement of the face and beard. The brim should curve across the gnome’s face and cover the upper edges of several pieces beneath it.
For the face, cut a simple oval or rounded shape from peach, beige, cream, or light tan fabric. The gnome’s visible facial feature is primarily the nose, so there is no need to create complicated eyes or expressions. Position the nose near the center beneath the hat brim. Padding the nose slightly more than the other pieces can produce an appealing rounded effect. Use tiny hand stitches, invisible appliqué stitches, or neat machine stitching around the perimeter to keep the shape smooth.
The layered beard gives this design much of its character. Instead of using one large gray piece, create several overlapping sections in light gray, cream-gray, and printed neutral fabrics. Each section can resemble a tapered leaf or elongated teardrop. Arrange the pieces from the outside toward the center, allowing one section to overlap another. A tiny amount of batting behind selected beard pieces will enhance the dimensional effect. Stitching just inside the edges can also emphasize the individual sections and make the beard appear fuller.
Complete the main gnome by adding the sleeves, rounded hands, central flowerpot, feet, and shoes. The hands can be made from the same peach or beige fabric used for the nose. Use green prints for the plant leaves and turquoise fabric for the pot, repeating the color of the hat brim. The shoes may be brown with slightly different prints so they remain distinguishable. Once these shapes are arranged correctly, secure them permanently and sew around their edges to create a clean, durable padded appliqué wall hanging.
Adding the Flowers, Pots, Details, and Dimensional Stitching
The yellow flowers create important bright focal points throughout the Padded Wall Panel with Gnome and Flowers Pattern. Make each flower from five rounded petals surrounding a small orange or coral center. You can trace a single petal template several times or create complete flower templates. Slight variations are perfectly acceptable and can make the project feel more handmade. Use rich golden yellow fabric rather than extremely pale yellow so that the flowers remain visible against both the blue background and green foliage.
Create the flower attached to the gnome’s hat first. It should sit near the curved tip where the hat narrows, helping draw the viewer’s eye toward the upper portion of the panel. Lightly pad the petals if desired, but keep them thinner than the gnome’s nose. Position the orange flower center above the petals so that it hides their inner raw edges. Stitch around the center last to secure the entire flower assembly.
For the side flowers, build two small fabric flowerpots near the lower corners of the blue background. Use turquoise fabric for the pots and orange fabric for the upper rims, echoing colors already present in the gnome and frame. Add green leaves behind each pot rim before attaching the front portion of the pot. This overlapping construction gives the impression that the leaves are actually growing from inside the container rather than being placed on top of it.
Make thin green stems that rise from each side pot and support the large yellow flowers. The stems can be narrow bias strips, appliqué strips, or embroidered lines. Add simple pointed green leaves along the stems. On the left side, the flower can lean slightly toward the gnome, while the right flower can angle inward from the opposite direction. This subtle symmetry helps frame the central character and creates a balanced gnome wall décor composition.
The lower background also contains several earthy shapes suggesting hills, garden soil, or decorative landscape elements. Recreate them using tan, ochre, brown, green, and printed fabrics. These shapes should remain secondary to the main gnome, so avoid prints that are excessively bold. Layer them behind the gnome’s body and side flowerpots. The combination of warm brown and tan pieces along the bottom visually anchors the picture and prevents the gnome from appearing to float against the blue background.
Once every appliqué is attached, add decorative stitching. You can use a small blanket stitch, zigzag stitch, straight stitch, or hand appliqué stitch depending on the look you prefer. Stitching slightly inside the edge emphasizes the padded shapes and can produce the outlined appearance seen in the reference. Quilt selected interior areas lightly, but avoid flattening all of the batting. The goal is to retain the soft relief that makes the Padded Wall Panel with Gnome and Flowers Pattern look dimensional and tactile.
Finishing the Panel, FAQ, and Final Sewing Tips
When all appliqué work is complete, prepare the backing and final batting layer if you have not already quilted the entire panel. Place the backing fabric wrong side up, add batting, and position the completed top right side up. Smooth every layer carefully and baste them together. Quilt around the orange frame, floral border, and main appliqué shapes rather than filling every area with dense stitching. This approach keeps the padded gnome visually prominent while stabilizing the wall hanging.
Square the finished panel before adding the final edge treatment. You may bind the outside with fabric taken from the floral border, dark blue cotton, orange fabric, or another coordinating print. Attach a hanging sleeve to the back if the project will be displayed on a wall. A sleeve is usually preferable to attaching visible loops because it keeps the front appearance clean and allows the panel to hang more evenly. Add a handmade label with the date or maker’s name if desired.
FAQ: What is a Padded Wall Panel with Gnome and Flowers Pattern? It is a decorative textile wall hanging that combines appliqué, fabric layering, quilting, and light padding. The padding is placed behind selected fabric shapes to make the gnome, flowers, hat, beard, nose, and other details appear raised from the background. Unlike a heavily stuffed soft sculpture, the shapes should remain relatively flat while still producing visible dimension.
FAQ: What fabric is best for this project? Quilting cotton is one of the easiest choices because it is stable, widely available, simple to press, and easy to layer. Small-scale prints work particularly well for the hat, beard, clothing, foliage, shoes, landscape, and flowerpots. Tone-on-tone fabrics help add texture without making the composition too busy. Thin cotton batting, polyester batting, or lightweight fusible fleece can be used for the padded sections.
FAQ: Is the Padded Wall Panel with Gnome and Flowers Pattern suitable for beginners? A motivated beginner can make it, especially when the project is divided into small steps. The most important skills are tracing templates, cutting fabric accurately, positioning appliqué pieces, pressing carefully, and sewing around curves. Beginners may find fusible appliqué easier because the pieces can be temporarily secured before stitching. More experienced sewists can use turned-edge appliqué or hand stitching for a traditional finish.
FAQ: How do I keep padded appliqué pieces from becoming bulky? Use only a thin layer of batting and trim it slightly smaller than the fabric appliqué. Avoid placing thick batting beneath every small component. Reserve additional padding for important focal areas such as the hat brim, nose, flower petals, and selected beard pieces. Press around padded elements gently rather than crushing them directly with a hot iron. Controlled padding will provide dimension without making the finished fabric wall panel difficult to quilt or hang.
FAQ: Can I change the colors or size of the design? Absolutely. The Padded Wall Panel with Gnome and Flowers Pattern can be enlarged or reduced as long as the proportions of the templates remain consistent. You can also adapt the palette to your décor. A Christmas version could use red, green, cream, and gold, while a spring version could include pastel blue, lavender, pink, and fresh green. The important principle is maintaining enough contrast between neighboring pieces so that the gnome and flowers remain easy to recognize.
Conclusion
Creating a Padded Wall Panel with Gnome and Flowers Pattern is a rewarding way to combine patchwork fabrics, appliqué, quilting, dimensional padding, and decorative stitching in a single handmade project. The process begins with a stable blue background and coordinating fabric frame, continues with carefully prepared templates and layered gnome pieces, and develops through the addition of the green hat, turquoise brim, dimensional beard, flowerpot, yellow flowers, side pots, foliage, and landscape details. Light batting gives selected elements their attractive raised appearance, while decorative stitching defines the individual shapes and strengthens the construction.
EASILY FIND THE FREE PDF FOR THIS PATTERN HERE!
By working slowly and assembling the design from the back layers toward the front, you can recreate the cheerful character and balanced composition of the inspiration while still making the project uniquely your own. If you make this wall panel, leave your sincere opinion about the project and share any suggestions, color combinations, or creative changes you would love to try in your own version.