
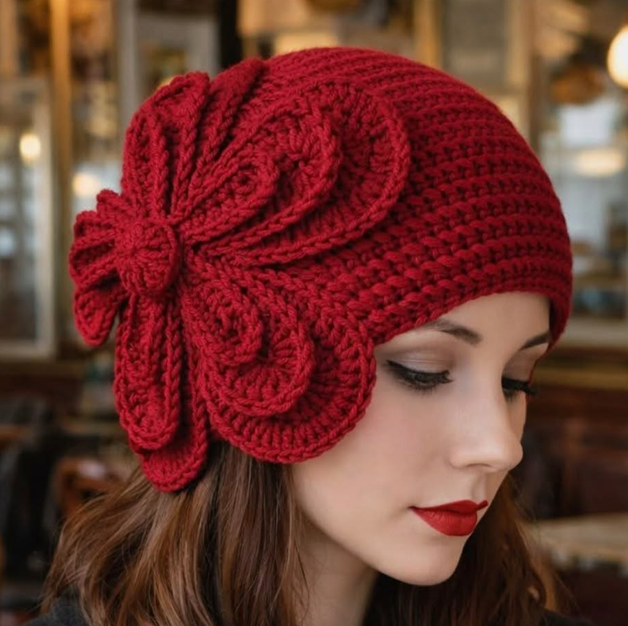
The Crochet Beanie with Flower Pattern is a beautiful project for anyone who enjoys combining practical crochet with decorative details. This design features a close-fitting beanie worked with an attractive textured stitch and finished with a large layered crochet flower placed to one side. The flower gives the hat a distinctive handmade appearance without making the construction unnecessarily complicated. Although the finished piece looks detailed, the project can be divided into manageable sections: creating the crown, forming the sides, shaping the lower edge, crocheting the flower petals, and assembling everything neatly. The instructions below use standard U.S. crochet terminology and include crochet abbreviations so that both confident beginners and intermediate crocheters can follow the pattern. Because yarn thickness, hook size, and individual tension can change the final dimensions, checking your gauge before beginning is one of the most important steps. With careful measuring and consistent stitches, this pattern can be adapted for several adult head sizes.
The main materials for this crochet flower beanie are approximately 180 to 250 grams of medium-weight yarn, depending on the yarn brand, size of the hat, and fullness of the flower. A soft worsted-weight yarn works especially well because it provides enough structure for the petals while remaining comfortable around the head. Choose a crochet hook around 4.5 mm to 5.5 mm, adjusting the size if necessary to obtain the correct gauge. You will also need scissors, a yarn needle, stitch markers, and a flexible measuring tape. For a comfortable adult beanie, a finished circumference of approximately 50 to 56 cm can work well because crochet fabric normally stretches when worn. Before starting the complete Crochet Beanie with Flower Pattern, make a small gauge swatch and compare it with your intended measurements. This simple preparation can prevent a finished hat that is either too tight or too loose.
Throughout this pattern, several common crochet abbreviations will be used. ch means chain, sl st means slip stitch, sc means single crochet, hdc means half double crochet, dc means double crochet, tr means treble crochet, st means stitch, sts means stitches, inc means increase, dec means decrease, BLO means back loop only, and FO means fasten off. An instruction such as 2 dc in next st means that two double crochet stitches should be worked into the same stitch to create an increase. Instructions placed inside parentheses are normally repeated the indicated number of times or around the entire round. A stitch marker is useful for identifying the beginning of each round, especially if you choose to crochet the hat in a continuous spiral. Understanding these crochet keys before beginning will make every stage of the Crochet Beanie with Flower Pattern easier to follow.
How to Crochet the Beanie Crown and Build the Correct Size
Begin the Crochet Beanie with Flower Pattern with a magic ring. Round 1: ch 2, then work 10 dc into the magic ring and join with a sl st to the first dc. Pull the center firmly closed but avoid tightening it so aggressively that the stitches become distorted. You should now have 10 dc stitches forming the small center circle of the crown.
DISCOVER MORE FREE PATTERNS HERE!
For Round 2, ch 2 and work 2 dc in each st around, then join with a sl st. You should finish with 20 dc stitches. For Round 3, ch 2, then repeat (1 dc in next st, 2 dc in next st) around, giving approximately 30 stitches. These evenly distributed increases allow the crown to expand while remaining relatively flat.
Continue with Round 4: ch 2, repeat (1 dc in each of the next 2 sts, 2 dc in next st) around. For Round 5, repeat (1 dc in each of the next 3 sts, 2 dc in next st). For the following rounds, continue the same principle by adding one more regular dc between each increase. This creates the gradual circular growth needed for the top of a well-shaped crochet beanie.
Measure the diameter of the crown frequently rather than relying only on a fixed number of rounds. A useful crochet sizing principle is to divide the desired finished head circumference by approximately 3.14 to estimate crown diameter. For example, a 54 cm circumference produces a crown diameter close to 17.2 cm. Because yarn stretches differently, use this calculation as a guide rather than an absolute rule.
Once the crown reaches the required diameter, stop increasing. Work 1 dc in each st around for several rounds. The crochet fabric will naturally begin curving downward, transforming the flat circle into a hat shape. Continue until the distance from the top center of the crown to the lower edge is approximately 18 to 20 cm, or until the beanie comfortably reaches the desired position above the ears.
Try the hat on during this stage whenever possible. The Crochet Beanie with Flower Pattern should fit securely without creating uncomfortable pressure around the forehead. If the hat feels too wide, a gentle decrease round can be added by working dc2tog at evenly spaced intervals. If it feels slightly tight, continue without decreases and consider using a larger hook for the lower section.
Creating Texture and Finishing the Lower Edge of the Crochet Beanie
The photographed style has noticeable crochet texture, and you can recreate a similar effect using front post double crochet and back post double crochet stitches. After completing the main body, ch 2 and alternate FPdc around next dc, BPdc around next dc across the round. Join with a sl st. This produces a flexible ribbed surface that gives the hat a professional finished appearance.
To make an FPdc, yarn over, insert the hook from front to back and then back to front around the post of the stitch below, yarn over, pull up a loop, and complete the double crochet normally. For a BPdc, work around the post from the opposite direction. Alternating these stitches creates raised vertical ridges while helping the lower edge stretch comfortably.
Continue the ribbing for approximately three to five rounds, depending on how deep you want the lower band to appear. For a more subtle edge, two or three rounds may be enough. A deeper band can provide additional warmth and may also improve the fit of the Crochet Beanie with Flower Pattern, especially when using a yarn with significant elasticity.
Another option is to work hdc in BLO instead of post stitches. Ch 1, then work 1 hdc into the back loop of each stitch around and join. Repeat for several rounds. Working through only the back loop leaves the unused front loop visible, creating neat horizontal ridges that can complement the textured petals of the large crochet flower.
Before fastening off, examine the edge of the hat carefully. If it has started flaring outward, work one adjustment round using occasional decreases. For example, repeat (1 hdc in each of next 8 sts, hdc2tog) around as needed. Do not add too many decreases at once because the band still needs enough stretch to pass comfortably over the head.
Finish the beanie with a neat round of sl st or sc if you want a more defined lower edge. Cut the yarn, leaving a tail of approximately 15 cm, pull it through the final loop, and weave it securely through the inside stitches using a yarn needle. At this point, the basic hat portion of your crochet hat with flower is complete and ready for its decorative focal point.
Step-by-Step Large Layered Crochet Flower Pattern
The large flower is the feature that gives the Crochet Beanie with Flower Pattern its dramatic appearance. Begin with a magic ring and ch 1. Work 8 sc into the ring, then join with a sl st. Pull the ring closed. This center will act as the foundation for the first group of petals and can later be covered with an additional crocheted center if desired.
For the first petal layer, repeat the following sequence around: sl st in next st, ch 2, 3 dc in same st, ch 2, sl st in same st. Repeat in each foundation stitch to form eight small petals. If you prefer fuller petals, work 4 dc instead of 3 dc. Keep your tension relaxed so that the flower does not curl too tightly.
To create the second layer, turn the flower slightly and work behind the first group of petals. Create chain spaces by attaching the yarn around the back of each foundation area and working approximately ch 4, sl st around next post. Repeat around. These chain loops form hidden foundations for the second layer without covering the first petals.
Into each ch-4 space, work sc, hdc, 4 dc, hdc, sc. Repeat the sequence in every chain space. These petals should extend beyond the first layer, immediately creating the dimensional appearance associated with a large crochet flower applique. If necessary, gently shape each petal with your fingers after completing the round.
For an even larger decorative flower like the one featured in the design, add a third layer. Behind the second layer, create new loops using ch 6 between attachment points. Into each loop work sc, hdc, 2 dc, 3 tr, 2 dc, hdc, sc. These longer stitches create elongated outer petals that spread beautifully across the side of the beanie.
Finish the flower center separately if you would like additional depth. Make a magic ring, work 6 sc into it, then work 2 sc in each st around for the next round. Add one additional round of sc if a larger center is preferred. FO with a long tail, position the circle over the flower center, and sew it securely. The result should be a rich, dimensional flower that complements the texture of the Crochet Beanie with Flower Pattern.
Assembling, Shaping, and Customizing the Crochet Beanie with Flower
Place the completed flower on the side of the beanie before sewing it permanently. The center of the flower generally looks attractive positioned slightly above ear level, with the petals extending upward toward the crown and downward toward the lower band. Try the beanie on and use removable stitch markers to determine the most flattering placement.
Thread a yarn needle with the long tail from the flower. Sew through the back portions of the petals and into the hat fabric without pulling the thread too tightly. Secure the flower center first, then attach selected areas of the middle and outer petals. Leaving some petal edges unattached creates the attractive three-dimensional effect seen in decorative crochet flower hats.
Avoid sewing every centimeter of every petal flat against the hat. The flower should appear structured but still have movement. Attach the widest points firmly enough to prevent the decoration from drooping while leaving several curved edges free. After sewing, knot the yarn securely on the inside and weave the tails through multiple stitches.
The Crochet Beanie with Flower Pattern can be customized with different color combinations. A deep red or burgundy yarn produces an elegant winter accessory similar to the inspiration, while cream, beige, dusty rose, forest green, navy, mustard, or soft gray can create completely different personalities. A contrasting flower is another option if you want the applique to stand out more strongly.
You can also change the scale of the flower without redesigning the entire hat. For a smaller flower, stop after the second petal layer. For an oversized statement flower, add another round of chain loops behind the outer petals and increase the number of tall stitches in each petal. Always consider the weight of the flower because an extremely heavy applique can pull the beanie to one side.
Finally, block the completed piece gently if the yarn fiber allows it. Shape the hat with your hands and arrange the petals evenly. Avoid excessive stretching, particularly around the ribbed band. Once dry and shaped, the Crochet Beanie with Flower Pattern should have a comfortable fitted silhouette, a clean lower edge, and a layered flower that becomes the centerpiece of the finished design.
FAQ About the Crochet Beanie with Flower Pattern
What skill level is required for the Crochet Beanie with Flower Pattern?
This project is best suited to an adventurous beginner or intermediate crocheter. The basic beanie uses familiar stitches such as sc, hdc, and dc, while the textured band and layered flower introduce slightly more advanced techniques. Beginners can practice the post stitches separately before adding them to the hat.
How much yarn is needed for a crochet beanie with a large flower?
For most adult sizes, approximately 180 to 250 grams of medium-weight yarn should be a useful starting estimate. The exact amount depends on yarn thickness, hat dimensions, stitch density, and the number of flower layers. Keeping an extra ball of matching yarn can be helpful when creating a particularly large decorative flower.
What is the best yarn for this crochet beanie pattern?
A smooth worsted-weight yarn is a practical choice because it displays the crochet texture clearly and provides enough body for the petals. Acrylic, wool blends, and other soft fibers can work well. Choose a yarn that feels comfortable against the forehead because the beanie will be worn directly against the skin.
How can I make the beanie larger or smaller?
Adjust the crown diameter before beginning the straight side rounds. For a larger beanie, continue the increase sequence for additional rounds. For a smaller beanie, stop increasing earlier. Measuring the wearer’s head and checking the crown frequently is more reliable than relying entirely on a predetermined stitch count.
Why is my crochet beanie becoming wavy while I increase?
A wavy crown usually indicates that too many increases are being made. If the circle begins ruffling, work a round with fewer increases or no increases before continuing. The exact adjustment can vary according to the yarn, hook, and individual crochet tension.
Why is my crown turning into a bowl too early?
If the crown curves downward before reaching the required diameter, there may not be enough increases. Add a round with evenly distributed increases. Remember that a slight curve is acceptable near the end of the crown section because the fabric eventually needs to form the sides of the hat.
Can I crochet the hat without the textured ribbing?
Yes. The lower band can be completed using ordinary sc, hdc, or dc stitches. However, ribbing created with post stitches or BLO stitches usually offers improved stretch and gives the Crochet Beanie with Flower Pattern a more finished appearance.
Can the crochet flower be removed from the hat?
Yes. Instead of permanently sewing the flower to the beanie, it can be attached to a removable fabric or crochet backing. However, any removable attachment should be chosen and secured carefully so the decoration remains stable during normal use.
How do I keep the crochet petals from curling too much?
Make sure your chain spaces are large enough for the number of stitches placed inside them, and avoid overly tight tension. Gentle blocking can also help shape the petals. If a petal still curls excessively, using a slightly larger crochet hook for the flower may improve the result.
Can I use different yarn weights for this pattern?
Yes, but changing yarn weight changes the dimensions significantly. A lighter yarn will normally create a smaller, thinner hat unless more rounds and stitches are added. A heavier yarn produces a thicker beanie and may require fewer rounds. Always make a gauge sample when substituting yarn.
How do I make the flower look fuller?
Add additional petal layers behind the existing rounds, gradually increasing the length of the chain loops. You can also increase the number of dc or tr stitches inside each petal. A combination of short inner petals and long outer petals creates the most noticeable dimensional effect.
How should I wash a handmade crochet flower beanie?
Follow the care instructions provided for the specific yarn used. Gentle washing is usually helpful for preserving the shape of decorative crochet work. Reshape the flower petals after washing and allow the hat to dry in a form that maintains its intended dimensions.
Conclusion
The Crochet Beanie with Flower Pattern combines a comfortable handmade hat with an eye-catching layered floral detail. In this tutorial, you learned how to begin with a magic ring, increase the crown gradually, form the sides of the beanie, add a flexible textured band, crochet several layers of decorative petals, create a raised flower center, and sew the applique securely to the finished hat. You also learned important crochet abbreviations such as ch, sc, hdc, dc, tr, sl st, BLO, inc, and dec, making the instructions easier to understand and adapt to future projects.
One of the greatest advantages of this crochet beanie pattern is its flexibility. You can adjust the crown diameter for different head sizes, modify the length of the hat, experiment with different ribbing styles, and make the crochet flower as subtle or dramatic as you prefer. Careful measuring, consistent tension, and regular fitting are the most important elements for achieving a comfortable result.
EASILY FIND THE FREE PDF FOR THIS PATTERN HERE!
Whether you choose deep red, neutral cream, classic black, soft pastel shades, or a contrasting flower, the finished Crochet Beanie with Flower Pattern can become a distinctive handmade accessory for cool-weather outfits. The combination of texture and dimensional petals gives the project a sophisticated appearance while still relying on practical crochet techniques that can be reused in many other creations. If you make your own version of this pattern, leave your sincere opinion about the tutorial and share your suggestions. Your ideas about colors, flower sizes, yarn choices, and possible pattern variations can inspire new ways to customize this beautiful Crochet Beanie with Flower Pattern.