
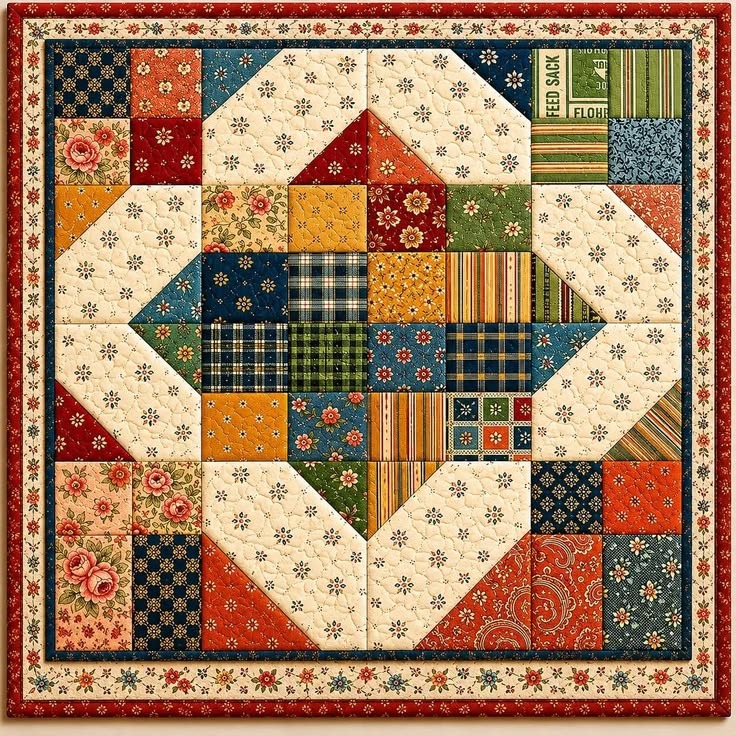
The Classic Farmhouse Style Patchwork Quilt Block Pattern is a beautiful way to combine traditional quilting, warm country colors, floral prints, plaids, stripes, and geometric piecing in one balanced design. The project shown in the reference image has the welcoming look often associated with farmhouse décor, where every fabric seems to tell a small story while still belonging to the same overall composition. At the center, a group of colorful patchwork squares creates a strong focal point, while large cream sections form an angular frame around them. Smaller squares, rectangles, and triangles fill the outer areas, producing a rich scrap quilt appearance without making the block feel disorganized. The combination of navy blue, brick red, mustard, cream, green, orange, and vintage floral fabrics gives the quilt a timeless character. Although the finished piece looks complex at first, it can be constructed gradually by dividing the design into manageable sections. With careful cutting, accurate seam allowances, and patient pressing, even quilters who are improving their piecing skills can recreate this charming farmhouse-inspired project.
One of the most appealing features of the Classic Farmhouse Style Patchwork Quilt Block Pattern is the freedom it gives you when choosing fabrics. You do not need every fabric to come from the same collection, because the charm of this style comes from combining prints that look collected over time. Small flowers, checks, plaids, narrow stripes, tiny geometric motifs, and subtle novelty fabrics can all work together successfully. The important part is maintaining a consistent color palette and creating enough contrast between the light background pieces and the darker central fabrics. In the pictured quilt, cream fabric plays an especially important role because it creates visual breathing space around the colorful patchwork center. Dark blue fabrics provide depth, while warm reds and oranges add energy. Green and mustard pieces help connect the different areas, creating the comfortable, slightly rustic personality that makes farmhouse patchwork quilting so recognizable.
Before beginning this project, organize your fabric, cutting tools, ruler, rotary cutter, pins or clips, sewing machine, thread, iron, and pressing surface. A standard 0.6 cm seam allowance, approximately 1/4 inch, works well for traditional quilt piecing. Because the design contains many small units, accuracy matters more than speed. Cut each square, rectangle, and triangle carefully, and label groups of pieces if necessary so that similar-looking fabrics do not become confusing during assembly. It is also helpful to arrange the entire block on a large table or design board before sewing. Take a quick reference photo of the layout so you can check placement later. The exact dimensions can be adapted to the size you want, but using a consistent base square makes construction much easier. For example, you can build the colorful sections from equal-sized squares and then create the larger cream-and-triangle units around them. This approach keeps the Classic Farmhouse Style Patchwork Quilt Block Pattern organized from the first seam to the final border.
Choosing Fabrics and Planning the Farmhouse Patchwork Layout
Begin by selecting approximately 12 to 20 coordinating fabrics. For an authentic Classic Farmhouse Style Patchwork Quilt Block Pattern, combine several medium and dark prints with a generous amount of cream or off-white fabric. Good choices include navy, muted teal, forest green, mustard yellow, rust orange, deep red, and warm beige. Floral fabrics with a vintage appearance are especially effective for the corners and outer patchwork areas.
DISCOVER MORE FREE PATTERNS HERE!
Next, separate the fabrics by visual value rather than only by color. Place the lightest cream prints in one group, medium-value florals and stripes in another, and dark plaids or navy fabrics in a third. This simple step helps prevent the quilt from becoming visually flat. Strong contrast is what makes the geometric shapes easy to recognize after the block is assembled.
The center should contain several colorful patchwork squares arranged closely together. In the reference project, plaid and small floral fabrics create a compact inner field with darker blue pieces anchoring the composition. You can reproduce the same effect by using darker fabrics toward the middle and introducing brighter mustard, teal, orange, or floral squares around them.
The large cream shapes surrounding the center create the most recognizable feature of the design. They behave almost like an oversized geometric frame, separating the central patchwork from the outer scrappy border. Use a cream print with a small, subtle motif so the area remains interesting without competing with the colorful fabrics.
Around the cream frame, arrange additional scrap quilt blocks using squares, rectangles, and triangle combinations. Floral pieces can be placed in the corners, while stripes and checks work beautifully along the sides. Try not to place identical colors directly beside one another unless you intentionally want them to read as a larger shape.
Finally, step away from the layout and look at it from a distance. A successful farmhouse quilt block should feel varied but balanced. If one corner looks much darker or brighter than the others, move a few pieces before sewing. Planning at this stage can save considerable time later and gives the finished block a polished, intentional appearance.
Cutting and Sewing the Central Patchwork Section
Start construction with the central patchwork area because it provides a stable reference point for the rest of the quilt. Cut equal squares from several contrasting fabrics. A practical size for a medium wall quilt or cushion panel could be approximately 8 cm to 10 cm squares before sewing, although the dimensions can be enlarged or reduced depending on your desired finished size.
Lay the squares in rows before stitching. In a Classic Farmhouse Style Patchwork Quilt Block Pattern, perfect repetition is not necessary. Instead, alternate plaid, floral, striped, and small geometric fabrics so neighboring pieces remain visually distinct. Keep several dark navy or deep green squares in the composition because they help anchor brighter colors.
Sew the squares together one row at a time using a consistent 0.6 cm seam allowance. After completing each row, press the seam allowances in alternating directions. For example, press the first row to the right and the second row to the left. When the rows are joined, the opposing seams will nest together and help create accurate intersections.
Join the completed rows slowly, matching every important seam junction. Pinning or clipping these intersections before sewing is useful, especially if the fabrics vary in thickness. After stitching, press the central section carefully from the front and back. Avoid pulling the fabric while pressing because distortion can make later units difficult to attach.
Add surrounding squares and rectangular units once the primary center is complete. The image uses mustard, orange, green, floral, striped, and cream pieces to transition between the dark central section and the lighter geometric frame. This transition is important because it distributes color throughout the composition instead of concentrating everything in one area.
Measure the completed center before cutting or attaching the next units. Quilting patterns sometimes accumulate tiny differences during piecing, even when the cutting was accurate. Measuring your actual center allows you to make small adjustments before adding the large cream sections, helping the patchwork quilt pattern remain square and flat.
Creating the Cream Geometric Frame and Outer Patchwork
The large cream areas can be constructed from rectangles, squares, and half-square triangle units. A half-square triangle, often abbreviated as HST, is made by joining two contrasting triangles to form a square. In this project, cream fabric is paired with red, orange, green, blue, or striped fabrics to create the pointed transitions around the central block.
An easy method for making HST units is to place two fabric squares right sides together, draw a diagonal line on the back of the lighter square, stitch on both sides of that line, and then cut along the marked diagonal. Open the two units and press the seam toward the darker fabric. Trim them to identical dimensions for cleaner assembly.
Arrange the cream pieces so they create the broad angular pathway seen around the center of the reference quilt. The light fabric should visually connect from one section to another, forming a continuous geometric shape. Check the orientation of every triangle before sewing because rotating one HST can noticeably interrupt the design.
Sew the cream and triangle units into larger sections before attaching them to the center. Working in modules is easier than trying to assemble the entire quilt one tiny patch at a time. After each module is completed, compare its measurement with the side of the central section where it will be attached.
Construct the outer patchwork with an informal assortment of vintage-style quilt fabrics. Larger floral rectangles can create beautiful corner features, while small squares provide variety. Striped fabrics can be rotated horizontally or vertically to add movement, and dark blue prints can be repeated in several locations to visually connect the border with the center.
Once all four outer sections are assembled, join them carefully around the cream frame. Press every seam before proceeding to the next area. At this point, the characteristic Classic Farmhouse Style Patchwork Quilt Block Pattern should be clearly visible, with the colorful center, cream geometric frame, and scrappy outer patchwork forming one cohesive square.
Adding Borders, Quilting, and Finishing the Project
After the main patchwork top is complete, measure it through the center horizontally and vertically. Use those measurements when cutting the inner border strips rather than simply cutting strips according to the outer edges. This technique helps prevent stretched or wavy borders and keeps the finished quilt square.
The reference project uses a narrow dark border followed by lighter floral and red outer borders. You can create a similar farmhouse effect by adding a narrow navy or dark green strip first. After that, attach a wider cream floral border, and finish with a warm red printed border. These layers create depth while framing the patchwork center beautifully.
Prepare the quilt sandwich by placing the backing fabric wrong side up, batting in the middle, and the patchwork top right side up. Smooth all layers carefully and secure them with safety pins, basting spray, or your preferred quilting method. Make sure the backing and batting extend several centimeters beyond the quilt top on every side.
For quilting, a gentle free-motion quilting pattern works especially well with this design because it adds texture without hiding the patchwork. Small loops, flowers, leaves, or wandering curves can complement the farmhouse theme. Straight-line quilting is another excellent option for beginners and can be stitched beside the seams or diagonally across selected blocks.
After quilting, trim the excess batting and backing so the edges are straight. Prepare binding strips from red, navy, green, or another coordinating fabric. Join the strips, press them lengthwise, and sew the binding around the quilt perimeter. Miter the corners neatly and finish the back by hand or machine according to your preferred technique.
Give the completed Classic Farmhouse Style Patchwork Quilt Block Pattern a final gentle press and inspect all seams and edges. The result can be used as a wall hanging, table topper, large cushion front, decorative panel, or as one block within a larger quilt. The mixture of traditional prints and structured geometry makes this project especially versatile for cozy country and farmhouse interiors.
FAQ About the Classic Farmhouse Style Patchwork Quilt Block Pattern
What is a Classic Farmhouse Style Patchwork Quilt Block Pattern?
A Classic Farmhouse Style Patchwork Quilt Block Pattern is a quilting design inspired by traditional country sewing. It usually combines warm colors, floral fabrics, checks, plaids, stripes, geometric shapes, and light neutral backgrounds. The overall effect is comfortable, handmade, and slightly vintage.
Is this quilt pattern suitable for beginners?
A confident beginner can make this project, although some patience is required. The basic techniques are straight seams, squares, rectangles, half-square triangles, pressing, border construction, and binding. Beginners may find it easier to create a smaller sample block before making the full project.
What fabrics work best for farmhouse patchwork quilting?
Quilting cotton is the easiest choice because it is stable, easy to cut, and simple to sew. Choose small floral prints, plaids, checks, stripes, and vintage-inspired motifs. Colors such as navy blue, cream, mustard, red, rust, green, and teal are particularly effective for a traditional farmhouse appearance.
Do all the fabrics need to come from the same collection?
No. In fact, mixing fabrics can make a scrap quilt look more authentic. The key is choosing prints that share similar colors or visual intensity. Repeating a few colors throughout the block helps unrelated fabrics feel connected.
Why is cream fabric important in this pattern?
The cream fabric creates contrast and gives the eye a place to rest. Without enough neutral space, the large number of prints could compete with one another. In this pattern, the cream pieces also form the distinctive geometric frame around the colorful center.
What seam allowance should I use?
A standard quilting seam allowance of approximately 0.6 cm or 1/4 inch is recommended. Consistency is more important than the exact system used. Every seam should have the same allowance so the units fit together correctly.
How can I make the patchwork intersections match accurately?
Accurate cutting, consistent seams, and careful pressing are essential. Press adjoining rows in opposite directions so the seam allowances nest together. Pin the intersections before sewing and stitch slowly as you approach each matching point.
Can I change the size of the quilt block?
Yes. The Classic Farmhouse Style Patchwork Quilt Block Pattern can be enlarged or reduced as long as all related pieces are resized proportionally. Using graph paper to plan the layout can be helpful when changing dimensions.
Can I use leftover fabric scraps for this project?
Absolutely. This design is ideal for fabric scraps because many different prints are used. Sort scraps by color and value first, then cut them into consistent squares, rectangles, or triangles. Small leftover pieces can add personality to the finished quilt.
What quilting design works best over busy patchwork fabrics?
Simple quilting is often the best choice. Meandering lines, gentle loops, small floral motifs, or straight-line quilting provide texture while allowing the fabrics to remain the main attraction. Avoid overly dense quilting if you want a softer finished project.
Should the quilt be prewashed?
Prewashing is a personal choice. If you are combining fabrics from different manufacturers, prewashing may help reduce concerns about uneven shrinkage or excess dye. If you prefer the slightly crinkled appearance that develops after a completed quilt is washed, you may choose to work with unwashed quilting cotton.
What can I make with this block besides a full quilt?
The block can become a decorative cushion, wall hanging, table topper, chair cover, seasonal panel, or centerpiece for a larger bed quilt. Because the design contains so many interesting fabrics, even a single block can become an attractive decorative project.
Conclusion
The Classic Farmhouse Style Patchwork Quilt Block Pattern combines everything many quilters appreciate about traditional patchwork: colorful scraps, vintage-inspired prints, strong geometric construction, practical sewing techniques, and a warm handmade appearance. By beginning with the central squares, gradually constructing the cream geometric frame, adding the outer patchwork sections, and finishing with coordinated borders, you can transform many individual fabric pieces into one balanced and impressive design.
Throughout this project, the most important lessons are to choose fabrics with good contrast, cut accurately, maintain a consistent 0.6 cm seam allowance, press each section carefully, and check measurements as the quilt grows. The combination of floral fabrics, plaids, stripes, dark blues, warm reds, greens, mustard tones, and cream gives the block its recognizable farmhouse quilt style, while the geometric arrangement keeps the finished piece organized and visually strong.
EASILY FIND THE FREE PDF FOR THIS PATTERN HERE!
This pattern is also an excellent reminder that patchwork does not require perfectly matching fabrics. Some of the most memorable quilts are created from materials with different prints and personalities. When repeated colors and balanced values are used thoughtfully, those differences become part of the charm. That is exactly what makes the Classic Farmhouse Style Patchwork Quilt Block Pattern such an enjoyable project for anyone who loves traditional sewing with a creative, personal touch. After completing your quilt, experiment with different borders, quilting styles, and fabric combinations to create your own version of this farmhouse classic. If you try this project, leave your sincere opinion about the pattern and share your suggestions. Your ideas about colors, fabric combinations, quilting methods, or possible variations can inspire new ways to create this beautiful farmhouse patchwork quilt.