
The Bird themed wall organizer Pattern is a charming sewing and quilting project that combines decorative appliqué, practical storage, and cheerful fabric colors in one handmade piece. Inspired by the bird-shaped organizer shown in the reference image, this project features a large stylized bird made from cream, orange, and warm red fabrics, with several useful pockets incorporated directly into the body and wing. The finished organizer can hold pens, markers, small sewing notions, crochet hooks, craft tools, notes, or other lightweight accessories while also working as a colorful piece of wall décor. What makes this design especially attractive is the combination of patchwork, visible stitching, curved appliqué pieces, and dimensional pockets. Even though the finished piece looks detailed, the construction can be divided into manageable stages, making the Bird themed wall organizer Pattern suitable for confident beginners as well as experienced quilters who enjoy functional fabric projects.
A successful Bird themed wall organizer Pattern begins with understanding the basic construction of the bird. Instead of treating the project as one complicated shape, think of it as several simple fabric sections assembled together: the body, head, beak, wing, tail, legs, feet, eye, hanging loop, and storage pockets. The body works as the foundation and can be created using two layers of cotton fabric with batting or stabilizer between them. Individual colored panels are then sewn or appliquéd onto this base. Warm shades such as orange fabric, burnt orange, cream, yellow, and rust create the autumn-inspired appearance seen in the photograph, although the pattern can easily be customized with blues, greens, floral prints, scraps, or traditional quilting fabrics. Decorative topstitching around the edges helps define every section while adding the handcrafted look that makes a fabric organizer feel special.
Before cutting anything, prepare your materials and decide approximately how large you want the finished organizer to be. A practical wall organizer can measure about 45 to 55 cm tall from the top of the bird’s head to the lower edge of the body, excluding the legs, with a width of approximately 30 to 38 cm. You will need quilting cotton, batting or medium-weight fusible interfacing, coordinating thread, fabric scissors or a rotary cutter, pins or clips, a sewing machine, an iron, paper for creating templates, and optional bias binding. Small scraps are perfect for the beak, eye, feet, and pocket details. Because the Bird themed wall organizer Pattern contains curved pieces, adding approximately 0.7 to 1 cm seam allowance to templates makes assembly easier. Pressing each component carefully before sewing is equally important because accurate pressing keeps the body flat and helps the pockets retain their shape.
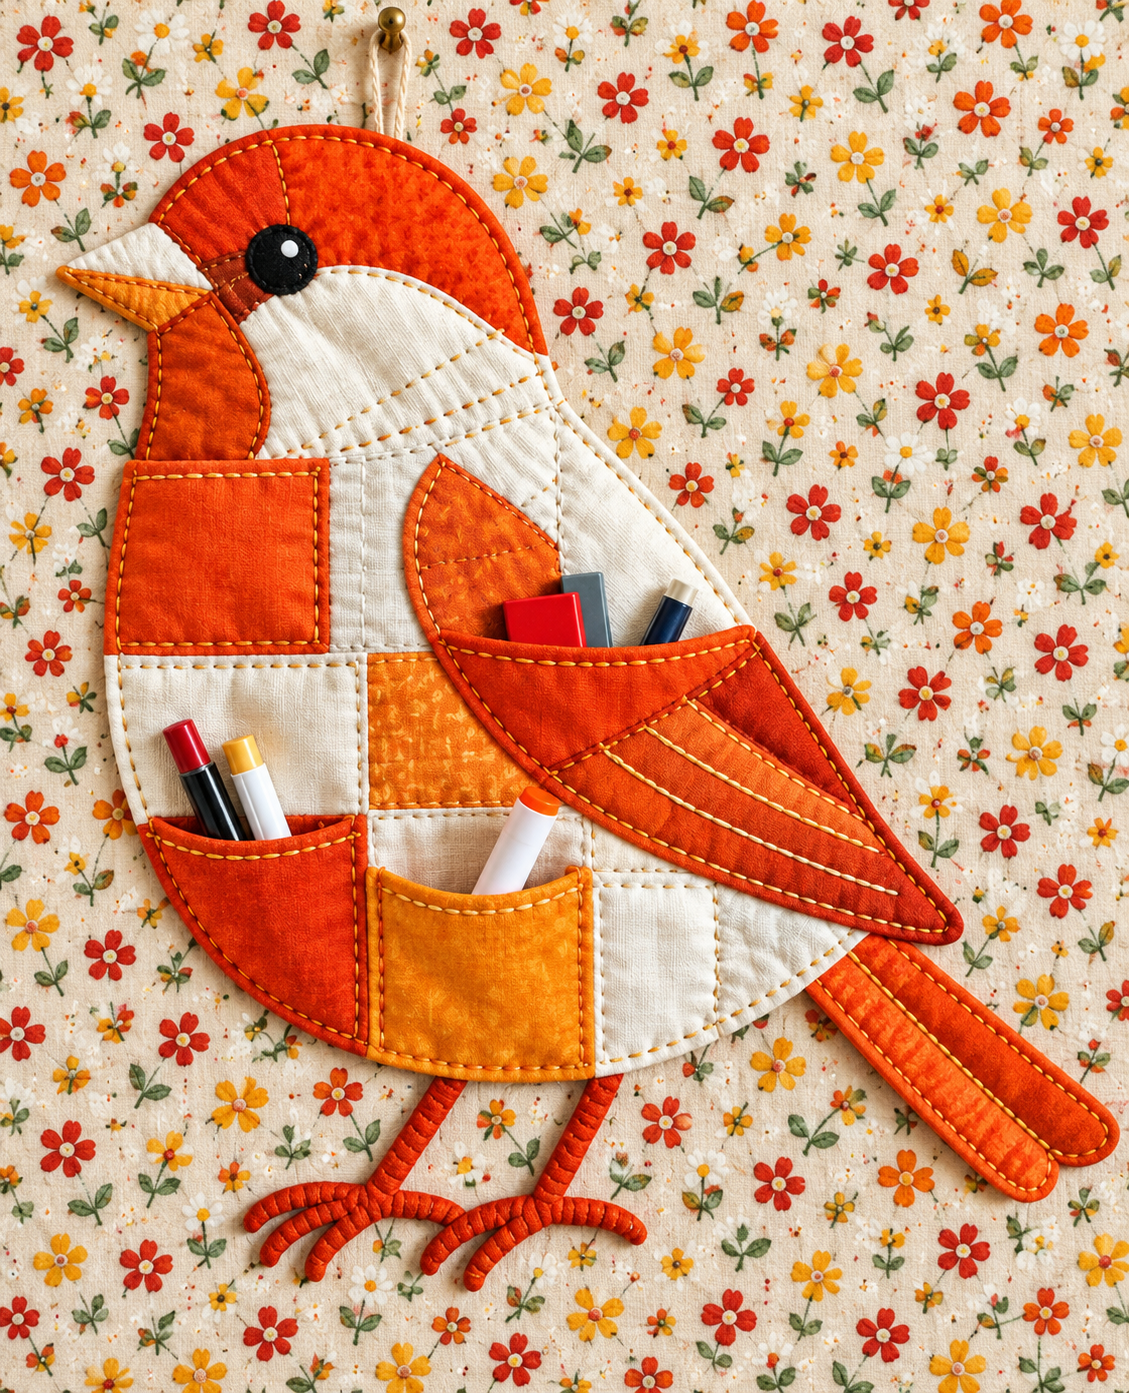
Preparing the Bird Themed Wall Organizer Pattern and Fabric Pieces
Start by drawing the main bird body on large paper. The silhouette should have a rounded belly, gently curved back, and raised neck. You do not need an anatomically realistic bird because this project is designed as a decorative quilted organizer. Make the body large enough to accommodate several pockets. Once you are happy with the shape, add seam allowance around the perimeter before cutting your fabric.
DISCOVER MORE FREE PATTERNS HERE!
Next, create separate paper templates for the head, beak, wing, tail, eye, legs, and feet. The head can overlap the upper body slightly, while the wing should extend diagonally across the center and lower right portion of the organizer. Keeping these pieces separate allows you to combine several fabrics and achieve the layered appearance associated with a patchwork bird wall organizer.
Cut two main body pieces from your chosen cream or neutral fabric. One will form the front and the other the back. Cut a matching piece of batting or stabilizer slightly smaller than the fabric layers. Sandwich the stabilizer between the front and backing fabrics and press or baste everything securely.
Now cut the orange and red accent pieces. For a look similar to the photograph, use deep burnt orange for the head, neck, wing, and several pockets. A lighter golden orange works beautifully for one or two sections because it prevents the finished Bird themed wall organizer Pattern from looking too flat or monochromatic.
Create the eye using a small circle of black fabric, felt, or appliqué fabric. A tiny cream or white circle placed inside the black eye gives the bird more expression. The beak can be made from two triangular or elongated orange pieces. Reinforce the beak with lightweight interfacing if you want it to maintain a crisp shape.
Before sewing, arrange every piece on top of the main body. This dry layout is one of the most useful steps in the entire process. Move the head, wing, and pockets until their proportions feel balanced. Taking a quick photo of the arrangement can help you remember exactly where each piece belongs when you begin sewing.
Sewing the Body, Head, Appliqué Details, and Decorative Stitching
Begin quilting the main body before attaching the dimensional pockets. Simple straight lines, gentle curves, or free-motion quilting can be used. In the reference design, the cream body contains subtle stitched sections that add texture without competing with the stronger orange elements. Keep your quilting relatively light so the organizer remains flexible.
Position the head and neck appliqué over the upper left portion of the body. Pin or fuse the piece in place and sew around the perimeter using a straight stitch, narrow zigzag stitch, or appliqué stitch. A contrasting thread such as golden yellow thread creates a beautiful handmade effect and makes the shape more visible.
Attach the beak next. Place it so that it extends slightly beyond the body silhouette. If you are sewing the organizer with turned edges, insert the raw end of the beak between fabric layers. For appliqué construction, stitch the base securely to the neck while leaving the pointed section extending outward.
Add the eye after the head has been permanently attached. Sew the black circle first and then add the small light-colored highlight. Because the eye is a strong focal point, place it carefully before stitching. Even a difference of one or two centimeters can change the expression of the bird.
Decorative topstitching is an important feature of this Bird themed wall organizer Pattern. Sew approximately 0.3 to 0.5 cm from the appliqué edges using a slightly longer stitch length. Yellow, gold, cream, or orange thread can create visible definition around the head, pockets, wing, and outer edges.
Continue building the patchwork body by sewing rectangular and curved fabric sections where desired. These pieces do not need to be perfectly symmetrical. A handmade patchwork design often looks more interesting when the sections vary slightly in width and shape. Press each section carefully after sewing to keep the organizer smooth.
Creating and Attaching the Storage Pockets and Wing
The pockets are what transform this decorative bird into a practical fabric wall organizer. Begin with the larger rectangular pocket located on the upper left section of the body. Cut the pocket fabric larger than the desired finished measurement so you can turn the edges under. For example, a finished pocket measuring approximately 13 x 14 cm can be cut around 15 x 16 cm.
Fold the upper edge of the pocket twice toward the wrong side, press it, and topstitch it securely. Fold the remaining raw edges under approximately 1 cm and press again. Position the pocket on the bird body and sew along the two sides and bottom, leaving the upper edge open.
Create the smaller lower pockets using the same method. Varying their dimensions makes the organizer more useful because narrow pockets are ideal for pens and crochet hooks while wider pockets can hold small scissors, rulers, notepads, or packets of craft supplies. Reinforce the upper corners with a few reverse stitches.
The large wing can also function as an additional storage pocket. Cut two matching wing shapes and place them right sides together. Sew around the perimeter while leaving a small opening, turn the piece right side out, press it carefully, and close the opening with topstitching.
Position the wing diagonally across the body so its lower section overlaps part of the organizer. Stitch around the outer curved perimeter while leaving the upper portion accessible if you want the wing to become a pocket. You can also sew additional diagonal lines across the wing to create smaller compartments.
Test every pocket before finishing the project. Insert markers, pens, small rulers, or similar lightweight items to verify that the openings are comfortable and that the pockets are deep enough. Making adjustments at this stage is easier than trying to modify the Bird themed wall organizer Pattern after the backing has been completely finished.
Finishing the Tail, Legs, Hanging Loop, and Wall Organizer
Create the tail from two long tapered fabric pieces. Add interfacing or thin batting if you want a padded appearance. Place the pieces right sides together, sew around the sides, turn them right side out, and topstitch near the edge. Insert the upper end of the tail behind the lower body before completing the final edge stitching.
The legs can be made from narrow fabric tubes, covered cord, or strips of fabric folded like bias tape. For a decorative quilted look, use orange fabric and visible topstitching. Make both legs approximately 15 to 20 cm long, adjusting the length according to the overall scale of your organizer.
To make the feet, form three narrow toes for each leg. They can be sewn from small fabric tubes or shaped from fabric-covered cord. Position the toes in a fan-like arrangement and stitch them firmly to the bottom of each leg. The whimsical feet are an important design detail because they give the bird its playful personality.
Finish the outside edge of the body using bias binding, turned edges, or close topstitching. A narrow orange binding looks particularly attractive because it visually connects the cream body with the orange head, wing, pockets, and tail. Work slowly around tight curves to avoid puckers.
Add a strong hanging loop at the top of the bird. A folded fabric strip measuring approximately 10 to 14 cm long works well. Secure the ends with several rows of stitching because the loop needs to support the weight of both the organizer and the objects placed inside its pockets.
Finally, press the completed Bird themed wall organizer Pattern gently and check all seams. Trim loose threads, reinforce pocket corners if necessary, and make sure the hanging loop is firmly attached. Once finished, the organizer can be hung in a sewing room, craft area, children’s study space, creative studio, kitchen, or any room where cheerful handmade storage is useful.
FAQ About the Bird Themed Wall Organizer Pattern
What is a Bird themed wall organizer Pattern?
A Bird themed wall organizer Pattern is a sewing template and construction concept used to create a bird-shaped fabric organizer with built-in storage pockets. It combines elements of quilting, appliqué, patchwork, and functional sewing. Unlike a simple decorative wall hanging, the pockets allow the finished piece to store lightweight everyday objects.
Is this project suitable for beginners?
Yes, especially for sewists who already understand basic straight stitching and simple curves. Beginners can simplify the design by using fewer patchwork sections and larger pockets. More experienced quilters can add detailed free-motion quilting, decorative stitching, piping, or additional appliqué.
What type of fabric works best for the organizer?
Quilting cotton is one of the best options because it is easy to cut, press, stitch, and combine with batting. Linen blends and medium-weight cotton can also work. Very stretchy fabrics are less suitable because they may distort around the pockets and curved edges.
Should I use batting or interfacing?
Using batting gives the organizer a soft quilted appearance, while interfacing provides firmness. You can use one or both depending on the result you prefer. A thin layer of batting combined with medium-weight interfacing can provide enough structure without making the wall organizer excessively bulky.
How large should the bird organizer be?
There is no mandatory size, but approximately 45 to 55 cm in height works well for a practical wall organizer. You can enlarge the templates for a sewing room organizer or reduce them to create a smaller decorative version for lightweight accessories.
How many pockets should I add?
Three to six pockets usually provide a good balance between function and appearance. The design shown in the reference image uses several different pocket shapes, including rectangular pockets and a large wing pocket. You can customize the number according to what you intend to store.
Can scraps be used for this sewing project?
Absolutely. This is an excellent fabric scrap project because the head, eye, beak, wing, pockets, and patchwork body sections can all be made from relatively small pieces. Using coordinated scraps also gives each organizer an original appearance.
Can I change the colors of the Bird themed wall organizer Pattern?
Yes. Orange and cream produce a warm, cheerful look, but there is no need to follow those colors exactly. Blue and white can create a coastal bird, red and green can give the project a seasonal feeling, and pastel fabrics can create a softer nursery-style organizer.
What can be stored inside the pockets?
Pens, pencils, fabric markers, crochet hooks, small rulers, notes, lightweight sewing tools, erasers, craft accessories, and other small objects are ideal. Avoid very heavy or sharp items because they can distort the organizer or damage the fabric.
How do I prevent the pockets from sagging?
Use interfacing inside larger pockets and reinforce the upper corners with additional stitching. Keeping each pocket proportional to the objects it will hold also improves stability. For deeper pockets, adding small pleats or gussets can create more capacity without pulling excessively on the main body.
Can the organizer be washed?
If all fabrics, batting, and interfacing are washable, the finished organizer can usually be gently hand washed or washed on a delicate cycle. Prewashing cotton fabrics before construction may help reduce unexpected shrinkage. Always dry the organizer flat or according to the care requirements of the materials used.
Why is decorative topstitching important in this pattern?
Topstitching strengthens edges while visually separating the different fabric sections. In this Bird themed wall organizer Pattern, contrasting stitches around the orange shapes help emphasize the patchwork construction and contribute to the warm handmade character of the finished design.
Conclusion
Creating a Bird themed wall organizer Pattern is a rewarding way to combine practical sewing with playful fabric art. Throughout this project, you learn how to prepare a bird-shaped foundation, work with batting and interfacing, build patchwork sections, sew appliqué details, construct useful pockets, create a dimensional wing, and finish the organizer with a tail, legs, feet, and hanging loop. Each stage can be customized, which means the same basic pattern can produce many completely different organizers.
The most important part of the process is working carefully with the proportions of the body and pockets. Preparing paper templates first, adding suitable seam allowances, pressing the fabric between construction stages, and reinforcing frequently used areas will make the finished project more durable. Visible decorative stitching, contrasting fabrics, and carefully arranged patchwork sections can then transform a simple storage accessory into an eye-catching handmade decoration.
EASILY FIND THE FREE PDF FOR THIS PATTERN HERE!
Whether you use warm orange fabrics like the reference project or create your own color palette, the Bird themed wall organizer Pattern offers plenty of opportunities for creativity. It is also a practical project for using fabric scraps while developing useful quilting, appliqué, pocket-making, and finishing skills. If you make your own version, leave your sincere opinion about the project and share your suggestions. It would be wonderful to know which colors, fabrics, pocket arrangements, or decorative details you would choose for your own Bird themed wall organizer Pattern.