
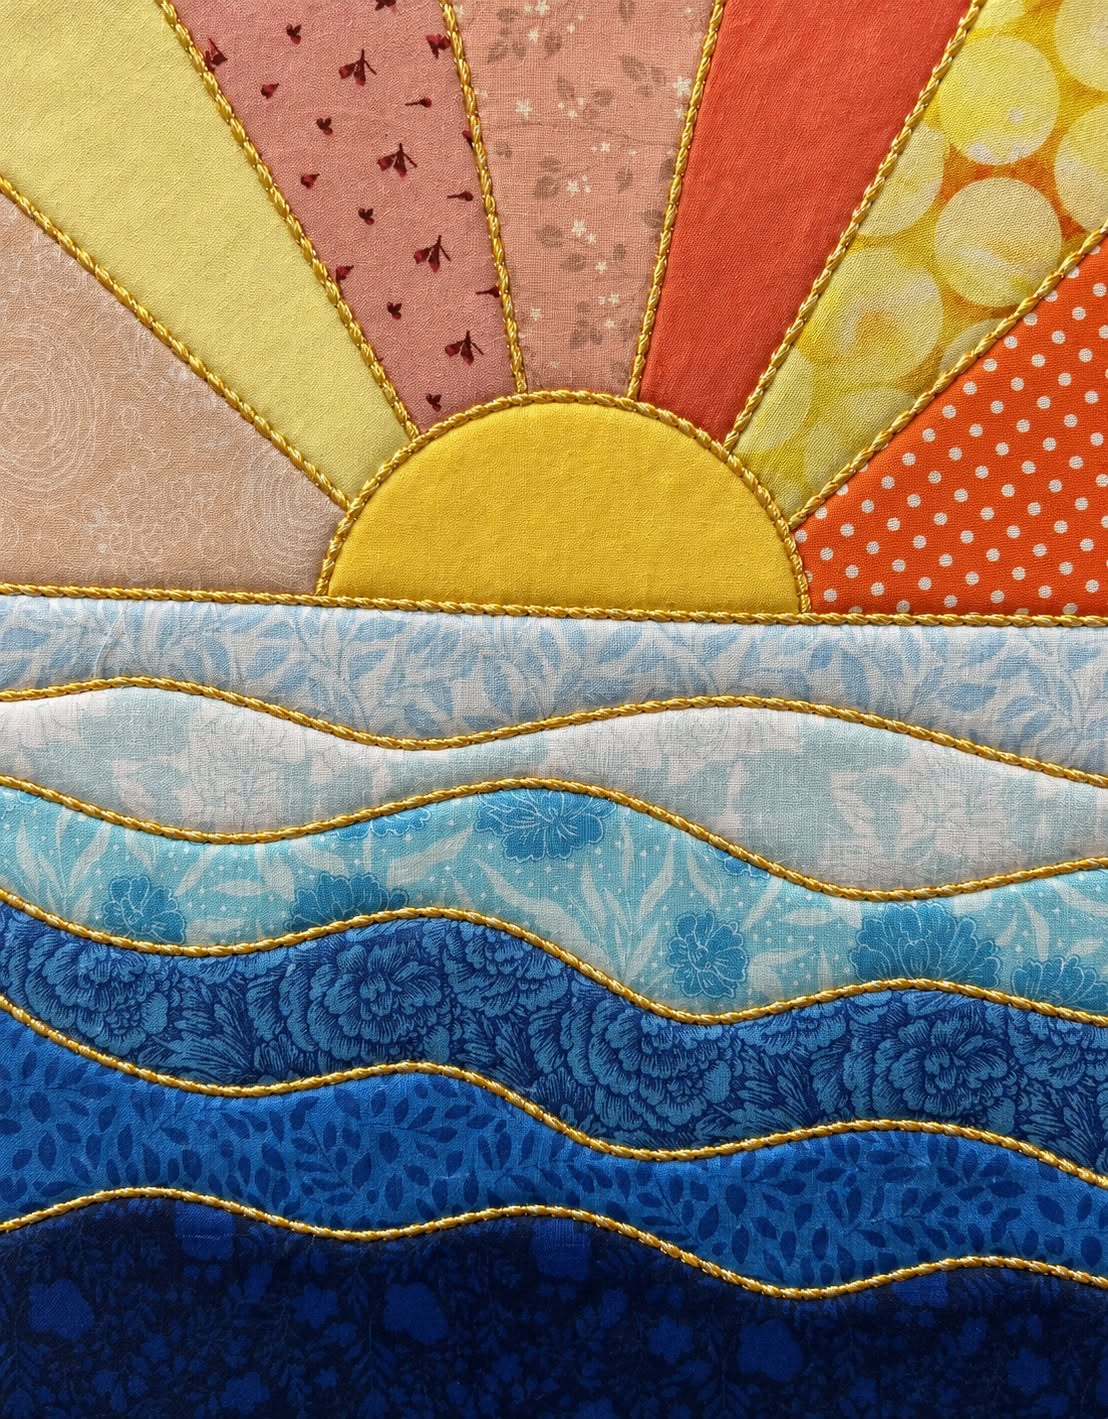
The “Sunrise over the Waves” Quilt Pattern is a cheerful textile project inspired by the peaceful moment when the sun appears above the ocean horizon. Its composition combines warm rays in shades of yellow, coral, peach, and soft pink with layered blue waves that gradually become deeper toward the bottom. The result is a quilt block that feels both modern and handmade, while still preserving the cozy personality associated with traditional patchwork. One of the most attractive details of this design is the contrast between the geometric sunrise and the organic curves of the water. Because different fabrics can be used for each section, the project is also an excellent opportunity to work with scraps from previous sewing projects. With thoughtful fabric selection, accurate cutting, and careful stitching, this pattern can become a wall hanging, decorative pillow panel, table topper, or part of a larger quilt.
Creating the “Sunrise over the Waves” Quilt Pattern is also a wonderful exercise for quilters who want to practice combining straight seams with curved shapes. The upper portion of the block is constructed like a stylized rising sun, with wedge-shaped pieces extending outward from a semicircle. Meanwhile, the lower half uses horizontal strips with gentle curves that imitate moving ocean waves. These contrasting techniques make the project visually interesting without requiring an overwhelming number of components. Beginners can simplify the curves and use wider strips, while experienced quilters can create additional wave layers or use more detailed fabric combinations. The most important idea is to preserve the visual transition from warm sunrise colors at the top to cool ocean blues below. That gradual change in color is what gives the finished quilt its distinctive landscape appearance.
Another appealing feature of the “Sunrise over the Waves” Quilt Pattern is its flexibility. There is no requirement to reproduce every print or shade exactly as shown in the inspiration image. Instead, think of the photograph as a guide for color placement, proportion, and movement. Warm yellows can represent sunlight, peach and orange fabrics can create the glowing sky, and several values of blue can suggest distance and depth in the ocean. Small floral prints, dots, tonal textures, and subtle geometric fabrics can all work beautifully together. Choosing fabrics from different collections can even enhance the handmade character of the piece. The goal is to create visual harmony rather than perfect duplication, allowing every finished sunrise quilt block to have its own personality.
Materials, Fabric Selection, and Preparing the Sunrise Quilt Pieces
Before cutting any fabric, decide the approximate finished size of your sunrise quilt block. A practical size for a decorative panel is approximately 40 × 50 cm, although the design can easily be enlarged or reduced. You will need several warm-colored cotton fabrics for the rays, one yellow or golden fabric for the sun, and at least five coordinating blue fabrics for the waves. Quilting cotton is an excellent choice because it is stable, easy to press, and widely available in both solid colors and prints. You will also need backing fabric, batting if the piece will be quilted, sewing thread, a rotary cutter or fabric scissors, a cutting mat, quilting ruler, pins or clips, and an iron.
DISCOVER MORE FREE PATTERNS HERE!
Begin the “Sunrise over the Waves” Quilt Pattern by planning the color arrangement of the sun rays. The inspiration uses a mixture of soft yellow, dusty pink, pale peach, coral, yellow-green, and orange. These colors do not need to match perfectly, but they should create a warm transition across the top of the block. Cut several wedge-shaped pieces that are wider at the outside edge and narrower where they meet the sun. Creating a paper template first can help maintain consistent angles. Add approximately 6 mm of seam allowance around each template piece if your template represents the finished shape. Labeling the wedges before sewing is also helpful because it prevents accidental changes in the planned color order.
Arrange the wedges on your work surface before stitching them together. This simple step can greatly improve the final appearance because you can evaluate whether neighboring colors have enough contrast. Try alternating quieter fabrics with more noticeable prints so that one area does not become visually heavy. Sew the wedges together one at a time using a consistent seam allowance, gently pressing each seam after stitching. Pressing the seams to alternating sides may help reduce bulk, although pressing them open can also produce a flatter surface when several seams converge. Continue joining the pieces until you have created the complete fan-shaped sunrise section.
The semicircular sun is one of the defining elements of this quilt pattern. To create it, draw or trace a half circle that fits comfortably across the lower center of your completed ray section. Add a seam allowance around the curved edge before cutting your yellow fabric. A mustard yellow, golden yellow, or softly textured yellow print works especially well because it creates contrast without appearing overly bright. Pin the curved edge of the semicircle carefully against the lower edges of the rays, distributing the fabric evenly. Small clips within the seam allowance can make curved piecing easier, but they should never extend beyond the stitching line.
Sew the curved sun seam slowly rather than trying to complete it quickly. Curved seams are easier to manage when the fabric is guided gently under the presser foot without stretching either layer. After stitching, carefully press the seam so the semicircle lies smooth and flat. If minor puckers appear, light steam and gentle pressing may help settle the fibers. Avoid pulling the fabric aggressively because distortion at this stage can make it more difficult to join the sunrise section to the waves. Once finished, trim the sides of the upper panel if necessary so they remain square and ready for assembly.
At this stage, place the completed sunrise portion aside and prepare the fabrics for the water. The wave quilt pattern works best when the blues progress from pale near the horizon to deeper shades toward the bottom. Consider using pale aqua, powder blue, turquoise, medium ocean blue, dark navy, and indigo. Prints with small flowers, leaves, dots, or subtle tonal patterns can imitate the natural movement and texture of water. Lay all the selected fabrics beneath the sunrise section before cutting them. This allows you to see the complete color progression and make adjustments before any permanent seams are created.
Sewing the Curved Waves, Assembling the Panel, and Quilting the Design
The waves are what give the “Sunrise over the Waves” Quilt Pattern its flowing character. Instead of cutting perfectly straight horizontal strips, create gently curved strips approximately 5 to 8 cm high. Draw a smooth wave across a paper template or directly onto pattern paper, avoiding extremely sharp curves. Each wave should extend slightly beyond the width of the quilt block so that the edges can be trimmed afterward. For an organic appearance, vary the curves slightly from one row to another. Some can rise near the center, while others can dip, creating the impression of natural ocean movement.
Curved wave strips can be assembled using traditional curved piecing. Place two neighboring strips right sides together and carefully align their curved edges. Pin or clip at several points, beginning at the ends and then matching the center. Additional clips between those points will help distribute the fabric evenly. Sew slowly while gently repositioning the fabric as the curve approaches the presser foot. After completing the seam, open the two pieces and press carefully. Continue this process with the remaining wave strips until the entire ocean portion becomes one continuous panel.
Another approach is to use appliqué for the waves, particularly if you are uncomfortable with curved seams. In that method, each wave can overlap the fabric beneath it slightly, and the upper curved edge can be secured with machine stitching. A narrow zigzag, blanket stitch, or straight edge stitch can provide a decorative finish. This technique changes the construction slightly but preserves the visual identity of the “Sunrise over the Waves” Quilt Pattern. It can also make the project more accessible to beginners. Whichever method you choose, consistent stitching and gentle curves will contribute more to a polished result than complicated techniques.
Once the wave section is complete, position it beneath the sunrise panel and check that the horizon line appears level. Sew the two major sections together using your standard seam allowance. Press the joining seam carefully, preferably toward whichever side produces less bulk. Square the entire panel using a quilting ruler, trimming only small amounts as needed. At this stage, you should clearly see the finished composition: radiant wedges surrounding a semicircular sun above a sequence of flowing blue waves. The strong contrast between these two sections is what makes this landscape quilt pattern immediately recognizable.
To turn the pieced top into a quilted project, create a quilt sandwich using backing fabric, batting, and the completed quilt top. Make the backing and batting several centimeters larger than the quilt top on all sides. Smooth each layer carefully to remove wrinkles, then secure them with quilting pins, basting spray, or your preferred basting method. Quilting can be simple because the piecing already provides plenty of visual interest. Straight lines following the sun rays can emphasize the sunrise, while gently curved quilting lines can follow the contours of the waves. Stitching in the ditch is another good option for maintaining a clean appearance.
After quilting, trim the excess batting and backing so that all layers are even. Finish the project with binding in a coordinating color such as navy, blue, warm yellow, coral, or a neutral shade. A darker binding can visually frame the artwork, while a yellow or orange binding can reinforce the warm sunrise palette. Sew the binding securely around all four edges, paying particular attention to neat corners. Once the final stitches are completed and the project receives a gentle press, the “Sunrise over the Waves” Quilt Pattern is ready to display as a mini quilt, wall panel, pillow front, or component of a larger coastal quilt.
Frequently Asked Questions About the “Sunrise over the Waves” Quilt Pattern
Is the “Sunrise over the Waves” Quilt Pattern suitable for beginners? Yes, although some basic sewing experience is helpful. The straight seams used for the sun rays are relatively approachable, while the curved waves introduce an excellent opportunity to develop new quilting skills. Beginners who are nervous about curved piecing can simplify the waves or use an appliqué construction method instead. Practicing one curved seam with scrap fabric before working on the final pieces can also increase confidence and accuracy.
What fabrics work best for this quilt pattern? High-quality quilting cotton is one of the easiest materials to use because it has enough structure for accurate cutting and piecing. You can combine solids with tonal prints, florals, dots, geometric designs, and subtle textures. The most important consideration is color value rather than matching fabric collections. Light blues near the horizon and increasingly dark blues toward the bottom create depth, while warm yellows, oranges, peaches, and pinks establish the sunrise atmosphere.
How many different fabrics should I use for the design? There is no fixed requirement, but approximately six to eight fabrics for the sky and sun and five to seven fabrics for the waves will create plenty of visual variety. Scrap quilters can use even more fabrics, provided the overall warm-to-cool color arrangement remains clear. Using several prints within the same color family can make the scrap quilt pattern feel rich without making the composition chaotic.
How can I make curved seams look smoother? Accuracy begins with gentle curves, consistent seam allowances, and careful pinning. Avoid stretching the fabric while sewing because stretched edges can create puckering. Sew slowly and allow the fabric to naturally follow the curve. Afterward, press rather than aggressively ironing back and forth. If your first curve is not perfect, remember that quilting often helps smooth minor irregularities and integrates the seams into the overall design.
Can this design be enlarged into a full-size quilt? Absolutely. One option is to enlarge the entire “Sunrise over the Waves” Quilt Pattern proportionally and create one dramatic landscape composition. Another idea is to make several individual sunrise blocks and join them together. Each block could use different fabric combinations, producing a collection of unique sunrises and oceans. Borders or sashing can be placed between the blocks if you want additional visual separation.
What quilting design complements the sunrise and waves best? Quilting that follows the existing shapes is usually especially effective. Radiating straight or slightly curved lines can emphasize the sun, while horizontal flowing lines can reinforce movement in the ocean. Free-motion waves are another possibility for experienced quilters. However, elaborate quilting is not necessary. Even simple stitching along the major seams can provide sufficient stability while allowing the fabrics and pieced landscape to remain the main visual focus.
Conclusion
The “Sunrise over the Waves” Quilt Pattern combines traditional patchwork techniques with the beauty of a simple coastal landscape. By dividing the design into two main areas—warm sun rays and cool flowing waves—the project becomes much easier to understand and construct. What initially appears to be a detailed textile illustration is actually a thoughtful arrangement of geometric wedges, one semicircle, and several curved horizontal strips.
The first important lesson is careful fabric selection. Warm yellows, peaches, pinks, corals, and oranges establish the glowing sunrise, while pale aqua through deep navy creates the illusion of ocean depth. Prints can add personality, but maintaining a clear color progression is more important than using a specific fabric collection. This freedom makes the project especially suitable for using treasured quilting scraps.
The second lesson involves construction accuracy. Consistent seam allowances, patient pressing, and careful alignment will produce cleaner sun rays and smoother curves. The semicircular sun may require a little patience, but sewing slowly makes a significant difference. Likewise, wave pieces should be handled gently to prevent stretched edges and unwanted distortion.
The curved ocean section is also an opportunity to adapt the project to your own skill level. Traditional curved piecing produces a beautifully integrated surface, but appliqué can offer a simpler alternative. Both approaches can achieve the recognizable appearance of the “Sunrise over the Waves” Quilt Pattern, so there is no need to feel restricted to only one sewing technique.
After the top is assembled, quilting adds both structure and artistic detail. Following the direction of the sun rays and waves can enhance the sense of movement already created by the patchwork. A coordinating binding then provides a clean frame around the entire composition, transforming the pieced panel into a finished textile artwork that can be displayed or incorporated into another sewing project.
EASILY FIND THE FREE PDF FOR THIS PATTERN HERE!
Most importantly, this quilt pattern encourages creativity rather than exact duplication. Your sunrise can be soft and pastel, vibrant and tropical, or rich with autumn-inspired colors. Your ocean can range from pale turquoise to dramatic midnight blue. If you make your own version of the “Sunrise over the Waves” Quilt Pattern, leave your sincere opinion about the project and share your suggestions. Your ideas about colors, fabrics, wave construction, quilting details, and possible variations can inspire even more creative interpretations of this peaceful sunrise design.