
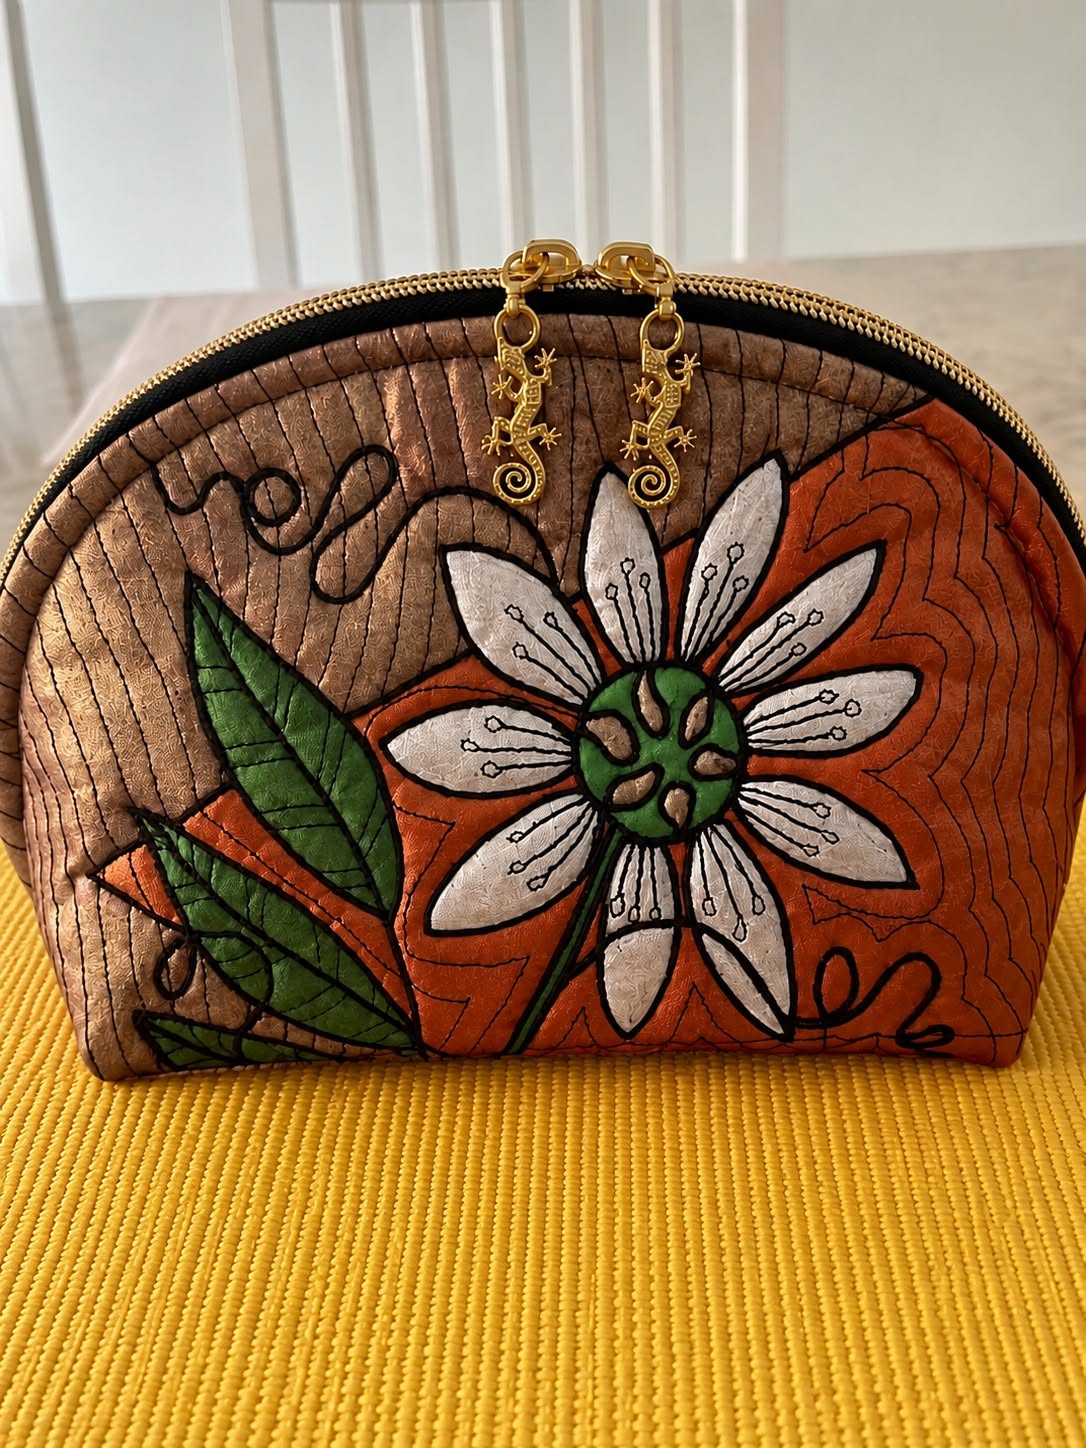
The Quilted Zippered Toiletry Bag with Flower Appliqué Pattern is a beautiful sewing project that combines practical storage with the warmth and personality of handmade quilting. Inspired by the photographed bag, this design features a softly rounded silhouette, decorative machine quilting, a prominent floral appliqué, leafy details, contrasting fabric sections, and a zipper that follows the curved upper edge. The result is a compact but eye-catching accessory that can be used as a toiletry bag, cosmetic pouch, sewing notions organizer, or travel case. One of the most appealing aspects of this project is how traditional quilting techniques can be transformed into an everyday object. Instead of creating a flat quilt block and stopping there, the decorative surface becomes part of a useful three-dimensional bag. This makes the project especially rewarding for quilters who want to explore functional sewing while still enjoying fabric selection, appliqué, stitching, and creative embellishment.
Creating a Quilted Zippered Toiletry Bag with Flower Appliqué Pattern also provides an excellent opportunity to work with scraps and coordinated fabrics. In the reference design, warm rust, dusty brown, muted green, cream, and dark outlines work together to create a handcrafted botanical appearance. You do not need to copy these exact colors to achieve a similar result. Floral fabrics, solids, batiks, linen-look cotton, or traditional quilting cotton can all be used successfully. The most important principle is contrast: the flower petals should be clearly visible against the background, the leaves should stand apart from surrounding sections, and the quilting stitches should complement rather than overwhelm the appliqué. By planning the colors before cutting, you can create a professional-looking flower appliqué toiletry bag while still giving the project your own creative identity.
Although the finished bag may appear detailed, the construction can be divided into manageable stages. You will first prepare the pattern and fabric pieces, then build the quilted exterior panels, create and attach the flower appliqué pattern, quilt the surfaces, prepare the lining, install the zipper, and finally assemble the bag into its rounded shape. Intermediate sewists will likely find the process familiar, but an ambitious beginner can also complete the project by working slowly and practicing curved zipper installation beforehand. The decorative stitching does not have to be perfect. In fact, slight variations in the quilting lines can enhance the artistic handmade character. Throughout this tutorial, the emphasis is on careful preparation, secure construction, and a balanced design so the finished quilted zippered bag is both attractive and durable.
Materials, Pattern Preparation, and Fabric Selection
Begin your Quilted Zippered Toiletry Bag with Flower Appliqué Pattern by gathering quilting cotton for the exterior, fabric for the flower and leaves, coordinating lining fabric, lightweight batting, interfacing if additional structure is desired, a zipper, matching or contrasting thread, fusible web for appliqué, and basic sewing supplies. A zipper measuring approximately 30 to 35 cm works well for a medium toiletry bag, although the exact length should match the dimensions of your pattern. You will also need scissors or a rotary cutter, pins or clips, an iron, and a sewing machine with a standard presser foot and zipper foot.
DISCOVER MORE FREE PATTERNS HERE!
For a medium-size finished bag, you can begin with two exterior rectangles measuring approximately 28 cm wide by 22 cm high. These rectangles are intentionally larger than the final panels because quilting can slightly reduce the fabric dimensions. Cut two pieces of batting and two lining pieces in approximately the same size. Once the decorative work has been completed, the panels can be trimmed into their final rounded shape. This approach gives you more control than attempting to quilt pieces that have already been precisely cut.
The silhouette visible in the photograph has a relatively flat bottom and a curved upper section. To create your own toiletry bag sewing pattern, draw a rectangle approximately 25 cm wide and 18 cm high. Keep the bottom edge straight and round the two upper corners gradually until they meet the central top area. Avoid creating sharp curves because the zipper will be easier to sew around a gentle arc. Fold the paper pattern in half before cutting it so both sides remain symmetrical.
Next, plan the decorative arrangement. The large flower is the focal point of the flower appliqué pattern, so position it slightly off-center rather than placing it exactly in the middle. Draw one circular flower center and approximately eight elongated petals around it. The petals can measure around 5 to 7 cm long depending on the size of your bag. Add two or three leaves extending toward the lower corner to recreate the natural composition seen in the inspiration image.
Color selection plays an important role in making the appliqué stand out. A warm reddish or terracotta section can create contrast against a taupe or brown background, while cream petals and green leaves provide visual balance. If you prefer a brighter project, use turquoise, yellow, coral, pink, or blue. The quilted toiletry bag pattern is flexible enough to suit modern, rustic, farmhouse, traditional, or bohemian fabric collections.
Before beginning the appliqué, prewash the fabrics if you normally prewash quilting cotton. Press everything carefully so the pieces lie flat. Place the exterior fabric over the batting and temporarily secure the layers with quilting spray, safety pins, or light basting stitches. Preparing the layers properly at this stage prevents shifting later and helps produce smooth, consistent quilting across the entire quilted zippered toiletry bag.
Creating the Flower Appliqué and Decorative Quilting
Trace each petal, leaf, and flower-center shape onto the paper side of fusible web. Remember that fusible appliqué shapes are reversed when transferred to fabric, although this is usually not important for symmetrical petals and leaves. Cut roughly around each traced piece, leaving a small margin outside the lines. Fuse the shapes to the wrong side of the chosen fabrics according to the fusible web instructions, then cut directly along the drawn lines.
Arrange the prepared pieces on the exterior panel before permanently fusing anything. Start with the largest background color sections if your design contains multiple fabric areas. Then position the leaves, flower petals, and center. Step back and look at the composition before pressing. Good placement is essential because the Quilted Zippered Toiletry Bag with Flower Appliqué Pattern depends heavily on the flower becoming the visual focal point without appearing crowded by the zipper or seam allowances.
Once you are satisfied with the arrangement, fuse the pieces permanently with an iron. Protect delicate fabrics with a pressing cloth if necessary. Allow everything to cool before stitching. Sew around every appliqué piece with a narrow zigzag, blanket stitch, satin stitch, or free-motion outline. Dark thread can create the bold illustrated appearance visible in the inspiration photo, while thread that matches each fabric will produce a softer and more traditional finish.
After outlining the flower, add decorative details to the petals. Small stitched lines extending inward from the edges can suggest botanical veins or stamens. The central circle can also be decorated with small shapes or free-motion stitching. These details transform a simple appliqué flower pattern into a more expressive design. However, avoid placing excessive stitching near the seam allowance because some of it may disappear during final bag construction.
Now begin quilting the background. The photographed pouch uses numerous curved and gently flowing lines that follow the contours of the flower, leaves, and color sections. You can recreate this effect using free-motion quilting or a regular presser foot. Begin approximately 5 to 8 mm away from an appliqué edge and sew another line parallel to it. Continue outward, gradually filling the surrounding space with repeated contours.
You may also quilt separate areas using different patterns. Straight diagonal lines can complement leaves, while wavy lines can fill large background sections. Echo quilting around the flower emphasizes the central motif and gives the bag an attractive dimensional texture. Once quilting is complete, press the panel gently, place your paper template over it, and trim the exterior to the final rounded toiletry bag pattern shape.
Installing the Zipper and Constructing the Bag
Prepare the second exterior panel using the same quilt sandwich method. It can feature simpler quilting if you want the floral front to remain the main attraction. You could repeat part of the flower design on the back, create another botanical motif, or quilt the entire panel using evenly spaced curved lines. Trim the back panel with the same paper template so both sides of the Quilted Zippered Toiletry Bag with Flower Appliqué Pattern match perfectly.
Cut two lining pieces using the finished exterior panels as templates. A tightly woven cotton fabric is ideal because it is lightweight and easy to sew. If the bag will frequently hold cosmetics or toiletries, consider a washable lining fabric. Avoid extremely thick lining because several fabric layers must be sewn together around the curved zipper and lower seams.
Before installing the zipper, mark the center of the zipper tape and the center of the curved top edge. Matching these reference points makes it easier to distribute the zipper evenly around the curve. Place the zipper right sides together with the exterior panel and clip it in place. Curves are generally easier to manage with sewing clips than with pins because clips allow the zipper tape to remain flexible.
Using a zipper foot, stitch slowly along the zipper tape. Reduce your sewing speed when approaching the rounded corners and reposition the fabric frequently rather than forcing it under the presser foot. If the zipper tape resists the curve, tiny clips can be made in the outer edge of the tape, taking great care not to cut close to the zipper teeth. Smooth installation is one of the most important steps in achieving a polished zippered toiletry bag.
Attach the lining to the same zipper edge so the zipper becomes sandwiched between the exterior and lining layers. Turn the fabrics away from the zipper and topstitch approximately 2 or 3 mm from the seam. Topstitching keeps the lining away from the zipper teeth and creates a clean professional finish. Repeat the same process with the opposite side of the zipper, carefully aligning both bag panels.
Open the zipper at least halfway before sewing the remaining seams. This is extremely important because the opening will allow you to turn the bag right side out later. Match the exterior panels right sides together and align the lining panels in the same way. Sew around the perimeter while leaving a turning opening of approximately 8 to 10 cm in the lining.
For a slightly wider and more stable base, box the lower corners by pinching each corner so the side and bottom seams align. Mark a short line approximately 2.5 to 3 cm from the tip and stitch across it. Trim away the excess fabric if desired. Turn the entire quilted zippered toiletry bag through the opening, push out the corners gently, close the lining opening with a narrow stitch, and place the lining inside the bag.
Finishing Details, Care, and Creative Variations
After turning the bag right side out, inspect the zipper carefully. Run it back and forth several times to ensure no lining fabric catches in the teeth. Press the finished pouch gently using appropriate heat for your chosen fabrics. Avoid pressing directly over plastic zipper teeth or delicate embellishments. A final light press can dramatically improve the shape of the Quilted Zippered Toiletry Bag with Flower Appliqué Pattern.
Decorative zipper pulls can add personality to the project. The inspiration bag features attractive ornamental pulls that complement the warm fabric palette. You can use purchased zipper charms, handmade tassels, fabric tabs, beads, or simple ribbon loops. Any decoration should remain lightweight enough that it does not interfere with normal zipper operation.
The finished pouch can be used for much more than toiletries. It works beautifully as a cosmetic organizer, sewing accessory bag, crochet-hook case, small travel organizer, art-supply pouch, or handmade gift. Because the exterior is quilted, the batting provides gentle cushioning for items stored inside. This functional versatility is one reason a quilted zipper pouch can be such a satisfying project.
You can easily resize the pattern while preserving the same construction method. For a smaller cosmetic pouch, reduce the template proportionally and use a shorter zipper. For a larger travel bag, enlarge the width and height while adding firmer interfacing for support. When scaling the flower appliqué pattern, try to maintain enough empty background space around the motif so the design remains visually balanced.
Fabric scraps from previous quilting projects can also be incorporated into the background. Instead of using two large color sections, piece several scraps together before adding batting. Once the flower appliqué and continuous quilting are added, the different fabrics become visually connected. This variation turns the Quilted Zippered Toiletry Bag with Flower Appliqué Pattern into an excellent scrap-friendly project.
To care for the finished bag, empty it completely before cleaning and follow the washing recommendations for the fabrics, batting, thread, and zipper used. Gentle hand washing is often appropriate for heavily embellished bags, while simple cotton versions may tolerate a delicate machine cycle. Reshape the pouch while damp and allow it to dry thoroughly before storing items inside.
Frequently Asked Questions About the Quilted Zippered Toiletry Bag with Flower Appliqué Pattern
What fabric is best for a quilted toiletry bag?
Medium-weight quilting cotton is one of the easiest options because it is stable, readily available, and easy to quilt. Linen blends can also create a beautiful textured appearance. The batting underneath provides additional body, so extremely heavy exterior fabric is generally unnecessary.
What type of batting should I use?
A thin cotton, cotton-blend, or lightweight polyester batting works well for this project. Very thick batting may make the curved seams and zipper difficult to sew. If you want a firmer bag, lightweight batting combined with woven interfacing usually provides better control than extremely bulky batting alone.
Can a beginner make this flower appliqué toiletry bag?
Yes, although a beginner should practice appliqué and zipper installation on fabric scraps first. The individual techniques are relatively straightforward when completed slowly. Breaking the project into separate stages makes the Quilted Zippered Toiletry Bag with Flower Appliqué Pattern much easier to manage.
Do I need a special sewing machine for quilting the bag?
No. A standard domestic sewing machine can complete the project. A walking foot may help with straight quilting, while a free-motion foot can be useful for organic decorative lines. However, neither is absolutely necessary if you prefer simple quilting with a regular presser foot.
Should I quilt before or after cutting the final bag shape?
Quilting slightly larger rectangles first is usually easier. Quilting can cause minor shrinkage or distortion, so trimming the pieces afterward produces cleaner and more accurate final panels.
How can I prevent the lining from getting caught in the zipper?
After attaching the lining, press it away from the zipper and add a narrow row of topstitching. This keeps excess fabric away from the zipper teeth and helps the zipper operate smoothly.
Can I make the appliqué without fusible web?
Yes. Traditional needle-turn appliqué, raw-edge appliqué, or turned-edge machine appliqué can all be used. Fusible web is recommended mainly because it holds small petals and leaves firmly in position while you stitch around them.
What seam allowance should I use?
A seam allowance of approximately 0.7 to 1 cm works well for most bag construction. The important thing is to use the same seam allowance consistently so the front, back, and lining remain properly aligned.
Can waterproof fabric be used for the lining?
A water-resistant or laminated lining can be useful for toiletry storage, but it should be compatible with your sewing machine and needle. Remember that ordinary stitched seams are not completely waterproof unless they are specially sealed.
How do I make the bag stand more firmly?
Choose a stable batting, add lightweight or medium-weight interfacing, and create boxed bottom corners. These features provide additional structure without making the zipper area excessively bulky.
Can I change the flower design?
Absolutely. The construction of the bag remains the same whether you use a daisy-inspired flower, sunflower, rose, tulip, wildflower, butterfly, bird, or another appliqué motif. This makes the basic pattern highly customizable.
Why are decorative quilting lines important?
Quilting holds the exterior fabric and batting together while adding texture and dimension. Echo quilting around the appliqué also highlights the flower and creates the handcrafted appearance that defines this style of quilted toiletry bag.
Conclusion
The Quilted Zippered Toiletry Bag with Flower Appliqué Pattern combines several enjoyable sewing techniques in one practical handmade project. Beginning with carefully selected fabrics, you learned how to prepare a rounded bag template, create a layered quilt sandwich, design and fuse a botanical appliqué, stitch the flower and leaves, add decorative quilting, prepare the lining, install a curved zipper, assemble the exterior, and complete a stable finished pouch.
The most important lesson is that this project does not depend on perfect duplication of the photographed design. The same construction principles can be adapted to different colors, fabrics, flower shapes, quilting styles, zipper pulls, and finished dimensions. By understanding each stage rather than simply copying the surface appearance, you can confidently create your own version of the Quilted Zippered Toiletry Bag with Flower Appliqué Pattern and personalize it for travel, cosmetics, sewing supplies, gifts, or everyday organization.
EASILY FIND THE FREE PDF FOR THIS PATTERN HERE!
Take your time around the curved zipper, secure the appliqué carefully, and allow the quilting to become part of the artistic character of the bag. Small handmade variations are not necessarily imperfections; they often give quilted accessories their unique charm. Once you have completed one pouch, the same method can become the foundation for many future quilted bag designs. If you make your own Quilted Zippered Toiletry Bag with Flower Appliqué Pattern, leave your sincere opinion about the project and share any suggestions, color combinations, appliqué ideas, or construction changes you would like to try. Your creative ideas can inspire new variations and make the next handmade version even more personal.