
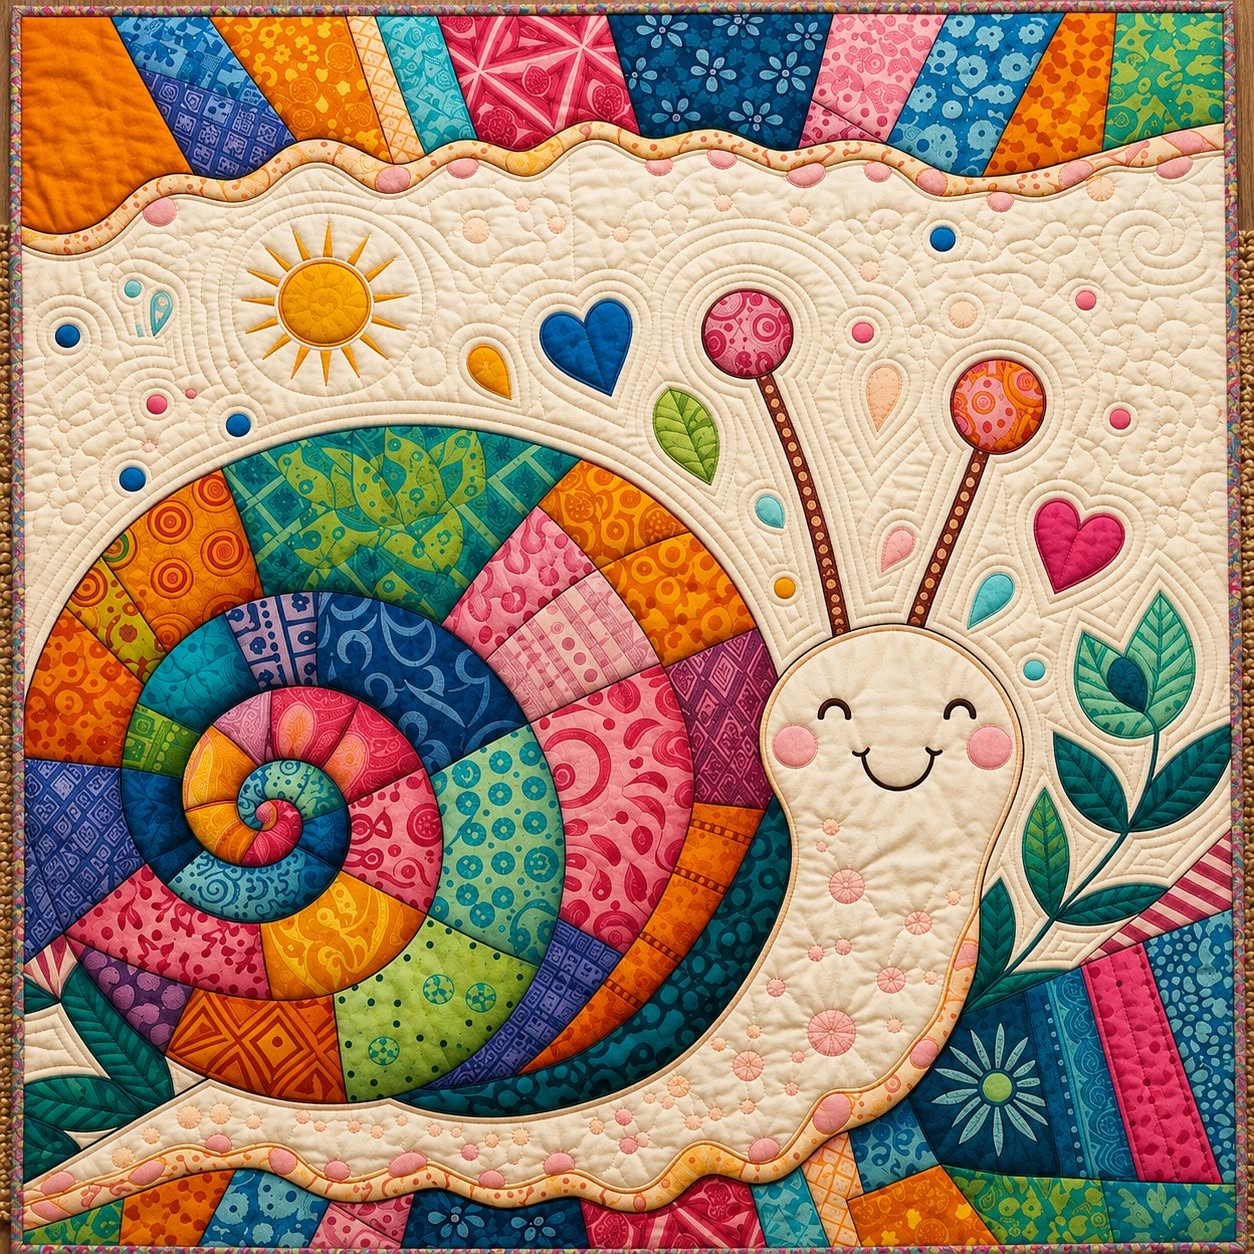
The Happy Snail Panel Bedspread Pattern is a cheerful quilting project that combines appliqué, patchwork, curved piecing, decorative stitching, and free-motion quilting in one charming textile design. Inspired by the colorful snail panel shown in the reference image, this project features an oversized smiling snail with a dramatic spiral shell made from many different printed fabrics. The warm cream background gives the colorful pieces room to stand out, while hearts, leaves, flowers, a sun, and small decorative shapes create a playful garden atmosphere. One of the greatest strengths of the Happy Snail Panel Bedspread Pattern is that it can be adapted to different sizes, from a decorative wall quilt or nursery panel to a larger throw or bedspread. Instead of requiring every fabric to match perfectly, the design benefits from variety, making it an excellent opportunity to use coordinated scraps from previous quilting projects. The finished piece can feel detailed and sophisticated while still maintaining the friendly handmade personality that makes patchwork quilting so appealing.
When planning your own Happy Snail Panel Bedspread Pattern, it is helpful to think of the quilt as several visual layers rather than one complicated picture. The first layer is the background and outer patchwork border, which establishes the dimensions and color palette of the project. The second layer is the snail, especially its large spiral shell, which becomes the main focal point and deserves the strongest collection of contrasting prints. The third layer contains smaller appliqué details such as leaves, hearts, flowers, antennae, facial features, and the sun. Finally, quilting stitches add texture across the empty spaces and help unite the top, batting, and backing. This layered approach makes the project much easier to understand because each part can be prepared separately before the final assembly. Beginners can simplify some decorative elements, while experienced quilters can add more intricate quilting, embroidery, or additional fabric motifs without changing the basic character of the design.
Another reason the Happy Snail Panel Bedspread Pattern works so well as a handmade project is the freedom it gives you when selecting fabrics. The illustrated shell contains orange, turquoise, teal, blue, pink, red, purple, green, and yellow sections, while the surrounding patchwork repeats many of the same shades. This repetition creates visual harmony even though the individual prints are very different. For your own version, consider choosing approximately eight to fifteen coordinating fabrics and repeating them in several places rather than using a completely new print for every piece. Patchwork quilting, fabric appliqué, spiral quilt design, and decorative quilting are important ideas within this pattern because they describe the main techniques that bring the composition together. Careful pressing, accurate cutting, and patient stitching are more important than speed. By approaching the design one section at a time, you can create a colorful snail quilt that looks thoughtfully planned while still retaining the relaxed personality of handmade sewing.
Materials, Fabric Selection, and Preparing the Happy Snail Design
Begin the Happy Snail Panel Bedspread Pattern by deciding the finished size of your project. A practical decorative panel might measure approximately 90 x 110 cm, while a throw or bedspread can be enlarged proportionally. Because the reference design is almost rectangular, it can be scaled without dramatically changing its overall appearance. Add seam allowance wherever separate pieces will be joined and remember that quilting may slightly reduce the final dimensions.
DISCOVER MORE FREE PATTERNS HERE!
For the background, choose a light neutral cotton such as cream, ivory, oatmeal, or very pale beige. A calm background is especially useful because the snail shell contains many strongly colored fabrics. Good-quality quilting cotton is recommended because it is stable, easy to press, and comfortable to appliqué. Prewashing is optional, but treating all fabrics consistently helps reduce unexpected shrinkage.
Select a varied collection of prints for the shell and decorative border. Small-scale florals, dots, geometric patterns, swirls, abstract motifs, and tonal fabrics work beautifully in this style. Try to include several color families rather than concentrating on only one shade. The goal of scrap quilting is not randomness for its own sake; successful scrap quilts usually contain repeated colors that create a visual connection between otherwise different prints.
You will also need batting, backing fabric, thread, pins or clips, fabric scissors, a rotary cutter, a cutting mat, rulers, an iron, and your preferred appliqué supplies. For raw-edge appliqué, fusible web can make positioning easier. For turned-edge appliqué, prepare templates slightly differently so the seam allowance can be turned underneath. Both methods are suitable for the Happy Snail Panel Bedspread Pattern, so choose the technique you enjoy most.
Before cutting valuable fabric, sketch the main snail outline on paper. Divide the shell into a large spiral and mark several curved sections inside it. You do not need to reproduce every tiny division from the photograph. Instead, concentrate on maintaining the recognizable spiral movement. Make separate templates for the snail body, head, shell sections, antennae, hearts, leaves, sun, flowers, and other decorative elements.
Label each template before cutting it apart. Small markings such as S1, S2, S3 for shell sections and L1, L2 for leaves can prevent confusion later. If using fusible appliqué, remember that some templates may need to be traced in reverse depending on the product and method being used. Organizing the pieces now makes the later assembly of your snail quilt pattern much easier.
Building the Colorful Spiral Shell and Snail Appliqué
The shell is the visual center of the Happy Snail Panel Bedspread Pattern, so begin its construction before attaching the entire snail to the background. Start with a small circular or curved center piece. Add the next fabric section around it, gradually creating the characteristic spiral. Alternating warm and cool colors helps each section remain visible rather than blending into neighboring pieces.
As the spiral becomes larger, increase the size of the fabric segments. The outer sections can be significantly wider than those near the center. Notice how a natural spiral expands continuously rather than forming several unrelated circles. Keeping that movement in mind will help your shell look fluid. Gentle curves are easier to sew and appliqué than extremely tight ones, especially if this is your first curved patchwork project.
You can construct the shell as a pieced unit or create the effect with layered appliqué pieces. Piecing gives the shell a traditional patchwork character, while appliqué provides greater flexibility when shaping complicated curves. A combination of the two methods can also work extremely well. Regardless of technique, press carefully after completing each section so the shell stays flat.
For the snail body, use cream, pale beige, soft peach, or another quiet color that contrasts with the shell. Trace and cut one long body shape that includes the head and gently curved underside. The body should extend slightly beneath the shell so the two elements appear naturally connected. Add the head toward the right-hand side, allowing enough open space above it for the antennae.
The smiling face is an important part of the Happy Snail Panel Bedspread Pattern. Create the eyes with small curved lines, embroidery, or carefully stitched appliqué. Add a simple curved smile and two rosy circular cheeks. Small details often look better than complicated facial features because they preserve the sweet, clean appearance of the original concept. Test the face placement with a removable marking tool before stitching permanently.
Finally, position the shell over the body and check the complete silhouette before attaching anything to the main background. Step several feet away and look at the project as a whole. The shell should feel large and dominant without completely hiding the body. Once you are satisfied, secure the shell and body using your preferred appliqué stitching method, keeping curves smooth and avoiding unnecessary stretching.
Adding Flowers, Hearts, Leaves, Sun, and Patchwork Borders
With the snail established, begin arranging the surrounding decorative shapes. In the reference-inspired composition, flowers and leafy stems rise near the snail’s head while hearts and small colorful droplets fill some of the open spaces. These motifs balance the enormous shell and prevent the upper-right portion of the panel from appearing empty. Keep the arrangement loose and organic rather than perfectly symmetrical.
Create simple flowers using circular centers and narrow stems. The taller flowers can extend upward from behind or beside the snail’s head, echoing the shape of its antennae. Use pinks, reds, peaches, or oranges for the flower heads and greens or blues for the leaves. Repeating shell colors in these details helps establish color harmony in quilting throughout the entire project.
Next, add several hearts in different sizes. Hearts provide soft shapes that contrast nicely with the angular patchwork sections. A dark blue heart near the upper-middle area and a brighter pink heart near the flower stems can act as visual anchors. Smaller teardrops or dots may be scattered around them, but avoid filling every empty space. Some quiet background is necessary for the design to breathe.
The sun is another attractive motif for the upper background. Cut a round golden-yellow center and surround it with simple triangular or elongated rays. You can appliqué the rays individually or embroider them after attaching the circular center. Keeping this element relatively small ensures that it supports rather than competes with the colorful spiral snail appliqué.
To create the patchwork border, cut irregular-looking strips or trapezoidal pieces from fabrics already used in the shell. Although the finished pieces can appear spontaneous, it is safer to construct them as controlled patchwork units. Sew neighboring pieces together, press the seams, and trim each assembled border section to the required size. This creates the lively appearance seen in the Happy Snail Panel Bedspread Pattern while maintaining straight outer edges.
Attach the border sections around the cream center panel according to your chosen layout. The illustrated style works especially well with colorful sections along the top and bottom, while the central snail remains surrounded by lighter negative space. If you want a more traditional bedspread, you can continue the patchwork around all four sides. Press the completed quilt top carefully before preparing the batting and backing.
Quilting, Finishing, and Customizing Your Happy Snail Panel Bedspread Pattern
After completing the quilt top, prepare your quilt sandwich. Place the backing fabric wrong side upward on a clean surface, position the batting over it, and place the Happy Snail Panel Bedspread Pattern top right side upward. Smooth all three layers carefully from the center toward the edges. Baste them using safety pins, temporary spray designed for quilting, or long hand-basting stitches.
Begin quilting around the major appliqué shapes. Stitching close to the shell, body, flowers, leaves, hearts, and sun helps define their outlines while securing the quilt layers. This technique is sometimes called outline quilting. Matching thread produces a subtle result, while contrasting thread can emphasize the handmade appearance. Choose a thread weight appropriate for your machine and fabric.
The large cream background is an excellent place for free-motion quilting or gentle decorative patterns. Swirls, waves, loops, leaves, pebbles, and echo quilting are all suitable possibilities. You do not need to reproduce every quilted line visible in the reference image. Instead, choose one or two motifs that you can stitch consistently. Even relatively simple quilting can create beautiful texture when repeated across a large area.
Quilt the spiral shell according to its individual fabric sections. Stitching close to the internal curved seams emphasizes the spiral and prevents its many colors from visually merging. Some quilters may enjoy adding decorative lines inside larger shell pieces, but avoid excessive quilting if the bedspread is intended to remain soft. The goal is texture and stability rather than making the quilt unnecessarily stiff.
Once quilting is finished, trim the batting and backing so all layers have clean, straight edges. Prepare binding strips and sew them around the outside perimeter. A darker blue, teal, green, or coordinating multicolor fabric can frame the design effectively. Take extra care at the corners, where neat folds will give the finished quilt panel a polished appearance.
The final Happy Snail Panel Bedspread Pattern can be customized in countless ways. You might create a pastel nursery version, a bright rainbow edition, a country-style quilt with muted florals, or a modern interpretation using geometric fabrics. The shell could even become a memory quilt made from meaningful fabric scraps. As long as the spiral shell, cheerful snail body, and balanced decorative motifs remain recognizable, the design can be adapted to your own creative style.
FAQ: Frequently Asked Questions About the Happy Snail Panel Bedspread Pattern
What is the Happy Snail Panel Bedspread Pattern?
The Happy Snail Panel Bedspread Pattern is a decorative quilting concept centered on a large snail appliqué with a multicolored spiral patchwork shell. It combines several sewing methods, including patchwork, appliqué, decorative stitching, quilting, and binding. The pattern can be used for wall panels, throws, children’s quilts, or larger bed coverings.
Is this pattern suitable for beginners?
A confident beginner can make a simplified version. The easiest approach is to use fusible raw-edge appliqué rather than complicated curved piecing. Beginners can also divide the shell into fewer sections and use basic straight or gently curved quilting. More experienced quilters may increase the number of shell pieces and experiment with detailed free-motion quilting.
What fabric is best for a snail appliqué quilt?
Medium-weight 100% quilting cotton is generally one of the easiest choices. It cuts accurately, presses well, and is available in an enormous range of colors and prints. Using fabrics of approximately the same weight helps the finished quilt lie evenly.
Can I make the shell from fabric scraps?
Yes. In fact, scraps are ideal for this project because the shell depends on variety. Small pieces left from other quilts can create interesting changes in color and pattern. Try repeating several colors elsewhere in the quilt so the scrap selection looks coordinated rather than disconnected.
How many colors should I use?
There is no strict number, but eight to fifteen main fabrics offer plenty of variation for a colorful version. You can use additional small scraps for accents. A limited palette of four or five colors can also produce an attractive, more modern interpretation of the Happy Snail Panel Bedspread Pattern.
Do I have to use free-motion quilting?
No. Straight-line quilting, gentle curves made with a walking foot, echo quilting, or simple stitched outlines can all work effectively. Free-motion quilting creates beautiful organic texture, but it is an optional technique rather than a requirement.
How can I keep appliqué pieces from shifting?
Fusible web, fabric glue intended for appliqué, temporary adhesive products, pins, or hand basting can hold pieces in place. Follow the instructions appropriate for your chosen product and fabric. Always test heat-sensitive materials on scraps before applying them to the main quilt.
Should the shell be pieced or appliquéd?
Either method works. Traditional piecing can produce beautiful seam definition, but curved sections demand greater accuracy. Appliqué is generally easier when recreating an irregular spiral. A hybrid technique, where several shell sections are pieced and the completed shell is appliquéd onto the body, can provide an excellent balance.
What quilting design works best on the cream background?
Soft swirls, waves, leaves, loops, echo lines, or simple meandering patterns complement the garden theme. The neutral background provides an opportunity to add texture without introducing another strong color. Keep the quilting density reasonably consistent so the surface remains balanced.
Can the pattern be enlarged into a full bedspread?
Yes. The central panel can be enlarged proportionally or surrounded with additional patchwork borders. Another option is to keep the snail panel at its original scale and add coordinating quilt blocks around it until the required bed dimensions are reached.
How do I make the spiral shell look balanced?
Start with a small center and allow each subsequent section to widen gradually as the spiral moves outward. Avoid making every section the same size. Alternate colors and values so neighboring fabrics remain distinct. Laying all pieces on the background before sewing also allows you to correct awkward areas.
Can I wash the finished quilt?
A properly constructed cotton quilt is generally washable, although care depends on the exact fabrics, batting, thread, appliqué products, and embellishments you choose. Follow the care recommendations for your materials. Testing fabrics for colorfastness before construction can also help prevent unexpected color transfer.
How can I make the design look more professional?
Accurate pressing, smooth appliqué curves, consistent stitch length, balanced colors, and neat binding make a significant difference. Do not rush the preparation stage. Carefully positioning each element before stitching usually produces better results than trying to correct placement after pieces have already been secured.
Can I change the flowers and decorative elements?
Absolutely. The smaller motifs are ideal places for personalization. Flowers can become butterflies, stars, mushrooms, extra hearts, leaves, or other simple appliqué shapes. Keeping a consistent color palette will help new elements feel like a natural part of the Happy Snail Panel Bedspread Pattern.
Conclusion
The Happy Snail Panel Bedspread Pattern brings together many of the most enjoyable aspects of quilting: colorful fabric selection, scrap patchwork, playful appliqué, creative composition, decorative stitching, and textured quilting. By dividing the project into manageable stages, even a detailed-looking design becomes much easier to construct.
The process begins with choosing a light background and coordinating colorful fabrics. From there, the spiral shell can be assembled gradually, followed by the snail body, face, antennae, flowers, leaves, hearts, sun, and surrounding patchwork. Careful placement before stitching is particularly important because it allows the entire composition to remain balanced.
Once the decorative top is complete, batting and backing transform it from a fabric picture into a true quilt. Outline quilting emphasizes the snail and garden motifs, while swirls, waves, or other free-motion designs can add beautiful texture to the neutral spaces. A carefully attached binding provides the final frame.
Most importantly, the Happy Snail Panel Bedspread Pattern does not need to be copied piece for piece to be successful. The colors, prints, number of shell sections, border width, quilting style, and decorative motifs can all be adapted. That creative flexibility is what allows one basic idea to become a genuinely personal handmade project.
EASILY FIND THE FREE PDF FOR THIS PATTERN HERE!
Whether you make it as a colorful bedspread, a smaller quilt, a nursery decoration, or an artistic wall panel, this cheerful snail offers many opportunities to practice and combine important quilting skills. Take your time, enjoy selecting the fabrics, and allow the small variations of handmade sewing to become part of the finished character. If you create your own version of the Happy Snail Panel Bedspread Pattern, leave your sincere opinion about the project and share your suggestions. Which colors would you choose for the spiral shell, and what details would you add or change? Your ideas can inspire new variations of this cheerful quilting design.