
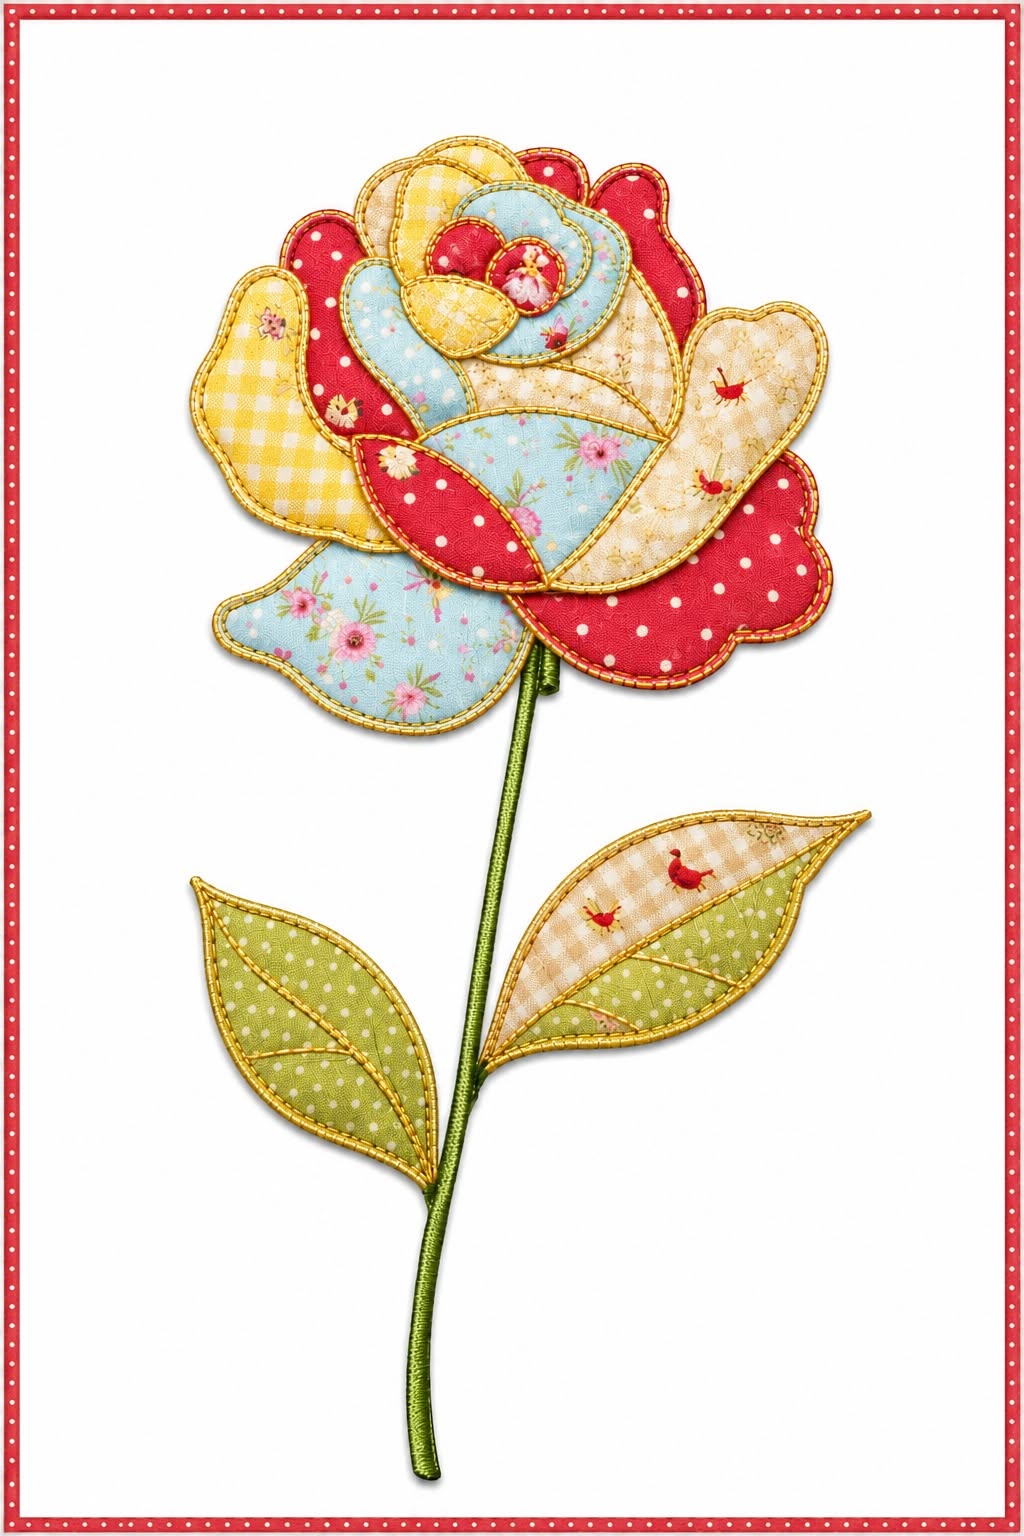
The Rose appliqué in patchwork Pattern is a charming fabric-art project that combines the softness of floral design with the creative freedom of patchwork appliqué. Inspired by the layered rose shown in the reference image, this project uses overlapping fabric pieces to build a dimensional flower, a slender stem, and two decorative leaves. The result can become the centerpiece of a quilt block, wall hanging, cushion cover, table runner, tote bag, or decorative fabric panel. One of the greatest advantages of this design is that every rose can look slightly different depending on the fabrics you select. Small florals, checks, polka dots, and vintage-inspired prints work especially well because they create interesting contrast while maintaining the handmade character associated with traditional quilting.
Although the finished flower appears detailed, the construction method is approachable when the project is divided into manageable stages. Instead of trying to create the entire rose from one complicated fabric shape, the Rose appliqué in patchwork Pattern is assembled from individual curved pieces that overlap to suggest natural petals. This layered method also makes the project an excellent way to use fabric scraps left from previous sewing projects. Light blue prints, warm cream fabrics, sunny yellow pieces, cheerful red patterns, and fresh green fabrics can be combined just as they appear in the inspiration, or you can create an entirely different color palette. The important principle is to maintain enough contrast between neighboring petals so that every layer of the rose remains clearly visible.
Another attractive feature of this patchwork rose pattern is the opportunity to combine several sewing techniques in a single project. You will practice tracing appliqué templates, positioning fabric shapes, working with fusible web if desired, stitching curved edges, layering petals, and creating decorative details. The visible stitching around the flower contributes greatly to its handmade appearance, so the project does not need to look mechanically perfect. Slight differences in curves or fabric placement often make an appliqué flower more interesting and personal. By working slowly from the background pieces toward the foreground petals, even someone who is still developing appliqué skills can produce a polished rose with depth, texture, and personality.
Materials and Planning for the Rose Appliqué in Patchwork Pattern
Before beginning the Rose appliqué in patchwork Pattern, gather a collection of coordinating cotton fabrics. Quilting cotton is an excellent option because it is easy to cut, presses well, and remains stable while being stitched. For a look similar to the reference project, choose approximately four or five color families: red or coral for several petals, pale blue for contrasting petals, yellow for accent pieces, cream or beige for softer sections, and green for the stem and leaves. Combining tiny flowers, gingham, dots, and other small prints will give the finished rose a delightful scrappy patchwork appearance.
DISCOVER MORE FREE PATTERNS HERE!
You will also need basic sewing supplies such as sharp fabric scissors, small appliqué scissors, a fabric marking pencil, an iron, pins or appliqué clips, coordinating sewing thread, and a sewing machine. If you prefer fusible appliqué, include lightweight double-sided fusible web. Fusible web is a thin adhesive material placed between the appliqué fabric and the background. When heated with an iron according to its manufacturer’s directions, it temporarily or permanently attaches the fabric pieces, helping prevent them from shifting during stitching.
Prepare the template pieces before cutting any fabric. The rose in this design can be interpreted as a series of irregular teardrops, curved petals, partial circles, and softly scalloped outer shapes. Begin by drawing or tracing the largest outer petals first. Then create progressively smaller templates for the middle and center of the rose. You do not need perfectly symmetrical pieces. In fact, gently irregular shapes often create a more natural-looking fabric rose appliqué because real flower petals are rarely identical.
When creating templates, remember that some pieces will overlap significantly. A portion of each lower petal may disappear beneath another piece, so adding approximately 5 to 8 mm of extra fabric in hidden overlapping areas can make assembly easier. This additional section is different from a traditional seam allowance because appliqué pieces are generally placed on top of one another rather than stitched together with standard seams. The extra area simply prevents small gaps from appearing between overlapping petals.
Select a background fabric that allows the rose to stand out clearly. A solid white, cream, pale beige, soft gray, or very subtle print is usually effective. Press the background thoroughly before beginning because wrinkles can distort the placement of the appliqué pieces. If the finished project will become a quilt block, consider cutting the background slightly larger than the final required dimensions. It can be trimmed accurately after the appliqué work has been completed.
Finally, arrange all fabric selections on the background before cutting every piece. This planning stage helps you evaluate contrast. Avoid placing two fabrics with almost identical colors or print density directly beside each other unless you intentionally want them to visually blend. Alternating light, medium, and stronger colors helps define each layer of the Rose appliqué in patchwork Pattern and creates the dimensional appearance that makes this project so attractive.
Cutting, Layering, and Building the Patchwork Rose
Begin construction with the largest petals. Trace the appropriate templates onto the paper side of the fusible web if you are using it, remembering that the final shapes may be reversed after fusing. Rough-cut each fusible piece, leaving a small border around the traced line. Fuse the pieces to the wrong side of your chosen fabrics according to the instructions supplied with the fusible product. Once cool, cut accurately around the traced shapes using small, sharp scissors.
Lay the largest petal shapes on your prepared background. The bottom section of the flower can include a broad light-blue petal, while larger red, yellow, and cream sections can form the outer sides. Study the overall silhouette before permanently attaching anything. The outer petals should create a loose rounded shape rather than a perfect circle. This irregular outline gives the patchwork flower appliqué more visual movement and makes the rose feel organic.
Next, begin building the middle layer. Position medium-sized curved shapes so that their lower edges overlap the first layer. A strong color such as red can be placed beside pale blue or cream to create clear separation between petals. Try rotating some templates slightly rather than arranging every petal vertically. Changing their angles suggests the way petals naturally open outward from the center of a rose.
Continue toward the center using progressively smaller pieces. Small yellow, red, blue, and cream fabric scraps work beautifully here. At this stage, pay close attention to the direction of printed motifs. Tiny flowers or checks do not necessarily need to align perfectly, but rotating the fabrics in different directions adds energy to a scrap fabric appliqué project. Before fusing the pieces permanently, step back and check that the flower has a recognizable center surrounded by increasingly larger petals.
The central section can be constructed with several very small overlapping shapes. A rounded blue piece may become the base of the center, with two or three red circular or oval petals layered on top. A small yellow or cream accent can complete the focal point. Because these pieces are small, tweezers or the tip of a pin can help position them accurately. Avoid making the center overly complicated; a few well-chosen shapes usually create more definition than many tiny pieces crowded together.
Once you are satisfied with the entire arrangement, secure the flower according to your chosen appliqué method. If using fusible web, press carefully rather than sliding the iron across the surface, because sliding may shift the layered pieces. Allow the fabrics to cool completely before sewing. The assembled Rose appliqué in patchwork Pattern should now clearly resemble a dimensional rose, even before the decorative stitching is added.
Stitching the Rose, Stem, and Decorative Leaves
Stitching transforms the layered fabric shapes into a finished appliqué. A narrow zigzag stitch, blanket stitch, satin-style edge stitch, or simple straight stitch close to the edge can all work well. For a handmade appearance similar to the reference design, a narrow visible stitch following each petal outline is especially effective. Test your stitch on scrap fabric before sewing the actual flower so you can adjust the width, length, and thread tension.
Begin with pieces that are visually underneath other petals whenever possible. Stitch slowly around the curves and stop with the needle down before turning the fabric. This simple technique helps produce smoother curved lines. You do not need to sew across every area hidden underneath another petal. Concentrate primarily on visible edges. A neutral beige or tan thread can create a vintage appearance, while contrasting thread can emphasize the appliqué stitching as a decorative feature.
After securing the rose, prepare the stem. The reference design uses a narrow green stem extending downward from the flower. You can create this with green bias tape, a narrow folded fabric strip, decorative cord, satin stitch, or a carefully cut fabric strip. For a fabric version, cut a strip approximately 8 to 12 mm wide, depending on the scale of your flower. Position it so that the upper end disappears naturally beneath the rose.
The leaves can be constructed from two or more fabrics for additional detail. Draw simple pointed oval shapes approximately proportional to the flower. Each leaf can be divided diagonally or lengthwise, allowing you to combine two prints. In the inspiration image, soft green fabrics dominate the foliage while a light cream printed fabric provides an accent. This color combination connects beautifully with the beige petals in the flower while still maintaining the traditional green appearance of the leaves.
Before attaching the leaves, determine their placement along the stem. Positioning one leaf slightly higher than the other creates a more natural composition. Angle them upward rather than placing both horizontally. After fusing or pinning them, stitch around their outer edges. Add an interior stitched line to suggest the central vein, and include one or two smaller diagonal lines if desired. These simple details can make a basic patchwork leaf appliqué appear much more refined.
Complete the project by pressing the appliqué carefully from the wrong side whenever your materials allow it. A pressing cloth can protect delicate threads and fusible areas. Square or trim the background fabric only after the rose is completely stitched. From this point, the Rose appliqué in patchwork Pattern can be incorporated into almost any sewing project, including a quilt block, decorative pillow, framed textile panel, table topper, tote bag pocket, or handmade gift.
FAQ About the Rose Appliqué in Patchwork Pattern
What is a Rose appliqué in patchwork Pattern? A Rose appliqué in patchwork Pattern is a decorative sewing design created by arranging multiple fabric pieces in the shape of a rose and stitching them onto a background fabric. Unlike a rose made from a single fabric piece, the patchwork approach uses different colors and prints to represent individual petals. This creates more depth and makes the design especially useful for showcasing small fabric scraps.
Can beginners make this patchwork rose? Yes. Beginners can successfully create this design if they work one layer at a time. Starting with fusible appliqué can make the process easier because the pieces remain securely positioned while they are stitched. New sewists should begin with slightly larger petals rather than extremely small pieces, practice the edge stitch on scrap fabric, and assemble the entire flower on the background before permanently attaching anything.
What fabric is best for rose appliqué? Medium-light 100% cotton quilting fabric is one of the easiest choices because it cuts cleanly, accepts fusible web well, and is comfortable to sew by machine or hand. Small-scale floral fabrics, gingham, polka dots, tone-on-tone prints, and solids are particularly effective for patchwork roses. Very thick fabrics can make heavily layered areas bulky, while highly stretchy fabrics may be more difficult to control.
Do I need fusible web for appliqué? Fusible web is helpful but not essential. It simplifies positioning and reduces shifting, particularly when the flower contains many overlapping petals. However, traditional needle-turn appliqué, raw-edge appliqué, glue-basted appliqué, and other methods can also be used. The best method depends on the appearance you want. Raw-edge techniques tend to produce a casual handmade character, while turned edges can provide a cleaner traditional finish.
How can I make the patchwork rose look dimensional? The secret is fabric layering and contrast. Place larger petals behind smaller ones, overlap the edges, vary the direction of the pieces, and alternate colors with different values. A pale cream petal beside a strong red petal will usually be easier to distinguish than two similar red prints. Decorative stitching around individual petals also creates visual boundaries that increase the illusion of depth.
What can I make with the finished rose appliqué? The design is extremely versatile. A finished fabric rose appliqué can decorate a quilt block, pillow cover, table runner, wall hanging, tote bag, fabric basket, apron, journal cover, or framed textile artwork. You can also repeat the pattern to create several roses for a larger quilt or floral panel. Changing the fabric palette allows the same basic pattern to coordinate with country, vintage, romantic, modern, or colorful patchwork styles.
Conclusion
Creating the Rose appliqué in patchwork Pattern is an enjoyable way to transform small pieces of fabric into a detailed floral composition. The process begins with choosing coordinating quilting fabrics and preparing simple petal templates, then continues by arranging the larger outer petals, building increasingly smaller layers toward the center, and securing every piece with your preferred appliqué technique. Careful color contrast helps define the petals, while overlapping fabric shapes provide the characteristic dimensional look of the rose.
The final stages—decorative edge stitching, adding the green stem, constructing patchwork leaves, and pressing the finished work—bring all of those individual pieces together into one cohesive design. Most importantly, this pattern leaves plenty of space for creativity. Your rose does not need to duplicate every fabric, curve, or stitch from the inspiration. Using favorite scraps and experimenting with color combinations is part of what makes patchwork appliqué so rewarding.
EASILY FIND THE FREE PDF FOR THIS PATTERN HERE!
Whether you use your finished flower for a quilt, cushion, wall panel, bag, or another handmade project, the techniques learned through this Rose appliqué in patchwork Pattern can also be adapted to many other floral appliqué designs. With patience and careful layering, even simple fabric shapes can produce an impressive and richly textured result. Please leave your sincere opinion about this project and share your suggestions as well. Your ideas about different colors, fabrics, stitches, or creative ways to use the finished rose can inspire new versions of this beautiful patchwork design.