
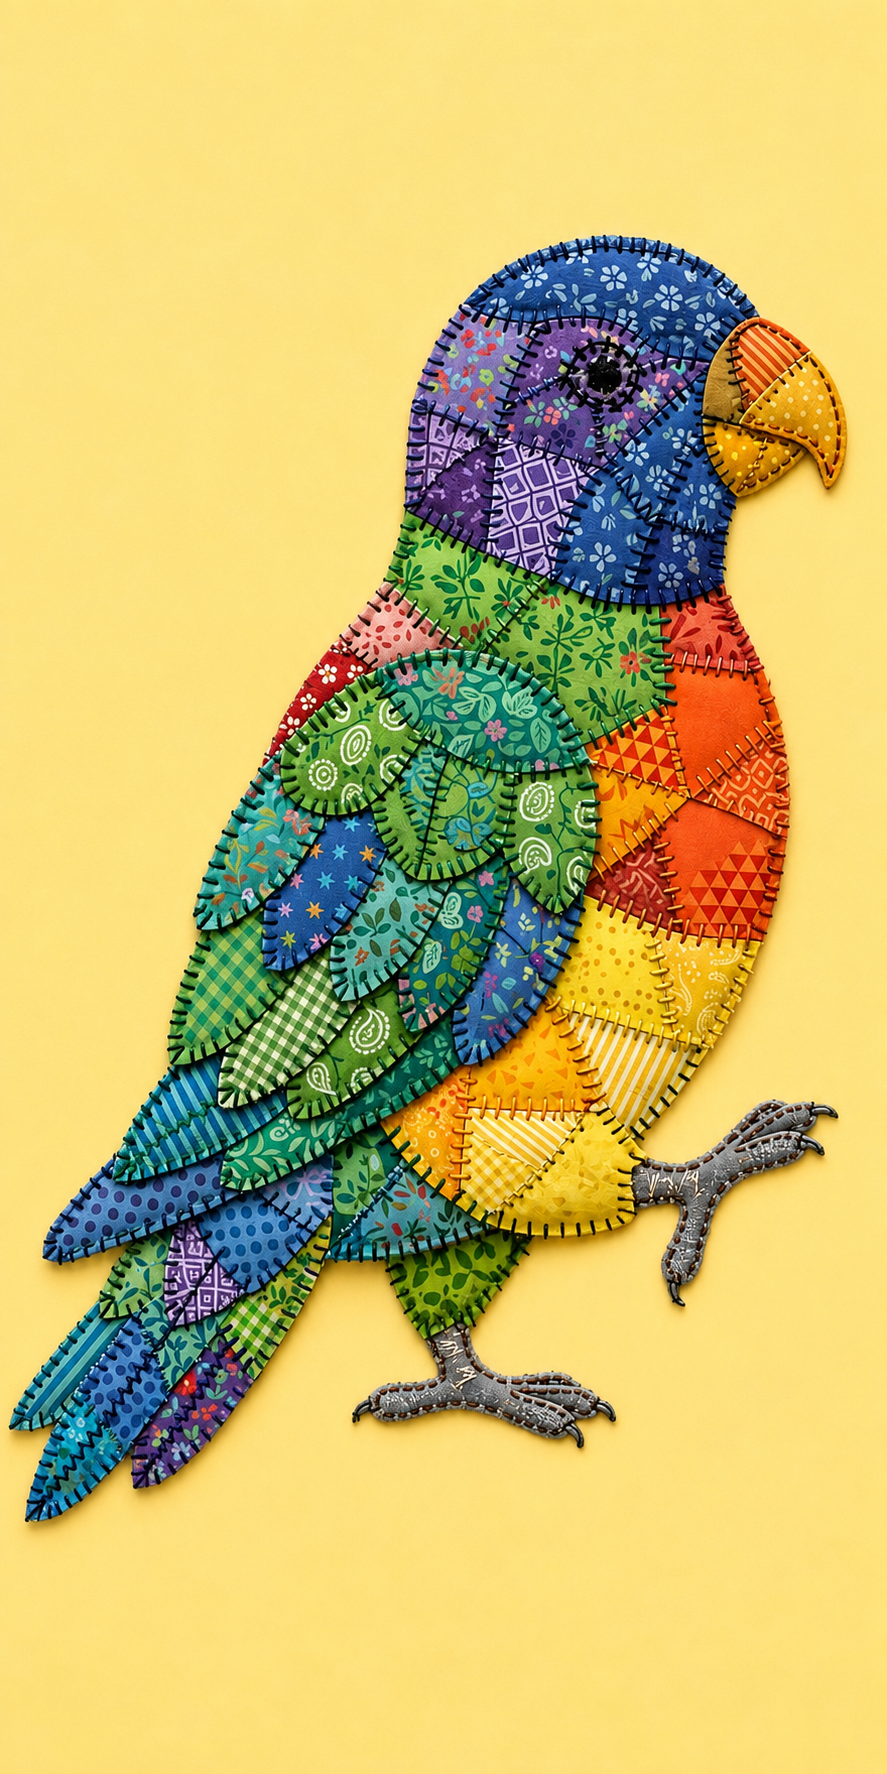
The Patchwork Bird Panel Pattern is a colorful textile project that combines traditional patchwork, decorative appliqué, visible hand-style stitching, layered fabric shapes, and a playful bird silhouette. Inspired by the project shown in the image, this design transforms a collection of small fabric scraps into an expressive decorative panel filled with blues, greens, purples, oranges, yellows, and patterned prints. One of the most attractive qualities of this project is that the fabrics do not need to match perfectly. In fact, combining florals, geometric prints, dots, checks, stripes, and small motifs helps create the lively handcrafted appearance that makes the bird so distinctive. The finished piece can become a wall hanging, framed textile artwork, decorative quilt panel, pillow front, or the central motif of a larger quilt.
Creating a Patchwork Bird Panel Pattern is also an excellent way to use leftover fabric from previous sewing projects. Instead of requiring large pieces of material, the bird is constructed from many relatively small sections that overlap or join together to form the head, body, wing, tail, beak, and feet. The image suggests a deliberately irregular patchwork style, where different pieces follow the natural contours of the bird rather than forming conventional square quilt blocks. Decorative stitches around almost every fabric edge emphasize each shape and add texture. Although the finished bird looks complex, the project becomes much easier when it is divided into manageable stages: preparing the template, selecting fabrics, building the main body, making the layered wing and tail, adding details, and completing the decorative stitching.
Another reason the Patchwork Bird Panel Pattern works so well as a handmade project is its flexibility. You can reproduce the same general color progression shown in the reference image or create an entirely different palette using fabrics already available in your sewing collection. Beginners can simplify the number of individual patches, while experienced quilters can create smaller pieces and more elaborate stitching. The goal is not absolute mathematical perfection but visual harmony, strong construction, and careful layering. Using good-quality cotton, accurate templates, secure appliqué methods, and consistent stitches will help the finished panel look polished while still maintaining the warm, slightly imperfect character associated with handcrafted patchwork bird appliqué.
Materials and Preparation for the Patchwork Bird Panel Pattern
Begin your Patchwork Bird Panel Pattern by gathering a varied selection of cotton fabrics. Quilting cotton is especially convenient because it is stable, easy to cut, and available in countless prints. For a design similar to the image, collect blue and purple fabrics for the head, green and turquoise fabrics for the wing area, orange and yellow pieces for the breast and belly, plus gray or neutral fabric for the feet. Small scraps are ideal, so this project can be an effective scrap fabric sewing project.
DISCOVER MORE FREE PATTERNS HERE!
You will also need a larger piece of fabric for the background. The reference design uses a warm yellow background, which creates strong contrast against the cooler blues and greens of the bird. A background approximately 45 × 60 cm provides comfortable working space for a medium-sized decorative panel, although the dimensions can be adjusted to suit your intended finished project. Press the background carefully before beginning because wrinkles can make appliqué placement more difficult.
Additional supplies should include fabric scissors or a rotary cutter, cutting mat, quilting ruler, sewing pins or temporary fabric adhesive, coordinating sewing thread, embroidery thread or heavier decorative thread, a hand-sewing needle, and a sewing machine if you prefer machine appliqué. Lightweight fusible web is optional but highly useful because it stabilizes the numerous individual patches before stitching. If using fusible web, always follow the manufacturer’s temperature instructions to avoid damaging the fabric.
Next, prepare the bird template. Draw or trace a simple side-view bird silhouette containing a rounded head, curved body, pointed tail, short legs, feet, and beak. The image shows a relatively tall bird with a gently curved chest and long tail feathers. Divide the main silhouette into irregular sections that will later become individual fabric patches. These shapes can resemble soft polygons, curves, feathers, or free-form pieces rather than precise geometric blocks.
Number the pattern pieces before cutting them apart. This small preparation step makes assembling the Patchwork Bird Panel Pattern considerably easier because dozens of similar shapes can otherwise become confusing. You can also mark basic color families directly on the template, such as blue for the head, green for the wing, orange for the upper breast, and yellow for the lower body. Maintaining a rough color plan helps achieve a balanced composition.
Finally, prewash fabrics if you normally prewash quilting materials, then press every scrap flat. Crisp fabric produces more accurate shapes and cleaner appliqué edges. Sort your scraps by color before cutting so you can easily compare prints and values. Try mixing small prints with larger motifs, dark shades with lighter ones, and geometric designs with florals. This variation is essential to the charming visual rhythm of the Patchwork Bird Panel Pattern.
Building the Bird Body with Patchwork and Appliqué
Start construction with the largest sections of the bird. Place your complete bird silhouette on the background and lightly mark its outline using a removable fabric marker. This guideline keeps the finished design proportional as individual pieces are added. Work from the central body outward rather than starting with tiny details. Larger patches establish the basic shape and provide reference points for the smaller pieces.
For the head, combine several blue and purple fabrics. Cut irregular pieces according to your divided template and arrange them like a mosaic. The image features deep blue around the upper head, purple near the face, and additional blue prints around the neck. Slightly overlapping the pieces can make hand appliqué easier, while accurately butted edges may be preferred if you want a cleaner contemporary style.
Create the eye using a small circular fabric piece, button-like appliqué shape, or embroidered circle. Because the eye becomes a visual focal point, choose a very dark fabric that contrasts strongly with the surrounding purple and blue patches. Secure the eye before finishing all decorative stitching around the head. A ring of visible stitches around the eye can echo the blanket stitching used throughout the rest of the bird.
The breast and body can transition gradually from warm orange to golden yellow. Arrange several orange scraps through the upper chest and side, then place yellow pieces toward the belly. Using different prints within the same color family prevents the area from appearing flat. Stripes, dots, diamonds, florals, and tonal fabrics can all work together as long as the overall warm-color section remains visually connected.
The neck area creates a bridge between the blue head and warm body. Green fabrics work especially well here because green visually connects cool blue with warmer yellow. Use two or three shades of green rather than a single fabric. This technique creates greater depth and makes the bird appear assembled from numerous individual textile fragments rather than large solid blocks.
Once you are satisfied with the arrangement, secure each piece using fusible web, pins, temporary adhesive, or careful basting. Avoid permanently attaching everything until you have checked the complete silhouette from a distance. The curves of the back, chest, and neck should remain smooth even though the internal patchwork consists of irregular pieces. This stage establishes the structural foundation of the Patchwork Bird Panel Pattern.
Creating the Layered Wing, Tail, Beak, and Feet
The wing is one of the most distinctive features of this Patchwork Bird Panel Pattern. Instead of constructing it as one flat appliqué shape, build it from several overlapping feather-like pieces. Begin with a larger base wing in green or turquoise fabric, then position smaller elongated shapes over it. Arrange the pieces in gently descending rows so that they resemble natural feathers while still retaining an artistic patchwork appearance.
Combine green, teal, turquoise, and blue fabrics throughout the wing. Variation in prints is particularly effective here because each feather becomes visually independent. Some feathers may contain floral motifs, others checks, stars, or abstract designs. Keep the darkest pieces near the lower or rear sections if you want additional visual depth. Allow each feather to overlap the one beneath it slightly before securing the appliqué.
The tail can be constructed using the same layered principle. Cut several long tapered shapes and arrange them diagonally from the lower back of the bird. The reference image combines blue, turquoise, green, and purple tail pieces, creating a continuation of the wing colors. Varying the length and angle of individual feathers gives the tail movement and prevents it from appearing overly symmetrical.
For the beak, select contrasting warm fabrics such as yellow, mustard, or orange. The bird appliqué pattern can use two or three separate beak shapes layered together to suggest upper and lower sections. Small differences in color or print can make this simple area surprisingly detailed. Position the beak carefully because its angle strongly influences the bird’s expression and overall character.
The feet and legs can be made using gray, brown, or charcoal fabric. Because these shapes are narrow, adding a small amount of stabilizer underneath may help prevent stretching. Cut the toes slightly wider than the final desired size if you plan to turn the raw edges underneath. Alternatively, use raw-edge appliqué and secure every contour with close decorative stitching.
After placing the wing, tail, beak, legs, and feet, review the entire Patchwork Bird Panel Pattern before stitching permanently. Check whether any part appears visually too heavy or too empty. Adjust individual fabrics if necessary. The objective is to distribute color and print throughout the bird so that the eye moves naturally from the blue head through the green wing toward the orange and yellow body and finally down the multicolored tail.
Decorative Stitching, Finishing, and Display Ideas
The bold stitching visible around the fabric pieces is essential to the personality of this project. A blanket stitch is particularly suitable because it outlines each patch while simultaneously securing the appliqué. You can sew the stitch by hand using embroidery floss or recreate it with a sewing machine that includes a blanket-stitch setting. Dark thread creates maximum contrast and highlights the mosaic construction.
When hand stitching, keep the spacing reasonably consistent while accepting small natural variations. Perfect mechanical uniformity is unnecessary for this type of folk-art patchwork. The handcrafted appearance is part of its charm. Stitch around each patch independently, working carefully through curved sections and corners. Shorter stitches generally make tight curves easier to control.
Pay special attention to layered wing and tail feathers. Stitch the exposed edge of each feather while allowing the overlapping sections to remain visually dimensional. If the project will be handled frequently, such as on a cushion or bag, secure all edges thoroughly. For decorative wall art, lighter stitching may be sufficient because the textile will experience less physical wear.
After all appliqué pieces are attached, press the panel carefully from the reverse side. Protect dimensional details by placing the project face down on a soft towel if necessary. Do not aggressively press over decorative embroidery. A gentle finishing press helps flatten the background while preserving the texture created by the layered fabrics and visible stitches.
You may finish the project as a simple textile panel or convert it into a small quilt. For a quilted version, layer the appliqué top with batting and backing fabric. Add subtle quilting to the background without overwhelming the bird. Simple echo quilting around the silhouette or widely spaced free-motion lines can help the colorful Patchwork Bird Panel Pattern remain the primary visual focus.
The completed design can be displayed in several ways. It can become a wall hanging with a fabric sleeve on the back, a framed textile piece, a cushion front, a decorative tote panel, or the centerpiece of a larger quilt. A narrow coordinating fabric border can provide a polished frame. Whatever finish you choose, the combination of colorful scraps and expressive stitching makes this patchwork bird project an effective showcase for creative fabric selection.
FAQ – Frequently Asked Questions About the Patchwork Bird Panel Pattern
What is a Patchwork Bird Panel Pattern?
A Patchwork Bird Panel Pattern is a sewing design in which the silhouette of a bird is created from multiple fabric pieces rather than one continuous piece of cloth. The patches may be pieced together, appliquéd to a background, or combined using both techniques. Decorative stitching often emphasizes the borders between the fabrics.
Is this project suitable for beginners?
Yes, although beginners may find it easier to start with fewer and larger patches. The most important skills are accurate cutting, basic appliqué, careful placement, and simple decorative stitching. As confidence increases, the pattern can be divided into smaller pieces for a more detailed appearance.
What fabric works best for this design?
Medium-weight quilting cotton is usually the easiest choice. It is stable enough for appliqué, simple to cut, and widely available in coordinating prints. Cotton scraps from previous quilting and patchwork projects are especially useful.
Do all of the fabrics need to coordinate?
No. The charm of the project comes partly from combining different prints. However, organizing the scraps into broad color families creates a more intentional result. For example, blues and purples can form the head, greens the wing, oranges the chest, and yellows the belly.
Should I use fusible web for the appliqué?
Fusible web is optional but helpful, especially when working with many small pieces. It temporarily or permanently stabilizes the patches before stitching and reduces shifting. Hand-appliqué enthusiasts may prefer traditional basting or turned-edge methods instead.
What stitch should I use around the patchwork pieces?
Blanket stitch is an excellent choice because it is decorative and functional. Zigzag stitch, satin stitch, straight stitch, or hand embroidery can also work. The visible dark blanket-style stitching shown in this type of design strongly enhances its handmade appearance.
Can I make the bird larger or smaller?
Absolutely. The template can be enlarged or reduced before cutting. If you greatly reduce the size, simplify some of the smallest patches because tiny appliqué pieces become more difficult to handle and stitch accurately.
How can I stop small pieces from fraying?
Using fusible web can reduce movement and fraying during construction. Close decorative stitching also secures raw edges. For maximum durability, you can use turned-edge appliqué, although this method requires additional preparation.
Can this pattern be sewn entirely by hand?
Yes. In fact, hand sewing can complement the rustic character of the Patchwork Bird Panel Pattern beautifully. You can attach each appliqué piece and complete the blanket stitching with embroidery thread. Machine sewing simply makes the process faster.
Can I turn the finished panel into a quilt?
Yes. Add batting and backing fabric after completing the appliqué, then quilt the background and border. The bird can serve as the central feature of a wall quilt or become one block within a larger nature-inspired quilt.
How do I choose colors for the bird?
Start with three or four major color families and gradually introduce related shades. A successful approach is to use cool blues and purples for the head, greens for the wing, warm oranges and yellows for the body, and a combination of several colors for the tail.
How can I make the finished project look more professional?
Accurate templates, pressed fabrics, secure appliqué, balanced color placement, and consistent decorative stitching make the biggest difference. Take time to arrange all pieces before permanently attaching them, and continually check the silhouette while assembling the bird.
Conclusion
The Patchwork Bird Panel Pattern is a creative way to transform small pieces of fabric into a detailed and highly decorative textile project. Throughout this tutorial, we explored how to prepare the bird template, organize scraps by color, create the patchwork head and body, construct a layered feather wing, assemble the tail, add the beak and feet, and finish every section with decorative blanket stitching. These techniques make the project approachable while still offering plenty of opportunities for experienced quilters to personalize the design.
One of the greatest advantages of this patchwork appliqué project is that every version can look different. Changing the fabrics, prints, stitch colors, background, feather arrangement, or bird proportions allows you to create a completely individual piece while following the same basic construction process. The mixture of scrap quilting, appliqué, layering, embroidery, and color planning turns ordinary leftover fabric into an expressive piece of textile art.
EASILY FIND THE FREE PDF FOR THIS PATTERN HERE!
Whether you use your finished Patchwork Bird Panel Pattern as a wall hanging, quilt centerpiece, cushion front, framed panel, or decorative sewing project, careful construction and thoughtful fabric placement will help achieve a colorful result similar in spirit to the reference image. Most importantly, enjoy experimenting with fabrics rather than worrying about making every patch identical. Handmade details are what give this type of project its distinctive personality. If you enjoyed this tutorial, leave your sincere opinion about the project and share your suggestions. I would love to know which colors you would choose for your own Patchwork Bird Panel Pattern, which part of the tutorial you found most useful, and what other patchwork or appliqué projects you would like to see explained in the future.