
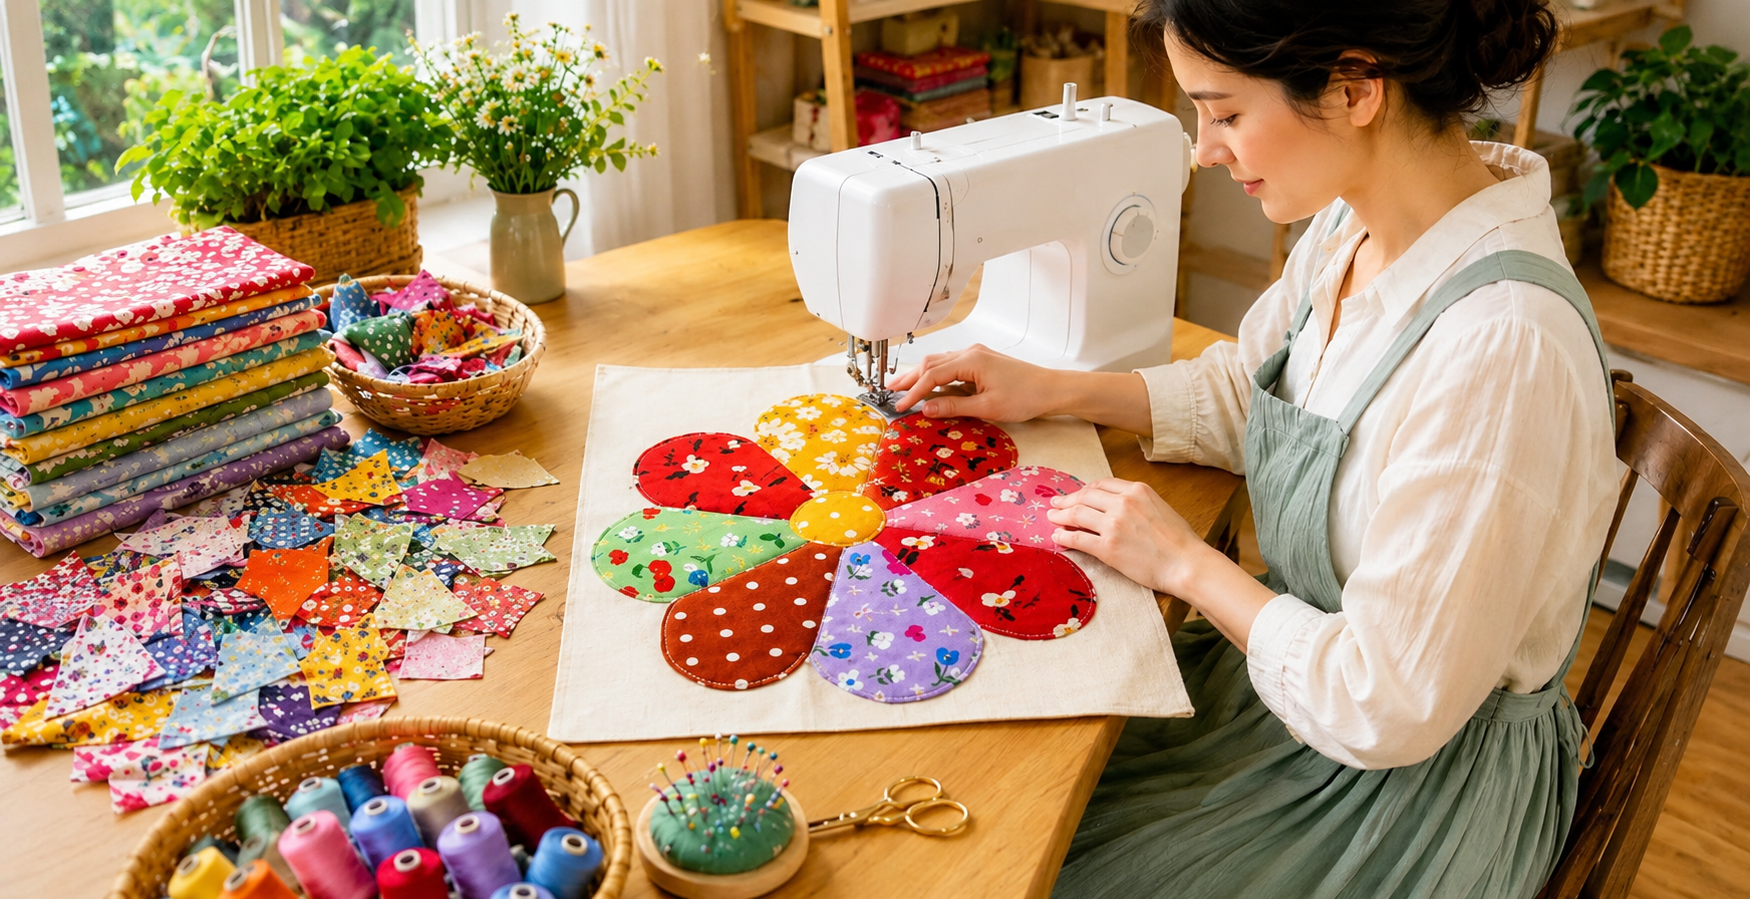
The Pot holder made with fabric scraps Pattern is a charming sewing project that turns small leftover pieces of fabric into something colorful, practical, and full of personality. Instead of allowing beautiful cotton scraps to remain forgotten in a drawer, this project gives them a useful purpose while creating an attractive handmade accessory for the kitchen. The flower-inspired design shown in the project is especially appealing because each petal can feature a different print, allowing you to combine florals, polka dots, solids, and other coordinating fabrics. It is also an approachable project for anyone who wants to practice basic sewing, appliqué, quilting, and decorative stitching techniques. Because the individual pieces are relatively small, you can experiment with colors without needing large amounts of material. The finished result can become a decorative fabric scrap pot holder, a kitchen mat, or simply an inspiring example of creative scrap sewing.
Another advantage of the Pot holder made with fabric scraps Pattern is its flexibility. You do not need to reproduce every color exactly as it appears in the inspiration image, because the beauty of a scrap project comes from combining fabrics you already own. A warm palette might include orange, yellow, red, and brown pieces, while a softer version could use pink, mint green, lavender, and cream. For a traditional country-style look, small floral prints work particularly well, while modern geometric fabrics can give the same pattern a completely different personality. The project can therefore be adapted to seasonal decorating, kitchen colors, or fabric collections left over from other quilts. Most importantly, the method teaches how several individual fabric shapes can be assembled into one balanced and attractive composition.
Making a Pot holder made with fabric scraps Pattern also provides an opportunity to improve useful sewing skills while completing a manageable project. You will learn how to choose complementary scraps, create consistent petal shapes, position appliqué pieces, add batting, and finish the edges securely. Careful preparation is important because a neat template and accurate placement make the final flower look much more symmetrical. The project does not require advanced equipment, although a sewing machine makes the process faster and creates strong, even seams. Beginners can work slowly and practice on spare fabric before sewing the final pieces. By following each stage carefully, even someone with limited sewing experience can create a polished handmade item that celebrates the creativity and resourcefulness of scrap fabric sewing.
Materials, Fabric Selection, and Preparing the Pattern
Begin your Pot holder made with fabric scraps Pattern by gathering several small pieces of cotton fabric. Quilting cotton is an excellent choice because it is easy to cut, holds its shape well, and comes in countless prints and colors. For a flower similar to the inspiration project, prepare approximately eight petal fabrics plus one contrasting fabric for the center. Scraps measuring roughly 15 x 20 cm are generally sufficient for individual petals, depending on your chosen finished size. You will also need a larger piece of fabric for the backing and another piece for the base beneath the appliqué. Coordinating rather than perfectly matching fabrics usually creates the most interesting result.
DISCOVER MORE FREE PATTERNS HERE!
A key concept in this project is fabric scraps, which simply refers to smaller leftover sections of material from previous sewing projects. These scraps can include pieces from quilts, bags, cushions, clothing projects, or fabric samples. Before using them, press each piece carefully with an iron so that folds and wrinkles do not distort your templates. Inspect the scraps for damaged areas, loose weaving, or stains and cut around anything unsuitable. Selecting fabrics with a similar weight helps the finished flower lie evenly. Cotton scraps are particularly beginner-friendly because they remain stable while being cut and sewn.
Next, create your petal template. Draw a rounded teardrop shape approximately 16 cm long and 9 cm wide at its broadest point, adjusting these measurements according to the overall size you want. The narrow end will point toward the center of the flower, while the rounded end forms the outside edge. Fold the paper template vertically to check that both sides are reasonably balanced before cutting it out. You can make the petals identical for a symmetrical appearance or introduce very small variations for a more handmade character. Consistent templates, however, make arranging the flower much easier.
For the center, prepare a circular template approximately 8 to 10 cm in diameter. This circle will cover the narrow inner tips of the petals and visually unite the entire design. A bright yellow or orange center creates a cheerful flower effect, although any contrasting fabric can work. Trace the circle onto your chosen fabric using a removable fabric marker or chalk. If you intend to turn the raw edge underneath before stitching, add approximately 6 mm of seam allowance around the template. If you prefer raw-edge appliqué, you can cut directly along the finished outline.
Prepare the base fabric next. A square measuring about 38 x 38 cm provides comfortable space for a medium flower design, although you may alter the dimensions according to your needs. Press the base thoroughly and mark its horizontal and vertical center lines lightly. These guidelines help position the petals evenly around the middle. Place the petal templates temporarily on the base before cutting all your pieces so you can confirm that the proportions look right. Good preparation prevents discovering later that your flower is too large or too small for the background.
Finally, gather the essential sewing supplies for the Pot holder made with fabric scraps Pattern. You will need fabric scissors or a rotary cutter, pins or fabric clips, matching or contrasting thread, an iron, a sewing machine, and your templates. A layer of batting will add structure and softness, while an appropriate heat-resistant layer should be included if the finished piece will actually be used to handle hot cookware. Ordinary decorative batting alone should not automatically be assumed to provide sufficient heat protection. With all materials prepared in advance, the sewing process becomes more organized and enjoyable.
Cutting, Arranging, and Sewing the Fabric Scrap Flower
Place your paper petal template on the wrong side of the first fabric scrap and trace around it carefully. Repeat this process with your remaining scraps until you have enough petals to complete the flower. Eight petals create an attractive balanced arrangement, although six, ten, or even twelve can be used when the template proportions are adjusted appropriately. Cut each piece slowly to maintain smooth curves. Clean cutting is especially important around the rounded ends because irregular edges become noticeable when the petals are placed together. Press every cut piece once more before arranging them.
Now begin arranging the petals on your prepared base fabric. Position the narrow tips toward the center and allow the wider rounded sections to radiate outward. Start with petals at the top, bottom, left, and right, creating four basic reference points. Add the remaining petals between those positions to form a balanced circle. Step back from your work occasionally and look at the overall composition rather than focusing only on one petal. Adjust the colors so that similar prints or tones are not unnecessarily grouped together unless that arrangement is intentional.
Color placement plays an important role in a successful fabric scrap flower. A useful technique is alternating warmer and cooler colors around the circle. For example, red can sit beside yellow, followed by green, orange, lavender, and pink. Dark fabrics can be separated with lighter ones to create definition between individual petals. Small floral prints look especially lively when combined with dots or simpler designs. There is no single correct arrangement, so take a quick photo of different layouts before sewing if you want to compare options.
Once you are satisfied with the placement, secure each petal using pins, temporary fabric adhesive designed for sewing, or fusible appliqué web according to your preferred technique. If using fusible web, follow its specific application instructions and avoid excessive heat that could distort delicate cotton. Secure the pieces one at a time so their positions remain consistent. Check the distance from every rounded petal edge to the outer border of your base. Maintaining similar spacing around the flower produces a more professional composition.
Sew around each petal using a narrow zigzag, blanket stitch, or straight stitch close to the raw edge. Appliqué stitching is the technique of attaching one fabric shape onto the surface of another, and it is central to this pattern. A zigzag stitch provides good edge coverage, while a straight stitch creates a softer raw-edge style that may develop a slightly frayed appearance over time. Sew slowly around the curves, stopping with the needle down whenever you need to reposition the fabric. Avoid pulling the base while sewing because stretching can create ripples around the petals.
After every petal is attached, place the fabric circle over the center where the narrow ends meet. The circle should cover minor variations in the inner petal points and create a clean focal point. Pin or fuse it securely before sewing around its circumference with the same stitch used on the petals. A contrasting center, especially yellow or orange, helps the flower stand out against colorful scraps. Press the completed appliqué gently from the wrong side when possible. At this stage, your Pot holder made with fabric scraps Pattern should already resemble the colorful handmade flower featured in the inspiration.
Adding Batting, Quilting, and Finishing the Pot Holder
To transform the appliqué panel into a finished pot holder, prepare the quilted layers. Place the backing fabric right side down on a flat surface, followed by the appropriate insulating material or batting, and position the appliqué top right side up. Smooth each layer from the center toward the edges so there are no wrinkles. If the piece is intended mainly as decoration, standard quilt batting may provide the desired structure. If it will contact hot cookware, use materials specifically suitable for heat protection and follow their manufacturer instructions. Safety and function should always take priority over appearance.
Secure the layers using safety pins, temporary basting spray suitable for quilting, or hand-basting stitches. Begin securing from the center and work outward to reduce shifting. Avoid placing pins directly where your sewing-machine needle will pass. The goal is to keep all layers behaving as one piece while quilting. A small project like this is ideal for beginners learning how to manage multiple layers because it can be rotated more easily than a large quilt. Check the back periodically while sewing to make sure folds are not forming.
Quilting adds both stability and decorative texture to the project. You can stitch approximately 3 to 5 mm inside each petal edge, echoing the flower shapes and emphasizing the colorful fabrics. Another option is quilting only the cream or neutral background around the flower. Straight lines, gentle curves, or simple free-motion quilting can all complement the appliqué. If you are new to machine quilting, a regular straight stitch with a slightly longer stitch length is perfectly suitable. The purpose is to secure the layers while enhancing the handmade appearance.
Trim the quilt sandwich once the quilting is complete. Use a ruler and rotary cutter, if available, to create clean square edges. A finished dimension of approximately 34 to 36 cm can work nicely for a larger decorative piece, while a traditional kitchen pot holder can be made smaller. Check all four corners for squareness before adding the binding. Removing uneven excess batting now makes the finishing process much easier. Do not cut too close to decorative stitching around the flower.
Binding gives the Pot holder made with fabric scraps Pattern a neat outer edge. Cut fabric strips approximately 6 cm wide, join them if necessary, and press the long strip in half lengthwise. Sew the binding around the front edge, carefully shaping the corners, then fold it toward the back and secure it by machine or hand. A binding color can be selected from one of the petals to visually connect the border with the central design. Neutral binding is another good option when the flower itself already contains many bold colors. Press the finished edges gently for a crisp appearance.
Before considering the project complete, inspect all seams and decorative stitching. Trim loose threads, check the binding, and confirm that each appliqué piece is securely attached. If you would like to hang the piece decoratively, a small fabric loop can be incorporated into one corner. The finished project demonstrates how scrap fabric sewing, quilting, and appliqué can work together in a useful handmade design. Small variations are part of the charm, so perfection is less important than secure construction and thoughtful color placement. Your completed piece should feel personal because every fabric scrap contributes something different to the final flower.
FAQ About the Pot holder made with fabric scraps Pattern
What is the best fabric for a Pot holder made with fabric scraps Pattern? Quilting cotton is one of the most convenient choices because it is stable, easy to sew, widely available, and ideal for appliqué. Cotton scraps also coordinate well even when they come from different collections. Try to avoid combining extremely lightweight fabric with very heavy material because the difference can make the petals difficult to sew evenly. Prewashing may be useful when you expect the finished item to be washed regularly. Whatever fabric you choose, press it thoroughly before tracing and cutting. Smooth fabric produces more accurate pieces.
Can beginners make this fabric scrap pot holder? Yes. The project uses fundamental skills such as tracing templates, cutting fabric, arranging appliqué pieces, sewing curves, and making a simple quilt sandwich. Beginners may want to practice the appliqué stitch on spare fabric before working on the final petals. Slower sewing is often better than trying to move rapidly around curved shapes. You can also choose a straight raw-edge appliqué stitch if a decorative zigzag feels difficult initially. Completing this smaller project can build confidence for larger appliqué quilts later.
How many fabric scraps do I need? For the flower design described in this Pot holder made with fabric scraps Pattern, approximately eight different scraps are ideal for the petals, plus another piece for the center. However, you can repeat fabrics if your scrap collection is limited. Each petal requires only a relatively small section of material, making this pattern useful for leftover pieces. You will need larger pieces for the background and backing. Combining scraps from previous projects can also give the finished item sentimental meaning.
Do I need heat-resistant batting? If you plan to use the project with hot cookware, an appropriate insulating layer designed for that purpose is important. Decorative quilt batting can provide softness and structure, but it should not automatically be treated as reliable protection from high temperatures. Follow the specifications provided for the insulating material you choose. You may also construct the project purely as a decorative kitchen mat or wall hanging if you prefer. Clearly deciding how the item will be used helps determine the most suitable internal layers.
Can I sew the petals by hand instead of using a sewing machine? Absolutely. Hand appliqué can create a beautiful traditional appearance. Turned-edge appliqué hides the raw fabric edges and works particularly well for a carefully finished heirloom-style piece. Blanket stitch can also be sewn by hand around each petal for a visible decorative effect. Hand sewing takes longer, but it offers excellent control around curves. The same Pot holder made with fabric scraps Pattern can therefore be adapted for either machine sewing or traditional hand techniques.
How can I make the flower look symmetrical? Begin by marking the center of the background fabric and placing four petals at the main compass positions: top, bottom, left, and right. Then add the other petals evenly between them. Keeping one consistent template for all petals also improves symmetry. Do not permanently attach anything until you have viewed the complete layout. Measuring the distance between each outer petal edge and the border can help reveal uneven placement. Minor differences are perfectly acceptable in a handmade project, but careful positioning creates a balanced result.
Can I change the number of petals? Yes, and this is one of the easiest ways to personalize the design. Six broad petals can create a bold, simple flower, while ten or twelve narrower petals produce a more detailed appearance. If you increase the number of petals, reduce their width so they fit comfortably around the center. Arrange paper templates before cutting fabric to test your proportions. This prevents wasting favorite scraps. The center circle may also need to be resized according to the number and width of petals.
How should the finished pot holder be washed? Washing instructions depend on the fabrics, batting, insulating layer, thread, and appliqué method used. Cotton projects are generally easier to care for when all components have compatible washing requirements. Gentle washing can help preserve appliqué edges and decorative stitching. Allow the piece to dry completely before storing or using it. Always prioritize the care instructions associated with any specialized insulating material included inside the project. Proper care can significantly extend the life of your handmade sewing work.
Can I use the same pattern for something other than a pot holder? Certainly. The flower can become a quilt block, table mat, placemat, cushion panel, wall hanging, tote bag decoration, or decorative kitchen panel. Increasing the petal size can turn the motif into the center of a larger quilt project. Reducing the dimensions can create smaller appliqué blocks that can be repeated across a quilt. This versatility is one reason scrap patterns are so useful. Once you understand the basic construction method, the same flower can inspire many different sewing projects.
What makes this pattern a good scrap-busting project? A scrap-busting project is designed to use fabric pieces that might otherwise remain unused after larger sewing projects. Because each flower petal requires only a small amount of material, even irregular leftovers can often provide enough usable fabric. Combining different prints also means you do not need a large quantity of any single design. This reduces waste while encouraging creative color combinations. The Pot holder made with fabric scraps Pattern demonstrates that small pieces of fabric can become the central feature of an attractive finished project rather than being treated as leftovers.
Conclusion
The Pot holder made with fabric scraps Pattern is a rewarding way to combine creativity, practical sewing skills, and leftover materials in one colorful project. Throughout this tutorial, you learned how to select coordinating fabric scraps, prepare a petal template, cut and arrange the flower pieces, apply them to a fabric base, attach the central circle, assemble the quilt sandwich, add decorative quilting, and finish the outer edges with binding.
You also learned how the same basic pattern can be customized with different fabrics, colors, petal counts, dimensions, and finishing techniques. Whether you create it as a functional kitchen accessory or adapt it into a decorative quilted piece, the project is an excellent example of how simple scraps can become something distinctive and useful. If you make your own version, leave your sincere opinion about the project and share your suggestions for colors, fabrics, or variations you would like to try next.