
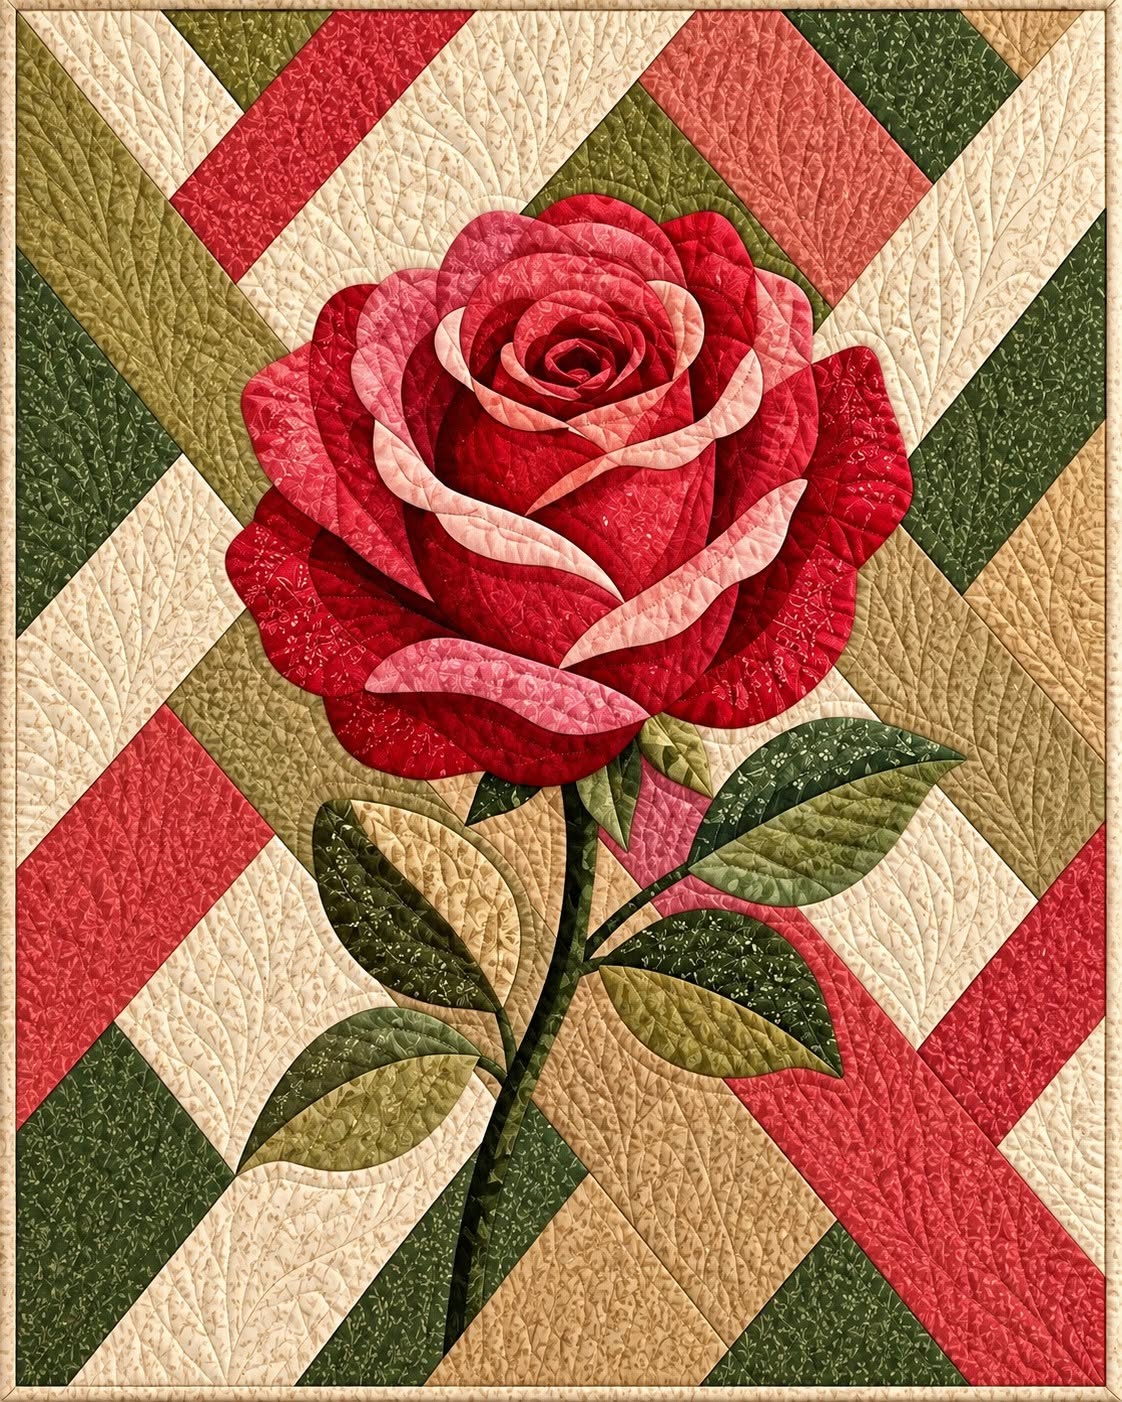
The Rose motif bedspread tutorial Pattern is a beautiful quilting project that combines bold geometric patchwork with a large floral appliqué to create a bedspread that immediately becomes the focal point of a room. Inspired by the project shown in the reference image, this design features a dramatic red rose positioned over a background made from wide diagonal fabric strips in cream, coral, beige, olive, and deep green. The contrast between the structured background and the soft curves of the flower is one of the most attractive aspects of the design. Although the finished quilt looks sophisticated, the construction can be divided into manageable stages, making it possible for confident beginners and experienced quilters to adapt the project to their own skill level. Throughout this tutorial, you will learn how to select fabrics, construct the patchwork foundation, assemble the rose petals, create the stem and leaves, and finish the quilt with decorative quilting. The goal is not to reproduce every millimeter of the original piece, but to understand the construction method so you can create your own personalized rose motif quilt.
Before beginning your Rose motif bedspread tutorial Pattern, it is important to understand how the design is organized. The bedspread is essentially made from two visual layers. The first layer is the geometric patchwork background, constructed with large diagonal bands and rectangular sections. The second layer is the oversized rose appliqué, including several overlapping petals, a long stem, and multiple leaves. This layered approach makes the project easier than it may initially appear because the background can be completed before the floral elements are positioned. You can also customize the colors without changing the basic technique. Red and coral fabrics create a traditional romantic rose, while pink, burgundy, yellow, or even blue fabrics can produce a completely different result. Similarly, the background could be made from neutral beige fabrics for a calm farmhouse look or brighter colors for a more modern patchwork bedspread.
Fabric selection plays an especially important role in this project because texture and color variation help define both the petals and the background sections. Instead of using only one red fabric for the flower, choose several coordinating shades such as crimson, coral, dusty rose, burgundy, and soft pink. Small prints, tone-on-tone designs, and subtle textures work beautifully because they add depth without distracting from the floral shape. For the leaves, combine olive, moss, forest green, and muted khaki fabrics. The background can include cream, ivory, beige, tan, muted coral, and green. You will also need batting, backing fabric, coordinating thread, fusible appliqué web if you prefer that method, basic quilting tools, and enough space to assemble the large pieces. Careful preparation at this stage will make the rest of the Rose motif bedspread tutorial Pattern much smoother and more enjoyable.
Preparing the Fabric and Building the Geometric Patchwork Background
Begin by deciding the finished size of your rose motif bedspread. A practical project size is approximately 150 x 190 cm for a generous throw or smaller bed covering, although you can enlarge the pattern for a full bedspread. Add approximately 2 to 3 cm around the outer edges while constructing the quilt top so that you have room for trimming after quilting. Wash and press cotton fabrics before cutting if you normally prewash your quilting fabric. This helps prevent unexpected shrinkage and makes accurate cutting easier.
DISCOVER MORE FREE PATTERNS HERE!
Study the background of the reference design and notice that it is constructed from wide diagonal sections rather than tiny patchwork blocks. Cut several strips approximately 18 to 25 cm wide from your cream, beige, coral, olive, and dark green fabrics. The exact width does not have to be identical throughout the quilt. Slight variations create the modern, handcrafted appearance visible in the original Rose motif bedspread tutorial Pattern.
Arrange the strips diagonally on a large table or clean floor before sewing. Alternate light and dark colors so neighboring sections remain easy to distinguish. Cream fabric can act as visual breathing space between stronger colors such as coral and forest green. Avoid placing too many dark fabrics together because they may compete with the large red rose that will later become the central feature of the quilt.
Sew neighboring strips together using an approximately 6 mm quilting seam allowance. Press each seam carefully, alternating the direction of the seam allowances where practical. You can create several large patchwork sections first and then join them together into the complete rectangular background. After assembling the panel, square the edges and confirm that the dimensions remain slightly larger than your intended finished size.
When recreating the geometric appearance from the photograph, do not worry about perfectly duplicating every diagonal line. The important idea is to create wide intersecting bands that move across the quilt from different directions. Some sections can form large rectangles, while others can create diagonal columns. This irregular organization gives the patchwork quilt pattern its distinctive contemporary character.
Once the background is assembled, press it thoroughly from both sides. Lay it flat and check for waves, stretched edges, or bulky seams. Correcting these issues now is much easier than fixing them after the appliqué has been attached. The finished geometric foundation should be visually interesting on its own, but still calm enough to allow the large rose appliqué to become the dominant element.
Creating the Large Layered Rose Motif
The flower is the heart of the Rose motif bedspread tutorial Pattern, and the easiest way to construct it is by thinking of it as several overlapping petal rings. Begin with the small central petals and gradually enlarge the shapes as you move outward. You can draw your own petal templates on paper using the photograph as inspiration. The central petals should be narrow and curved, while the outer petals should become wider and more open.
For a large quilt similar to the reference project, the completed flower may measure approximately 70 to 85 cm across. Create several paper templates in different sizes before cutting the fabric. Making templates first allows you to experiment with the arrangement without wasting material. Label the templates center petals, middle petals, and outer petals so that assembly remains organized.
Choose your darkest red fabrics for some of the deeper central areas and combine them with medium red, coral, and pink fabrics. This variation creates visual depth. When two petals overlap, placing a lighter petal against a darker one makes the edge easier to see. The strong tonal contrast is one of the reasons the flower in this Rose motif bedspread tutorial Pattern looks dimensional even though it is constructed from flat fabric.
Trace the petals onto fusible web if you are using fusible appliqué. Follow the instructions supplied with your chosen product, then cut each petal slightly outside the traced line. Fuse the shapes to the wrong side of the selected fabrics before making the final cut. If you prefer traditional turned-edge appliqué, add a small seam allowance around every template and prepare the edges before positioning the pieces.
Arrange the rose directly on the completed patchwork background before permanently attaching anything. Start with the larger outer petals, then gradually build toward the center. Overlap the petals generously so the flower looks natural instead of appearing like separate shapes placed beside one another. Step several feet away from the project periodically to evaluate the balance and overall flower shape.
When you are satisfied with the arrangement, secure the petals according to your chosen appliqué method. Stitch around each shape with a narrow zigzag, blanket stitch, satin stitch, or small straight appliqué stitch. A darker red thread creates stronger definition, while coordinating thread provides a softer finish. Work slowly around curves because smooth stitching will significantly improve the professional appearance of your rose appliqué quilt.
Adding the Stem, Leaves, and Quilting Details
After finishing the flower, create the long stem that extends toward the bottom of the bedspread. A finished width of approximately 3 to 5 cm works well for a flower of this scale. Cut the stem from dark green or olive fabric. A slightly curved stem looks more natural than a perfectly straight strip and also connects visually with the organic shapes of the petals.
The leaf appliqué can be made from several shades of green, exactly as the flower uses several shades of red. Draw elongated oval or almond-shaped leaves with pointed ends. Make some leaves approximately 15 cm long and others 25 to 30 cm long. Different sizes create movement and prevent the botanical section from looking repetitive.
Position several leaves along both sides of the stem. Some can point upward toward the flower while others angle outward or downward. In the reference design, the leaves overlap parts of the geometric background, helping visually connect the flower with the rest of the quilt. Try arranging all leaves before stitching so you can adjust spacing and direction easily.
Add smaller stems or branches connecting individual leaves to the main stem. These pieces can be created from narrow bias strips, which bend easily along gentle curves. Dark green fabric provides good definition against beige and cream background sections. Secure the stems first and then place the leaves over their ends for a clean, naturally layered finish.
Once every appliqué piece has been attached, assemble the quilt sandwich. Place the backing fabric wrong side up on a clean surface, add the batting, and position the completed quilt top over it. Smooth each layer carefully and baste with safety pins, temporary spray adhesive, or long basting stitches. Proper basting is essential because this large floral quilt contains many appliqué layers that can shift during quilting.
Quilt the project using a texture that complements the design. The photograph shows dense quilting across both the background and floral sections, which gives the entire bedspread a rich textile appearance. You can use free-motion curves, gentle waves, loops, or closely spaced organic lines. Quilting inside individual petals and leaves can emphasize their shapes, while continuous background quilting helps the Rose motif bedspread tutorial Pattern lie flat and remain durable.
Finishing the Bedspread and Achieving a Professional Result
After quilting, spread the project on a large flat surface and inspect the edges. Trim away excess batting and backing while squaring the corners carefully. Use a long ruler whenever possible so the sides remain straight. This final trimming step can dramatically improve the overall appearance of the bedspread, especially when working with a large patchwork quilt.
Prepare binding strips approximately 6 to 7 cm wide. You may choose a neutral beige similar to the background or select a darker green for additional definition. Join the strips diagonally to reduce bulk, press the long binding strip in half, and attach it around the quilt perimeter. Take extra care when forming the corners so they remain neat and balanced.
Sew the binding first to the front of the quilt using a consistent seam allowance. Fold it around the raw edge and secure it to the back by hand or machine. Hand stitching produces a traditional finish, while machine binding is faster and very durable. Either technique works well for the Rose motif bedspread tutorial Pattern when the stitches are even and secure.
Give the completed project a final inspection before washing or displaying it. Trim loose threads, examine the appliqué edges, and reinforce any areas that appear weak. Large appliqué petals are especially worth checking because their curved edges can experience stress when the quilt is frequently folded or washed.
If you want the bedspread to have a softer, slightly textured appearance, wash it gently according to the care requirements of your fabrics and batting. Cotton quilting often develops a subtle crinkled finish after the first washing, which can make a handmade quilt feel warm and inviting. Always confirm that your chosen fabrics are colorfast, particularly when combining deep red material with cream or ivory sections.
Your finished Rose motif bedspread tutorial Pattern can be used as a bed covering, oversized throw, decorative wall quilt, or statement textile. The combination of geometric patchwork and floral appliqué makes the design adaptable to traditional, country, cottage, and contemporary interiors. Most importantly, the method can be reused with other flowers, colors, and background arrangements once you understand the basic construction process.
FAQ – Frequently Asked Questions About the Rose Motif Bedspread Tutorial Pattern
Is the Rose motif bedspread tutorial Pattern suitable for beginners?
A patient beginner with basic sewing experience can complete the project, although the large appliqué and quilting stages require time. If you are new to quilting, practice curved appliqué on scrap fabric before working on the final flower.
What fabric is best for this rose bedspread?
High-quality quilting cotton is an excellent choice because it is easy to cut, press, stitch, and appliqué. Cotton also offers a huge variety of coordinating prints and solid colors.
How many red fabrics should I use for the rose?
Using at least four or five shades is recommended. Combining dark red, medium red, coral, dusty pink, and lighter pink gives the petals more dimension and makes the flower visually interesting.
Do I need fusible web for the appliqué?
No. Fusible web is convenient because it holds large shapes securely during stitching, but traditional needle-turn appliqué, raw-edge appliqué, or other appliqué methods can also be used.
How large should the central rose be?
For a bedspread measuring around 150 x 190 cm, a rose approximately 70 to 85 cm wide creates a dramatic focal point. You can resize the flower depending on the dimensions of your quilt.
Can I make the bedspread larger?
Yes. Simply enlarge the geometric background while keeping the rose centered or slightly above center. For a significantly larger quilt, you may also enlarge the flower and leaves so they remain proportional.
What colors can replace the red rose?
Pink, burgundy, peach, yellow, lavender, blue, or even multicolored fabrics can work. The Rose motif bedspread tutorial Pattern is highly customizable, so choose colors that complement your room or fabric collection.
Should I quilt over the appliqué pieces?
Yes, quilting inside the appliqué can help secure the layers and enhance the shape of the petals and leaves. Follow the natural curves of the flower for an attractive dimensional effect.
Can scraps be used for this project?
Absolutely. This is a wonderful scrap-friendly quilt project, particularly for the petals, leaves, and geometric background. Coordinating scraps can create a rich patchwork appearance while reducing fabric waste.
How can I make the rose look more realistic?
Use several color values, overlap the petals, vary their sizes, and place lighter fabrics beside darker ones. Slightly irregular petal shapes often look more natural than perfectly symmetrical pieces.
What is the best quilting design for this bedspread?
Organic free-motion quilting, gentle curves, wavy lines, leaves, loops, or dense meandering designs work especially well. The goal is to add texture without visually competing with the main rose motif.
How long does a project like this take?
The time depends on experience, quilt size, appliqué method, and quilting density. Instead of rushing, divide the project into stages: background construction, rose preparation, appliqué, quilting, and binding. Working section by section makes a large quilt much more manageable.
Conclusion
The Rose motif bedspread tutorial Pattern combines two classic quilting ideas—geometric patchwork and floral appliqué—into one dramatic and memorable project. You learned how to plan a large patchwork foundation, combine cream, coral, beige, and green fabrics, create layered rose petals, build a curved stem with leaves, assemble the quilt sandwich, add decorative quilting, and complete the edges with binding.
EASILY FIND THE FREE PDF FOR THIS PATTERN HERE!
The most important lesson is that an impressive quilt does not have to be constructed all at once. By separating the design into manageable stages, even a detailed rose appliqué bedspread becomes easier to understand and create. Feel free to experiment with the colors, flower size, background arrangement, quilting design, and binding so the finished piece reflects your own creative style. If you create your own version of this Rose motif bedspread tutorial Pattern, leave your sincere opinion about the tutorial and share your suggestions. Your ideas about colors, fabrics, quilting techniques, and future patterns can inspire even more creative projects.