
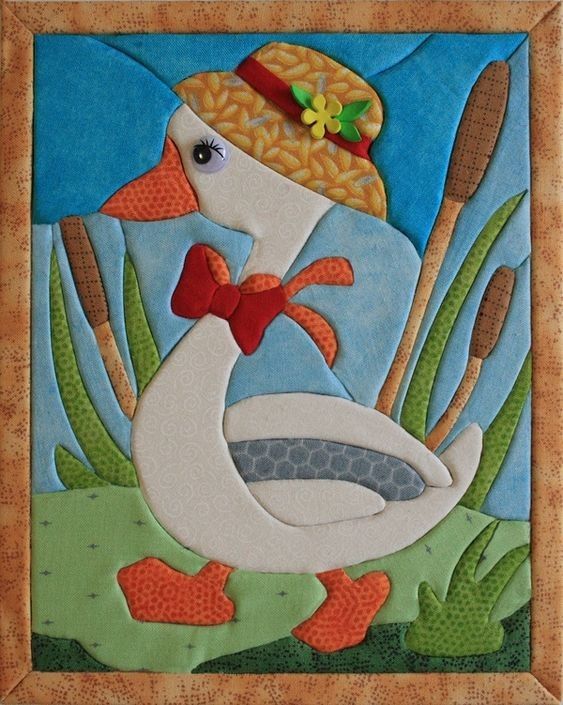
The Duck in a Hat Patchwork Block Pattern is a charming fabric appliqué project that combines traditional patchwork techniques with a playful country-style scene. The design features an elegant duck wearing a decorative hat and bow while standing among cattails, grass, and soft landscape shapes. Because the project uses several layers of fabric rather than complicated piecing, it can be approached successfully by confident beginners as well as experienced quilters. The most attractive part of this duck appliqué pattern is the opportunity to combine prints, textures, and contrasting colors in one compact composition. Small scraps from previous quilting projects can easily become the hat, beak, wings, leaves, flowers, bow, and background details. When carefully assembled, these individual pieces create a dimensional textile illustration that works beautifully as a quilt block, wall hanging, pillow front, or decorative fabric panel.
Creating a Duck in a Hat Patchwork Block Pattern also provides an excellent introduction to fabric appliqué, a technique in which smaller fabric shapes are positioned and stitched over a background layer. Instead of trying to reproduce every minor detail immediately, the easiest method is to divide the picture into major visual sections: the background, landscape, vegetation, duck body, clothing details, hat, and decorative accents. Each group can then be converted into simple paper templates before fabric is cut. This approach helps preserve the proportions of the original composition while making construction much easier to understand. Fusible web can simplify placement, although traditional turned-edge appliqué can also be used if you prefer a softer handmade finish. Regardless of the method selected, careful preparation is more important than speed because accurate placement makes the finished patchwork block pattern look clean and balanced.
Color selection is another important part of reproducing the personality of the Duck in a Hat Patchwork Block Pattern. The reference design combines a bright blue background with soft white and pale blue body fabrics, orange accents, green foliage, brown cattails, a warm golden hat, and a vivid red bow. You do not have to copy those colors exactly, but maintaining contrast between neighboring pieces will keep the shapes easy to recognize. Quilting cotton is generally the easiest material to work with because it presses well, holds its shape, and comes in a huge variety of prints. Subtle tone-on-tone fabrics are especially effective because they add visual texture without hiding the appliqué outlines. Before cutting your best material, arrange several fabric combinations together and photograph them so you can compare the alternatives before committing to the final duck patchwork design.
Preparing the Pattern, Fabric, and Background
Begin your Duck in a Hat Patchwork Block Pattern by deciding the finished size of the block. A practical decorative block can measure approximately 35 cm × 45 cm, although the design may be enlarged or reduced according to your project. Add at least 1.5 cm of extra fabric around every side so the block can be squared after appliqué and quilting. If you plan to create a wall panel with a substantial outer frame, leave additional space around the composition. Keeping the initial background slightly oversized is much safer than trying to work with exact finished measurements from the beginning.
DISCOVER MORE FREE PATTERNS HERE!
Next, create the templates for the duck appliqué. Trace the major shapes separately onto paper: the main body, neck and head, beak, front wing or clothing section, back wing, tail, feet, hat, hatband, flower, leaves, bow, cattails, and grass. Larger landscape areas can also be traced as individual shapes. Number every template and mark its orientation so that pieces are not accidentally reversed. If you are using fusible web, remember that the templates are normally traced in reverse because they flip when transferred to the fabric.
Choose a sturdy quilting cotton for the background of the patchwork block. A medium or bright blue works especially well because it creates strong contrast against the pale duck and green vegetation. Press the background fabric thoroughly before beginning construction because wrinkles can distort the placement of the appliqué pieces. If the fabric is very lightweight, a thin stabilizer placed behind it can help prevent puckering during stitching. Avoid extremely heavy stabilizers because they can make the finished block stiff.
For the duck, select at least two or three coordinated fabrics rather than using one identical white material everywhere. A subtle cream or white print can be used for the head and neck, while pale blue may be used for the upper body or garment-like section. A gray patterned fabric works nicely for the wing. Using these gentle changes in value is one of the easiest ways to create depth in a fabric appliqué pattern without complicated shading techniques.
Prepare the decorative fabrics next. Orange or rust-colored cotton works well for the beak, feet, and small accent areas, while a deep red fabric can be used for the bow and hatband. The hat can be made from golden yellow, tan, or straw-colored fabric with a small-scale print. Green fabrics in several shades are useful for leaves and marsh plants. Using multiple greens instead of one identical fabric gives the vegetation a more natural appearance.
Finally, organize all pieces before attaching anything permanently. Place the paper templates or fabric shapes over the background and check the entire composition from a distance. The duck should remain the dominant focal point of the Duck in a Hat Patchwork Block Pattern, while the cattails and foliage should frame it instead of competing with it. Take a quick reference photo once you are satisfied with the arrangement. This photograph can become extremely useful if the pieces move while you are preparing the next stages.
Building the Landscape and Duck Appliqué
Start assembling the Duck in a Hat Patchwork Block Pattern with the elements that visually sit farthest in the background. Place the lower landscape fabric first, creating the grassy or marsh-like ground behind the duck’s feet. A soft green fabric with a subtle print works especially well here. Press or baste it into place according to your chosen appliqué method. Working from the back layer toward the foreground prevents unnecessary overlapping problems later.
Add the tall leaves and cattails after positioning the landscape. The reference composition uses long green leaves around both sides of the duck, creating a natural frame. Cut these pieces with slightly varied shapes so the vegetation does not appear excessively symmetrical. Brown cattail heads can be attached to narrow stems and layered over the green leaves. These simple background elements immediately establish the wetland-inspired setting of the duck quilt block.
Now position the main body of the duck. It is usually easiest to begin with the largest torso and neck shape because this piece determines the placement of nearly every other feature. Smooth the fabric carefully before fusing or pinning it. Next, add the pale blue body section and wing pieces, making sure each overlap follows the intended direction. The visible layering should suggest feathers and clothing without making the block unnecessarily complicated.
Place the head, beak, and facial details after the body is secure. The orange beak should extend naturally from the front of the head while remaining proportional to the rest of the duck appliqué pattern. The eye can be created with a tiny circle of dark fabric, a secure button on decorative items that will not be used by small children, embroidery, or permanent fabric-safe stitching. Embroidery is often the most practical option because it produces a smooth result and does not add unnecessary bulk.
Add the feet near the lower edge of the body, checking that they visually connect with the ground. Slightly oversized orange feet give the Duck in a Hat Patchwork Block Pattern its whimsical character, so they do not need to look anatomically realistic. Leave enough spacing between them to make each shape readable. If your fabric print is directional, pay attention to its orientation before cutting these pieces because mismatched patterns can become surprisingly noticeable in small appliqué sections.
Before permanently stitching the duck, inspect every overlap. The body should cover portions of the vegetation naturally while some leaves may appear in front of the lower section depending on the composition. Adjusting these overlaps creates visual depth. Once you are satisfied, press the fusible pieces according to the manufacturer’s instructions or secure traditional appliqué pieces with pins or basting stitches. The central structure of your patchwork duck block is now ready for decorative details.
Adding the Hat, Bow, Details, and Appliqué Stitches
The hat is one of the most distinctive elements of the Duck in a Hat Patchwork Block Pattern, so give it careful attention. Start with the large golden hat shape and position it slightly over the top and back portion of the duck’s head. A fabric featuring small swirling, straw-like, or geometric motifs can imitate woven texture beautifully. Make sure the brim overlaps the head naturally. A slight tilt adds personality and helps recreate the playful appearance of the reference project.
Add the contrasting hatband across the hat. Red fabric creates strong visual continuity with the bow around the duck’s neck, although burgundy, green, or blue could also work in a customized version. Next, create a small flower and two leaves to decorate the band. These tiny appliqué pieces are ideal for using scraps. Secure them carefully because small shapes tend to lift more easily than large ones during stitching.
The bow should be positioned around the lower neck area and may consist of two loops, a center knot, and trailing ends. Using several separate pieces instead of cutting the entire bow as one shape gives the fabric patchwork pattern more dimension. A deep red print works especially well against pale body fabrics. If desired, place a tiny piece of lightweight batting beneath the center knot before stitching it down to create subtle relief.
Once every appliqué piece has been positioned, begin stitching around the raw edges. A blanket stitch is one of the most popular choices because it protects the edges while emphasizing every shape. A narrow zigzag stitch can create a denser outline, while a straight stitch placed close to the edge provides a more rustic raw-edge appearance. Test your preferred stitch on a scrap containing the same fabric and stabilizer combination before sewing on the actual block.
Thread color can significantly change the character of the Duck in a Hat Patchwork Block Pattern. Matching thread produces a soft and understated finish, while contrasting thread creates visible outlines similar to illustration. Gold, cream, brown, or darker versions of each fabric color can work beautifully. You can also use one consistent neutral thread throughout the project to unify all the different prints. Keep the stitch length consistent and sew slowly around tight curves.
After the appliqué stitching is complete, add optional embroidered details such as the eye, eyelashes, feather lines, or small decorative marks. Do not overcrowd the design; a few carefully placed details are usually enough. Press the block gently from the reverse side, using a pressing cloth if necessary. At this stage the recognizable Duck in a Hat Patchwork Block Pattern should be fully visible, with its hat, bow, marsh vegetation, and layered body forming a cohesive scene.
Quilting, Finishing, and Creative Ways to Use the Block
To turn the appliqué into a quilted block, create a simple quilt sandwich using the completed Duck in a Hat Patchwork Block Pattern, batting, and backing fabric. Cut the batting and backing slightly larger than the top. Smooth all three layers carefully and secure them with safety pins, temporary basting spray, or traditional thread basting. Keeping the layers flat is essential because small wrinkles can become permanently trapped during quilting.
Quilt around the outline of the duck first. Stitching close to major appliqué shapes is sometimes called outline quilting, and it helps the central motif stand out from the background. You can then add gentle quilting lines to the blue background. Curved lines suggesting wind or water work particularly well with this scene. If you prefer a cleaner appearance, simple echo quilting around the duck is another attractive option.
Quilt the lower landscape and plants with lines that follow their natural direction. Vertical stitching enhances the cattails, while curved or angled lines can emphasize leaves. The goal is not to cover every centimeter with heavy stitching but to create enough texture to hold the layers securely. When quilting over the duck patchwork block, avoid excessive stitching through tiny appliqué details because it may flatten them unnecessarily.
After quilting, square the block carefully. Measure from the central motif rather than blindly trimming equal amounts from each side, because slight movement may have occurred during appliqué and quilting. Make sure the duck remains visually centered. Once squared, the piece can receive a traditional binding or a decorative fabric frame similar to the warm brown border visible in the reference image. A contrasting border makes the blue interior look especially vibrant.
The finished Duck in a Hat Patchwork Block Pattern can be used in many ways beyond a traditional quilt. Turn it into a cushion cover, decorative wall panel, tote bag front, sewing-room decoration, table mat, or the center block of a larger quilt. If you plan to use it for a pillow or bag, consider slightly denser quilting because these items receive more frequent handling. For a wall hanging, lightweight quilting is usually sufficient.
You can also personalize the pattern while preserving the original concept. Change the hat colors for different seasons, use floral prints in spring, deeper earth tones for autumn, or festive fabrics for holiday décor. The surrounding cattails could be replaced with flowers, leaves, or other landscape motifs. What makes the Duck in a Hat Patchwork Block Pattern appealing is its flexibility: the recognizable duck remains the central character while fabric choices allow each maker to produce a unique interpretation.
FAQ – Frequently Asked Questions About the Duck in a Hat Patchwork Block Pattern
What is a Duck in a Hat Patchwork Block Pattern?
A Duck in a Hat Patchwork Block Pattern is a decorative sewing design featuring a duck created from layered fabric shapes. In this particular style, the duck wears a hat and bow and is surrounded by vegetation such as cattails and leaves. Most of the design is constructed using appliqué techniques rather than traditional geometric patchwork piecing.
Is this pattern suitable for beginners?
Yes. A patient beginner can complete this project, particularly when using fusible appliqué. The most important skills are accurate tracing, careful cutting, ironing, and slow stitching around curved shapes. Beginners may want to practice blanket stitching or narrow zigzag stitching on scrap fabric before working on the final block.
What fabric is best for this duck appliqué project?
High-quality quilting cotton is one of the easiest options. It is stable, easy to cut, and available in countless colors and patterns. Tone-on-tone cotton prints are particularly effective for the Duck in a Hat Patchwork Block Pattern because they create texture while keeping individual appliqué shapes clearly visible.
Do I need a sewing machine to make the block?
No. Although a sewing machine makes the process faster, traditional hand appliqué can produce an equally beautiful result. Hand stitching may even give the finished block a softer, more traditional appearance. The decision depends on your experience, available tools, and preferred style.
Should I use fusible web for the appliqué?
Fusible web is helpful because it keeps multiple pieces in position while you stitch. This project contains several small components, including leaves, hat decorations, bow sections, and facial details, so fusible web can greatly simplify assembly. However, it is optional, and traditional turned-edge appliqué can also be used.
How large should the finished patchwork block be?
There is no mandatory size. Approximately 35 cm × 45 cm is a comfortable starting point for a decorative panel, but the pattern can be enlarged for a wall hanging or reduced for a cushion. Always add extra fabric around the edges before quilting so the finished project can be squared accurately.
What stitch should I use around the appliqué pieces?
The blanket stitch is an excellent choice because it provides both decoration and edge security. A narrow zigzag stitch gives stronger coverage, while straight stitching close to the raw edge creates a casual handmade effect. Choose a method that complements the style you want for the finished project.
How can I prevent appliqué pieces from fraying?
Using fusible web and stitching completely around the raw edges will greatly reduce fraying. A close blanket or zigzag stitch provides additional protection. Avoid repeatedly handling unfinished appliqué pieces because excessive movement can loosen the edges before they are secured.
Can I change the colors shown in the original design?
Absolutely. Color customization is one of the most enjoyable parts of making a Duck in a Hat Patchwork Block Pattern. You could create a blue hat, yellow bow, floral body, darker background, or completely different seasonal palette. The main consideration is maintaining enough contrast between adjacent fabrics so each shape remains recognizable.
Can the completed block be used in a larger quilt?
Yes. After finishing and squaring the block, it can become a feature block within a larger quilt. You may surround it with solid borders, patchwork strips, traditional quilt blocks, or additional appliqué panels. Repeating the duck with different fabrics could even create a playful themed quilt.
Conclusion
The Duck in a Hat Patchwork Block Pattern combines appliqué, patchwork, fabric selection, decorative stitching, and quilting in a project filled with personality. By starting with a carefully prepared background, tracing the main shapes, building the landscape from back to front, assembling the duck, and then adding the hat, bow, flowers, vegetation, and stitched details, you can recreate the essential character of the design while still making it your own.
The key to a successful result is to work gradually. Prepare the templates before cutting fabric, test your color combinations, position every piece before permanently attaching it, and sew slowly around curves and small details. These simple habits can dramatically improve the appearance of any fabric appliqué project, especially one containing many overlapping shapes.
EASILY FIND THE FREE PDF FOR THIS PATTERN HERE!
Once the appliqué is complete, quilting and framing transform the project from individual fabric pieces into a finished textile artwork. Whether you use your Duck in a Hat Patchwork Block Pattern as a wall hanging, cushion, quilt centerpiece, tote panel, or handmade decoration, the combination of cheerful colors and charming details makes it an enjoyable project with plenty of possibilities for personalization. If you make your own version of this Duck in a Hat Patchwork Block Pattern, leave your sincere opinion about the project and share your suggestions. Which colors would you choose for the duck, hat, bow, and background? Your ideas may inspire new variations and creative ways to turn this delightful duck appliqué pattern into an even more personal patchwork project.