
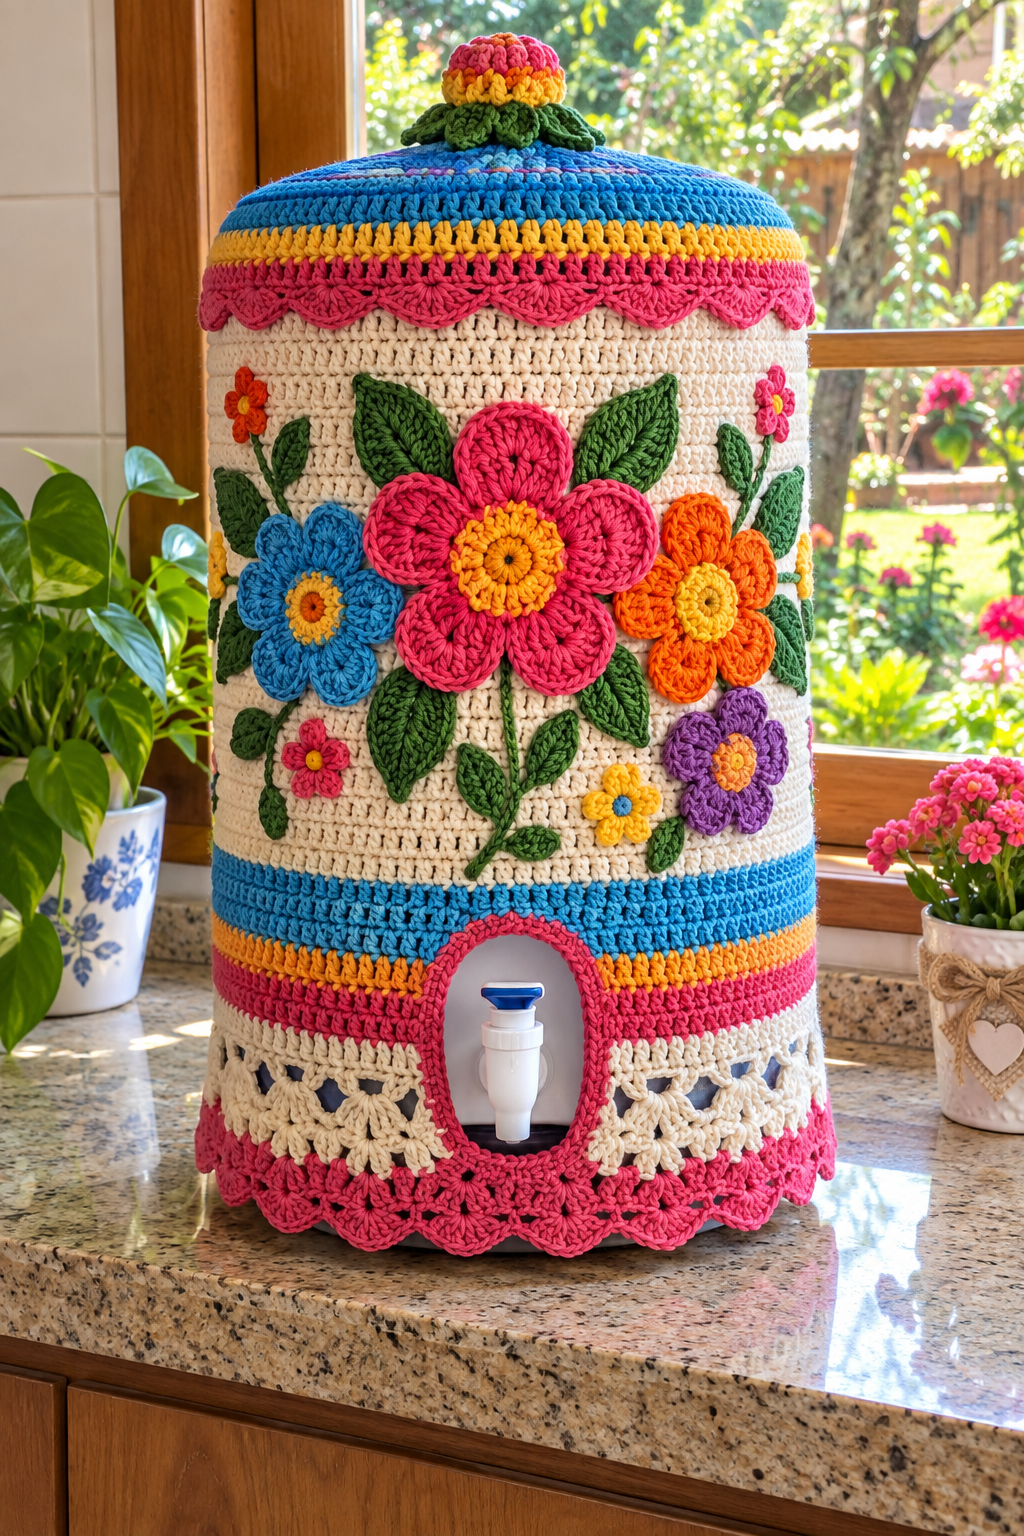
The Crochet Cover for 20 Liter Water Jug Pattern is a beautiful way to transform an ordinary water container into a decorative handmade piece that can complement a kitchen, dining area, craft room, patio, or family gathering space. Inspired by colorful floral crochet, this type of cover combines practical construction with creative details such as layered flowers, textured leaves, decorative borders, and an opening around the water tap. A handmade 20 liter water jug cover can also help visually soften the appearance of a large plastic container while allowing the dispenser to remain accessible. The project is especially appealing to crocheters who enjoy combining basic stitches with appliqué techniques because the main body can be relatively straightforward while the flowers provide plenty of opportunities for customization. Even beginners who know the most common crochet stitches can approach the project one stage at a time. The most important point is to measure the actual jug before starting, since 20-liter containers and dispensers can vary slightly in circumference, height, shoulder shape, and tap position.
One of the most attractive aspects of the Crochet Cover for 20 Liter Water Jug Pattern is that you do not need to reproduce every decorative element exactly. The design can be adapted to your yarn collection, preferred colors, and home décor. A neutral cream body creates an excellent background for bright flowers in pink, blue, orange, yellow, purple, and green, while colorful horizontal bands can make the cover look even more cheerful. Cotton yarn is particularly suitable because it creates clear stitch definition, holds decorative shapes well, and is generally comfortable to work with for home accessories. Acrylic or cotton-blend yarn can also be used when a slightly lighter or more economical option is preferred. Regardless of the fiber, maintaining consistent tension will help the finished cover sit neatly around the container without becoming excessively tight or loose. This tutorial uses US crochet terminology and explains the principal crochet abbreviations so that the instructions are easier to follow from beginning to end.
Before working on the actual Crochet Cover for 20 Liter Water Jug Pattern, measure the circumference around the widest part of the jug, the height from the lower edge to the beginning of the upper curve, the distance from the base to the tap, and the approximate dimensions of the tap area. Write these measurements down because they will determine the number of stitches and rounds needed. Instead of depending on a fixed stitch count that may fit only one brand of container, this pattern uses a measurement-based approach, making it much more versatile. Crochet a small gauge swatch using your chosen yarn and hook, then determine how many stitches you obtain across 10 cm. This simple step makes it easier to calculate the foundation circumference accurately. Remember that the cover should fit comfortably rather than tightly; the goal is to create a decorative sleeve that can be removed when necessary for cleaning or replacing the water container.
Materials, Measurements, and Crochet Stitch Keys
For this Crochet Cover for 20 Liter Water Jug Pattern, a medium-weight cotton or cotton-blend yarn is a practical choice. You may use approximately 700 to 1,000 grams of yarn, depending on the yarn thickness, stitch density, size of the jug, and amount of appliqué decoration you add. A suggested palette includes cream or off-white for the main body, blue for contrasting bands, pink for scalloped borders and large flowers, yellow or gold for flower centers, orange and purple for additional flowers, and several shades of green for leaves and stems. You will also need an appropriate crochet hook, scissors, a yarn needle, measuring tape, stitch markers, and removable markers for positioning the tap opening.
DISCOVER MORE FREE PATTERNS HERE!
The basic crochet keys used throughout the pattern are simple. ch = chain, which forms foundation stitches and connecting spaces. sl st = slip stitch, commonly used for joining rounds without adding significant height. sc = single crochet, a short and firm stitch that is useful around openings and edges. hdc = half double crochet, which offers a little more height while remaining fairly dense. dc = double crochet, an important stitch for building the body and petals efficiently. tr = treble crochet can be used for elongated petals or decorative shells, while st/sts = stitch/stitches, sp = space, rnd = round, and rep = repeat.
To calculate the starting circumference, first make your gauge swatch. For example, suppose 10 cm of your selected stitch pattern measures 16 stitches and your water jug measures 90 cm around its widest point. Divide 90 by 10 and multiply by 16, giving approximately 144 stitches. Because stitch patterns often require multiples such as 4, 6, or 8, adjust this number to the nearest compatible multiple. It is better to test the foundation chain around the jug before proceeding. The chain should meet comfortably without stretching strongly. A small amount of negative ease can help the finished crochet water jug cover remain in place, but excessive tightness can distort the flowers and tap opening.
Begin the lower section by making the required number of chains and joining carefully with a sl st, ensuring that the chain is not twisted. Work one or two rounds of sc to create a firm lower foundation. Continue with dc or hdc rounds for the main fabric. If you prefer a more decorative lower edge, reserve the scalloped trim until the main body has been completed. Place a stitch marker at the beginning of each round so that counting remains easy. Try the work around the jug after every several rounds, particularly during the first 10 to 15 cm, because changing hook size early is much easier than correcting a poorly fitted cover later.
The color arrangement can be customized, but a balanced version may begin with a pink decorative border, transition into a cream openwork section, followed by pink, yellow, and blue horizontal bands. The center of the cover can remain predominantly cream so the floral appliqués stand out clearly. Near the shoulder of the container, additional pink, yellow, and blue bands can echo the colors used at the bottom. Repeating the same colors in different areas creates visual unity without making the design look too busy. For an elegant version, use only three or four colors; for a cheerful farmhouse-inspired version, use the full rainbow-inspired palette.
Remember that measurements matter more than exact row numbers in a Crochet Cover for 20 Liter Water Jug Pattern. Different crochet styles can produce noticeably different heights even when the same number of rounds is worked. Measure the growing cover periodically and compare it with the actual jug. Keep the container nearby whenever possible and temporarily place the crochet piece around it to evaluate fit. This technique allows you to determine precisely when to make the tap opening, when to begin the upper shaping, and where the decorative bands should be positioned.
Step-by-Step Crochet Pattern for the Main Jug Cover
Start the main body from the lower circumference using the calculated foundation chain. Round 1: join the chain with a sl st and work one sc in each ch around. Join with a slip stitch. Round 2: ch 2 or ch 3 according to your preferred turning method, then work one dc in each stitch around. Continue making rounds of double crochet until the lower section measures approximately 8 to 12 cm, checking the fit regularly. The exact measurement depends on the location of your dispenser tap and the proportions of your jug.
To reproduce a decorative openwork effect, add a simple shell section. Work a round consisting of groups such as 3 dc, ch 1, skip 1 st, repeating around while adjusting the final repeat when necessary. On the next round, crochet groups of 3 dc into each ch-1 space and create another chain space between groups. This produces a light lace texture without making the cover excessively open. One or two openwork sections are usually enough because the central floral portion looks best on a relatively solid background. Finish the decorative section with a round of sc before changing colors.
The tap opening should be planned carefully. Place the partly completed cover on the jug and mark the left and right sides of the faucet area using stitch markers. Instead of crocheting across the marked stitches, work chains approximately equal to the width of the required opening. Skip the stitches between the markers and continue crocheting around the rest of the cover. On the following round, crochet into the newly created chain stitches as if they were regular stitches. This creates an opening while maintaining the continuous circular structure of the cover. The opening should be large enough to allow comfortable access to the tap handle and spout.
Once the body is completed, reinforce the tap opening using sc stitches. Attach pink or another contrasting yarn at one side of the opening and crochet evenly around its entire edge. If you want a thicker border similar to the decorative design shown in floral jug covers, add a second round of single crochet or reverse single crochet. At curved areas, occasionally work 2 sc in the same stitch so the border lies flat. Around tighter corners, skip a stitch when necessary. Avoid adding too many stitches because the opening may become wavy rather than smooth.
Continue the cream body above the tap area until you reach the point where the container begins to narrow toward the top. At this stage, gradual decreases may be necessary. A simple decrease can be made by working dc2tog, meaning double crochet two stitches together. Spread the decreases evenly around the round rather than placing them all in one area. Try the cover on the jug after each decrease round. The top should follow the shape of the container while remaining loose enough to be removed. If your jug has nearly vertical sides all the way to the top, very little shaping may be required.
Finish the upper portion with colorful horizontal stripes and a decorative scalloped band. A simple scallop can be created by working 5 dc in one stitch, skip 2 sts, sc in the next stitch, skip 2 sts, then repeating around. Adjust the spacing slightly if the stitch count does not divide perfectly. Above the scallops, add one or more rounds in yellow and blue before completing the top. You may close the upper section with a flat crocheted circle or create a removable lid-style topper. A decorative flower on top gives the Crochet Cover for 20 Liter Water Jug Pattern a charming handmade finish.
Crochet Flowers, Leaves, Borders, and Final Assembly
The large central flower is the visual focal point of this project. Begin with yellow or orange yarn and make a magic ring. Work approximately 12 dc into the ring and join with a slip stitch. Change to pink yarn for the petals. A simple petal sequence can be created by working ch 3, 2 or 3 tr in the same base area, ch 3, sl st, then moving to the next petal position. Repeat until you have five or six evenly arranged petals. For a fuller flower, work an additional outer round behind the first petals using chain spaces and slightly taller stitches.
Smaller flowers can be created with the same principle. For example, begin with a magic ring and work 10 or 12 sc into the center. Change color and create five petals using sl st, ch 2, 2 dc, ch 2, sl st in selected stitches or spaces. Blue, orange, purple, yellow, and pink flowers can be distributed across the cream section of the jug cover. Varying the sizes makes the arrangement appear more natural. Leave long yarn tails when finishing each flower because these tails can later be used to sew the appliqués securely onto the main cover.
For the leaves, use green yarn and begin with approximately ch 9 to ch 13, depending on the desired leaf size. Starting in the second chain from the hook, work progressively taller stitches along one side, such as sc, hdc, dc, dc, tr, dc, hdc, sc. Work several stitches into the final chain to turn the corner, then repeat the sequence along the opposite side of the foundation chain. Join with a slip stitch. This method creates a pointed oval leaf. For extra definition, surface crochet or embroider a central vein along the leaf using a darker green yarn.
Crocheted stems can be made from chains covered with slip stitches or by embroidering directly onto the finished cover. Arrange the largest flower approximately in the central front area, then position the second-largest flowers to either side. Add smaller flowers around them and fill empty spaces with leaves. Before sewing anything permanently, pin or temporarily tack all the pieces into place. Step back and examine the overall balance. Keeping some cream background visible is important because the open areas prevent the appliqué arrangement from becoming visually crowded.
When you are satisfied with the placement, sew each appliqué using a yarn needle and matching yarn. Work around the outer edges of flowers and leaves using small, secure stitches. Larger flowers may also need a few invisible stitches through their centers to prevent them from lifting away from the cover. Avoid sewing through the water jug itself, of course; remove the cover before completing this stage. After attaching every element, weave in all yarn ends securely on the wrong side. Trim excess yarn only after you are confident that the ends will not loosen.
Complete the Crochet Cover for 20 Liter Water Jug Pattern with a lower decorative edging. A scalloped border coordinates beautifully with floral appliqués. Attach the chosen color and work one foundation round of sc. On the following round, repeat skip 2 sts, 5 dc in next st, skip 2 sts, sc in next st. If necessary, modify the final few stitches slightly so the pattern meets neatly. Steam blocking may be suitable for some fibers, while cotton pieces can usually be lightly damp-blocked. Always follow the care recommendations for your yarn and avoid exposing acrylic yarn directly to excessive heat.
FAQ About the Crochet Cover for 20 Liter Water Jug Pattern
How much yarn do I need for a Crochet Cover for 20 Liter Water Jug Pattern? The exact amount varies according to the size of your container, yarn thickness, hook size, stitch pattern, and number of flowers. For many projects, approximately 700 to 1,000 grams of medium-weight yarn provides a useful starting estimate. A heavily decorated cover with numerous flowers and leaves may require more. Buying a little extra of the main background color is helpful because dye lots can vary.
What is the best yarn for a crochet water jug cover? Cotton yarn is an excellent option because it offers good stitch definition, stability, and a natural handmade appearance. Cotton blends can also work well and may be lighter. Acrylic is another possible choice, especially when color variety and affordability are priorities. Regardless of the material, choose a yarn that creates a fabric with enough structure to hold the appliqués without becoming excessively stiff.
What hook size should I use for this crochet pattern? The appropriate hook depends on your yarn. Medium-weight cotton commonly works with a hook somewhere around 4 mm to 5 mm, although the yarn label and your personal tension should guide the final choice. If your stitches are extremely tight, increase the hook size slightly. If the cover feels loose or lacks structure, try a smaller hook. Making a gauge swatch before beginning remains the most reliable approach.
How do I adjust the Crochet Cover for 20 Liter Water Jug Pattern to another jug size? Measure the new container and calculate the stitch count using your gauge. The formula is simple: determine how many stitches you have in 10 cm, divide the jug circumference by 10, and multiply that result by your stitch count. Adjust the total to suit the repeat used in your selected pattern. The same measurement-based method can be used for smaller water containers, provided the tap and upper shaping are repositioned accordingly.
Can beginners make this crochet water jug cover? Yes, especially if the project is divided into manageable stages. The main skills include chain, slip stitch, single crochet, half double crochet, double crochet, basic decreases, color changes, and simple appliqué assembly. Beginners may want to practice the flowers and leaves separately before sewing them onto the cover. The tap opening may require extra attention, but stitch markers make the process significantly easier.
How should I wash and care for a crocheted jug cover? The safest method depends on the yarn fiber, so check the yarn manufacturer’s care instructions. Many cotton covers can be gently hand-washed in cool or lukewarm water with mild detergent, reshaped, and dried flat. Remove the cover completely from the jug before washing. Avoid placing a damp crochet cover back onto the container. Regular gentle cleaning helps keep the decorative flowers, lighter background yarn, and tap area looking fresh.
Conclusion
The Crochet Cover for 20 Liter Water Jug Pattern combines practical construction, colorful crochet, and decorative appliqué into one creative home project. By beginning with accurate measurements, checking your gauge, and building the body in rounds, you can create a cover specifically fitted to your own 20-liter container. The main techniques covered in this tutorial include chains, single crochet, double crochet, shell stitches, decreases, scalloped borders, tap-opening construction, crochet flowers, leaves, stems, and appliqué assembly. Because the project is measurement-based, you can also modify the dimensions, colors, flower arrangements, or decorative bands without changing the basic construction method.
EASILY FIND THE FREE PDF FOR THIS PATTERN HERE!
The most enjoyable part of this Crochet Cover for 20 Liter Water Jug Pattern is making it personal. You can create a colorful floral version, use soft pastel shades, choose farmhouse-inspired neutrals, or coordinate the yarn with your kitchen décor. Take your time with the finishing details, secure the appliqués carefully, and check the fit throughout the project. A well-fitted handmade cover can turn a simple household water container into a distinctive crochet decoration. If you make your own version, leave your sincere opinion about the pattern and share your suggestions. Your ideas about colors, flowers, stitches, and possible improvements can inspire even more creative variations of this crochet project.