
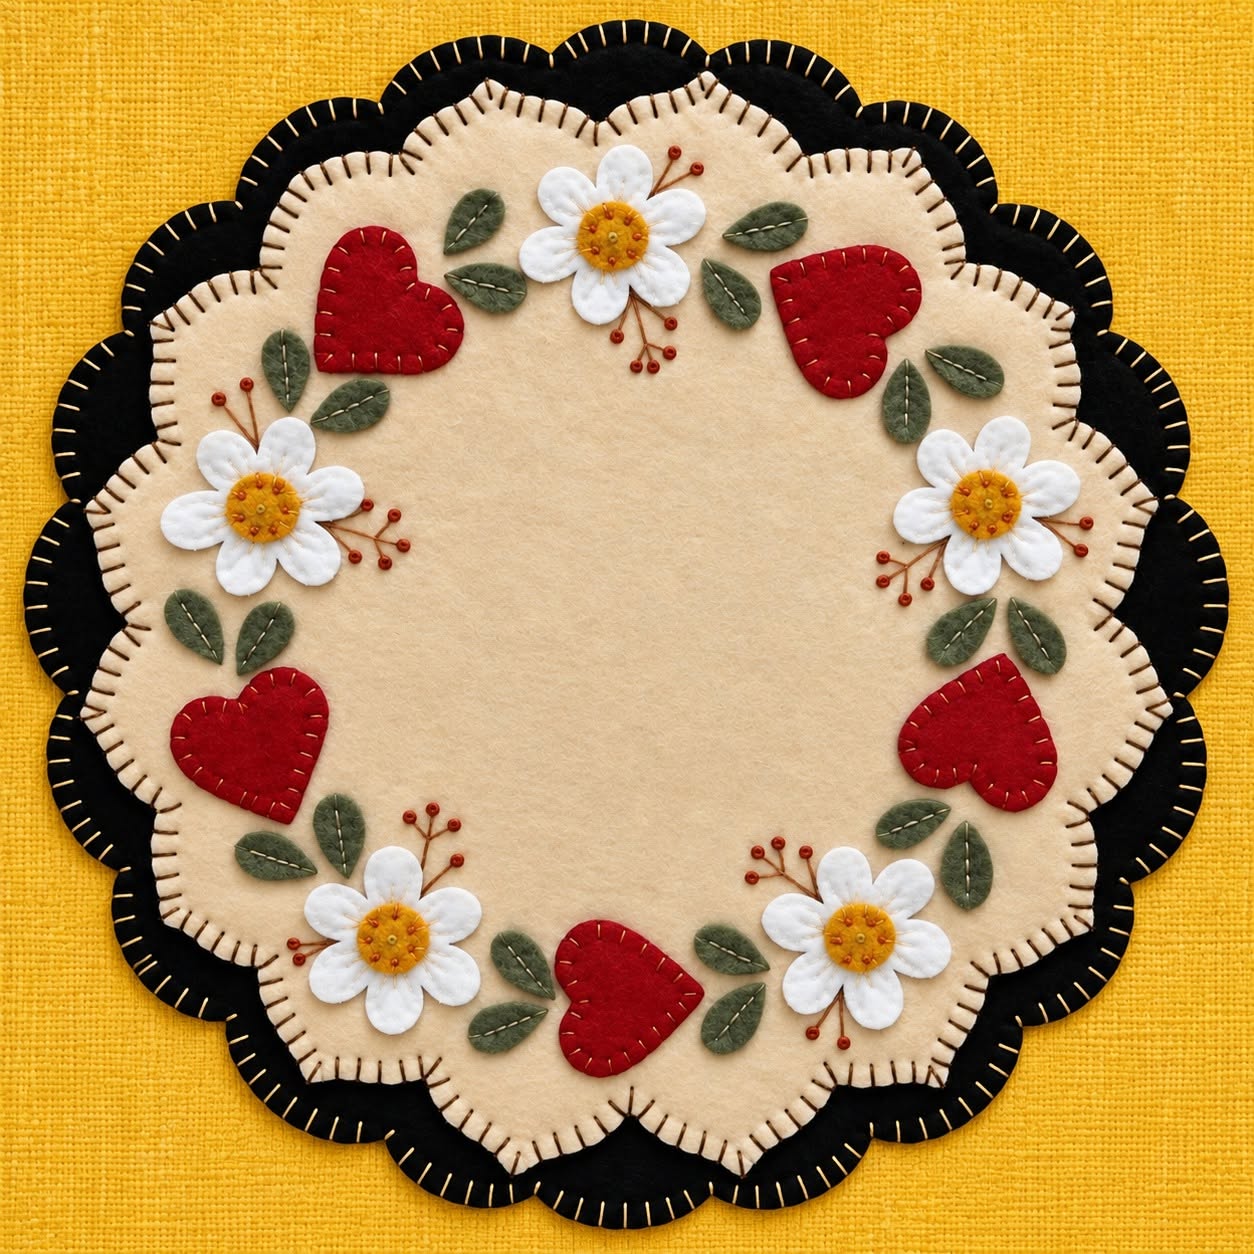
The Round Placemat with Appliqué Pattern is a charming sewing and felt-appliqué project that combines a practical table accessory with the warmth of handmade decoration. Inspired by the photographed piece, this design features a soft neutral center, a contrasting dark outer edge, decorative blanket stitching, white flowers, muted green leaves, and deep red hearts arranged in a balanced circular composition. The finished placemat has a cozy country-inspired appearance that works beautifully with farmhouse, cottage, rustic, or traditional home décor. One of the most attractive aspects of this project is that it does not require complicated patchwork construction, making it approachable for beginners while still offering enough decorative detail to interest experienced crafters. By working carefully through the cutting, positioning, appliqué, and finishing stages, you can reproduce the overall look of the photographed design while adding personal touches of your own. Throughout this tutorial, the term Round Placemat with Appliqué Pattern refers to both the circular base and the decorative arrangement that transforms a simple piece of fabric or felt into an eye-catching handmade table decoration.
Creating a Round Placemat with Appliqué Pattern is also an excellent opportunity to practice several useful sewing techniques in a single project. You will learn how to cut an accurate circular base, create a scalloped inner section, prepare small appliqué pieces, arrange repeated motifs evenly, and use decorative stitches as part of the finished design rather than simply as construction stitches. The photograph shows how effective a limited color palette can be: beige or cream provides a calm background, black or very dark brown creates strong definition around the edge, red hearts add warmth, green leaves bring a natural element, and white flowers brighten the entire composition. Because the shapes are relatively simple, you can create the appliqués from felt, wool felt, cotton fabric backed with fusible web, or even fabric scraps left from other sewing projects. A project like this is especially useful for anyone who enjoys hand sewing, fabric appliqué, felt crafts, or decorative table mat patterns because it can be adapted without changing the main construction method.
Before beginning your Round Placemat with Appliqué Pattern, remember that the exact measurements cannot be confirmed from a photograph alone, so the dimensions in this tutorial are practical suggestions rather than an exact reproduction of the original item. A finished diameter of approximately 36 to 40 cm, or about 14 to 16 inches, works well for most dining tables and provides enough room for the floral and heart arrangement. You can make the placemat slightly larger if you plan to place a dinner plate on it or smaller if you prefer to use it as a decorative centerpiece mat. The most important factor is maintaining good proportions between the center, scalloped edge, border, flowers, leaves, and hearts. Taking a few minutes to create paper templates before cutting the final material will make the construction much easier and help you achieve the neat, balanced appearance seen in the inspiration photo.
Materials and Preparation for the Round Placemat with Appliqué Pattern
For the base of the Round Placemat with Appliqué Pattern, choose a firm fabric that will hold its shape while remaining comfortable to sew. Wool felt is an excellent choice because its edges do not fray, but cotton fabric can also be used when combined with lightweight interfacing or fusible stabilizer. For a placemat measuring about 38 cm or 15 inches across, prepare a square of neutral beige fabric approximately 43 x 43 cm, along with a similarly sized piece of dark fabric for the backing or border.
DISCOVER MORE FREE PATTERNS HERE!
The dark outer border is an important visual element because it frames the lighter center and makes the appliqué colors stand out. Black, charcoal, espresso brown, or very dark navy can all work successfully. If you want to stay close to the appearance of the photographed design, select a black or near-black felt with a slightly textured surface. The contrast between the neutral center and dark border gives the placemat its distinctive handmade character.
For the decorative elements, gather small pieces of red, white, mustard yellow, and muted green material. The red fabric will become the hearts, white will form the flower petals, yellow or golden fabric will create the flower centers, and green will be used for the leaves. Felt is particularly convenient for these small pieces because it is easy to cut and remains stable during hand stitching. Cotton appliqué pieces can also be used if they are backed with fusible web.
You will also need embroidery floss or strong sewing thread. Dark thread can be used for the blanket stitching around the cream center, while matching or contrasting thread can outline the hearts, leaves, and flowers. If you want a softer look, choose thread colors close to the fabric colors. For more visible decorative stitching, select darker shades that emphasize the handmade edges.
Basic tools include sharp fabric scissors, small embroidery scissors, pins or fabric clips, a removable fabric marker, a ruler, a compass or large round household object for drawing the circle, sewing needles, and optional fusible web. A small embroidery hoop may also help when sewing detailed appliqués, although it is not essential for a project of this size.
The phrase Round Placemat with Appliqué Pattern describes an important combination of techniques. “Round placemat” refers to the circular table mat that forms the foundation of the project, while “appliqué pattern” refers to the smaller decorative fabric shapes stitched onto that foundation. Understanding this distinction is useful because the base is constructed first, and the appliqué motifs are then arranged and attached as a separate decorative stage.
Cutting the Circular Base and Creating the Decorative Border
Begin by deciding the finished diameter of your Round Placemat with Appliqué Pattern. A diameter of approximately 38 cm or 15 inches is a practical starting point. Draw the circle on the dark backing fabric using a compass, round tray, large plate, or homemade paper template. Cut the circle carefully, turning the fabric gradually instead of making short, uneven cuts.
Next, prepare the beige center section. Instead of creating a perfectly plain circle, the photographed project uses a softly scalloped edge that adds personality to the design. Make the beige center approximately 3 to 4 cm smaller than the dark base around the entire circumference. You can draw gentle scallops around the edge using a small round object as a guide or sketch them freehand if you prefer a more organic handmade appearance.
Place the beige scalloped section in the center of the dark circular base. Check that the amount of visible dark fabric is reasonably even around the entire outside edge. Pin the layers together or use a small amount of fabric-safe temporary adhesive. Avoid stretching the fabric while positioning it, because distortion at this stage can make the final placemat appear uneven.
Attach the scalloped center using blanket stitch, one of the most recognizable details in this type of appliqué work. Insert the needle from the back, bring the thread around the edge, and form evenly spaced loops that hug the fabric. The stitches do not need to be mechanically perfect; a slightly handmade quality complements the folk-art style of the finished placemat.
Continue the blanket stitch around the entire scalloped section. Try to maintain a consistent stitch depth and spacing. On tight curves, reduce the distance between stitches so the thread follows the shape naturally. This simple adjustment prevents gaps and gives each scallop a clean outline. Take your time around the circle because this stitching becomes an important decorative feature.
After completing the center, inspect the outer edge of the round fabric placemat. Depending on the material, you can leave felt unfinished, sew another row of blanket stitches around the outside, or create a narrow turned edge if you are using woven cotton. The inspiration photo features visible decorative stitching along the dark border, which helps visually connect the outer edge with the appliqué work in the center.
Making and Arranging the Heart, Flower, and Leaf Appliqués
The most recognizable decorations in the Round Placemat with Appliqué Pattern are the repeated hearts, flowers, and leaves. Begin by making paper templates before cutting your fabric. A heart approximately 4 to 5 cm wide works well for a 38 cm placemat. Create one symmetrical template, trace it several times onto red felt, and cut each piece carefully with small sharp scissors.
The white flowers can be created with five or six rounded petals surrounding a small golden-yellow center. You may cut individual petals and arrange them together or create each flower as a single white shape. Individual petals often produce a more dimensional appearance. The flower center can be made from a small circle of mustard felt and decorated with several tiny stitches or French knots to imitate texture.
For the leaves, prepare a small pointed oval template approximately 2.5 to 3.5 cm long. Cut several leaves from sage, olive, or muted green felt. The photograph uses groups of leaves around the hearts and flowers instead of creating one continuous vine. This arrangement keeps the center open and prevents the design from becoming too crowded.
Before sewing anything permanently, arrange every appliqué piece on the beige background. Alternate the red hearts and white flowers around the circular area, then fill the spaces with green leaves. Step away from the project occasionally and look at it from a distance. This makes it easier to notice areas that appear too heavy or too empty.
Once you are satisfied with the arrangement, pin the pieces carefully or attach them temporarily with tiny dots of fabric glue or fusible web. Stitch each heart close to its edge using small running stitches, blanket stitches, or whip stitches. Repeat the same technique on the leaves. For an especially charming result, add a simple central vein to some leaves with embroidery thread.
Finish the flowers by attaching the petals first and then placing the yellow centers on top. Small decorative brown or burgundy stitches can be added near selected flowers to imitate delicate stems, buds, or tiny branches like those visible in the photographed project. These details should remain subtle. Their purpose is to connect the motifs visually without overpowering the larger appliqué flowers and hearts.
Finishing, Personalizing, and Using Your Handmade Placemat
When all the appliqués are attached, place the Round Placemat with Appliqué Pattern on a flat surface and examine the complete composition. Check for loose threads, missed stitches, lifting appliqué edges, or uneven areas around the border. Small corrections made now will help the placemat maintain its shape and appearance after repeated use.
If the project feels too flexible, you can add a lightweight stabilizer or an additional backing layer. A firmer placemat generally sits more smoothly beneath dishes and decorative tableware. When using woven fabrics instead of felt, adding a backing also hides the embroidery knots and gives the reverse side a more professional finish.
Pressing should be done carefully. Felt, synthetic fibers, and fusible products may react badly to high heat, so always use a pressing cloth and a low setting when appropriate. If the project is made from wool felt, gentle steaming from a safe distance may be enough to relax minor wrinkles. Never flatten dimensional appliqué flowers aggressively.
Personalization is one of the biggest advantages of this fabric appliqué pattern. The red hearts can be changed to burgundy, pink, blue, or gold. White flowers can become yellow daisies, pastel blossoms, or even simple stars. Green leaves can be replaced with autumn colors for a seasonal table mat. The construction method stays the same, so you can create many variations from one basic pattern.
You can also make a coordinated set of four, six, or eight placemats. When producing several pieces, create all paper templates first and cut the appliqués in batches. This approach saves time and makes it easier to keep the sizes consistent. Slight differences in motif placement are perfectly acceptable and often enhance the handmade personality of the collection.
The completed Round Placemat with Appliqué Pattern can be used under plates, serving bowls, flower arrangements, candles placed in suitable holders, or decorative centerpieces. It also makes a thoughtful handmade gift for people who appreciate sewing and home décor. More importantly, the project teaches reusable skills such as blanket stitching, hand appliqué, circular cutting, motif placement, and decorative embroidery.
FAQ: Round Placemat with Appliqué Pattern
What is the best fabric for a Round Placemat with Appliqué Pattern?
Wool felt is one of the easiest materials because it is stable, easy to cut, and does not fray. Cotton fabric is also a good option, especially when supported with fusible interfacing. For the appliqués, felt works especially well for hearts, leaves, petals, and small decorative pieces because the shapes remain clean after cutting.
What size should a round placemat be?
A useful handmade placemat can measure approximately 36 to 40 cm, or around 14 to 16 inches, in diameter. The ideal size depends on your dishes and table. If you are creating a decorative mat rather than a traditional place setting, you can make it smaller or larger while keeping the appliqué motifs proportional to the base.
Can a beginner make this appliqué placemat?
Yes. The Round Placemat with Appliqué Pattern is suitable for beginners because most of the pieces use simple shapes. The main techniques are cutting, positioning, basic appliqué stitching, and blanket stitch. Beginners can practice the stitches on fabric scraps before working on the final mat.
Do I need a sewing machine for this project?
No. The design can be completed entirely by hand. In fact, visible hand stitching contributes greatly to the rustic character of the pattern. A sewing machine can be used for the backing or outer edge if preferred, but it is not necessary.
How do I keep the appliqué pieces evenly spaced?
Arrange all major pieces before sewing anything in place. First position the hearts and flowers at approximately equal intervals around the circle. After that, add the leaves to fill the spaces. Photographing the temporary arrangement with your phone can also help you remember the position while sewing.
Can I use fusible web instead of hand stitching every piece?
Fusible web can hold the appliqués in place and make sewing easier, especially when using cotton fabric. However, decorative stitching around the shapes is still recommended because it reinforces the edges and gives the appliqué pattern its handmade appearance.
How can I wash a handmade appliqué placemat?
Care depends on the materials used. Cotton versions may tolerate gentle washing, while wool felt pieces usually require more delicate care. Hand washing in cool water and drying the placemat flat is often the safest approach. Always consider the washing recommendations for the specific fabric, thread, and adhesive used in your project.
Can I change the flowers and hearts to other shapes?
Absolutely. Once you understand the construction of the Round Placemat with Appliqué Pattern, you can replace the hearts with pumpkins, stars, birds, butterflies, leaves, or seasonal motifs. The circular arrangement makes the pattern especially adaptable.
How can I make the scalloped edge look even?
Create a paper template before cutting the fabric. Mark equally spaced points around the circle and use the same small curved template to draw each scallop. Consistency is more important than mathematical perfection, particularly in a handmade folk-art design.
What stitches work best for this pattern?
Blanket stitch is ideal for outlining the scalloped center and can also be used around the appliqués. Running stitch, whip stitch, backstitch, and small embroidery stitches are useful for adding leaves, stems, flower centers, and decorative details.
Conclusion
The Round Placemat with Appliqué Pattern is a beautiful example of how simple sewing techniques can create a detailed and welcoming piece of handmade home décor. Starting with a round dark base and a neutral scalloped center, you can gradually build the design by adding red hearts, white flowers, green leaves, decorative branches, and carefully worked blanket stitching. The project does not depend on complicated equipment or advanced sewing skills, which makes it an enjoyable choice for both beginners and experienced crafters.
Throughout this tutorial, you learned how to choose appropriate fabrics, determine the placemat size, cut the circular foundation, create the scalloped center, prepare reusable appliqué templates, distribute decorative elements evenly, attach the pieces, finish the edges, and personalize the color palette. These techniques can also be used in many other appliqué sewing projects, including table runners, wall hangings, cushions, ornaments, and decorative fabric panels.
EASILY FIND THE FREE PDF FOR THIS PATTERN HERE!
Most importantly, your finished Round Placemat with Appliqué Pattern does not need to be identical to the photographed inspiration. Handmade sewing becomes especially rewarding when the maker adds personal choices through colors, fabrics, stitches, and small decorative details. Use the original arrangement as a guide, but allow your own creativity to shape the final piece. If you make this Round Placemat with Appliqué Pattern, leave your sincere opinion about the project and share your suggestions. What colors, flowers, or appliqué shapes would you use in your own version? Your ideas can inspire new variations and help other sewing lovers discover creative ways to personalize this charming handmade placemat.