
The Colorful Floral Patchwork Panel Pattern is a joyful quilting project that transforms fabric scraps into a striking decorative wall panel filled with oversized flowers, geometric petals, bold centers, and colorful border accents. Inspired by the panel shown in the photo, this project combines traditional patchwork techniques, simple appliqué-style construction, and creative fabric placement on a dark background. The black base makes every red, yellow, green, pink, orange, turquoise, and purple fabric stand out beautifully, while the different flower sizes give the composition movement and personality. One of the biggest advantages of this design is that the flowers do not have to be identical or perfectly symmetrical. Slight variations actually contribute to the handmade character of the finished piece. Quilters can use coordinated fabrics, leftover scraps, fat quarters, or small pieces collected from previous sewing projects. For beginners, the project is also an excellent opportunity to practice cutting, arranging, pressing, appliqué, and decorative stitching without having to make an entire bed-size quilt.
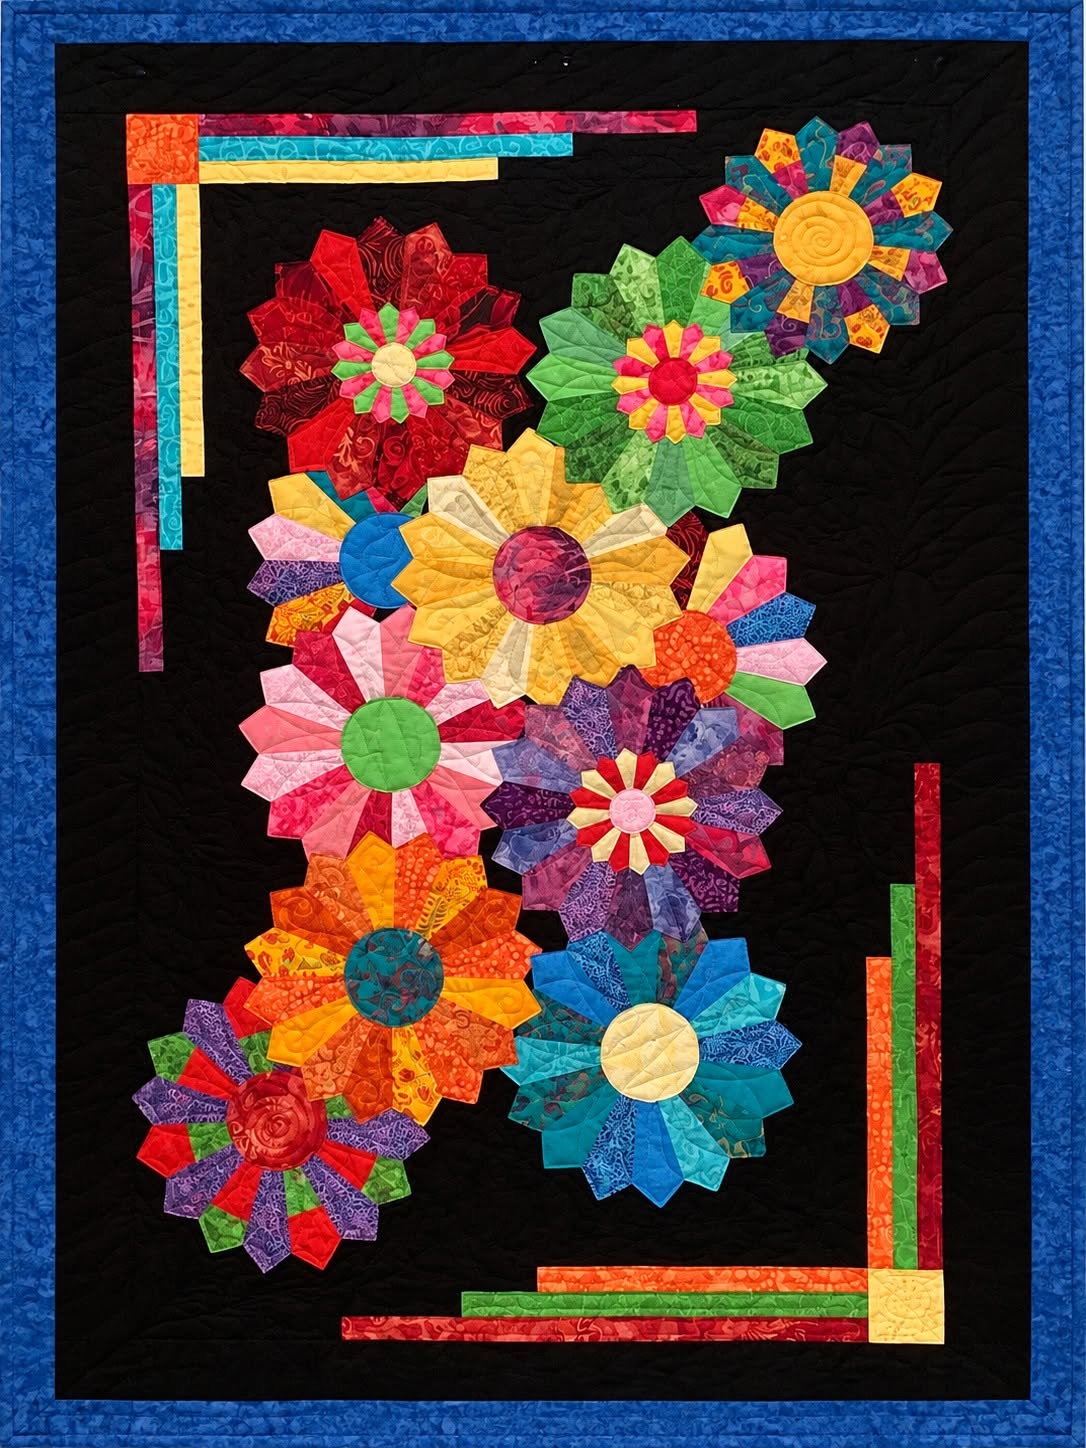
Creating a Colorful Floral Patchwork Panel Pattern is mainly about building the design in layers, beginning with a strong background and gradually adding flowers from the largest shapes to the smallest details. The panel in the reference image uses a vertical rectangular layout with a dark background and a diagonal arrangement of colorful flowers. Some flowers overlap visually, creating the impression of a garden growing across the quilt. Several blossoms use narrow wedge-shaped petals, while others use wider folded or pointed pieces that resemble Dresden Plate quilt blocks. Circular fabric centers provide contrast and help hide the inner ends of the petals. Small rectangular fabric strips placed near opposite corners create a modern frame without surrounding the entire panel. This combination of floral curves, geometric angles, and negative space makes the project interesting without making the construction unnecessarily complicated. The result can work as quilted wall art, a decorative fabric panel, or even the starting point for a larger quilt.
Another appealing feature of the Colorful Floral Patchwork Panel Pattern is its flexibility. You do not need to reproduce every fabric or flower exactly as shown in the inspiration image. Instead, the photograph can be used as a guide for proportion, placement, color balance, and overall construction. A successful version depends more on contrast and thoughtful arrangement than on matching individual prints. Bright fabrics look especially effective against black, charcoal, navy, or another deep neutral background because the flowers become the visual focus immediately. Quilters who prefer softer décor can use beige or cream backgrounds with pastel petals, while those who enjoy modern quilting might select solids and minimalist prints. The following tutorial explains the entire process step by step, including fabric preparation, flower construction, arrangement, stitching, quilting, and finishing techniques so that even someone making a decorative patchwork panel for the first time can approach the project confidently.
Materials, Measurements, and Fabric Preparation for the Colorful Floral Patchwork Panel Pattern
Begin by selecting fabric for the foundation of your Colorful Floral Patchwork Panel Pattern. For a wall panel similar in proportion to the photograph, a finished size of approximately 60 cm wide by 85 cm high works well. Cut the background fabric slightly larger, around 65 cm x 90 cm, so there is room for quilting and final trimming. Black cotton is particularly effective because it creates dramatic contrast with the multicolored flowers. Prewash fabrics if you normally prewash quilting cotton, then press everything carefully before cutting.
DISCOVER MORE FREE PATTERNS HERE!
For the flowers, collect a wide variety of colorful quilting cotton scraps. Reds, oranges, yellows, greens, turquoise, blues, pinks, purples, and burgundy tones will reproduce the energetic character seen in the original panel. You can mix solids, batiks, tone-on-tone prints, florals, and abstract fabrics. Small variations within each color family make individual flowers appear richer and more dimensional. You do not need large fabric pieces because most petals can be cut from scraps measuring only a few centimeters wide.
The main flowers can be constructed using wedge-shaped pieces similar to those used in a Dresden Plate quilt block. Create a paper or template plastic wedge approximately 12 to 16 cm long, depending on the desired flower size. The outer edge should be wider than the inner edge so that multiple wedges form a circle when placed side by side. For smaller flowers, reduce the template proportionally. Making two or three template sizes allows you to produce the varied flower dimensions visible in the inspiration panel.
You will also need circular pieces for the flower centers. These can range from approximately 5 cm to 10 cm in diameter, depending on the size of each blossom. The circles can be prepared using turned-edge appliqué, fusible web, or raw-edge appliqué. Choosing contrasting colors for the centers helps define each flower. For example, a yellow flower may receive a burgundy center, while a turquoise flower can look beautiful with a pale yellow circle.
Additional materials include lightweight fusible web if you prefer fusible appliqué, cotton batting, backing fabric, coordinating sewing thread, quilting thread, pins or fabric clips, fabric scissors, a rotary cutter, acrylic ruler, cutting mat, iron, and sewing machine. A quarter-inch quilting foot is helpful but not essential. Decorative or contrasting thread can also be used around the petals if you want the stitching to become part of the design rather than disappear into the fabric.
Before sewing, place the background fabric on a large table or design wall and roughly mark the usable area. Leave approximately 5 to 7 cm of open background around the edges because some space will be needed for quilting and finishing. Avoid permanently marking flower positions at this stage. Instead, prepare several flowers first and experiment with their placement later. This approach gives you much more freedom to create a balanced composition.
How to Make the Patchwork Flowers Step by Step
Start with one large flower so you can become familiar with the construction method. Cut approximately 12 to 20 fabric wedges, depending on the width and angle of your template. Use fabrics from the same general color family while allowing differences in print and value. For a red flower, for example, combine bright scarlet, dark burgundy, brick red, and patterned red fabrics. This controlled variety creates the textured appearance that makes the Colorful Floral Patchwork Panel Pattern so attractive.
Sew the wedge pieces together along their long sides using a consistent seam allowance of approximately 0.6 cm. Press the seams carefully as you work. You can press all seams in one direction or alternate them if the intersections become bulky. Once the wedges have been joined, they should form either a complete circle or a slightly irregular flower shape. Do not worry if the flower is not mathematically perfect. A small amount of irregularity can make the blossom appear more natural and handcrafted.
For pointed petals, fold the wide end of each wedge right sides together before joining the flower. Sew across the outer edge, trim the tiny corner, turn the point right side out, and press it flat. This creates a clean pointed tip without requiring separate binding. Another option is raw-edge appliqué, where the outer edges remain visible and are secured later with decorative stitching. Both methods work well, so choose the technique that best matches your sewing experience.
After the petal circle has been assembled, cover the center opening with a fabric circle. The center should overlap the inner petal edges by at least 1 cm. Position the circle carefully, then secure it with fusible web or pins. Stitch around the edge using a straight stitch, blanket stitch, zigzag stitch, or decorative machine stitch. A contrasting thread can emphasize the handmade appearance, while matching thread produces a quieter finish.
Repeat the process to make several different flowers. A panel similar to the photograph may contain approximately eight to ten blossoms, including large statement flowers and smaller accent flowers. Try a large yellow flower, a green flower, a red flower, an orange flower, a turquoise flower, and several multicolored smaller blossoms. Changing both the number and width of the petals will keep the design from looking repetitive.
Some smaller flowers can be created with simpler petals rather than full Dresden-style wedges. Cut narrow rectangles with rounded or pointed ends and arrange them around a circular center. These flowers are excellent for filling spaces between larger blossoms. They also introduce different visual rhythms into the floral patchwork panel, making the finished design feel more like a lively fabric garden than a collection of identical blocks.
Arranging, Appliquéing, and Quilting the Floral Panel
Once all your flowers are prepared, place the black background fabric on a large flat surface. Begin arranging the largest flowers first. In the reference design, the flowers travel roughly diagonally from the upper area toward the lower portion of the panel. This type of arrangement helps the viewer’s eye move naturally through the artwork. Avoid placing every flower directly in the center. Slightly offset positions create a more dynamic and contemporary composition.
Add the medium and small flowers around the main blossoms. Some shapes can overlap slightly, although the actual fabric layers do not need to become excessively thick. Before attaching anything permanently, step several feet away and examine the composition. Check whether one side feels heavier than another and whether any color appears too concentrated in a single area. Taking a quick photograph with your phone can also help reveal balance issues that are harder to notice while standing close to the panel.
When you are satisfied with the arrangement, secure each flower using your preferred appliqué technique. Fusible web is one of the easiest options because it keeps the flowers firmly positioned while stitching. Follow the manufacturer’s instructions for the fusible product you are using. If you prefer not to use adhesive, pin or baste each flower carefully. Work from the flowers positioned underneath toward those visually overlapping them.
Stitch around the outer edges of each flower. A narrow zigzag, blanket stitch, or straight stitch approximately 2 to 3 mm from the edge works well. You can use black thread for subtle outlines, matching thread for individual fabrics, or a decorative color such as gold for a stronger artistic effect. Stitch around the flower centers as well. These lines reinforce the appliqué pieces while giving the flowers additional definition.
The corner strip details are another important element of the Colorful Floral Patchwork Panel Pattern. Cut narrow fabric strips approximately 2 to 4 cm wide in colors already used within the flowers. Arrange them in staggered horizontal and vertical groups near two opposite corners. Reds, turquoise, yellow, green, and orange are especially effective. These strips visually frame the central flowers without enclosing the entire design inside a traditional border.
After all appliqué pieces have been attached, create a quilt sandwich with the backing fabric, batting, and completed quilt top. Baste the three layers securely. Quilt the open background areas with gentle curves, loops, flowing lines, or simple straight quilting. You can also add quilting inside the petals and centers to emphasize their shapes. Keep the quilting balanced so that the background remains flat while the flowers retain a slightly dimensional appearance.
Finishing, Customizing, and Displaying Your Patchwork Panel
When the quilting is complete, trim the panel carefully to its final dimensions. Use a long acrylic ruler and rotary cutter to create straight sides and square corners. If you began with approximately 65 cm x 90 cm, you may choose a finished measurement near 60 cm x 85 cm, although the exact size can be adjusted to suit your wall or intended use. Always measure the actual quilt before cutting binding strips.
Prepare binding using coordinating fabric. Black binding creates a clean continuation of the background, while a colorful binding can introduce one final decorative detail. Cut binding strips approximately 6 to 7 cm wide, join them end to end, press the long strip in half, and sew it around the panel using your preferred quilt-binding method. Mitering the corners gives the finished project a professional appearance.
For a wall hanging, consider adding a hanging sleeve to the back before completing the final hand stitching on the binding. A fabric sleeve allows a wooden dowel or curtain rod to support the quilt evenly. The sleeve should be slightly shorter than the width of the finished panel so that the hanging hardware remains discreet. Small fabric corner pockets can also work well for lightweight panels.
The Colorful Floral Patchwork Panel Pattern can easily be personalized. Instead of reproducing the original palette exactly, choose colors that coordinate with a specific room. A farmhouse version could use burgundy, mustard, cream, olive, and brown. A coastal version might feature aqua, turquoise, coral, sand, and navy. A children’s version could combine bright primary colors, while a sophisticated modern version could focus on jewel tones against charcoal fabric.
You can also change the overall size of the project. Make a smaller patchwork wall hanging using only three or four flowers, or expand the design into a lap quilt with many additional blossoms. Individual flowers could also become cushion fronts, tote bag decorations, table runners, or placemats. Once you understand the petal construction method, the possibilities extend far beyond a single decorative panel.
Finally, remember that successful patchwork is not about making every petal perfectly identical. Fabric selection, color relationships, texture, stitching, and personal creativity are equally important. Allowing small differences between flowers gives the Colorful Floral Patchwork Panel Pattern its distinctive handmade charm. Take time to experiment with placement before sewing permanently, and enjoy watching an ordinary collection of fabric scraps develop into an expressive piece of textile art.
FAQ – Frequently Asked Questions About the Colorful Floral Patchwork Panel Pattern
What is a Colorful Floral Patchwork Panel Pattern?
A Colorful Floral Patchwork Panel Pattern is a decorative textile project made by arranging fabric pieces into flower shapes and attaching them to a larger background. It combines elements of patchwork, quilting, and appliqué. The finished piece can be displayed as wall art or adapted for other sewing projects.
Is this floral patchwork project suitable for beginners?
Yes. A confident beginner can make this project successfully. The most important skills are basic machine sewing, accurate cutting, pressing, and simple appliqué. Beginners may find fusible appliqué easier than traditional turned-edge appliqué because the shapes remain securely positioned while stitching.
What fabrics are best for this patchwork panel?
Quality 100% cotton quilting fabric is usually the easiest material to work with because it cuts cleanly, presses well, and remains stable during sewing. Batiks, solids, small prints, and tone-on-tone cottons can all be combined successfully. Scrap fabrics are particularly useful because the petals require relatively small pieces.
How many flowers should I make?
There is no mandatory number. For a panel approximately 60 cm x 85 cm, around eight to ten flowers can create a full composition similar to the inspiration image. You can use fewer large flowers for a minimalist design or many smaller blossoms for a denser garden effect.
Do all the flowers need to be the same size?
No. In fact, combining different sizes usually produces a more attractive composition. Large flowers establish focal points, medium flowers connect different areas, and small flowers fill visual gaps. Variation is one of the most effective ways to create depth in a floral quilt panel.
Can I make the flowers without a Dresden Plate ruler?
Yes. You can create a simple wedge template from paper, cardboard, or template plastic. Once you determine the desired petal angle and length, trace the same template onto each fabric. Consistent cutting is more important than owning a specialized ruler.
Should I quilt the flowers as well as the background?
You can quilt both areas. Stitching inside the petals can emphasize their shape and provide extra stability. However, leaving some sections more lightly quilted can make the flowers appear slightly raised compared with the background. Experiment with quilting density to achieve the look you prefer.
What color background works best?
A dark background such as black, charcoal, or navy creates strong contrast with colorful flowers and closely matches the style of the photographed project. However, white, cream, beige, or pastel backgrounds can also work. The key is ensuring enough contrast between the flowers and the foundation fabric.
Can leftover fabric scraps be used for this project?
Absolutely. This project is particularly suitable for a scrap quilt because every flower can contain several different fabrics. Even small remnants can become petals, flower centers, or decorative corner strips. Using scraps also helps give the panel a rich, varied appearance.
How can I keep the flower arrangement balanced?
Begin with the largest flowers and distribute strong colors across the panel instead of grouping them in one location. Then fill spaces with medium and small flowers. Leaving areas of visible background is also important because the negative space prevents the composition from appearing overcrowded.
Can the pattern be enlarged into a full quilt?
Yes. The same flower-making technique can be repeated across a larger quilt top. You could create a floral border, scatter flowers over a large background, or organize them into separate blocks. Just remember to distribute colors and flower sizes throughout the quilt for visual balance.
How should the finished patchwork panel be cared for?
If it is displayed on a wall, occasional gentle dust removal may be enough. If washing becomes necessary, use a mild detergent and gentle cycle or hand wash depending on the fabrics and construction method. Always make sure appliqué pieces and embellishments are securely stitched before washing.
Conclusion
The Colorful Floral Patchwork Panel Pattern is a creative way to transform colorful fabric scraps into a beautiful piece of handmade textile art. Throughout this tutorial, you learned how to prepare the background, select coordinating fabrics, create wedge-shaped patchwork petals, assemble flowers of different sizes, add contrasting centers, arrange the blossoms across the panel, appliqué the pieces securely, create colorful corner accents, quilt the layers, and finish the project with binding.
One of the most valuable lessons in this project is that creativity matters just as much as precision. The mixture of bold colors, different prints, varied petal shapes, and overlapping flowers gives the finished panel its unique character. By using patchwork quilting, fabric appliqué, Dresden-style flowers, and thoughtful color placement, you can create a version that reflects your own sewing style while still preserving the beautiful visual idea behind the original inspiration.
EASILY FIND THE FREE PDF FOR THIS PATTERN HERE!
Whether you display it as quilted wall art, give it as a handmade gift, or adapt the flowers for cushions, bags, table runners, or a larger quilt, this pattern offers many opportunities for experimentation. Save your favorite scraps, try unexpected color combinations, and allow each flower to become a small composition of its own. If you make your own Colorful Floral Patchwork Panel Pattern, leave your sincere opinion about the project and share your suggestions. Which flower colors would you choose, and what changes would you make to create your own version? Your ideas can inspire new combinations and even more creative patchwork projects.