
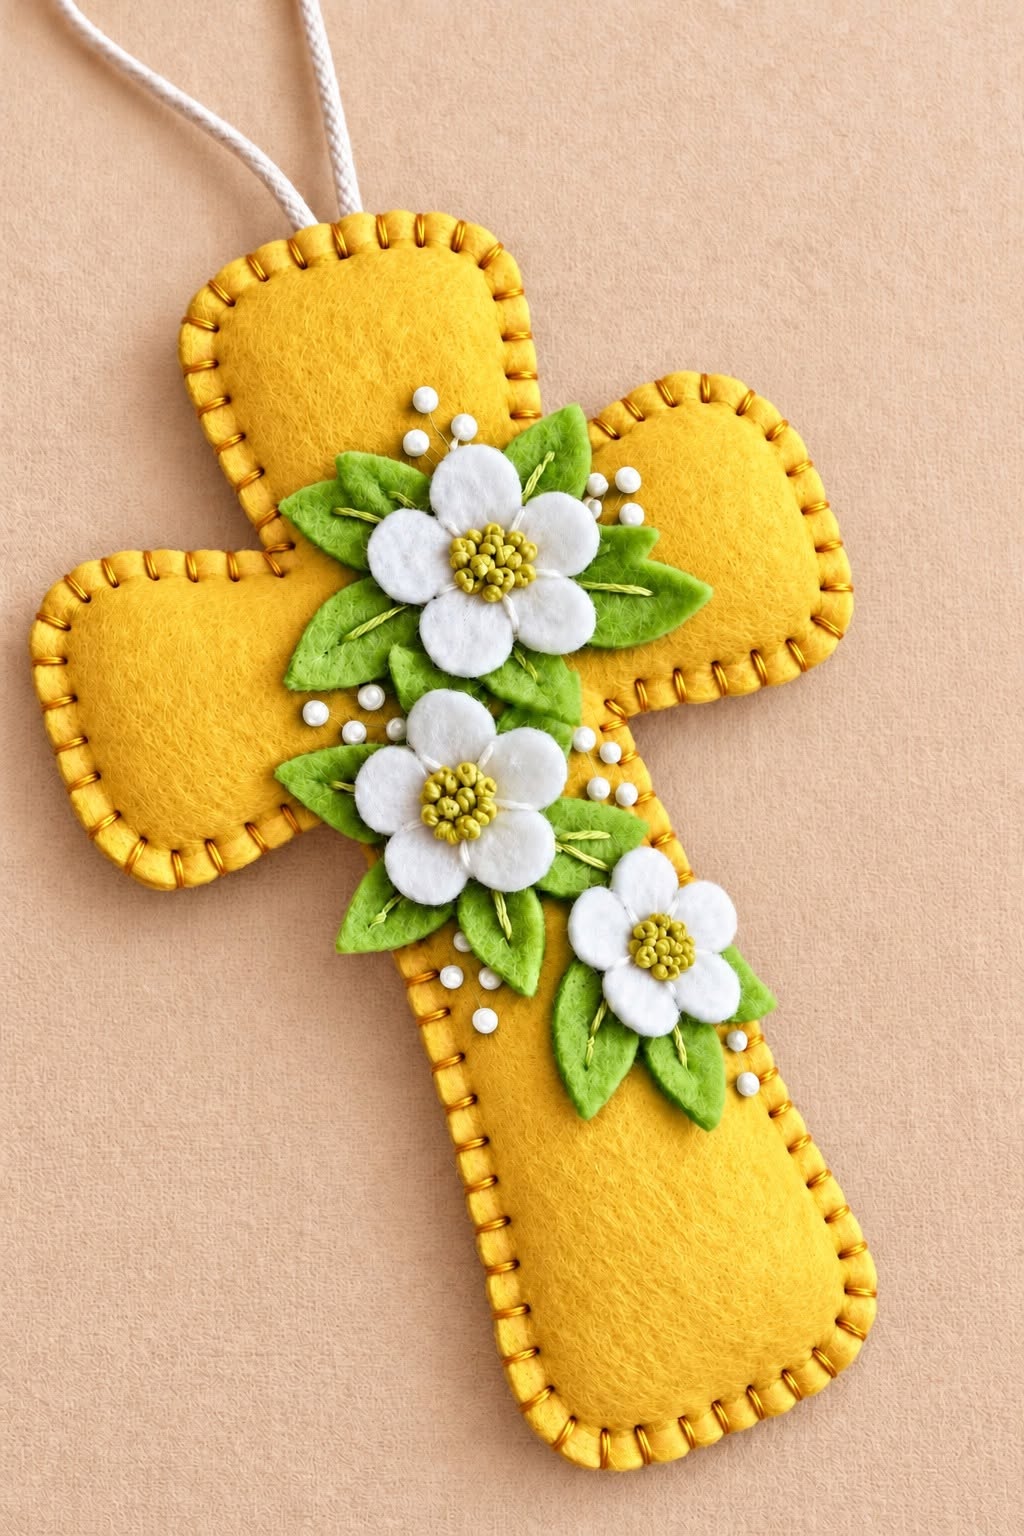
The Cross with Felt Flowers Pattern is a charming handmade project that combines the softness of felt, decorative blanket stitching, floral appliqué, and a meaningful cross-shaped design. Inspired by the project shown in the photo, this craft can be created as a wall ornament, door decoration, nursery accent, Easter decoration, memorial keepsake, or handmade gift. One of the greatest advantages of working with felt is that it does not fray easily, which makes the material friendly for beginners who are still developing their sewing skills. The turquoise cross provides a bright base, while the white felt flowers and green leaves create a beautiful natural contrast. Decorative stitches around the edges add a handcrafted finish that makes the entire piece look polished. With patience and a few inexpensive materials, you can reproduce your own Cross with Felt Flowers while adjusting the colors and details to match your personal style.
The design may look elaborate at first, but it is actually made from several simple shapes assembled in layers. The cross itself can be cut from two matching pieces of felt, stitched together, and lightly stuffed to provide volume. The flowers are created from rounded white petals, while the leaves can be cut from green felt and decorated with simple embroidery stitches. Small beads or felt dots can be added around the flowers to imitate the delicate decorative accents visible in the inspiration image. A hanging cord attached to the upper section allows the finished craft to be displayed easily. Because every component is created separately before final assembly, you can work slowly and correct the position of the elements before sewing or gluing them permanently.
For this tutorial, the term Cross with Felt Flowers refers to a decorative felt cross embellished with layered handmade flowers, leaves, embroidery, and optional bead details. The goal is not simply to copy the appearance of the photographed piece, but to understand how its basic construction works so that you can make a personalized version at home. You can enlarge or reduce the measurements, substitute embroidery thread colors, change the flower centers, or use different shades of felt. Beginners can simplify the decoration, while experienced crafters can introduce extra embroidery, additional flower layers, or more elaborate stitching. The instructions below focus on an accessible construction method using centimeters so the pieces can be measured accurately. By following each stage carefully, the finished Cross with Felt Flowers Pattern should have a balanced shape, soft structure, and attractive handcrafted appearance.
Materials and Preparing the Cross with Felt Flowers Pattern
Begin by collecting the materials needed for your Cross with Felt Flowers Pattern. You will need turquoise or aqua felt for the cross, white felt for the flower petals, light or medium green felt for the leaves, embroidery floss, a sewing needle, scissors, paper, a pencil, pins, and polyester fiberfill. You can also use small white beads, pearl-style craft beads, or tiny felt circles for decorative accents. A fabric-safe craft glue can be useful for temporarily positioning small pieces before sewing.
DISCOVER MORE FREE PATTERNS HERE!
For a medium-sized decoration similar in proportion to the photo, prepare a cross template approximately 29 to 32 cm high and around 20 to 23 cm wide across the arms. The lower section should be longer than the top section, giving the cross its traditional silhouette. Keep the corners softly rounded rather than completely square. Rounded edges are easier to stitch neatly and create the soft appearance associated with felt ornaments.
Fold a sheet of paper in half before drawing the template if you want both sides of the cross to remain symmetrical. Draw half of the shape along the fold, cut it out, and open the paper. Place the finished template on your turquoise felt and trace around it twice. These two pieces will form the front and back layers of the felt cross decoration.
Cut the felt slowly with sharp fabric scissors so the edges remain clean. Felt can stretch slightly when handled aggressively, so rotate the material rather than pulling it while cutting. After cutting both cross pieces, place one over the other to check that their outlines match. Trim any small uneven areas before beginning the stitching process.
The project in the photo features a contrasting edge around the turquoise felt. You can recreate this appearance by placing a narrow strip of lavender, lilac, or pale blue felt between the front and back layers, or simply use a decorative blanket stitch in a contrasting color around the edge. Purple or lilac thread works especially well with turquoise. White, navy blue, pink, or gold thread could also be used for a different style.
Before sewing the layers together, prepare a hanging loop using approximately 25 to 35 cm of cord, ribbon, or braided thread. Fold it in half and insert the ends between the two felt layers at the top of the cross. Secure the cord with several strong stitches. This reinforcement is important because the hanging loop will support the entire weight of your completed Cross with Felt Flowers.
Sewing, Stuffing, and Creating the Felt Flower Details
Pin the two cross pieces together with the edges aligned. Starting near one lower corner, sew around the outside using a blanket stitch. Try to keep the stitches evenly spaced, approximately 0.5 to 0.8 cm apart. Consistent spacing makes the handmade edging look intentional and gives the Cross with Felt Flowers Pattern a professional finish.
Do not close the entire cross immediately. Leave an opening of approximately 5 to 7 cm along the lower section. Insert small amounts of polyester fiberfill through this opening. Use the blunt end of a pencil, a stuffing tool, or your fingers to gently push the filling into the arms and upper portion of the cross. Avoid overstuffing because the project should remain softly padded rather than becoming extremely firm.
Once the cross has an even amount of volume, finish sewing the opening with the same blanket stitch. Check the shape from the front and gently distribute the filling if necessary. At this stage, the basic felt cross is finished and ready to receive its flowers and leaves. The soft padding also gives the floral decorations a slightly raised appearance after they are attached.
To create each white flower, draw a small petal template measuring roughly 2.5 to 3.5 cm long. Cut five petals for each flower. The inspiration piece contains several flowers positioned diagonally through the middle section of the cross, and using three flowers usually provides an attractive arrangement. Therefore, you may need approximately fifteen white felt petals.
Arrange five petals in a circle so their inner ends overlap slightly. Secure them with a few small stitches through the center. For additional dimension, place a tiny amount of stuffing beneath the center or gently pinch each petal before stitching it down. The center can be made using small yellow-green felt circles, French knots, embroidered knots, or tiny beads clustered closely together.
Repeat the process until you have three finished flowers. They do not need to be completely identical because slight variations contribute to the handmade character of the Cross with Felt Flowers. For a natural visual hierarchy, you can make the upper flower slightly larger, the middle flower medium-sized, and the lower flower a little smaller.
Making Felt Leaves and Arranging the Floral Composition
The green leaves provide essential contrast against the aqua base and help connect the flowers visually. Draw a simple pointed oval approximately 3 to 5 cm long and use it as your leaf template. Cut approximately twelve to eighteen leaves, depending on how full you want your floral arrangement to appear. Using two slightly different shades of green can make the design look more dimensional.
Add embroidery to each leaf before attaching it to the cross. A straight stitch running down the center can represent the main vein, while two or three short diagonal stitches can imitate smaller veins. Light green, cream, yellow, or white embroidery thread works beautifully for this detail. These small stitches help simple felt shapes appear more refined.
Position the largest flower near the intersection of the cross, slightly above the center. Arrange several leaves behind it so that their pointed ends radiate outward. Place the second flower beneath the first and angle the leaves in the opposite direction. Finally, position the smallest flower lower on the vertical section. This arrangement creates the flowing diagonal composition seen in the Cross with Felt Flowers Pattern inspiration.
Do not permanently attach anything until you are satisfied with the layout. Move the flowers and leaves around while viewing the project from a short distance. The floral decoration should feel balanced without completely hiding the cross shape. Leaving visible turquoise areas around the arrangement helps maintain a clean visual composition and prevents the ornament from appearing overcrowded.
When you are pleased with the positioning, attach the leaves first. Small hand stitches near the center of each leaf usually provide enough support while allowing the outer edges to remain slightly raised. Then place the flowers over the bases of the leaves and sew securely through their centers. You may also place a few hidden stitches beneath individual petals to keep them positioned correctly.
For the tiny white details shown around the flowers, use small pearl beads, seed beads, embroidered French knots, or miniature circles cut from white felt. Scatter them rather than arranging them in perfectly straight lines. These accents should support the floral design rather than dominate it. Secure beads carefully, especially if the project will be displayed in an area accessible to small children or pets.
Finishing and Personalizing Your Cross with Felt Flowers
Inspect the entire Cross with Felt Flowers after completing the floral arrangement. Look for loose threads, uneven stitches, or pieces that need additional reinforcement. Felt projects are forgiving, so small imperfections are usually easy to correct. Trim loose thread ends carefully without cutting the decorative stitches around the outer edge.
If the hanging loop appears loose, reinforce it from the back using several additional stitches. The cross should hang vertically without tilting heavily to one side. If the floral arrangement has added more weight to one section, you may need to adjust the position of the hanging cord slightly. Test the decoration before displaying it permanently.
You can personalize the Cross with Felt Flowers Pattern by changing the main color of the cross. Soft pink creates a gentle romantic style, cream produces a neutral farmhouse appearance, navy blue offers a stronger contrast, while green or burgundy can create a seasonal look. The flowers can also be made in pastel yellow, lilac, pink, peach, or blue instead of traditional white.
Another way to customize the project is through the stitching. Blanket stitch, running stitch, backstitch, French knots, and simple straight embroidery stitches all work well with felt. Beginners may want to use one type of stitch throughout the project, while experienced sewists can combine several techniques. Choosing a contrasting embroidery floss makes each handmade stitch more visible.
The finished craft can be used in several ways. It can become a felt wall hanging, a handmade Easter decoration, a decorative door ornament, a thoughtful handcrafted gift, or part of a larger seasonal display. Smaller versions can even be transformed into ornaments, while larger versions may become decorative wall pieces. Always choose the size and finishing details according to where the project will be displayed.
Most importantly, allow your handmade version to have its own character. Handmade felt work does not need perfectly identical petals or mechanically even stitches to look beautiful. The appeal of a Cross with Felt Flowers comes from texture, careful color choices, and visible craftsmanship. Taking your time during cutting, positioning, and stitching usually produces a much more satisfying result than rushing through the project.
FAQ About the Cross with Felt Flowers Pattern
What is a Cross with Felt Flowers?
A Cross with Felt Flowers is a decorative craft made from felt shaped into a cross and embellished with handmade felt flowers, leaves, embroidery, beads, or similar details. The cross may be flat or lightly stuffed depending on the desired finish.
Is the Cross with Felt Flowers Pattern suitable for beginners?
Yes. Felt is one of the easiest fabrics for beginners because its raw edges generally do not require hemming. Basic cutting, blanket stitching, and simple embroidery techniques are enough to complete this project successfully.
What type of felt should I use?
Craft felt works for decorative projects, but a thicker, higher-quality felt often keeps its shape better. Wool-blend felt provides an especially attractive texture, although standard polyester felt can also produce excellent results.
How large should the felt cross be?
There is no mandatory size. A decorative cross around 29 to 32 cm tall is convenient for a wall or door ornament. You can enlarge the pattern for wall décor or reduce it considerably for ornaments and small gifts.
Can I make the project without stuffing?
Yes. If you prefer a flatter appearance, simply sew the two felt layers together without adding fiberfill. You may also use a single thick felt layer, although a double layer usually looks more finished and provides additional stability.
What stitch works best around the cross?
The blanket stitch is one of the most popular choices because it protects and decorates the outer edge at the same time. Running stitch and whip stitch can also be used if you prefer a simpler finish.
How do I make the flowers look three-dimensional?
Layering the petals, pinching their bases slightly, adding minimal stuffing, and allowing the petal edges to remain loose can create more dimension. A raised cluster of knots or beads in the center also helps produce a realistic flower effect.
Can I use fabric glue instead of sewing?
Fabric-safe glue may be used for some decorative pieces, especially when positioning tiny elements. However, sewing the main parts generally provides a stronger and longer-lasting construction. A combination of glue and stitching can also work well.
What colors work well for a Cross with Felt Flowers?
Turquoise, white, and green create the fresh combination seen in the inspiration image. Other attractive combinations include cream with blush pink, navy with white, burgundy with beige, pastel yellow with white, or lavender with green.
How can I make the pattern more decorative?
You can add embroidery, small beads, pearl-style accents, additional leaves, tiny felt buds, decorative stitching, ribbon, or layered flowers. Keep the embellishments balanced so the basic cross silhouette remains clearly visible.
Can the Cross with Felt Flowers be given as a handmade gift?
Yes. A handmade felt cross can make a thoughtful decorative gift for many occasions. Colors, flowers, initials, dates, or small embroidered details can be personalized according to the recipient and purpose.
How should I clean a finished felt decoration?
Gentle surface cleaning is usually preferable. Remove dust using a soft cloth or soft brush and avoid aggressive washing that could distort the stuffing, embroidery, beads, or felt flowers. Always consider the specific care requirements of the materials you selected.
Conclusion
The Cross with Felt Flowers Pattern brings together several enjoyable handmade techniques in one approachable project. You learned how to create the cross template, cut matching felt layers, add a hanging loop, sew the outer edge with a blanket stitch, lightly stuff the shape, create white felt flowers, embroider green leaves, arrange the floral composition, and finish the decoration with small accent details. Each stage can be customized, making this project suitable for both beginners and more experienced crafters.
EASILY FIND THE FREE PDF FOR THIS PATTERN HERE!
The most important lesson is that a beautiful Cross with Felt Flowers depends on careful preparation rather than complicated techniques. Clean cutting, balanced flower placement, even stitching, and harmonious colors can transform a few simple pieces of felt into a detailed handmade decoration. You can keep the turquoise, white, green, and lilac combination inspired by the photo or develop an entirely different palette for your home, season, or gift idea. If you make your own version of this Cross with Felt Flowers Pattern, leave your sincere opinion about the project and share any suggestions you have. It would also be wonderful to know which colors, flowers, stitches, or decorative details you would choose to personalize your own handmade cross.