
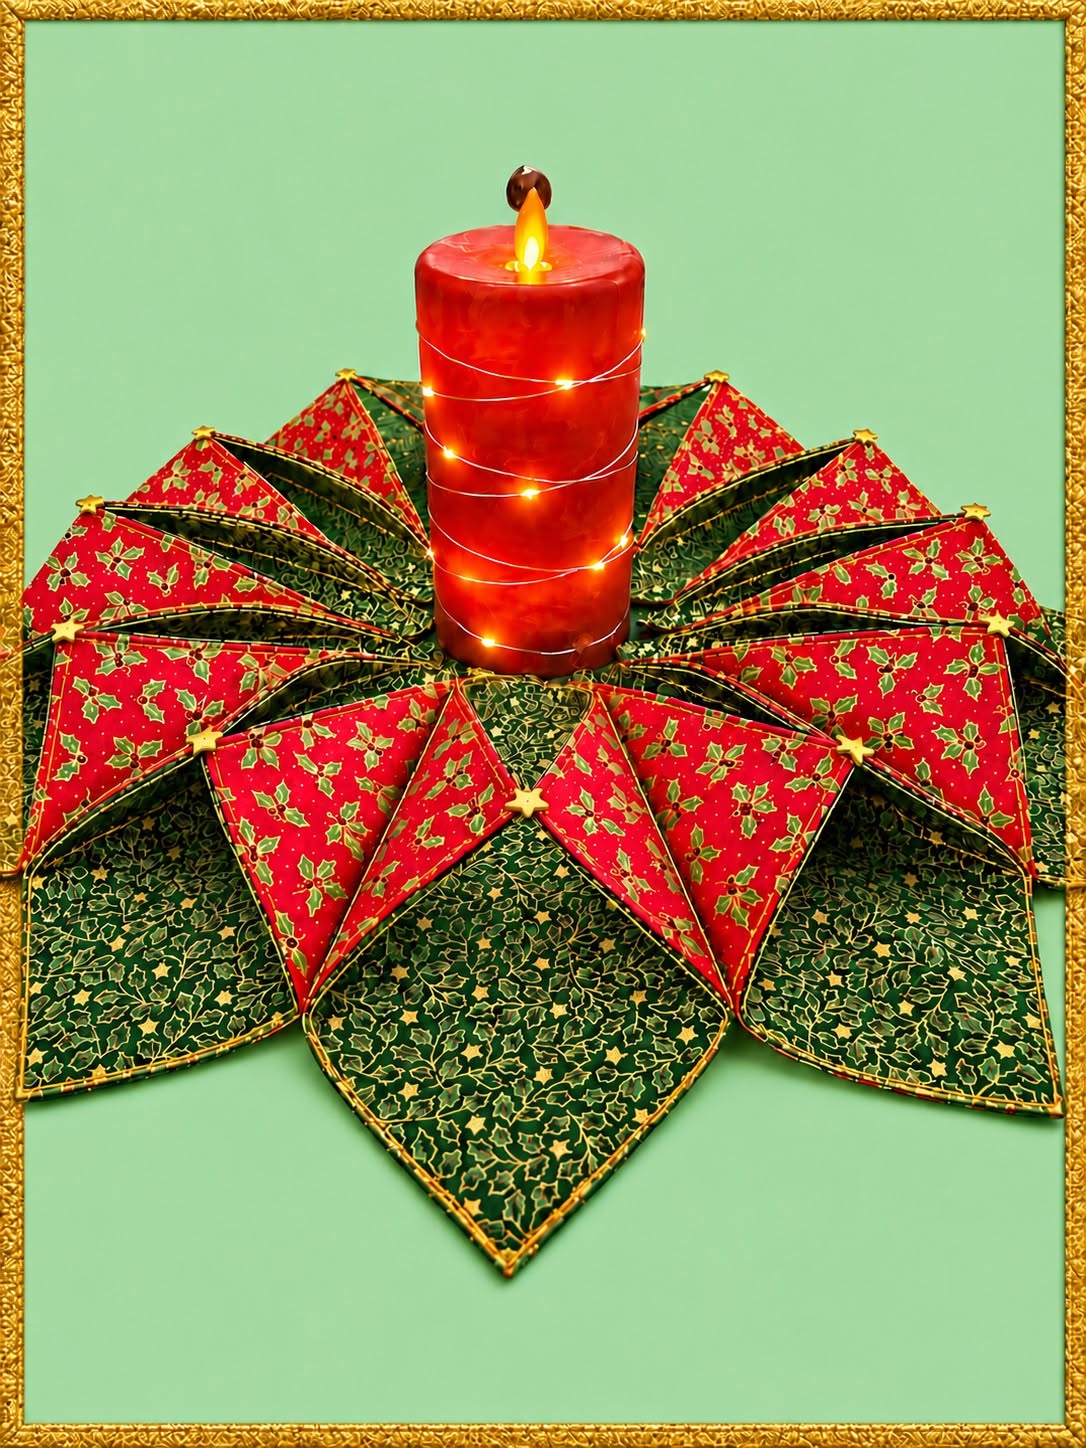
The Fabric and Candle Centerpiece Pattern is a beautiful sewing project that combines decorative fabric folding with the warm visual appeal of a candle centerpiece. Inspired by the design shown in the photo, this project creates a layered, flower-like arrangement made from alternating red and green fabric sections, with a candle placed in the center. The finished piece can work wonderfully as a Christmas table decoration, a festive dining-room accent, or a handmade seasonal gift. Although the design looks elaborate, the construction is based on repeated fabric units, careful pressing, and symmetrical placement. Once you understand how each folded section is assembled, the project becomes much easier to reproduce. Throughout this guide, you will learn how to create your own Fabric and Candle Centerpiece Pattern from the beginning while keeping the result balanced, polished, and visually appealing.
One of the most attractive characteristics of this fabric centerpiece is the dimensional effect created by the folded fabric. Instead of producing a completely flat quilted mat, the individual sections open slightly to resemble petals or pointed leaves surrounding the central candle. The contrast between deep green fabric and bright red holiday fabric creates a classic seasonal appearance, while gold details can add an elegant finishing touch. You can also adapt the same construction method for other seasons by choosing different fabrics, such as pastel colors for spring, orange and brown for autumn, or blue and silver for winter. The basic Fabric and Candle Centerpiece Pattern therefore offers plenty of creative possibilities beyond a single holiday theme. Because the design is assembled from repeating units, it is also an excellent project for practicing accurate cutting, pressing, topstitching, and fabric placement.
Before beginning, remember that a centerpiece containing fabric and a candle requires careful attention to fire safety. For everyday decoration, an LED flameless candle is the safest choice because it produces the same warm centerpiece effect without an exposed flame near fabric. If a real candle is ever used, it should remain inside an appropriate heat-resistant holder, be kept well away from the fabric, and never be left unattended. The sewing instructions below focus on creating the decorative textile portion of the project, allowing you to choose the safest centerpiece option for your home. With approximately 0.5 to 0.75 meter of each main fabric, matching thread, lightweight interfacing or batting, pins, scissors, a ruler, an iron, and a sewing machine, you can begin creating this distinctive decoration. Accurate preparation will make the later stages of the Fabric and Candle Centerpiece Pattern much smoother.
Materials, Fabric Selection, and Cutting Preparation
Start by choosing two coordinating fabrics with strong contrast. To recreate the appearance of the photo, use a deep green cotton fabric with a small gold print and a red Christmas cotton fabric featuring holly leaves, berries, stars, or another small seasonal motif. Quilting cotton works especially well because it is easy to fold, press, sew, and shape. Avoid extremely thick upholstery fabrics because they may create bulky seams when several folded layers overlap.
DISCOVER MORE FREE PATTERNS HERE!
You will also need a lightweight stabilizer. Thin fusible interfacing is a practical option because it gives each fabric unit enough structure to hold its pointed shape. Lightweight batting can also be used if you prefer a softer, slightly padded centerpiece. The goal is not to make the sections stiff like cardboard, but to give them enough body so the individual petals remain visible after the centerpiece is assembled.
For a medium centerpiece, prepare fabric squares measuring approximately 20 cm x 20 cm. You can adjust this measurement depending on the desired finished diameter. Larger squares create a larger centerpiece, while smaller squares produce a more compact decoration. Cut equal numbers from the red and green fabrics so the finished pattern can alternate consistently around the center.
A practical starting point is to cut between 12 and 16 fabric squares, depending on how full you want the design to appear. If you use 16 units, eight can feature the red fabric more prominently and eight can feature the green fabric. The centerpiece shown in the reference image has a very full layered appearance, so additional sections can be added if desired. Before cutting all the pieces, make one test unit to confirm that the scale works for your table.
Cut matching interfacing pieces slightly smaller than your fabric squares, leaving approximately 0.5 cm around the edges. Fuse the interfacing to the wrong side of the appropriate fabric according to the manufacturer’s general heat-setting method, using a pressing cloth if necessary. Press carefully instead of sliding the iron aggressively, because excessive movement can distort the fabric grain. Flat, accurately prepared squares are important for achieving symmetrical folded points.
Organize all your cut pieces before sewing. Place the red squares in one stack, the green squares in another, and keep the interfacing, thread, clips, and ruler nearby. This simple preparation saves time and helps maintain consistency throughout the Fabric and Candle Centerpiece Pattern. At this stage, you can also decide whether you want decorative stitching in gold, green, red, or a neutral matching shade around the edges.
Sewing and Folding the Decorative Fabric Units
Begin with one fabric square and place it right side up on your work surface. Depending on the construction method you prefer, you can create each decorative section from two contrasting squares sewn together or from a folded single square with a contrasting layer beneath it. For a look similar to the photo, combining red and green fabrics within each section creates the most dramatic dimensional effect. Place two contrasting pieces with right sides together and align all edges carefully.
Sew around the perimeter using approximately a 0.7 cm seam allowance, leaving a small opening of about 5 cm for turning. Trim the corners diagonally without cutting through the stitches. Turn the square right side out through the opening, gently push out the corners with a blunt turning tool, and press the entire piece flat. Fold the raw edges of the opening inward and secure them with clips or pins.
Topstitch approximately 0.3 cm from the edge around the complete square. This closes the turning opening and gives the piece a clean, professional finish. A slightly longer stitch length can make decorative topstitching more attractive. If your fabric contains gold details, gold-toned thread can coordinate beautifully with the print, although regular red, green, cream, or white thread can also create an attractive result.
Next comes the folding process that creates the characteristic petal shape of the Fabric and Candle Centerpiece Pattern. Rotate the square so one corner points toward you like a diamond. Bring selected corners inward toward the center while allowing the contrasting inner fabric to remain visible. Press the folds lightly to establish their shape. The finished unit should resemble a pointed fabric petal with one color framing the other.
Make each fold as consistently as possible. Using a ruler to check the distance between the folded edges and the center can help maintain uniformity. Secure the lower portion of each fold with a few stitches so it does not open completely during final assembly. Do not sew across the entire decorative flap because leaving part of it loose creates the dimensional appearance visible in the reference image.
Repeat this process with every square. Alternate which fabric becomes the dominant outer color so that some sections display more red while others display more green. Place the finished pieces next to one another periodically to check the developing color sequence. Consistency is more important than absolute perfection; small handmade variations can give the centerpiece personality, but the main points should remain approximately equal in length and width.
Arranging and Assembling the Fabric Centerpiece
Once all folded units are prepared, arrange them in a circle on a large flat surface before sewing anything permanently. Position the pointed ends facing outward and the narrower folded ends toward the center. Alternate the red and green fabric petals around the circle. This test arrangement allows you to adjust spacing until the shape looks balanced from every direction.
Begin creating the outer layer first. Place approximately six to eight units in a circular formation, slightly overlapping each neighboring piece. The exact overlap depends on the size of your squares and the fullness you want. A generous overlap creates a compact, richly layered centerpiece, while less overlap produces a wider and more open design. Measure the distance from the center to several outer points to make sure the circle remains symmetrical.
Pin or clip adjacent units together near the center area. Sew them securely using short straight seams or several reinforced stitches where the layers overlap. Keep most permanent stitching near the center so the outer fabric points remain free and dimensional. As the pieces connect, periodically place the centerpiece flat on the table and correct any uneven sections before continuing.
Create a second layer using the remaining folded units. Position these pieces between the gaps of the first layer so the points form an alternating pattern. This offset placement produces the flower-like appearance seen in the photo. Rotate the centerpiece as you work rather than trying to sew everything from one fixed position. Careful rotation helps you evaluate the overall shape and prevents too many pieces from gathering on one side.
The center should remain relatively flat and stable. If necessary, create a small circular fabric base approximately 15 to 20 cm in diameter and sew or hand-stitch the folded units to it. A hidden base can make assembly much easier because it provides a stable foundation for all the individual sections. Choose fabric that coordinates with the green or red layers so any visible portions blend naturally into the finished design.
After the layers are connected, place the LED candle temporarily in the center to check proportion and spacing. The candle should sit on a stable, heat-safe surface rather than directly on loose fabric. Adjust any petals that lean too far inward. When viewed from above, the centerpiece should resemble a large symmetrical flower or starburst, with the candle forming the central focal point of the Fabric and Candle Centerpiece Pattern.
Finishing Details, Styling, and Customization Ideas
The finishing details can transform a simple sewing project into an elegant table decoration. Inspect all visible seams and remove loose threads. Press only the sections that need correction, because excessive pressing may flatten the dimensional folds. If necessary, place a folded cloth underneath individual petals while pressing so their raised shape remains intact.
Small decorative accents can be added where the folds meet. The reference design includes tiny gold star-like details near some of the points, creating an attractive festive effect. You can achieve a similar appearance using securely sewn fabric embellishments, embroidered stars, decorative buttons placed away from the candle area, or small appliqué shapes. Keep embellishments lightweight so they do not pull the fabric out of position.
For a traditional Christmas interpretation, combine red fabric, green fabric, and gold details. For a more contemporary centerpiece, try white and gold, navy and silver, burgundy and cream, or sage green and beige. The construction method remains the same even when the color palette changes. This flexibility makes the Fabric and Candle Centerpiece Pattern useful for weddings, birthdays, winter decorating, Thanksgiving tables, and other special occasions.
You can also adjust the size of the finished project. Smaller squares can produce a centerpiece suitable for a side table, while larger squares can create a dramatic dining-table decoration. If you enlarge the pattern substantially, consider adding another layer of folded fabric units for additional fullness. Always make a test section before cutting expensive fabric so you can confirm the proportions.
To store the centerpiece, remove the candle and lay the fabric decoration flat in a clean container. Avoid crushing the folded points under heavy objects. If the fabric becomes wrinkled after storage, reshape the sections with your fingers and lightly press them when appropriate. Good storage allows the fabric candle centerpiece to be reused for several seasons.
When displaying the project, keep the surrounding decorations simple enough for the fabric work to remain visible. A neutral tablecloth or wooden table can provide a beautiful background for the bold red and green colors. An LED candle with a warm glow can highlight the gold details without creating the fire risk associated with an exposed flame. The result is a handmade centerpiece that combines traditional quilting techniques with sculptural fabric folding.
FAQ – Frequently Asked Questions About the Fabric and Candle Centerpiece Pattern
What is a Fabric and Candle Centerpiece Pattern?
A Fabric and Candle Centerpiece Pattern is a sewing design that uses folded or quilted fabric pieces arranged around a central candle or candle holder. The fabric sections usually form petals, leaves, stars, or geometric shapes, turning the centerpiece into both a textile project and a decorative table accent.
What fabric is best for this centerpiece?
Quilting cotton is one of the best choices. It is easy to cut accurately, responds well to pressing, and holds decorative folds without excessive bulk. Cotton fabrics with small prints also work particularly well because the design remains visible even after the fabric is folded.
How much fabric do I need?
For a medium centerpiece, approximately 0.5 to 0.75 meter of each main fabric is usually sufficient, although the exact amount depends on the size and number of squares. Buying a little extra fabric is helpful for test pieces, cutting errors, or pattern matching.
Can beginners make this project?
Yes. A confident beginner can complete the project by working slowly and creating one test unit first. The most important skills are accurate cutting, straight stitching, turning fabric corners, pressing, and repeating the folds consistently. The circular assembly may take patience, but it does not require highly advanced sewing techniques.
Can I use different colors instead of red and green?
Absolutely. The Fabric and Candle Centerpiece Pattern can be adapted to almost any color scheme. Blue and silver can create a winter design, cream and gold can look elegant for celebrations, pastel shades can work for spring, and orange, brown, and mustard fabrics can create an autumn centerpiece.
Does the centerpiece need interfacing?
Interfacing is not always mandatory, but it is highly recommended. Lightweight interfacing helps the fabric hold its folded shape and gives the finished sections better definition. Without stabilization, very soft cotton may collapse or wrinkle more easily.
How many folded fabric sections should I make?
Between 12 and 16 units is a useful starting range for a medium project. However, the correct number depends on the size of your units and how much overlap you want. Arrange the pieces loosely in a circle before final sewing to determine whether additional sections are necessary.
Can I wash the finished centerpiece?
If all fabrics and stabilizers are washable, gentle hand washing may be possible. However, repeated washing can alter the folded shape. Spot cleaning is often preferable for decorative pieces. Always test your fabrics for colorfastness beforehand, particularly when using strong reds or dark greens.
Is it safe to place a real candle in the middle?
Fabric is combustible, so an LED flameless candle is the preferred option for this type of textile centerpiece. If a real candle is used, it must be isolated in an appropriate heat-resistant holder, kept at a safe distance from fabric, and continuously supervised. Never leave an open flame unattended.
How can I make the folded points look even?
Accurate cutting and consistent pressing are essential. Make one finished unit and use it as a reference for every remaining section. You can also measure each fold before securing it. Once all pieces are arranged in the circle, adjust them before completing the permanent assembly.
Can this pattern be used outside Christmas decorating?
Yes. Although the red-and-green version naturally suits Christmas, the design itself is versatile. Changing the fabrics, decorative stitching, and central accessory can transform it into a centerpiece for weddings, Easter, autumn celebrations, birthdays, or everyday home décor.
Conclusion
The Fabric and Candle Centerpiece Pattern combines simple sewing methods with creative fabric folding to produce a striking dimensional decoration. By choosing coordinating quilting cotton, cutting uniform squares, adding lightweight stabilization, sewing and turning each unit carefully, and folding the sections into consistent pointed shapes, you can recreate the layered appearance shown in the reference image. Alternating contrasting fabrics around the circle gives the design its distinctive flower-like effect, while optional decorative stitching and small embellishments add personality.
EASILY FIND THE FREE PDF FOR THIS PATTERN HERE!
The most important part of the process is consistency. Take time to measure the pieces, press each fold, test the circular arrangement before permanent sewing, and keep the center stable. Using a flameless LED candle provides a warm decorative effect while keeping the project much more suitable for a fabric-based display. Once you understand the basic construction, the same Fabric and Candle Centerpiece Pattern can be customized with countless colors, prints, sizes, and seasonal themes. If you decide to make this project, leave your sincere opinion about the pattern and share your suggestions. It is always interesting to hear which fabric combinations, decorative details, or creative variations you would choose for your own handmade centerpiece.