
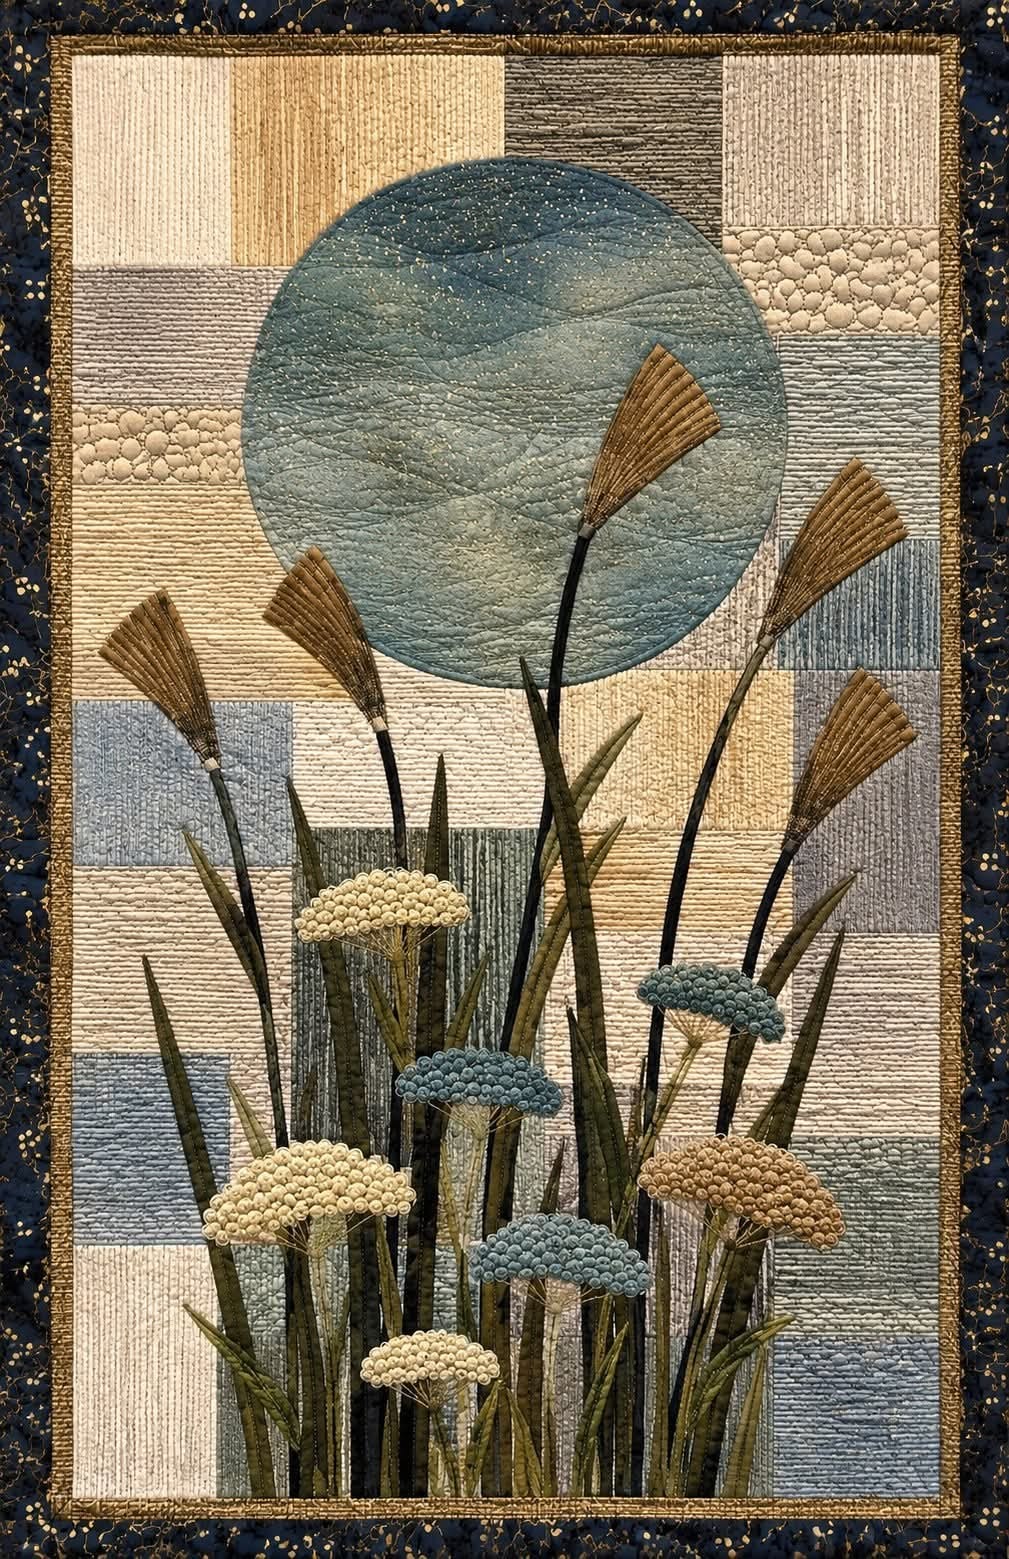
Patchwork Art (Quilt) – Beautiful Wall Panel Pattern is a wonderful example of how traditional quilting techniques can become genuine textile artwork. Inspired by the wall panel shown in the reference image, this project combines geometric patchwork, appliqué, textured quilting, botanical shapes, and a large circular focal point. Instead of making a conventional bed quilt, the goal is to create a decorative piece designed to hang on a wall, where every fabric choice and stitched detail becomes part of the composition. The combination of cream, beige, muted blue, olive green, brown, charcoal, and dark navy creates an elegant natural palette that can complement rustic, contemporary, farmhouse, or artistic interiors. Although the finished panel looks sophisticated, it can be approached gradually by dividing the design into manageable sections and assembling them one at a time.
One of the most attractive characteristics of this Patchwork Art (Quilt) – Beautiful Wall Panel Pattern is its impressive use of texture. The background is constructed from rectangular and square fabric sections, but those simple shapes become much more interesting because different quilting patterns are applied to them. Some areas can be stitched with closely spaced straight lines, while others can feature pebbles, gentle waves, irregular curves, or free-motion quilting. A large blue-gray circle dominates the upper portion of the composition and creates a peaceful moon-like or abstract-sky effect behind the tall botanical elements. In the foreground, narrow stems, elongated leaves, textured flower heads, and fan-shaped brown seed heads provide depth and movement. This contrast between a structured geometric background and organic appliqué makes the panel visually rich without requiring extremely complicated patchwork blocks.
Making a beautiful wall panel quilt pattern like this also gives you considerable creative freedom. You do not have to reproduce every shape or stitch exactly as it appears in the inspiration image. Handmade textile art is especially appealing when the maker allows small variations in fabric, quilting, positioning, and appliqué to become part of the final design. For a practical starting size, consider a finished panel of approximately 60 cm wide by 90 cm high, although you can enlarge or reduce those dimensions according to the wall where the quilt will be displayed. Gather quilting cotton, textured fabrics, batting, backing fabric, coordinating thread, appliqué materials, a rotary cutter, quilting ruler, cutting mat, pins or clips, sewing machine, and basic pressing tools. Once the materials are prepared, the project can be built systematically from background to foreground.
Planning the Patchwork Background and Choosing the Fabrics
Begin your Patchwork Art (Quilt) – Beautiful Wall Panel Pattern by studying the overall composition rather than concentrating immediately on individual flowers. The background provides the foundation for everything that will be added later. For a 60 x 90 cm finished panel, prepare a patchwork center slightly larger than the intended finished dimensions so that it can be squared after quilting. Arrange rectangles approximately 8 to 16 cm wide and 8 to 20 cm tall, varying the dimensions instead of creating a perfectly regular checkerboard. This irregular arrangement helps reproduce the artistic character of the reference panel.
DISCOVER MORE FREE PATTERNS HERE!
Choose a controlled quilt fabric color palette. Cream, ivory, oatmeal, sand, pale beige, soft gray, dusty blue, slate blue, muted olive, taupe, and occasional charcoal pieces work particularly well. Avoid making every rectangle equally bold. The background should remain visually quieter than the appliqué that will eventually sit in front of it. Using several fabrics within the same tonal family produces subtle variation while maintaining harmony throughout the wall hanging.
Before sewing, arrange all of the rectangles on a large flat surface. Move them around until dark, medium, and light values feel balanced. Try not to place every blue fabric in one area or every cream rectangle in another. Instead, distribute colors across the panel while leaving enough pale sections to create breathing room. Take a quick reference photo of the arrangement before picking up the pieces, because it is surprisingly easy to forget the layout once sewing begins.
Sew neighboring rectangles together with a consistent 6 mm seam allowance, approximately the standard quarter-inch quilting seam. Build smaller units first and then join those units into larger horizontal or vertical sections. Press the seams carefully after each stage. Depending on the direction of adjoining seams, pressing to one side can help seams nest neatly, while pressing open may reduce bulk where several pieces intersect.
Once the patchwork background has been assembled, place it over batting and backing fabric to create a traditional quilt sandwich. Cut the batting and backing several centimeters larger than the patchwork top on every side. Baste the three layers securely with your preferred quilting method. A stable sandwich is particularly important here because the background will receive substantial quilting before the dimensional botanical appliqué is added.
Quilt each background section with a slightly different texture. Straight horizontal lines can be spaced approximately 3 to 6 mm apart, while other blocks can receive gentle waves, pebble quilting, vertical lines, or small irregular curves. You do not need to fill every centimeter with complicated free-motion stitching. The key SEO concept and practical technique here is textured quilting: changing the stitch texture from block to block makes simple patchwork rectangles appear much more sophisticated.
Creating the Large Circle and Building the Botanical Appliqué
The large circular element is the visual anchor of the Patchwork Art (Quilt) – Beautiful Wall Panel Pattern. For a 60 x 90 cm wall hanging, a circle around 34 to 40 cm in diameter creates a strong focal point without overwhelming the composition. Make a paper template first, position it on the upper half of your quilt, and check the proportions before cutting your fabric. Remember that several tall stems will eventually overlap the circle.
Select a dusty blue, blue-gray, or muted teal fabric for this feature. You can use a single fabric or create the circle from subtly blended pieces. Apply it using your preferred appliqué technique, such as raw-edge fusible appliqué or turned-edge appliqué. Raw-edge appliqué is usually more approachable for beginners because fusible web temporarily stabilizes the shape while it is stitched into position.
After securing the circle, add curved quilting lines across its surface. These lines can suggest distant hills, wind, water, or an abstract landscape. Keep the stitching organic rather than perfectly symmetrical. Additional small stippling or irregular quilting between the curved lines can create the richly textured surface visible in the inspiration piece. Using a thread close to the blue fabric color will emphasize texture without creating excessive visual contrast.
Next, make the appliqué stems. Cut narrow strips in dark brown, charcoal, black, deep olive, and muted green. The stems should vary in width and height; perfectly identical stems would make the composition look too formal. Some can rise from the bottom almost to the center of the circle, while shorter stems should remain in the foreground. Gentle curves are desirable because they give the arrangement natural movement.
The elongated leaves can be created from narrow tapered fabric shapes. Use several olive tones, from deep moss to brown-green, so that overlapping leaves remain distinguishable. Position the leaves at different angles along the stems and near the base. Some should point almost vertically, while others can lean toward the sides. This variation is an important part of botanical quilt appliqué, where silhouette and direction help communicate the feeling of real vegetation.
Before permanently stitching these pieces, arrange all stems and leaves on the quilt and evaluate the entire composition from a distance. Place the wall panel upright if possible. Check that the plants overlap the circular background naturally and that the lower portion does not become excessively crowded. Once you are satisfied, secure the shapes and stitch around their edges with matching or subtly contrasting thread.
Making the Textured Flowers, Seed Heads, and Final Border
The foreground flowers are among the most distinctive details in this Patchwork Art (Quilt) – Beautiful Wall Panel Pattern. Rather than using flat printed flowers, the design achieves its character through small repeated fabric or thread elements clustered together. Prepare rounded flower-head foundations in cream, dusty blue, muted teal, and warm tan. Vary their sizes so that the botanical arrangement appears layered and naturally irregular.
For the raised texture, create numerous small fabric circles, knots, rolled textile pieces, or tightly stitched dimensional motifs and attach them securely to the flower-head foundations. Keep dimensional embellishments firmly stitched, especially if the finished quilt will be handled or transported. You can also create a flatter, easier-care version by using dense free-motion circles or embroidered knots rather than heavily raised pieces. The objective is visual texture, not an exact duplication of a particular construction method.
Attach the flower heads at different heights. A larger cream flower can occupy the lower-left area, while blue-gray flowers can be distributed through the center and right side. Add a tan flower toward the lower-right area to echo the brown tones of the seed heads above. Overlapping stems and leaves behind the flowers will create convincing depth, which is one of the strongest features of this art quilt wall hanging.
The tall fan-shaped seed heads can be constructed from brown or bronze fabric. Start with tapered triangular or fan-shaped foundations. Add narrow stitched channels or slim fabric strips radiating outward from the base toward the wider upper edge. This produces the characteristic ribbed appearance. Make several seed heads in different sizes and directions instead of duplicating one identical template throughout the panel.
Once all of the appliqué has been secured, inspect the quilting around each shape. Additional background stitching can help the appliqué stand forward visually. This technique is sometimes called quilting around appliqué or background filling. However, avoid excessive stitching immediately over dimensional flower details. The aim is to emphasize their raised character while keeping the quilt structurally stable.
Finish by squaring the wall panel and adding a narrow inner border followed by a wider dark outer border. A gold-brown inner accent can connect visually with the brown botanical elements, while a deep navy or charcoal outer border frames the lighter composition beautifully. Quilt the border with vines, curves, meandering lines, or another subtle pattern. Add binding around the outer edge and, if the piece will be displayed, sew a hanging sleeve to the back.
Finishing, Displaying, and Personalizing Your Art Quilt
After completing the major construction, examine your Patchwork Art (Quilt) – Beautiful Wall Panel Pattern under good lighting. Look for loose threads, unsecured appliqué edges, missed quilting areas, or distortion along the edges. Trim thread tails carefully and make any necessary reinforcement stitches. Textile wall art benefits enormously from careful finishing because viewers often examine it at close range.
Check whether the quilt hangs straight before completing the sleeve. Lay it flat and measure the width at the top, middle, and bottom. If necessary, carefully square the edges before attaching the final binding. A properly squared wall hanging quilt will display more professionally and will prevent one side from appearing longer than the other once it is mounted.
For the hanging sleeve, cut a strip of fabric wide enough to accommodate your preferred hanging rod. Sew it securely across the upper back without allowing stitches to show prominently on the quilt front. The sleeve should support the weight evenly across the width rather than concentrating tension at two small hanging points. Larger or heavier textile panels may benefit from a wider sleeve and a rigid support.
Personalization is where this pattern becomes especially interesting. You can replace the muted blues with turquoise, sage, lavender, rust, or soft rose. The circular feature might represent a moon, sun, landscape, or simply an abstract geometric form. Flowers can also be adapted to match the colors of a particular room. Maintaining the original relationship between geometric patchwork and organic appliqué will preserve the artistic feeling even when the palette changes substantially.
Beginners should remember that the project does not need to be completed quickly. Divide the work into stages: fabric selection, background piecing, quilting, circle appliqué, stems, leaves, flowers, seed heads, border, binding, and hanging sleeve. Completing one stage carefully before beginning another reduces mistakes and makes an elaborate-looking project much easier to manage.
The finished Patchwork Art (Quilt) – Beautiful Wall Panel Pattern should feel handcrafted rather than mechanically perfect. Small variations in quilting lines, flower placement, leaf angles, and fabric texture contribute to its personality. Concentrate on secure construction, balanced composition, attractive color relationships, and enjoyable stitching. Those qualities matter more than trying to make every organic shape identical.
FAQ About Patchwork Art (Quilt) – Beautiful Wall Panel Pattern
What is a patchwork art quilt?
A patchwork art quilt is a textile piece that combines quilting construction with artistic composition. Unlike many traditional quilts designed primarily for beds, art quilts are often created for display. They can combine piecing, appliqué, embroidery, free-motion quilting, dimensional details, and unconventional layouts.
What size should I make this wall panel?
A practical starting measurement is approximately 60 x 90 cm, but the pattern is highly adaptable. A smaller version can work in an entryway or sewing room, while a larger interpretation can become a statement piece. Keep the proportions of the large circle and tall botanical shapes consistent when resizing.
Is the Patchwork Art (Quilt) – Beautiful Wall Panel Pattern suitable for beginners?
An adventurous beginner can make it by dividing the project into individual stages. Basic machine sewing, accurate cutting, simple patchwork, and basic appliqué skills are enough to begin. Free-motion quilting and dimensional flowers may require practice, but simpler stitching alternatives can be substituted.
What fabrics are best for an art quilt wall panel?
Good-quality quilting cotton is an excellent foundation because it is stable and easy to sew. Small amounts of linen-look cotton, textured fabric, batik, or other suitable woven materials can add visual interest. Test unfamiliar fabrics before incorporating them extensively because different materials may stretch or react differently during quilting.
Do I need a special sewing machine?
No. A standard sewing machine capable of straight stitching can handle most of the construction. A walking foot can make quilting straight lines easier, and a free-motion quilting foot is useful for curved textures and pebble designs. Neither is required for every version of the project.
How can I make the circular appliqué accurately?
Create a full-size paper or template-material circle before cutting the fabric. Fold the template gently into quarters to identify the center and use those reference points when positioning it. Fusible web can make a large raw-edge appliqué circle easier to stabilize before stitching.
How do I create the textured flower heads?
You can use small fabric circles, rolled textile elements, embroidery-style knots, dimensional appliqué, or dense circular stitching. Choose a technique appropriate to your experience level. Whatever method you select, make sure every dimensional element is firmly secured.
Can I wash a dimensional wall quilt?
That depends on the materials and embellishments used. A heavily dimensional art quilt is generally better treated as decorative textile art rather than frequently washed household bedding. Using washable fabrics and securely stitched embellishments will make maintenance easier.
What batting should I use for a wall hanging?
A relatively stable, low- to medium-loft batting usually works well. Excessively thick batting can make a large wall panel harder to hang flat, although a slightly higher loft can emphasize quilting texture. Always consider the desired finished appearance before selecting batting.
How can I keep a quilted wall panel from becoming wavy?
Accurate piecing, careful pressing, thorough basting, balanced quilting, and even fabric handling all help. Try to distribute quilting across the surface instead of heavily quilting one area while leaving another completely unquilted. Square the panel before binding it.
Can I change the colors from the original inspiration?
Absolutely. The combination of muted blue, cream, olive, brown, gray, and navy creates a sophisticated natural appearance, but the same beautiful wall panel pattern could be interpreted with brighter or softer colors. Focus on maintaining enough contrast between the background, circle, stems, leaves, and flowers.
How long does this patchwork wall panel take to make?
The time varies significantly depending on size and quilting complexity. Piecing the background may be relatively quick, while dimensional flowers and detailed quilting can require considerably more time. Treating the project as several smaller sewing sessions makes the process more comfortable and enjoyable.
What makes this design effective as wall art?
Its strength comes from contrast. Rectangular patchwork creates architectural structure, the large circle provides a strong focal point, vertical plants introduce movement, and dimensional flowers add texture. Together, these elements guide the eye around the entire composition.
Should I quilt before or after adding the appliqué?
For this style, much of the background quilting can be completed before adding highly dimensional foreground elements. Additional quilting can then be added around appliqué where necessary. Planning the sequence prevents bulky embellishments from interfering with machine quilting.
How should I display the finished quilt?
A fabric hanging sleeve attached to the back is one of the cleanest options. Insert a suitable rod or support through the sleeve so the panel’s weight is distributed evenly. Keep valuable textile art away from persistent moisture and conditions that could damage fabric over time.
Conclusion
The Patchwork Art (Quilt) – Beautiful Wall Panel Pattern demonstrates how ordinary fabric pieces can become expressive textile artwork through thoughtful composition and detailed stitching. Starting with a geometric patchwork background, you learned how to develop a balanced palette, assemble irregular rectangular sections, build a quilt sandwich, and use textured quilting to give each area its own character.
The next stages transform that foundation into a landscape-inspired composition. A large blue-gray circular appliqué establishes the main focal point, while dark stems, elongated leaves, dimensional flowers, and fan-shaped seed heads create a striking foreground. Careful layering is particularly important because it gives the relatively flat materials a convincing sense of depth.
Finally, borders, binding, additional quilting, and a hanging sleeve turn the textile composition into finished quilted wall art ready for display. Whether you follow the muted natural palette or develop an entirely different color scheme, the fundamental process remains the same: plan carefully, build in layers, balance geometric and organic shapes, and allow texture to become an important part of the design.
EASILY FIND THE FREE PDF FOR THIS PATTERN HERE!
Most importantly, use this Patchwork Art (Quilt) – Beautiful Wall Panel Pattern as inspiration rather than a restriction. Change the flowers, experiment with fabric textures, resize the circle, modify the background blocks, or introduce colors that better suit your home. Handmade quilting becomes especially meaningful when the maker’s own creative decisions are visible in the finished piece. If you make your own version, leave your sincere opinion, creative suggestions, and ideas about the project—your perspective may inspire an entirely new interpretation of this beautiful patchwork wall panel.