
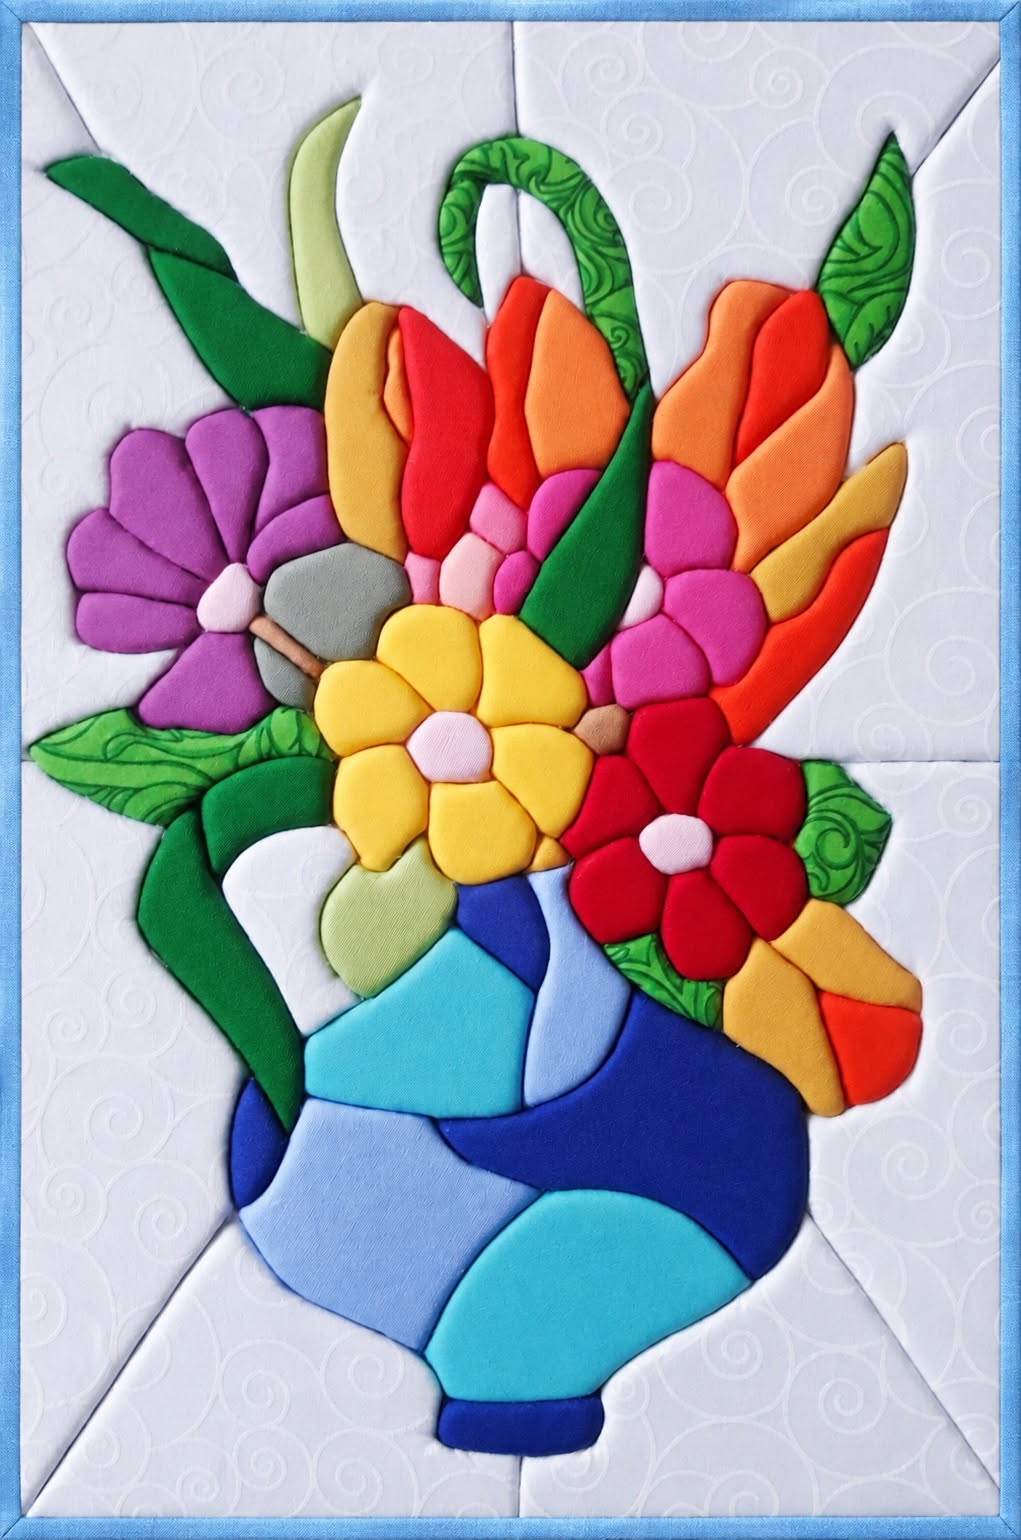
The Quilt Panel with Flower Pot Appliqué Pattern is a cheerful textile project that combines dimensional appliqué, colorful fabric shapes, floral composition, and traditional quilting techniques in one decorative panel. Inspired by the flower arrangement shown in the reference image, this design features a rounded blue flower pot filled with layered blossoms, curved stems, leaves, and elongated decorative petals. The raised appearance of many pieces gives the project an almost sculpted quality while still preserving the softness expected from a handmade quilt. One of the biggest advantages of this design is the freedom to work with scraps from previous sewing projects, making every finished panel slightly different. Bright reds, purples, yellows, oranges, greens, and blues create a strong contrast against the light background fabric. Whether displayed as wall décor, incorporated into a larger quilt, or adapted into a cushion panel, this flower pot appliqué quilt can become an eye-catching handmade piece.
Creating a Quilt Panel with Flower Pot Appliqué Pattern also offers an excellent opportunity to practice several important quilting skills without having to construct a full-size bed quilt. The project involves selecting coordinating fabrics, preparing appliqué templates, building dimensional pieces, arranging flowers, attaching curved stems, assembling the flower pot, and finishing everything with quilting stitches. Beginners can simplify the design by using fewer flowers and larger shapes, while experienced quilters can add detailed stitching, extra leaves, decorative quilting, or more elaborate fabric combinations. The reference panel uses smooth padded pieces that create gentle shadows around the edges and help each flower stand apart visually. This effect can be recreated with lightly stuffed appliqué, turned-edge appliqué, or a dimensional fabric technique depending on personal preference. Careful planning is especially important because the arrangement contains several overlapping elements. Building the composition gradually makes the process easier and helps maintain a balanced bouquet.
Another attractive quality of the Quilt Panel with Flower Pot Appliqué Pattern is its flexibility in color, size, and finishing style. You do not need to reproduce every fabric color exactly to achieve a beautiful result, because the overall relationship between the flower pot, leaves, blossoms, and background is more important than exact matching. A pale background keeps the colorful pieces visually clear, while the deep and light blue sections of the pot create a stable foundation for the bouquet. Green stems connect the flowers and guide the viewer’s eye upward through the composition. Small pieces can be cut from fabric scraps, making this an economical project for quilters who already have a collection of cotton remnants. Before sewing permanently, arranging all pieces on the background and photographing the layout can help preserve your preferred placement. With patience and careful construction, the finished appliqué flower panel can look polished, dimensional, and full of handcrafted character.
Materials and Preparation for the Quilt Panel with Flower Pot Appliqué Pattern
Begin by gathering high-quality quilting cotton in several colors. For a design similar to the reference image, prepare white or cream fabric for the background, several shades of blue for the pot, multiple greens for leaves and stems, and colorful scraps in red, orange, yellow, pink, purple, and soft neutral shades for the blossoms. The term Quilt Panel with Flower Pot Appliqué Pattern refers to both the decorative layout and the individual shapes used to construct the finished textile panel.
DISCOVER MORE FREE PATTERNS HERE!
You will also need lightweight batting, backing fabric, matching or contrasting sewing thread, fabric scissors, pins or clips, a fabric marking pencil, an iron, and basic sewing supplies. Optional materials include fusible web for easier positioning and a small amount of polyester fiberfill if you want the individual appliqué shapes to appear noticeably raised. Using thin padding rather than excessive stuffing usually produces a smoother quilted appearance.
Decide on the finished dimensions before cutting the background. A practical decorative panel might measure approximately 45 × 60 cm, although the design can easily be enlarged or reduced. Cut the background a few centimeters larger than the desired finished measurement so that it can be trimmed accurately after the appliqué and quilting are complete. Prewash fabrics if you normally prewash quilting cotton to reduce unexpected shrinkage.
Next, create paper templates for the major components. Separate the image into simple shapes: the pot, pot sections, flower petals, flower centers, long decorative petals, leaves, and curved stems. Symmetry is not required because the charm of this flower appliqué pattern comes from the slightly organic shapes. Numbering the templates can make assembly much easier, especially when several similar petals are used.
Trace each template onto the appropriate fabric. If you plan to make turned-edge pieces, add approximately 0.6 cm of seam allowance around each template. For raw-edge fusible appliqué, the shapes can generally be cut directly to the finished outline because no turned seam allowance is required. Always follow the technique that feels most comfortable for your skill level.
Before sewing anything permanently, place the cut fabric pieces over the background and build the entire arrangement. Begin with the pot at the lower portion of the panel and allow the bouquet to expand naturally above it. Check that the flowers are distributed evenly and that no single color dominates one side unnecessarily. This preparation stage is essential for a well-balanced Quilt Panel with Flower Pot Appliqué Pattern.
Creating the Flower Pot, Stems, Leaves, and Dimensional Appliqué
Start construction with the flower pot because it visually anchors the entire composition. The pot shown in the reference design is assembled from several curved fabric sections in dark blue, royal blue, pale blue, and turquoise. Rather than cutting one solid pot shape, divide the pot template into irregular curved sections. This gives the lower area a beautiful patchwork appearance and introduces movement through the different shades.
Arrange the individual blue sections until they form a rounded pot with a narrower base. Sew neighboring sections together when using traditional piecing, or prepare each one as an individual appliqué section and position them closely together on the background. Keep curves smooth and press gently after stitching. Add a small dark blue base at the bottom to complete the silhouette of the pot.
The green stems should be prepared before the flowers because several blossoms will overlap them. Cut narrow bias strips for stems that need to bend easily. Bias-cut fabric is particularly useful for curved appliqué because the diagonal grain allows the strip to follow rounded lines without creating excessive wrinkles. Press the edges toward the center and position the stems so they appear to emerge naturally from the flower pot.
Create the leaves using multiple green fabrics to prevent the foliage from looking flat. The reference design combines solid dark green pieces with lighter patterned green leaves, which provides attractive variation. Some leaves are long and pointed, while others are rounded or slightly curved. Changing leaf shape and fabric value helps the bouquet feel more natural and gives the eye several different details to explore.
For the padded appearance, make each petal as a small dimensional unit. Place a fabric shape right sides together with a lightweight backing piece, sew around most of the edge, trim carefully, turn right side out, and gently fill with a very thin amount of fiberfill if desired. Close the opening with small stitches. Another option is to place a small batting shape beneath each appliqué piece before stitching it to the background.
Attach the stems and lower foliage first, followed by the pot, or adjust the sequence wherever natural overlapping requires it. Use tiny hand stitches for an invisible traditional finish or a narrow machine stitch for a faster construction method. The objective is to maintain smooth outlines while keeping the three-dimensional quality visible. Consistent stitching will help the flower pot quilt panel look carefully finished.
Building and Arranging the Colorful Appliqué Flowers
Begin the floral arrangement with the largest blossoms. The purple flower on the left can be constructed from approximately eight rounded petals surrounding a pale center. Arrange each petal in a circular formation and allow the edges to touch or slightly overlap. Position the flower so that some greenery remains visible behind it, creating the impression that the flower sits naturally inside the bouquet.
The yellow flower near the center provides an important visual focal point. Create six or seven rounded yellow petals and arrange them around a pale pink or cream center. Because yellow is naturally bright, placing it near the center helps draw attention to the middle of the Quilt Panel with Flower Pot Appliqué Pattern. Slight differences in petal size can make the flower appear handmade rather than mechanically perfect.
Next, build the deep red flower on the lower right side. Use rounded red petals arranged tightly around a small light-colored center. The strong red contrasts beautifully with both the blue pot and the green foliage. When arranging this flower, allow a few green leaves to extend around it so the red does not visually merge with neighboring orange and burgundy pieces.
The upper section can be filled with elongated petals and tulip-like forms in red, orange, golden yellow, and warm coral. These pieces are less symmetrical than the round blossoms, which makes the upper bouquet more dynamic. Place taller pieces toward the back and shorter pieces toward the front. This simple layering principle helps create depth and makes the floral arrangement appear fuller.
Small pink, magenta, neutral, and muted green pieces can fill empty spaces between the larger flowers. These smaller shapes are extremely useful because they connect the individual blossoms visually and prevent large gaps from appearing in the composition. Avoid filling every space completely, however. A little visible background between selected shapes keeps the design readable and prevents the bouquet from becoming too crowded.
Once satisfied with the arrangement, attach the flowers gradually rather than removing everything at once. Work from the pieces that visually sit farthest behind toward those in the foreground. Check the original layout frequently as you sew. Maintaining deliberate overlaps is one of the most important steps for achieving the layered appearance associated with this dimensional flower appliqué quilt.
Assembling, Quilting, and Finishing the Decorative Panel
After all appliqué elements are securely attached, inspect the panel from a short distance. Look for loose edges, awkward gaps, or areas where a petal may need an additional stitch. This is also a good time to add subtle embroidery or decorative stitching. Small details can emphasize leaves, flower centers, or selected curves without distracting from the bold fabric shapes.
Prepare the quilt sandwich by placing the backing fabric wrong side up, positioning the batting over it, and placing the completed appliqué top right side up. Smooth all three layers carefully to remove wrinkles. Baste with safety pins, temporary basting spray, or large hand stitches. Proper basting is particularly important around dimensional appliqué because thick flowers can shift during quilting.
Quilt the background rather than stitching heavily across the dimensional flowers. Gentle free-motion swirls are especially appropriate for a design like the reference panel because they create texture while allowing the colorful bouquet to remain dominant. Straight lines, loops, leaves, or simple curves are also suitable. Keeping the quilting relatively dense around the appliqué can make the raised elements stand out even more.
Around the pot and floral shapes, consider using echo quilting. Stitch approximately 0.6 to 1 cm away from the appliqué outline and follow the general shape of the design. Echo quilting creates a subtle frame around the bouquet and emphasizes its silhouette. If using a sewing machine, move slowly around tight curves so the spacing remains as consistent as possible.
When the quilting is finished, trim the panel to the final dimensions. Check that the flower arrangement remains centered before removing excess fabric. Finish the edges with traditional quilt binding in a coordinating color such as blue, green, white, or another shade used within the bouquet. A narrow binding keeps attention on the Quilt Panel with Flower Pot Appliqué Pattern rather than the outside edge.
Finally, press only where appropriate and avoid crushing heavily padded appliqué pieces with a hot iron. Add a hanging sleeve to the back if the panel will be displayed as wall art. You can also adapt the finished design for a pillow front, table decoration, tote bag panel, or central block in a larger quilt. The same Quilt Panel with Flower Pot Appliqué Pattern can therefore inspire many different sewing projects.
FAQ – Frequently Asked Questions About the Quilt Panel with Flower Pot Appliqué Pattern
What is a Quilt Panel with Flower Pot Appliqué Pattern?
A Quilt Panel with Flower Pot Appliqué Pattern is a decorative quilt design in which fabric shapes representing a flower pot, stems, leaves, and flowers are attached to a larger background panel. The appliqué pieces can be flat or lightly padded to create additional dimension.
Is this flower appliqué quilt suitable for beginners?
Yes. Beginners can simplify the project by reducing the number of petals and using fusible raw-edge appliqué. More experienced quilters can choose turned-edge appliqué, hand stitching, dimensional petals, free-motion quilting, and more complex layering.
What fabric works best for this project?
Quilting cotton is an excellent choice because it is stable, easy to cut, widely available, and available in countless colors and prints. Small scraps are particularly useful because the design contains many relatively small appliqué components.
Do I need to use the same colors shown in the reference design?
No. The colors are only inspiration. You could create pastel flowers, an autumn palette, a monochromatic arrangement, or even a bouquet made entirely from patterned scraps. Maintaining good contrast between the background, pot, greenery, and flowers is more important than matching specific colors.
How can I make the flower petals look raised?
Add a small piece of lightweight batting beneath each petal or create individual turned fabric pieces containing a very small amount of fiberfill. Avoid overstuffing because excessively thick pieces can become difficult to attach and may distort the overall panel.
Can the appliqué pieces be sewn by machine?
Absolutely. A narrow zigzag, blanket stitch, or straight stitch can be used depending on whether the edges are raw or turned. Machine appliqué is practical when you want to complete the project more quickly.
Can this pattern be sewn by hand?
Yes. Hand appliqué works beautifully for this style of project. Small slip stitches around turned edges can create a refined finish, while hand quilting can further enhance its traditional appearance.
What size should the finished panel be?
There is no mandatory size. Approximately 45 × 60 cm is a practical starting point for wall décor, but the templates can be scaled according to the intended project. Always enlarge or reduce every template by the same percentage to preserve the proportions.
Should the background be quilted before or after adding the appliqué?
For this style, it is generally easier to attach the appliqué first and assemble the quilt sandwich afterward. Quilting around the finished flowers helps emphasize their raised appearance and visually integrates the appliqué with the background.
How do I keep the flower arrangement balanced?
Place the largest flowers first, distribute strong colors across the design, and fill the spaces gradually with smaller blossoms and leaves. Take a photo before sewing so you can remember your preferred arrangement if pieces are moved during construction.
What quilting design works well around flowers?
Swirls, gentle curves, loops, leaves, echo quilting, and simple free-motion patterns all complement floral appliqué. A lightly colored thread can keep the background quilting subtle while allowing the colorful flowers to remain the main feature.
Can this Quilt Panel with Flower Pot Appliqué Pattern be adapted to other projects?
Yes. The floral arrangement can become a cushion cover, tote bag front, table runner section, wall hanging, quilt center, or decorative fabric panel. Individual flowers can also be reused as appliqué motifs in smaller sewing projects.
Conclusion
The Quilt Panel with Flower Pot Appliqué Pattern brings together color, texture, appliqué, quilting, and creative fabric placement in one rewarding project. Beginning with a simple background, you learned how to plan the flower pot, prepare curved stems, create leaves, construct dimensional petals, arrange multiple flowers, assemble the quilt sandwich, and finish the panel with decorative quilting and binding. The most important part of the process is not copying every shape perfectly, but developing a balanced composition where the blue pot, green foliage, and colorful blossoms work together.
EASILY FIND THE FREE PDF FOR THIS PATTERN HERE!
This project is also a wonderful way to use fabric scraps while practicing essential techniques such as appliqué quilting, dimensional appliqué, echo quilting, curved fabric preparation, color coordination, and layered floral design. By adjusting the templates, colors, number of flowers, or quilting pattern, you can transform the original concept into a completely personal piece while preserving the recognizable character of the Quilt Panel with Flower Pot Appliqué Pattern. If you create your own version, leave your sincere opinion about the project and share your suggestions. Which colors would you choose for your flower pot and bouquet, and what other details would you add to make this appliqué panel uniquely yours?