
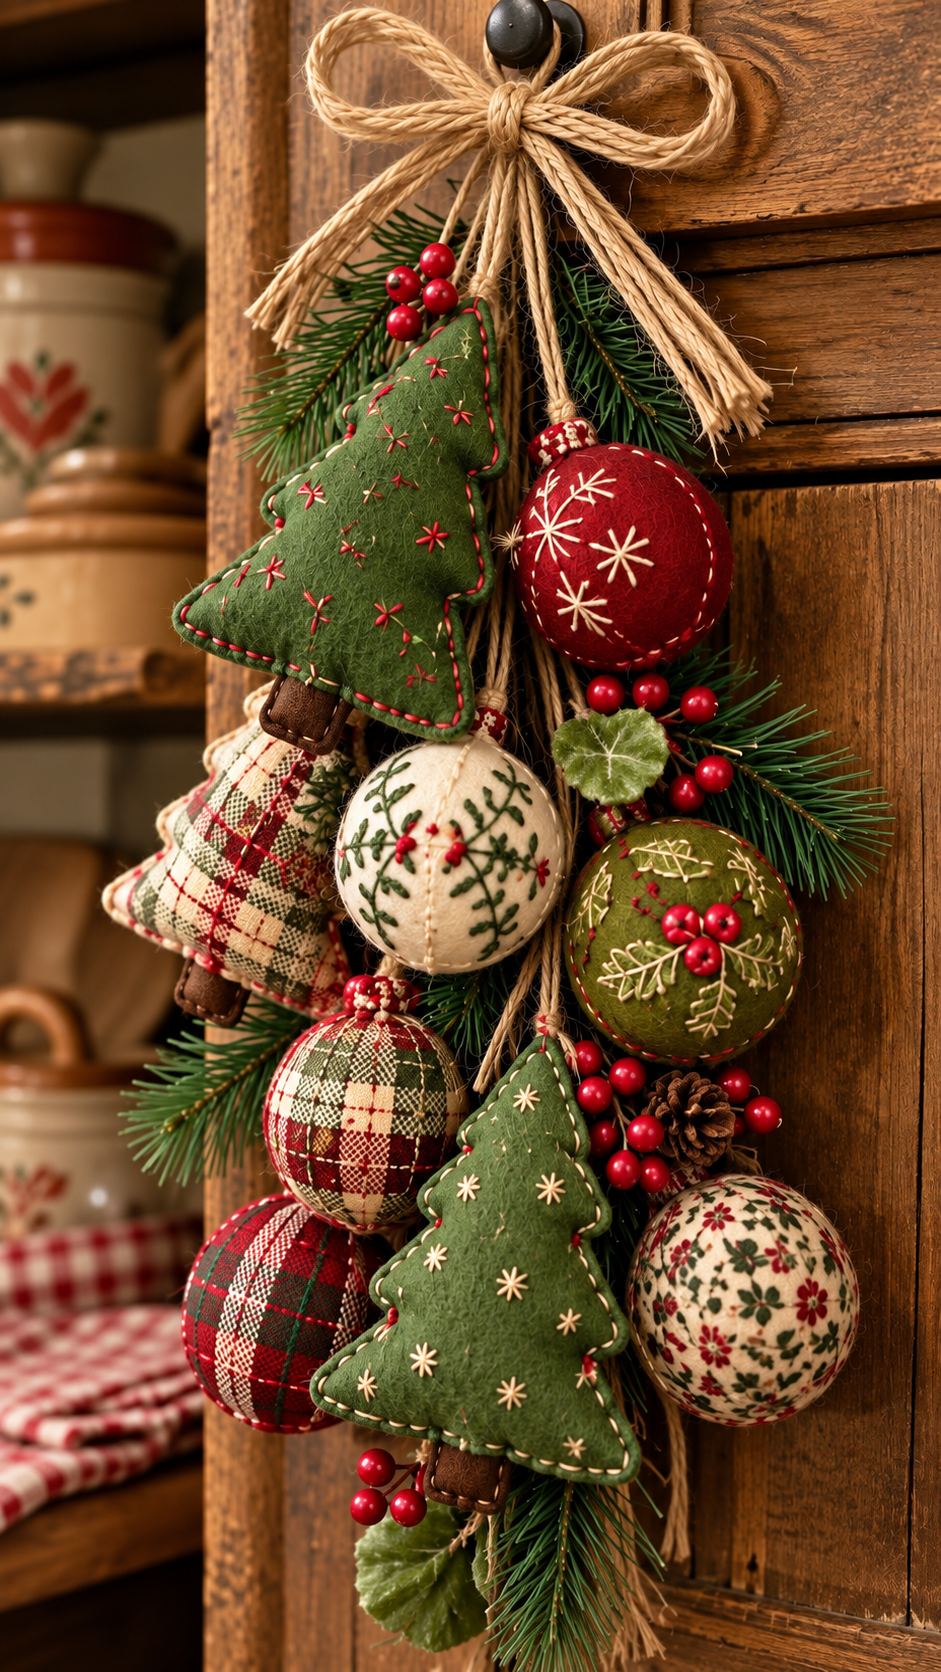
The Christmas Door Decoration Sewing Tutorial Pattern is a warm, handmade way to transform a simple doorway, cabinet, wall, or entry space into a charming Christmas focal point. Inspired by the decoration shown in the photo, this project combines stuffed fabric Christmas trees, round fabric ornaments, embroidered details, greenery, berries, rustic cord, and a large jute bow. The result has a cozy country look that works beautifully with farmhouse, primitive, traditional, and vintage Christmas décor. One of the most attractive features of this sewing project is that every ornament can be customized with different fabrics, stitches, colors, and sizes. You can use fabric scraps left from other sewing projects, which also makes this an excellent idea for anyone who enjoys practical scrap-busting crafts. Throughout this Christmas Door Decoration Sewing Tutorial Pattern, you will learn how to plan the arrangement, sew the main shapes, add embroidery, create dimensional ornaments, and assemble everything into one balanced hanging decoration.
Although the finished piece looks detailed, the construction is based on simple shapes that are accessible even to sewists with limited experience. Most of the fabric ornaments can be created from circles, triangular Christmas tree silhouettes, and small rectangular pieces used for tree trunks. Decorative stitching provides much of the character, so perfect precision is not necessary. Slightly uneven hand stitches can actually enhance the rustic handmade appearance of the project. The key is to choose a harmonious collection of Christmas fabrics, including olive green, deep red, cream, beige, plaid, and small floral prints. Mixing solid fabrics with patterned pieces creates depth while preventing the arrangement from looking too uniform. Adding natural-looking elements such as pine branches, artificial red berries, jute cord, and small pinecones completes the traditional holiday appearance.
Another advantage of the Christmas Door Decoration Sewing Tutorial Pattern is its flexibility. You can make a long vertical decoration similar to the inspiration photo, create a shorter version for a cabinet handle, or enlarge the components for a statement piece on a front door. The stuffed ornaments are lightweight, making them suitable for hanging without requiring a heavy support structure. You can sew most components by machine and finish the decorative details by hand, or complete almost the entire project with hand sewing if you prefer. Beginners can simplify the embroidery while experienced makers can add more elaborate snowflakes, botanical motifs, French knots, blanket stitches, and decorative seams. Before starting, read through the complete tutorial and arrange your materials by color so that the finished composition feels coordinated rather than crowded. Careful planning at the beginning will make the final assembly considerably easier.
Materials and Preparation for the Christmas Door Decoration Sewing Tutorial Pattern
For this Christmas Door Decoration Sewing Tutorial Pattern, gather cotton or linen-blend fabrics in traditional Christmas shades. Good choices include dark red, moss green, ivory, beige, brown, tartan, gingham, miniature floral prints, and muted vintage-inspired designs. Small scraps are perfectly suitable because most pieces are relatively small. You will also need polyester fiberfill, coordinating sewing thread, embroidery floss, hand-sewing needles, fabric scissors, pins or clips, and a removable fabric marking pen.
DISCOVER MORE FREE PATTERNS HERE!
Prepare several decorative materials for the final arrangement. Useful additions include jute twine, rustic rope, artificial pine branches, red craft berries, miniature pinecones, decorative leaves, and a strong hanging loop. These elements are not sewn into every ornament but are placed between them during assembly. Choose lightweight artificial greenery whenever possible because excessive weight can pull the fabric ornaments out of position.
Create paper templates before cutting your fabric. Draw two or three Christmas tree templates approximately 12 to 18 cm tall, adjusting the size according to your desired decoration. The tree shape should have gently curved or slightly irregular branches instead of perfectly sharp geometric points. Create circle templates approximately 8 to 11 cm in diameter for the stuffed Christmas balls. Different sizes will make the arrangement look more natural and layered.
For each stuffed tree, cut two matching fabric pieces with right sides facing each other. Add approximately 0.7 to 1 cm of seam allowance around the template if it is not already included. Cut small rectangles of brown fabric for the trunks. A rectangle approximately 3 cm wide and 5 cm long works well for a medium tree, although the dimensions can easily be adjusted. Fold the trunk fabric in half, sew it, turn it right side out, and lightly stuff it if desired.
The round ornaments can be made in several ways, but a simple gathered-circle technique creates a soft spherical shape. Cut larger fabric circles and gather the outer edge using strong hand-sewing thread before adding fiberfill. Alternatively, cut several curved fabric segments and sew them together to create a more structured ball. The segmented method is excellent when you want visible seams that can later be emphasized with decorative embroidery.
Before sewing, place the unassembled fabrics on a flat surface and check the overall color balance. Avoid putting every red fabric on one side or every green piece in another area. Alternate plaid ornaments, solid greens, cream fabrics, and deep reds throughout the planned layout. Photographing your arrangement before sewing can help you remember where each color was intended to appear during final assembly.
How to Sew the Fabric Christmas Trees and Stuffed Ornaments
Begin with the fabric trees because they form the strongest visual shapes in the Christmas Door Decoration Sewing Tutorial Pattern. Place two tree pieces with their right sides together and position the finished trunk between the bottom edges, with the raw end extending into the seam. Pin everything securely. Sew around the tree using a small straight stitch, leaving an opening of approximately 4 to 5 cm along one side for turning and stuffing.
Trim excess fabric at sharp corners without cutting through the stitches. Clip carefully around inward curves so the fabric can turn smoothly. Turn the tree right side out using a blunt turning tool, knitting needle, or chopstick to gently shape the corners. Do not push too aggressively because the fabric can tear at the tips. Press lightly with an iron if necessary before adding the stuffing.
Fill each tree with small amounts of polyester fiberfill, working gradually from the upper point downward. Use enough filling to create dimension without making the tree extremely firm. A slightly soft tree usually looks more natural in a rustic hanging decoration. Once satisfied with the shape, turn the opening seam allowance inward and close it with a ladder stitch or small whipstitches.
To make the round ornaments, place the prepared pieces right sides together if using a sewn ball pattern. Stitch around each section carefully while maintaining a consistent seam allowance. Leave a small opening for turning. After turning, insert fiberfill gradually and massage the stuffing into the curves so that the ornament becomes evenly rounded rather than lumpy. Close the opening securely with invisible hand stitches.
For a simpler gathered ornament, sew a running stitch around the outside of a fabric circle, approximately 0.7 cm from the edge. Pull the thread slightly to begin gathering the fabric, add fiberfill to the center, and continue tightening the thread until the opening becomes very small. Secure the thread firmly with several knots. You can hide this gathered area underneath greenery, berries, a decorative cap, or another ornament during assembly.
Make approximately six to eight round fabric Christmas ornaments in different colors and patterns, plus two or three stuffed trees. You do not need to reproduce the inspiration image exactly. The goal is to create a similar layered composition while using your own fabric collection. Different prints, embroidery combinations, and ornament sizes will make the finished decoration unique while maintaining the recognizable style of the Christmas Door Decoration Sewing Tutorial Pattern.
Embroidery, Decorative Stitches, and Rustic Christmas Details
Embroidery is what turns simple stuffed fabric shapes into detailed handmade ornaments. Start with the edges of the Christmas trees. Use contrasting embroidery floss and create evenly spaced running stitches or blanket stitches around the perimeter. On green fabric, red, cream, or gold-toned thread creates attractive contrast. On plaid fabric, dark red or green thread usually complements the existing pattern without overwhelming it.
Add small decorative stars or snowflakes across the tree surfaces. A basic snowflake can be created with three intersecting straight stitches followed by tiny branches near the ends. Simple hand embroidery stitches are often more effective than complicated motifs because the ornaments are relatively small. You can also scatter tiny crosses, French knots, or star-shaped stitches across the fabric to imitate the handmade details visible in traditional Christmas decorations.
The round ornaments are ideal surfaces for botanical embroidery. On cream fabric, use green thread to create branches and leaves, then add tiny red French knots to represent berries. A red ornament looks beautiful with cream or beige snowflakes. Green ornaments can be decorated with pale gold leaves and groups of red berries. Varying the motifs prevents the entire project from appearing repetitive.
For a vintage look, avoid making every stitch identical. Handmade rustic Christmas sewing often benefits from subtle irregularity. Slight variations in the spacing of the stitches can make the ornaments look more authentic and personal. However, keep the stitches secure because these decorations may be stored and reused for many Christmas seasons. Knot embroidery thread carefully on the back or hide it within the stuffed ornament whenever possible.
Create decorative ornament tops using small scraps of felt, jute, fabric tubes, or gathered pieces of matching material. You can also tie small loops of cord to individual ornaments before assembling the complete decoration. These loops are particularly useful if you want the ornaments to remain removable. A few ornaments may even be used separately on a Christmas tree after the holiday door decoration is dismantled.
Finish the decorative components by creating a large jute bow. Cut several long strands of jute cord, form two generous loops, and wrap another strand tightly around the center. Leave long tails hanging below the bow. A rustic bow works particularly well with the fabric textures and natural greenery. If jute fibers begin fraying too much, trim the ends carefully rather than coating them heavily, because the slightly rough texture contributes to the handmade appearance.
Assembling and Hanging the Finished Christmas Door Decoration
Begin final assembly by laying all components on a large table. Position the largest stuffed Christmas tree near the upper section and distribute round ornaments below and beside it. Place another tree closer to the bottom to visually balance the first one. The Christmas Door Decoration Sewing Tutorial Pattern works best when the arrangement is asymmetrical but still visually balanced, meaning that every ornament does not need an identical partner on the opposite side.
Create a central support from several strong strands of jute cord or a narrow fabric strap. This backbone will hold the decoration together while remaining mostly hidden behind the ornaments and greenery. Attach the largest ornaments first with strong hand stitches, upholstery thread, or securely tied cord. Make sure each component is firmly connected before adding smaller decorative elements.
Insert artificial pine branches behind and between the fabric pieces. The greenery should frame the ornaments rather than cover them. Place small clusters of red berries near areas that need additional color, especially between cream or green ornaments. Miniature pinecones can be positioned near the lower section or among berry clusters. Keep checking the decoration from a distance because spacing that looks good close-up can appear different once the piece is hanging vertically.
Add the large jute bow at the top after the main body has been assembled. Secure it strongly to the central support instead of attaching it only to the greenery. Behind the bow, add a durable hanging loop large enough to fit your chosen door hook or cabinet knob. Test the hanging strength before displaying the project, particularly if you have used numerous ornaments and decorative branches.
Once the decoration is hanging, adjust individual components until the arrangement feels natural. Rotate round ornaments to display their best embroidered sides and gently bend artificial pine branches outward. Separate berry clusters if they appear too concentrated in one location. Long strands of jute can be allowed to hang naturally through the arrangement, adding vertical movement and connecting the top bow with the lower decorations.
Your completed Christmas Door Decoration Sewing Tutorial Pattern can be adapted for different interiors and holiday themes. For Scandinavian décor, use white, beige, muted red, and natural linen. For a farmhouse version, combine buffalo plaid, cream, olive green, and burlap. For an elegant interpretation, choose deep burgundy, forest green, ivory, velvet accents, and subtle gold embroidery. The basic construction stays the same, while fabric selection completely changes the mood of the finished project.
Frequently Asked Questions About the Christmas Door Decoration Sewing Tutorial Pattern
What fabric is best for a Christmas Door Decoration Sewing Tutorial Pattern?
Medium-weight cotton quilting fabric is one of the easiest options because it is stable, easy to cut, and available in many Christmas prints. Linen blends, lightweight wool, felt, and homespun fabrics are also excellent for a rustic appearance. Very stretchy fabrics are generally harder to control when creating small stuffed shapes.
Can beginners make this Christmas sewing project?
Yes. The basic sewing techniques include straight stitching, turning, stuffing, closing openings by hand, and simple embroidery. Beginners can simplify the decorative stitching and use basic running stitches instead of complex embroidery. Creating paper templates before cutting also makes the project easier to manage.
How much seam allowance should I add?
A seam allowance of 0.7 to 1 cm works well for most pieces. Narrower allowances can be used on smaller ornaments, but beginners may find slightly wider allowances easier to sew consistently. Remember to clip curved areas and trim corners before turning the pieces right side out.
How many ornaments are needed for a door decoration?
There is no required number. A medium vertical hanging decoration can look full with approximately two or three stuffed trees and six to eight round ornaments. Add greenery, berries, pinecones, and jute between them to create volume without having to sew dozens of fabric components.
Can I make the ornaments without a sewing machine?
Absolutely. This project can be completed using hand sewing. Use small backstitches for strong seams and ladder stitches for closing openings. Hand sewing takes longer, but it also complements the traditional handmade style of this type of Christmas decoration.
What filling should be used inside the ornaments?
Standard polyester fiberfill is convenient, lightweight, and easy to shape. Small clean fabric scraps can also be used, although they create a heavier ornament. Avoid overstuffing the pieces because softer shapes usually hang more naturally within the finished arrangement.
How can I make the Christmas balls perfectly round?
Use small amounts of stuffing at a time and distribute them evenly around the inside of the ornament. Massage the finished ball gently with your hands until the shape becomes balanced. A multi-panel ball pattern generally creates a more spherical ornament than a single gathered fabric circle.
What embroidery stitches work best for this project?
Running stitch, backstitch, blanket stitch, straight stitch, French knots, and simple lazy daisy stitches are all useful. These techniques can create snowflakes, berries, leaves, stars, branches, and decorative borders without requiring advanced embroidery skills.
Can leftover quilting fabric be used?
Yes, and this project is particularly suitable for fabric scraps. Because the ornaments are relatively small, many pieces can be cut from leftover quilting cotton. Mixing coordinated scraps also creates the layered vintage appearance associated with handmade Christmas decorations.
How can I make the decoration look more rustic?
Choose muted colors such as moss green, burgundy, cream, brown, and beige. Use homespun plaid, linen textures, jute, natural-looking greenery, wooden details, and hand embroidery. Avoid overly shiny materials if you want a traditional rustic Christmas décor style.
Can the Christmas door decoration be used outdoors?
The project is primarily suited to indoor or protected areas because ordinary cotton fabric and embroidery thread can absorb moisture. A covered porch may be suitable if the decoration remains protected from rain, snow, strong sunlight, and excessive humidity. Bring the piece indoors during severe weather to help preserve the fabric.
How should the finished decoration be stored after Christmas?
Remove dust gently, make sure the piece is completely dry, and place it in a clean storage container. Avoid compressing it beneath heavy decorations because the stuffed ornaments can lose their shape. Tissue paper placed around the embroidered pieces can help protect the surface during storage.
Can the pattern be enlarged or reduced?
Yes. One of the benefits of a Christmas Door Decoration Sewing Tutorial Pattern based on simple geometric templates is that the shapes can easily be resized. Larger trees and balls create a dramatic front-door decoration, while smaller pieces can become cabinet ornaments, garlands, gift toppers, or Christmas tree decorations.
Can I change the traditional red and green color palette?
Certainly. Christmas sewing does not have to be limited to red and green. Blue and silver can create a winter theme, cream and gold produce a more elegant result, and pink with white gives the project a softer contemporary appearance. Keep the colors coordinated across the ornaments so the final composition remains visually connected.
Conclusion
The Christmas Door Decoration Sewing Tutorial Pattern combines approachable sewing techniques with embroidery and creative holiday decorating. By starting with simple fabric trees and stuffed balls, adding decorative Christmas stitches, and then layering the pieces with pine branches, berries, pinecones, and rustic jute, you can build a detailed decoration without relying on complicated construction methods. The project is especially useful for using leftover quilting fabrics while creating something that can become part of your seasonal décor year after year.
The most important lessons are to plan the colors before cutting, keep the stuffing soft and evenly distributed, vary the embroidered motifs, and assemble the decoration gradually around a strong central support. Small handmade details such as snowflakes, berries, leaves, running stitches, and blanket-stitched edges give each ornament personality and help recreate the cozy appearance that makes this design so appealing.
EASILY FIND THE FREE PDF FOR THIS PATTERN HERE!
Once you understand the basic method, feel free to modify the sizes, fabrics, colors, ornament quantities, and embellishments. Your version does not need to be identical to the inspiration photo. A successful handmade project should reflect your own style while maintaining the structure and visual balance taught throughout this tutorial. If you create your own Christmas Door Decoration Sewing Tutorial Pattern, leave your sincere opinion about the project and share your suggestions. Which fabric combination would you choose, and what other Christmas ornaments would you add to the arrangement? Your ideas can inspire even more creative versions of this festive sewing project.