
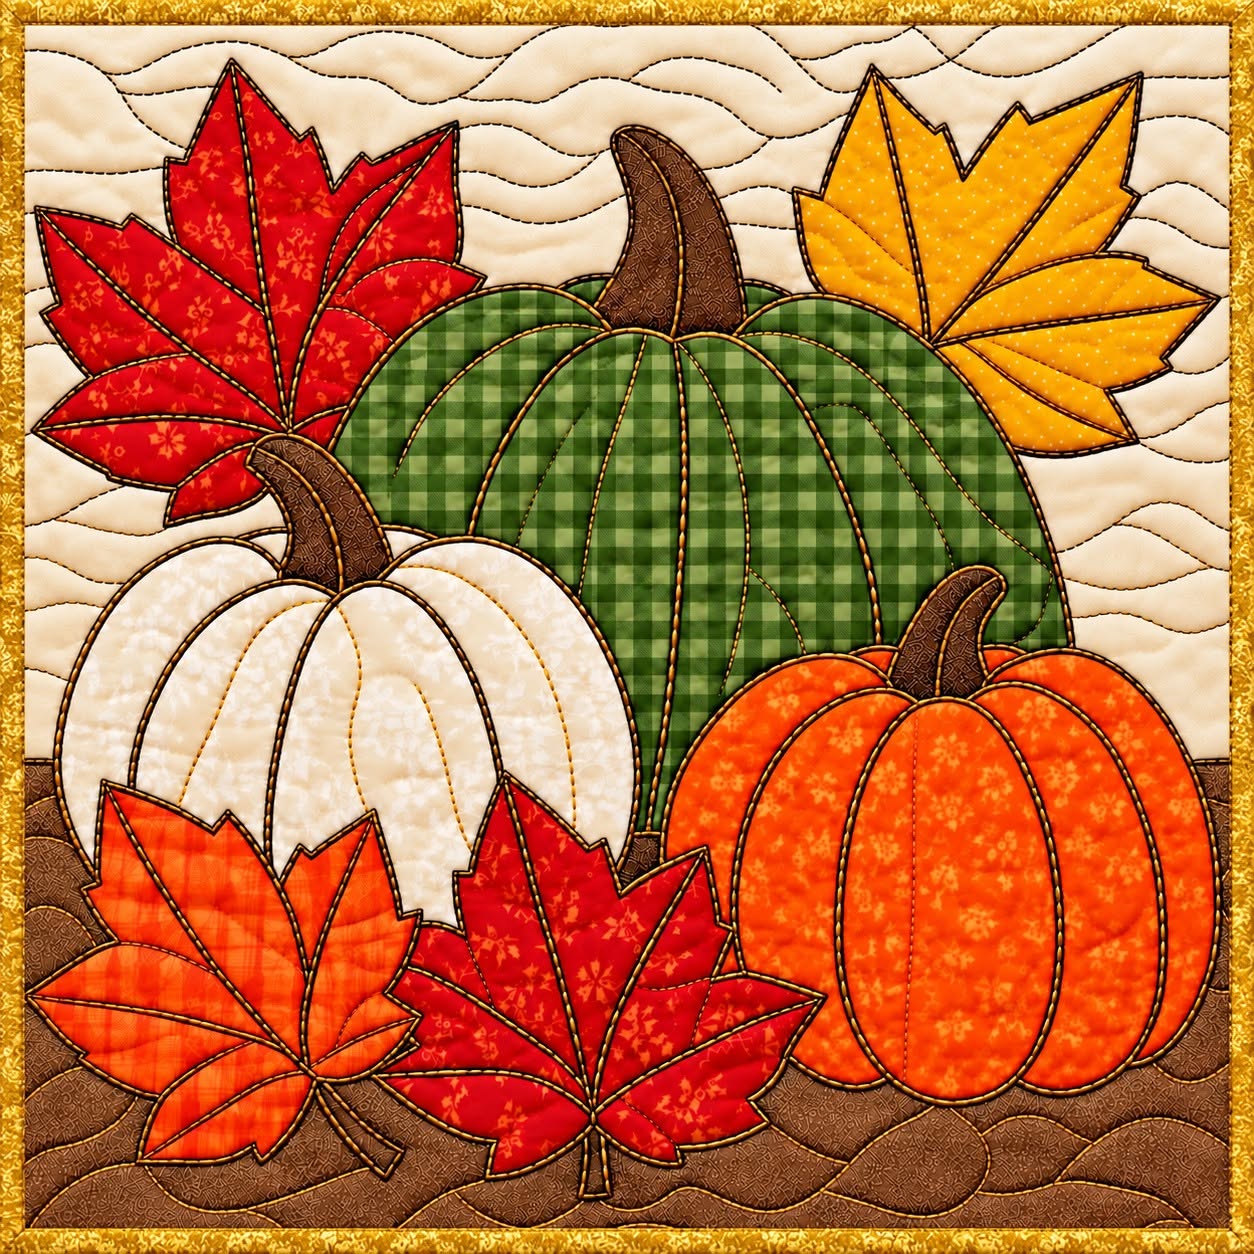
The Autumn Pumpkin Quilt Block Pattern is a warm, inviting sewing project that combines pumpkins, maple-style leaves, layered appliqué, and classic autumn colors into one decorative textile composition. Inspired by the project shown in the reference image, this design features a large orange pumpkin as the central focal point, accompanied by a soft cream pumpkin and a green checked pumpkin. Red, orange, and golden leaves surround the pumpkins and help create the feeling of a colorful fall harvest. The finished piece can be used as a quilt block, seasonal wall hanging, table decoration, pillow front, or as part of a larger autumn quilt. One of the strengths of this pattern is that it allows quilters to combine different prints and textures while keeping the overall composition visually balanced. Even though the design appears detailed, the individual pieces can be prepared separately and assembled gradually, making the project accessible to confident beginners and enjoyable for experienced quilters.
When we use the term Autumn Pumpkin Quilt Block Pattern, we are describing both the decorative theme and the construction method behind the project. “Autumn” refers to the seasonal palette of orange, rust red, mustard yellow, cream, olive green, brown, and beige. “Pumpkin” identifies the main appliqué motif, while “quilt block” refers to the fabric composition that can stand alone or become part of a larger quilt. Finally, “pattern” refers to the templates and placement plan used to recreate the design. The reference project combines several quilting techniques, including fabric appliqué, layered shapes, decorative stitching, quilting lines, and careful fabric selection. The pumpkins are divided into curved sections that imitate their natural rounded appearance, while the leaves are constructed with pointed lobes and stitched veins. These small details add movement and dimension without requiring overly complicated sewing techniques.
Before beginning your Autumn Pumpkin Quilt Block Pattern, spend time planning the size, fabrics, and placement of every element. A square background around 40 to 45 cm can work well for a decorative block, although you can enlarge or reduce the templates depending on your final project. Select quilting cotton whenever possible because it is stable, easy to press, and simple to appliqué. Prepare a neutral beige background, orange fabrics for the central pumpkin, cream fabric for the lighter pumpkin, green checks or prints for the smaller pumpkin, and several autumn prints for the leaves. You will also need brown fabric for stems and an optional brown fabric section along the bottom to suggest a surface or ground. Coordinating thread, lightweight fusible web, fabric scissors, pins, an iron, a sewing machine, and basic quilting tools will help you achieve clean results. Washing, drying, and pressing your fabrics before cutting can also reduce unexpected shrinkage later.
Materials, Fabric Selection, and Pattern Preparation
The first step in creating an Autumn Pumpkin Quilt Block Pattern is choosing fabrics that clearly separate each appliqué shape. The background in the inspiration piece is light and neutral, allowing the stronger autumn shades to stand out. A beige, cream, oatmeal, or softly printed fabric works especially well. Small dots or subtle tonal patterns can add texture without competing with the pumpkins and leaves. If you plan to add quilting to the background later, avoid extremely busy prints because they can make your quilting lines difficult to see.
DISCOVER MORE FREE PATTERNS HERE!
For the largest pumpkin, prepare two or three coordinating orange fabrics. You can use the same fabric throughout, but combining slightly different orange prints adds depth. The pumpkin appliqué should remain visually dominant, so choose a rich orange that contrasts clearly with the background. Small floral designs, tonal prints, subtle vines, or tiny geometric patterns work nicely because they introduce interest without hiding the shape of the pumpkin.
The cream pumpkin provides an important visual break between the stronger orange and green sections. Choose off-white, ivory, pale beige, or low-volume cream fabrics. Avoid pure white if you want a rustic fall appearance. A softly patterned cream fabric can create a handmade country style similar to the inspiration. Because the pumpkin is light, select thread that blends with the fabric for interior seams or choose a darker decorative thread when you want the curved segments to stand out.
For the green pumpkin, olive, sage, moss, or muted forest green fabrics create an authentic autumn palette. A checked or gingham fabric is especially effective because it gives the design a cozy farmhouse character. The Autumn Pumpkin Quilt Block Pattern works best when each pumpkin has its own personality, so there is no need to use identical prints. The goal is to keep the colors harmonious while maintaining enough contrast to distinguish each shape.
Prepare maple-inspired leaves in red, burnt orange, and mustard yellow. Make several templates in different sizes so the finished composition looks natural rather than perfectly symmetrical. Each leaf can be cut as one complete shape, making construction much easier. For additional detail, mark a center vein and several smaller diagonal veins. These lines can later be stitched with contrasting thread to create the appearance of leaf structure and add decorative quilting.
Finally, prepare paper templates for every component before cutting the final fabrics. Create templates for the large pumpkin sections, cream pumpkin, green pumpkin, stems, and leaves. Add approximately 0.6 cm seam allowance if you intend to use turned-edge appliqué. If you prefer fusible appliqué, the shapes can usually be traced at their finished size because the raw edges will be secured with stitching. Number the pumpkin sections from left to right to avoid confusion when assembling the design.
Cutting and Building the Three Pumpkin Appliqués
Begin with the central orange pumpkin because it establishes the scale of the entire composition. Draw a rounded pumpkin silhouette approximately 24 to 28 cm wide for a medium-sized block. Divide the pumpkin into four or five vertical curved sections. The outer sections should curve outward while the middle sections remain taller and more vertical. This division creates the characteristic dimensional appearance found in a traditional Autumn Pumpkin Quilt Block Pattern.
Transfer the pumpkin pieces onto fabric or fusible web according to your preferred appliqué method. When using fusible web, remember to trace directional shapes in reverse because they will flip after being fused to the wrong side of the fabric. Cut roughly around each traced section, fuse it to the fabric according to the product instructions, and then cut carefully on the final outline. Allow each piece to cool before removing the paper backing to prevent distortion.
Arrange the orange pumpkin sections on the background before permanently attaching anything. Begin with the outside sections and work toward the center. Slightly overlapping the sections can help create depth, but keep the overall pumpkin shape smooth. Position the pumpkin high enough to leave space for the cream and green pumpkins in front. Once you are satisfied with the placement, fuse or pin the pieces according to the appliqué technique you are using.
Next, make the cream pumpkin slightly smaller than the orange pumpkin. Position it toward the lower left side, allowing part of the orange pumpkin to remain visible behind it. Divide the cream pumpkin into several curved segments just as you did with the orange version. Curved stitched lines are especially important on pale fabrics because they help define the pumpkin’s form. Maintain smooth curves and avoid making every section exactly identical; slight variation often makes the finished fabric pumpkin appliqué look more natural.
Construct the green pumpkin for the lower right area. It should overlap the bottom portion of the large orange pumpkin and may also overlap a small section of the cream pumpkin, depending on your chosen layout. A green checked fabric works beautifully here because the straight printed lines contrast with the curved pumpkin segments. Keep the outer shape rounded and slightly wider at the lower portion. Add three or four interior curves to give the pumpkin dimension.
Cut stems from dark brown, gray-brown, or textured fabric. The large orange pumpkin can have a tall curved stem, while the cream and green pumpkins can have shorter stems. Fuse or appliqué each stem before placing any pumpkin section that should overlap its lower edge. This layering detail makes the Autumn Pumpkin Quilt Block Pattern appear intentionally constructed rather than looking like separate flat shapes placed beside one another.
Creating Autumn Leaves and Assembling the Quilt Block
Once the pumpkins are prepared, begin creating the decorative leaves. Trace maple-style leaf templates onto red, orange, and golden fabrics. You can create two large leaves for the upper corners and two slightly smaller leaves near the lower portion of the block. The combination of different sizes gives the project movement and helps frame the central pumpkins. Sharp leaf points are attractive, but slightly rounded tips are easier to sew and less likely to fray.
Position a large red leaf behind the upper-left side of the orange pumpkin. A yellow or mustard leaf can be placed behind the upper-right side. These upper leaves should appear to emerge from behind the central pumpkin rather than sitting directly on top of it. Therefore, attach them before permanently sewing the pumpkin edges. This is an important part of successful layered appliqué, where background elements are applied first and foreground elements are added later.
The lower leaves can overlap the cream and green pumpkin areas slightly or remain in front of the brown ground section. An orange leaf on the lower left and a red leaf near the center will create color repetition and visually connect the upper and lower sections. Repeating similar colors in different areas is a useful design principle because it prevents one part of the quilt block from feeling too heavy.
Add decorative veins to each leaf after the shapes are secured. Begin with one line running from the stem toward the central point. Then stitch smaller lines toward the side lobes. Gold, mustard, dark brown, or coordinating thread can all work well. Decorative leaf stitching is not only attractive but also helps hold larger appliqué pieces securely to the quilt background. Keep the stitch length consistent for a polished appearance.
Now examine the overall Autumn Pumpkin Quilt Block Pattern before completing the edge stitching. The orange pumpkin should remain the dominant element, while the cream and green pumpkins create a layered foreground. The leaves should frame the pumpkins without covering too much of them. Adjust any shapes that are not permanently fixed. Even a movement of one or two centimeters can significantly improve the visual balance of the finished quilt block.
When the composition looks balanced, secure the appliqué edges. A small zigzag stitch, blanket stitch, satin stitch, or straight raw-edge appliqué stitch can be used. If you want the stitched outlines to be noticeable like those in the inspiration, choose brown, gold, or dark neutral thread. If you prefer a softer look, match the thread to each fabric. Sew slowly around tight curves and leaf points, stopping with the needle down whenever you need to pivot the fabric.
Quilting, Finishing Details, and Creative Variations
After completing the appliqué, layer the quilt block with batting and backing fabric. Smooth the three layers carefully and secure them with quilting pins, clips, or temporary basting. The batting will give the pumpkins additional volume and make the stitched segments appear more pronounced. Low-loft cotton or cotton-blend batting is an excellent option when you want the finished Autumn Pumpkin Quilt Block Pattern to remain relatively flat.
Quilt the background without overwhelming the appliqué. Gentle curves, loops, meandering lines, or echo quilting can fill the open areas. Another option is to stitch around the outer edges of each pumpkin and leaf. This technique visually raises the appliqué shapes and creates a subtle three-dimensional effect. Quilting lines do not need to be extremely dense; even a moderate amount of quilting can give the piece a professional finish.
Add quilting inside the pumpkins by following the curved segment lines. Stitching along these lines emphasizes the rounded shape and makes the pumpkins appear fuller. You can also quilt close to the leaf veins and around each stem. If your fabric already contains strong checks or prints, simpler quilting is often better because it prevents the surface from becoming visually crowded.
Trim the completed block so the edges are straight and square. If you plan to use it as an individual wall hanging or table mat, prepare binding strips approximately 6 to 6.5 cm wide. Join the strips, press them, and sew the binding around the outer edge. Fold it to the back and secure it by hand or machine. A brown, rust, green, or coordinating neutral binding can frame the autumn colors beautifully.
You can also adapt the Autumn Pumpkin Quilt Block Pattern for different projects. Reduce the templates to create mug rugs, placemats, or small decorative blocks. Enlarge the pumpkins for a wall hanging or pillow cover. Several blocks could be joined together with sashing to make a larger fall quilt. Changing the leaf colors from traditional autumn shades to blue, purple, or burgundy can produce a more contemporary interpretation while keeping the same construction process.
The final step is pressing and checking your work. Trim loose threads and inspect every appliqué edge. If any points or curves have lifted, secure them with additional stitching. Press from the back whenever possible, especially if fusible products were used. Once finished, your Autumn Pumpkin Quilt Block Pattern should showcase three dimensional-looking pumpkins surrounded by colorful fall leaves, creating a cozy handmade decoration that celebrates the textures and colors associated with autumn.
FAQ – Frequently Asked Questions About the Autumn Pumpkin Quilt Block Pattern
What is an Autumn Pumpkin Quilt Block Pattern?
An Autumn Pumpkin Quilt Block Pattern is a quilting design featuring pumpkin and fall-inspired fabric motifs arranged on a quilt block. The shapes are generally created through appliqué and can be combined with decorative quilting, seasonal leaves, stems, and autumn-colored fabrics.
Is this pumpkin quilt pattern suitable for beginners?
Yes. A beginner who understands basic cutting, pressing, and sewing can make this project. Fusible appliqué is particularly beginner-friendly because the pieces can be positioned and fused before edge stitching begins. Beginners may want to practice stitching around curves on scrap fabric first.
What fabric is best for an autumn pumpkin quilt block?
Quilting cotton is one of the best choices because it is stable, widely available, and easy to sew. Orange tonal prints, cream low-volume fabric, green checks, brown textures, and red or golden prints work especially well for this seasonal design.
Do I need fusible web for the appliqué?
No. Fusible web is convenient but not required. You can use needle-turn appliqué, freezer-paper appliqué, raw-edge appliqué, or another technique you already enjoy. Fusible web simply makes positioning and securing multiple shapes easier.
How large should the pumpkin quilt block be?
There is no required size. A block measuring approximately 40 to 45 cm square is practical for a wall hanging or pillow front. You can resize the templates for larger or smaller projects as long as all design elements are adjusted proportionally.
Should the pumpkin sections be separate fabric pieces?
They can be. Separate sections create more visual depth and allow you to mix fabrics. However, you can also cut one complete pumpkin shape and add curved stitched lines afterward. Both methods can produce an attractive pumpkin quilt block.
What stitch should I use around appliqué pieces?
Blanket stitch and narrow zigzag stitch are popular choices. A straight stitch close to the raw edge can also be effective for a more rustic appearance. Satin stitch provides fuller edge coverage but requires more thread and careful machine control.
Can I make this pattern without a sewing machine?
Yes. Hand appliqué and hand quilting can be used throughout the project. The process will take longer, but hand stitching can create a beautiful traditional finish.
How can I make the pumpkins look three-dimensional?
Use several curved pumpkin sections, quilt along the segment lines, and choose fabrics with slightly different values. Positioning smaller pumpkins in front of the larger orange pumpkin also creates visual depth through overlapping layers.
Can I change the colors of the Autumn Pumpkin Quilt Block Pattern?
Absolutely. Traditional fall colors are only a starting point. You could create pumpkins in blue, teal, burgundy, gold, gray, or even patchwork scraps. The most important factor is maintaining enough contrast between the background and the appliqué shapes.
How do I prevent appliqué edges from fraying?
Choose a stitch that catches the raw edge securely. A narrow zigzag or blanket stitch is particularly useful. Good-quality quilting cotton and careful handling also help reduce fraying.
Can the finished block become a pillow cover?
Yes. Complete the appliqué and quilting first, trim the block to the desired pillow size, and then add an envelope or zippered backing. The layered pumpkins create a beautiful seasonal cushion design.
Conclusion
The Autumn Pumpkin Quilt Block Pattern brings together many enjoyable elements of seasonal quilting: bold pumpkins, colorful leaves, layered appliqué, decorative stitching, and rich fabric textures. Starting with a neutral background allows the orange, cream, green, red, and golden fabrics to become the center of attention while maintaining a cozy fall-inspired appearance.
Throughout this project, you learned how to choose coordinating fabrics, prepare templates, construct three different pumpkin shapes, create maple-inspired leaves, organize the appliqué layers, secure the raw edges, add decorative veins, quilt the finished design, and complete the project with binding or another finishing method. The same techniques can also be adapted to pillows, placemats, wall hangings, table décor, and larger seasonal quilts.
EASILY FIND THE FREE PDF FOR THIS PATTERN HERE!
The most important part of creating an Autumn Pumpkin Quilt Block Pattern is not making every curve perfectly identical. Handmade quilting becomes special through fabric choices, small variations, creative stitching, and personal details. Use the photograph as inspiration while allowing your own combination of prints, colors, and quilting lines to make the project unique. If you create your own version of this Autumn Pumpkin Quilt Block Pattern, leave your sincere opinion about the project and share your suggestions. Which pumpkin color would you choose, and what autumn fabrics would you add to make this quilt block your own?