
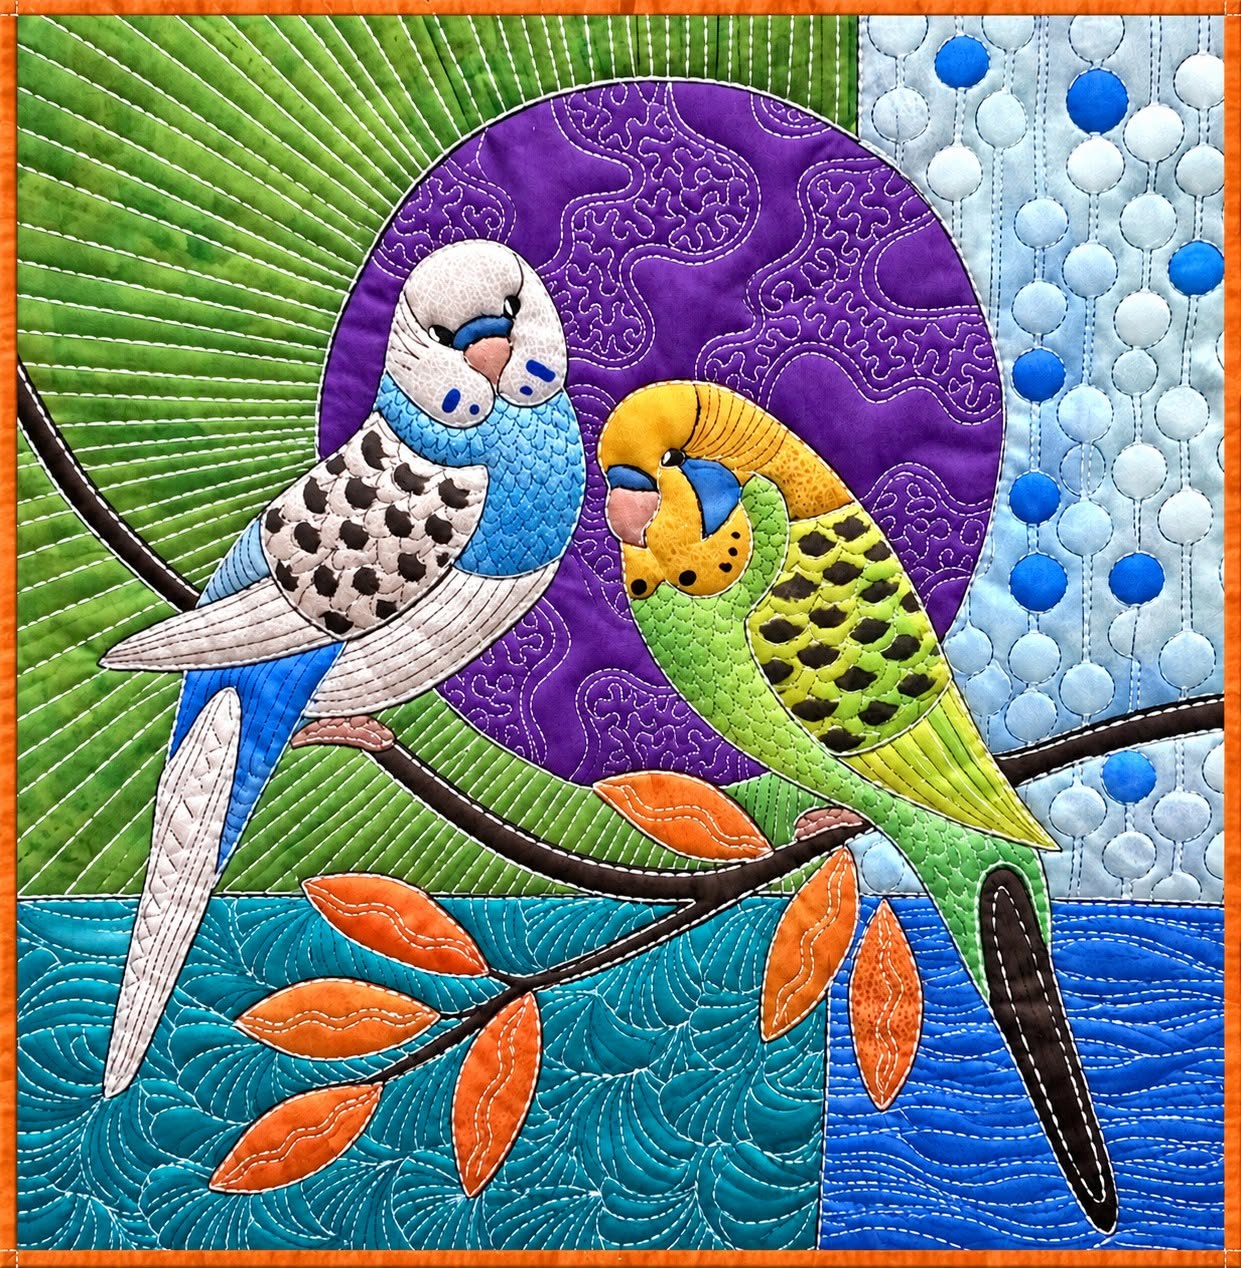
Patchwork Parakeets Appliqué and Quilting Tutorial Pattern is a charming fabric-art project that combines expressive bird appliqué, curved patchwork, decorative quilting, and careful color placement in one visually rich composition. Inspired by the image provided, this design features two colorful parakeets resting closely together on a branch, surrounded by large curved background sections in green, purple, turquoise, and blue. The contrast between the birds and the abstract background gives the finished piece the look of a small textile painting, making it suitable for a wall hanging, decorative cushion panel, mini quilt, or framed fabric artwork.
One of the most interesting qualities of this Patchwork Parakeets Appliqué and Quilting Tutorial Pattern is that it does not rely on complicated piecing alone to create depth. Instead, the project combines large background shapes with smaller appliqué pieces for the birds, wings, faces, leaves, branch, and tail feathers. Decorative quilting then adds a second layer of detail. Straight or gently curved parallel quilting creates texture in the green section, free-motion quilting fills the purple circle, pebble-inspired stitches decorate the pale blue area, and flowing lines can be used across the lower sections to suggest movement.
This project can be adapted for intermediate beginners as well as experienced quilters because each stage can be completed separately. You can simplify the bird details by using fewer fabric pieces, or create a highly detailed version with individually appliquéd feathers and dense quilting. The key is to build the composition gradually: prepare the background first, create a placement guide, assemble the parakeets, secure every appliqué section, layer the quilt sandwich, and finally add quilting that complements rather than competes with the birds. By following that sequence, the Patchwork Parakeets Appliqué and Quilting Tutorial Pattern becomes much easier to organize and finish successfully.
Materials, Fabric Selection, and Preparing the Patchwork Background
Begin by deciding the finished size of your project. A practical starting size for a decorative panel is approximately 40 x 40 cm, although the design can be enlarged or reduced. For a 40 cm square finished panel, cut your background foundation slightly larger, approximately 45 x 45 cm, so that you have extra fabric for quilting distortion and final trimming. You will also need batting and backing fabric approximately the same oversized measurement.
DISCOVER MORE FREE PATTERNS HERE!
For the background, choose several quilting cottons in colors similar to the reference image: green fabric, purple fabric, light blue fabric, deep blue fabric, and turquoise fabric. Tone-on-tone prints work especially well because they create visual interest without making the parakeets difficult to see. Fabrics containing subtle swirls, leaves, geometric marks, or small dots can imitate the layered textile effect visible in the original composition.
Create the largest shapes before working on the birds. The background can be constructed as curved appliqué rather than traditional curved piecing, which makes the process more accessible. Start with one complete foundation square. Cut a large green curved section for the upper-left area, a pale blue curved section for the upper-right area, and turquoise and deep blue pieces for the lower region. A large purple circle or oval should become the central focal background behind the birds.
Place the purple shape slightly above the center of the panel. In the reference composition, this dark purple area provides strong contrast behind the heads and upper bodies of the birds. If using raw-edge appliqué, apply lightweight fusible web to the wrong side of the purple fabric before cutting the circle. Fuse it to the background according to the manufacturer’s temperature recommendations, making sure the shape remains smooth and flat.
Next, position the remaining large background sections so that their edges meet or overlap slightly. Black or very dark fabric strips can be inserted between some sections to imitate the bold curved outlines seen in the design. These strips should remain relatively narrow, approximately 0.5 to 1 cm visible after stitching. Their purpose is to create definition between color areas rather than dominate the composition.
Once satisfied with the placement, secure all major background pieces. You may use a narrow zigzag, blanket stitch, satin stitch, or straight raw-edge appliqué. Raw-edge appliqué means that a fabric shape is placed on top of another fabric and stitched close to its unfinished edge. It is especially useful for artistic quilts because it allows curved and irregular shapes to be created without complicated seam allowances.
Creating the Parakeet Appliqué Pieces Step by Step
The next stage of the Patchwork Parakeets Appliqué and Quilting Tutorial Pattern is constructing the two birds. Before cutting fabric, draw or trace each parakeet as a simplified paper template. Separate the design into manageable sections such as body, head, face, wing, chest, tail feathers, beak, eye markings, and feet. Number the pieces so that you can easily reconstruct the bird after cutting.
For the left parakeet, select pale cream or white fabric for the face, soft blue for the chest, patterned black-and-white fabric for the wing, light neutral fabric for the lower body, and stronger blue fabric for tail accents. For the right parakeet, combine yellow or golden fabric for the head with green fabrics for the chest and body. A darker green-and-black print works particularly well for the wing because it suggests feather markings without requiring every individual feather to be appliquéd.
Apply paper-backed fusible web to the wrong side of each selected fabric before tracing the templates. Remember that fusible appliqué templates often need to be reversed if their direction matters. Trace each template onto the paper side of the fusible product, cut roughly around it, fuse it to the fabric, and then cut accurately on the traced outline. This method helps maintain clean curves around the parakeets’ faces, wings, and tails.
Build each bird on a non-stick appliqué sheet or directly on the quilt background. Begin with the largest body section, followed by the chest and head. Add the wing, face sections, cheek markings, beak, eye, and small feather details afterward. Slight overlaps between pieces are useful because they prevent gaps from appearing between fabrics. Refer frequently to the original placement so that the posture of both birds feels balanced and affectionate.
To create the recognizable parakeet facial markings, use small blue, black, cream, and neutral fabric pieces. The eyes can be tiny circles of dark fabric, while the beaks can be made from peach, tan, or pale brown fabric. If very small appliqué pieces become difficult to handle, fabric-safe textile markers or dense thread painting can be used for selected details instead of cutting extremely tiny shapes.
Once the birds are assembled correctly, fuse them permanently to the panel and stitch around every significant section. A narrow blanket stitch provides a traditional appliqué appearance, while a short zigzag gives additional security. Straight stitching close to the raw edge produces a contemporary finish. Use matching thread for subtle outlines or darker thread when you want the individual feather and body sections to remain clearly defined.
Adding the Branch, Leaves, Feather Details, and Decorative Quilting
The branch is an important compositional element because it visually supports both parakeets and connects the upper and lower portions of the panel. Cut the branch from black, charcoal, or very dark brown fabric. Allow it to travel diagonally beneath the birds, with smaller branches extending toward the lower leaves. The irregular shape is easier to achieve with appliqué than traditional patchwork piecing.
Create several individual leaves using rust, terracotta, brown, copper, or muted orange fabrics. Cut them in different sizes, approximately 2.5 to 6 cm long depending on the scale of the project. Position them naturally along the branch, pointing in slightly different directions. Stitch a line through the center of each leaf to imitate a vein and add simple diagonal lines if you want more botanical detail.
After completing all appliqué work, prepare the quilt sandwich. A quilt sandwich consists of backing fabric on the bottom, batting in the middle, and the finished quilt top on the surface. Smooth the three layers carefully and secure them with safety pins, temporary basting spray, or long hand-basting stitches. Good basting is essential because dense decorative quilting can cause shifting if the layers are not properly stabilized.
Begin quilting in the largest background sections. In the green upper-left area, quilt parallel curved lines that follow the direction of the fabric shapes. These repeated lines create a ribbed effect and help guide the viewer’s eye toward the birds. In the turquoise and blue lower sections, try flowing free-motion curves, wave-like lines, spirals, or loose feather-inspired motifs to create rich texture.
The pale blue upper-right section can be quilted with pebble quilting, a free-motion technique made from connected circles and rounded shapes. Mix small and medium circles rather than making every pebble identical. The purple central circle can contain meandering lines, floral curls, feathers, paisleys, or stippling. Keeping each background zone quilted differently is one of the easiest ways to reproduce the artistic character of the reference panel.
Quilt the birds more selectively. Avoid extremely dense quilting over their faces because too much stitching can obscure their expressions. Instead, follow the contours of the bodies and wings, adding feather-like arcs, short curved lines, and echo quilting around the appliqué edges. Echo quilting means stitching repeated lines around an appliqué shape, usually a few millimeters away from the previous line, helping the main motif stand out from its surroundings.
Finishing the Quilt and Achieving a Professional Appliqué Result
When all decorative quilting is complete, inspect the panel carefully before trimming. Look for any appliqué edges that have lifted, loose threads, skipped stitches, or areas where additional quilting may be needed. Secure loose thread ends by knotting and burying them between the quilt layers whenever possible. This produces a cleaner back than repeatedly backstitching on visible areas.
Square the panel using a quilting ruler and rotary cutter. For a project originally cut around 45 x 45 cm, the final measurement may finish near 40 x 40 cm depending on quilting density and your preferred border size. Measure from the center outward and make small trimming adjustments rather than removing large amounts of fabric at once.
Create binding from coordinated fabric. Dark blue, charcoal, black, purple, or green can all work well with this palette. Cut binding strips approximately 6 to 7 cm wide, join them with diagonal seams, press the strip in half lengthwise, and attach it around the quilt perimeter. Fold the binding to the back and finish it by hand for a traditional appearance or machine stitch it for a faster finish.
If you want to turn the Patchwork Parakeets Appliqué and Quilting Tutorial Pattern into a wall hanging, add a hanging sleeve to the back before completing the final binding stitches. A sleeve approximately 8 to 10 cm deep is usually sufficient for a small decorative rod. For a cushion instead, omit the binding and attach the quilted panel to an envelope-style or zipper-backed cushion cover.
Pressing should be done cautiously after quilting. Avoid crushing dimensional quilting with excessive pressure. If pressing is necessary, place the quilt face down over a thick towel and use moderate heat. This allows the quilted texture to remain visible. Fusible appliqué projects should also be protected from excessive heat after completion because repeated high temperatures can affect some adhesive products.
The final professional touch comes from balance. Do not feel obligated to quilt every centimeter with the same density. The birds should remain the focal point, while the contrasting textures of the green, purple, blue, and turquoise background create movement around them. When color, appliqué, and quilting density work together, the result becomes a textile artwork rather than simply a collection of stitched fabric pieces.
FAQ About the Patchwork Parakeets Appliqué and Quilting Tutorial Pattern
Is the Patchwork Parakeets Appliqué and Quilting Tutorial Pattern suitable for beginners?
Yes, especially if you simplify the number of appliqué pieces. Beginners can use fusible raw-edge appliqué and basic straight-line quilting instead of advanced free-motion designs. The most important step is organizing and numbering the bird templates before cutting.
What is the best fabric for appliqué birds?
High-quality quilting cotton is usually the easiest option because it is stable, easy to cut, and available in many prints. Small-scale prints are particularly useful for wings because the fabric pattern can naturally imitate feathers.
Do I need fusible web for this project?
It is not absolutely necessary, but it makes detailed appliqué significantly easier. Fusible web temporarily or permanently holds the shapes in place before edge stitching and reduces movement while sewing.
Can I hand appliqué the parakeets instead?
Yes. Needle-turn appliqué can create a beautiful traditional finish. Add seam allowance to every template piece, turn the raw edges underneath, and hand stitch each shape to the background with small invisible stitches.
What stitch should I use around raw-edge appliqué?
Blanket stitch, zigzag stitch, satin stitch, or straight edge stitching can all work. Blanket stitch produces a decorative outline, zigzag is secure, satin stitch completely covers the raw edge, and straight stitching gives a modern artistic appearance.
What is free-motion quilting?
Free-motion quilting is a technique where the feed dogs are lowered or covered and the quilter manually moves the quilt beneath the needle. This makes it possible to create curves, spirals, pebbles, feathers, stippling, and other decorative designs in almost any direction.
How can I quilt the project without free-motion quilting experience?
Use a walking foot and quilt gently curved or straight parallel lines. You can also echo the large background shapes and appliqué outlines. Even simple repeated lines can create strong texture when the spacing is consistent.
How do I prevent appliqué pieces from fraying?
Fusible web reduces fraying, but the most effective protection comes from stitching the edges. A narrow zigzag or blanket stitch is particularly useful when the finished item will be washed frequently.
Can this pattern be enlarged into a full-size quilt?
Yes. The bird panel can become the center medallion of a larger quilt. Add patchwork borders, flying geese, simple squares, strips, or solid fabric frames around the central design until the desired dimensions are reached.
What colors can replace those shown in the image?
Almost any coordinated palette can work. The important principle is contrast. Keep the birds visually separate from the background. For example, warm red and orange birds could be placed against blue-green backgrounds, or pastel birds could be used against deeper jewel-tone fabrics.
How should I transfer the parakeet templates onto fabric?
Trace each separated shape onto fusible-web paper. If the pattern is directional, reverse the template before tracing. Fuse the traced section to the wrong side of the selected fabric and cut directly on the outline.
Why is quilting density important?
Quilting density influences how raised or flat different parts of the design appear. Dense quilting around the birds can make them visually rise above the background, while lighter quilting inside the birds preserves softness and detail.
Can embroidery be added to the pattern?
Yes. Embroidery is an excellent way to create eyes, feather markings, leaf veins, feet, and small facial details. It is especially helpful when a fabric appliqué piece would be too small to cut accurately.
Should the birds be appliquéd before or after quilting the background?
For this style of project, it is usually easier to complete the appliqué before assembling the quilt sandwich and quilting. Quilting can then travel around and sometimes across selected appliqué areas, visually integrating the entire design.
How can I make both birds look dimensional?
Use fabrics with different values, meaning different degrees of lightness and darkness. Place lighter colors on prominent areas such as the face and chest and darker fabrics around wings or shadow areas. Curved quilting lines also help create the impression of rounded bodies.
Conclusion
The Patchwork Parakeets Appliqué and Quilting Tutorial Pattern brings together several enjoyable textile techniques in a single expressive project. The process begins with a colorful patchwork-inspired background, develops through detailed fusible or hand appliqué, and finishes with decorative quilting that gives every section its own texture and personality.
Throughout the project, you learned how to organize the background into large curved sections, create a central contrasting area, construct each parakeet from layered fabric shapes, add the branch and leaves, secure raw edges, assemble the quilt sandwich, and use techniques such as free-motion quilting, pebble quilting, echo quilting, and contour stitching to enhance the finished composition.
The greatest advantage of this pattern is its flexibility. You can simplify the appliqué for a quicker project or add more feather pieces, embroidery, thread painting, and dense quilting for a highly detailed art quilt. You can also transform the finished design into a wall hanging, pillow panel, framed textile piece, or the center of a larger quilt.
Most importantly, allow your choice of fabrics and stitches to give the two parakeets their own character. Patchwork and appliqué are especially rewarding when the maker adds personal variations rather than trying to reproduce every detail exactly. Different prints, unexpected colors, and individual quilting motifs can make each finished version unique.
EASILY FIND THE FREE PDF FOR THIS PATTERN HERE!
If you create your own Patchwork Parakeets Appliqué and Quilting Tutorial Pattern, leave your sincere opinion about the project and share your suggestions. Which colors would you choose for the parakeets, and what quilting design would you use in the background? Your ideas can inspire new variations of this colorful appliqué and quilting project.