
Butterfly keychains in crochet Pattern is a charming crochet project that combines decorative stitches, soft color changes, practical construction, and small finishing details to create an accessory that can be attached to keys, bags, backpacks, purses, or handmade gifts. The butterfly shape is especially appealing because it allows crocheters to experiment with symmetrical wings, contrasting yarn colors, textured borders, beads, and simple assembly techniques. Even though the finished piece looks detailed, the construction can be approached in manageable stages, making this crochet butterfly keychain suitable for adventurous beginners and enjoyable for more experienced makers who want a quick project.
One of the best qualities of the Butterfly keychains in crochet Pattern is its flexibility. You can create the wings with two closely related colors, use bright contrasting shades, or work with a single color for a cleaner look. The body can be crocheted, formed with beads, or created with a combination of yarn and decorative elements. The antennae may be made from crochet chains, cord, or reinforced yarn, while the keychain ring can be attached securely at the top of one wing or behind the butterfly body. Because the project uses relatively little yarn, it is also an excellent way to use small leftover balls from other crochet projects.
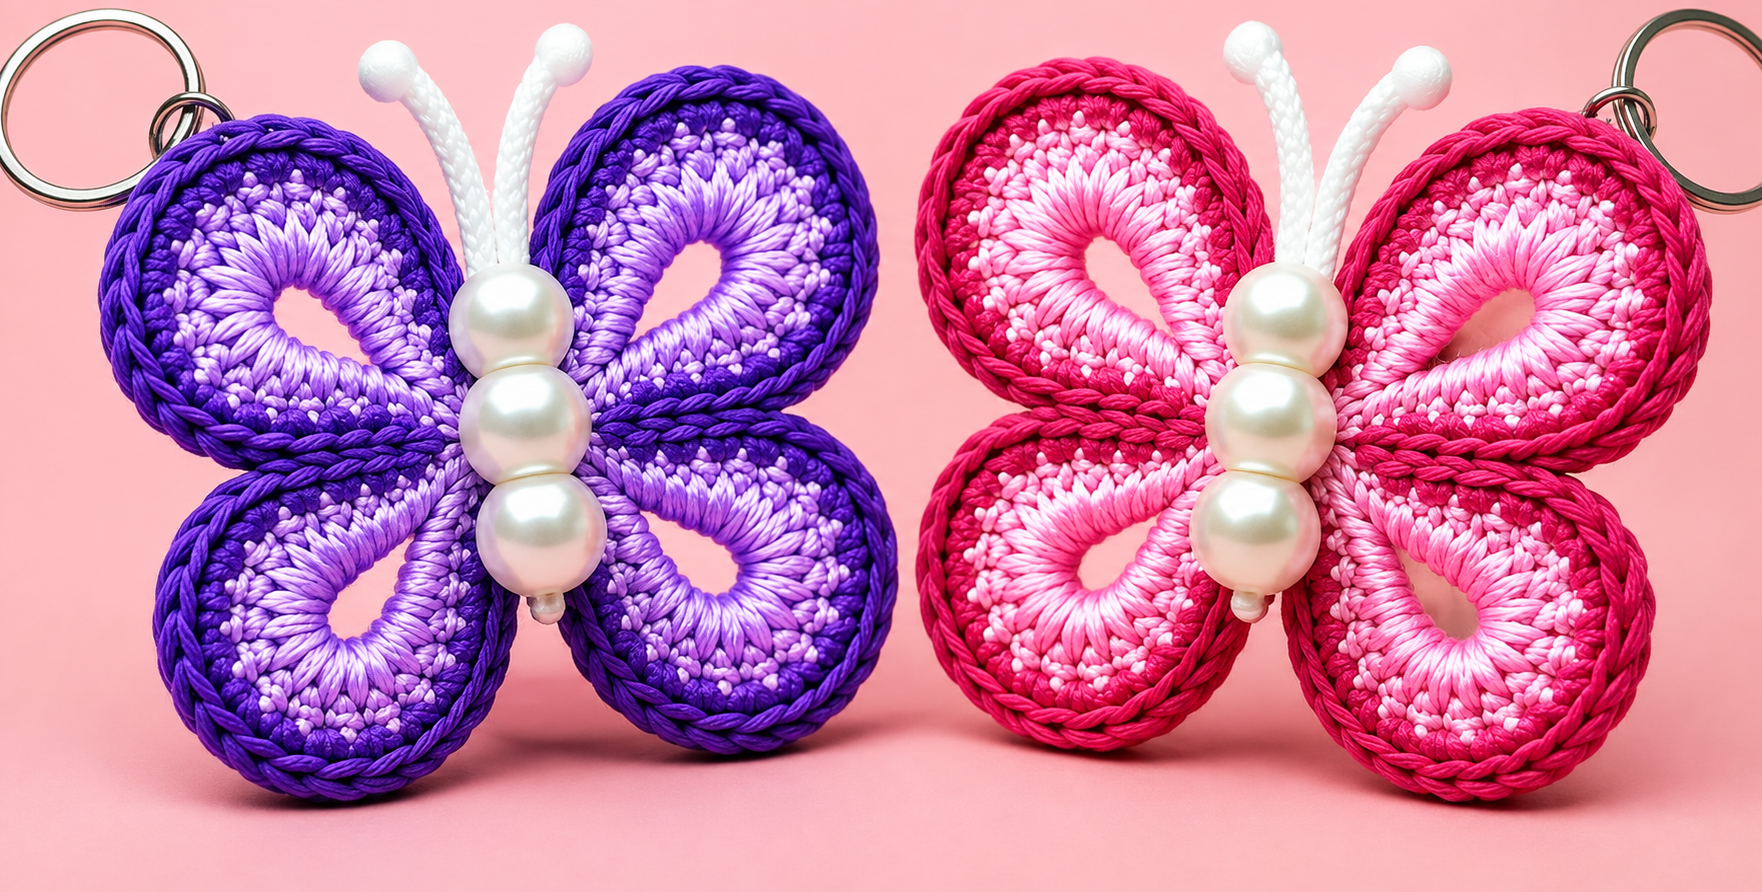
The pattern described in this guide is inspired by a butterfly with four rounded wings, open teardrop-shaped centers, decorative edging, a pearl-style body, and light-colored antennae. The instructions focus on understanding the crochet stitch keys, building the butterfly systematically, shaping each wing, joining the pieces, and creating a neat professional finish. Exact tension can vary from person to person, so the stitch counts and measurements below should be treated as a practical handmade pattern that can be adjusted slightly depending on yarn thickness, hook size, and desired finished dimensions.
Materials, Crochet Stitch Keys, and Preparation
Before beginning the Butterfly keychains in crochet Pattern, choose a smooth cotton or cotton-blend yarn that produces clearly defined stitches. A lightweight or sport-weight yarn works especially well for small keychains because it creates compact wings without making the project too bulky. You will normally need two colors for each butterfly, plus a small amount of white or cream yarn for the antennae.
DISCOVER MORE FREE PATTERNS HERE!
For a butterfly approximately 8 to 10 cm wide, a crochet hook around 2.5 mm to 3.5 mm is a practical starting range. Your ideal hook size depends on the yarn. The stitches should be firm enough for the butterfly to keep its shape, but not so tight that the curved wings become stiff or difficult to form. A slightly dense crochet fabric is generally preferable for a crochet keychain pattern.
You will also need a yarn needle, scissors, stitch markers if desired, a metal keychain ring or swivel clasp, and optional decorative beads. If you want a body similar to the butterfly shown in the inspiration image, three round pearl-style beads can be stacked vertically. Choose beads with holes large enough for strong thread, cord, or yarn to pass through safely.
The main crochet stitch keys used throughout this pattern are: ch = chain, sl st = slip stitch, sc = single crochet, hdc = half double crochet, dc = double crochet, tr = treble crochet, st = stitch, sts = stitches, sp = space, rep = repeat, and FO = fasten off. These abbreviations are commonly used in English-language crochet patterns and make written instructions shorter and easier to follow.
A chain stitch (ch) is used to begin sections and create flexible spaces. A slip stitch (sl st) joins rounds without adding significant height. A single crochet (sc) produces a compact stitch that works beautifully for borders. A half double crochet (hdc) gives moderate height, while a double crochet (dc) creates a taller, softer fabric that is useful for forming rounded wing sections.
Before starting the wings, crochet a small test circle or chain with your chosen yarn. Check that the stitches remain defined and that the fabric can curve naturally. If the crochet feels loose and floppy, change to a smaller hook. If it feels extremely stiff, move up one hook size. This small preparation step can greatly improve the finished Butterfly keychains in crochet Pattern.
How to Crochet the Four Butterfly Wings
The butterfly is formed from four individual or semi-connected oval motifs. Each wing contains an opening in the center, giving the finished accessory a lighter and more decorative appearance. The upper wings can be slightly larger than the lower wings, creating a traditional butterfly silhouette while preserving visual balance.
Begin the first upper wing with your lighter color. Ch 12, then join with a sl st into the first chain to form a ring. Make sure the chain is not twisted. This foundation ring creates the central opening. If you want a smaller opening, reduce the chain count slightly; if you want the open center to be more dramatic, add one or two chains.
For Round 1, work approximately 24 dc around the chain ring, spacing the stitches evenly rather than inserting them into individual chains. Join with a sl st. The objective is to create a smooth padded oval around the opening. If the ring begins curling excessively, add a few stitches. If it starts ruffling, remove a few stitches.
For Round 2, continue with the same color or change to your darker contrast yarn. Work 1 sc in the first st, 1 hdc in the next st, 2 dc in each of the next several sts, then gradually return through hdc and sc as you move around the opposite side. This variation in stitch height helps transform a simple ring into an elongated teardrop or petal shape.
To emphasize the top of the wing, place several increases around the wider outer curve. An increase means working two stitches into the same stitch. For example, you can repeat 2 dc in next st, 1 dc in next st around the broad portion. Around the narrower inner section, use single stitches without increases. This shaping technique is one of the most important skills in the crochet butterfly pattern.
For the final edging, use your darker color and work sc evenly around the wing, placing 2 sc in selected curved stitches whenever the border needs extra room. A neat single crochet border gives the wing a defined outline and can imitate the raised dark edging seen in decorative butterfly keychains. Fasten off and leave a long yarn tail for assembly.
Repeat the process for the second upper wing. For each lower wing, use the same basic method but begin with approximately ch 10 instead of ch 12, or work slightly fewer stitches in the first round. The lower wings should generally be 10 to 20 percent smaller than the upper wings. Once all four pieces are finished, arrange them together before sewing so you can adjust their positioning and maintain symmetry.
Joining the Butterfly, Making the Body, and Adding Antennae
Place the two larger wings at the top and the two smaller wings underneath them. The narrow ends of all four motifs should point toward the center. Overlap the inner edges slightly so there are no obvious gaps in the butterfly body area. Take time with this step because careful positioning makes a major difference to the appearance of the finished Butterfly keychains in crochet Pattern.
Thread a yarn needle with one of the wing colors and sew the inner portions of the upper wings together using small hidden stitches. Then attach the two lower wings beneath them. Avoid sewing too far into the wing because you want the outer sections to remain flexible and rounded. Concentrate most of the joining stitches near the center.
If you prefer a completely crocheted body, make a chain approximately 5 to 6 cm long, then work sc back across the chain. Make a second row if you want additional thickness. Fold or position this narrow strip vertically across the center where the wings meet, then sew it firmly in place. This creates a durable body that is washable and completely yarn-based.
For a bead body, thread three pearl-style beads onto strong cord or heavy sewing thread. Pass the cord through the middle of the butterfly and secure it firmly at the back. The largest bead can be placed at the top as the head, with two matching beads beneath it. Make several secure knots so the beads cannot loosen through regular handling.
To crochet the antennae, attach white or cream yarn behind the head area. Ch 10 to 14, depending on your desired length, then work sl st back along the chain. Fasten off at the base. Repeat for the second antenna. You can lightly curve each antenna with your fingers after finishing.
For rounded antenna tips, work several sc into the final chain before returning down the antenna. Another option is to tie a tiny knot or sew on a small decorative bead. Whichever technique you choose, make sure every small component is attached securely, especially if the butterfly will be used frequently on a handbag or set of keys.
Finally, attach the metal keychain ring. The strongest method is to create a small crocheted loop using ch 6 to 8, join it to the butterfly with several secure stitches, and pass the metal ring through the loop. Reinforce the attachment point carefully. Because the ring receives most of the pulling pressure, strong finishing is more important here than decorative appearance.
Finishing, Color Ideas, Size Adjustments, and Pattern Tips
Once the butterfly has been assembled, weave in every yarn end using a yarn needle. Move each tail through several stitches in different directions before trimming. This prevents the ends from pulling loose. Do not simply cut a yarn tail immediately beside a knot because frequent movement from a keychain can gradually loosen poorly secured finishing.
Blocking can improve the shape of the wings. Lightly dampen the crochet butterfly, arrange the wings symmetrically on a flat surface, and gently shape the curves with your fingers. Allow the piece to dry completely. Avoid aggressive stretching, especially when beads or metal components have already been attached.
Color selection is one of the most enjoyable elements of the Butterfly keychains in crochet Pattern. A purple butterfly can combine lavender with deep violet, while a pink butterfly might mix pale rose with strong magenta. Other attractive combinations include turquoise and navy, yellow and orange, mint and emerald, cream and brown, or pastel rainbow shades.
If you want a smaller butterfly, use thinner yarn, a smaller hook, and shorter foundation chains. Instead of starting an upper wing with ch 12, try ch 9 or ch 10. For a larger bag charm rather than a traditional keychain, use thicker cotton yarn and increase the foundation chain proportionally.
Beginners should focus more on consistent shape than perfect stitch counts. Crochet tension varies, and decorative motifs sometimes need slight adjustments. If one side of a wing looks flat, add an increase. If an edge begins to ripple, reduce the number of increases. Understanding how the fabric reacts is more useful than forcing an exact count when your yarn behaves differently.
Experienced crocheters can personalize the pattern with surface crochet, picot edging, small embroidered details, metallic thread, color gradients, or decorative beads around the wing edges. However, keeping the project lightweight is recommended. Too many beads can pull the wings downward and make the crochet butterfly keychain less practical.
The finished project should feel balanced, secure, and attractive from both sides. Before using or gifting it, gently pull the keyring, antennae, beads, and wings to confirm that every component is securely attached. This final inspection is especially important for handmade accessories that will experience regular movement.
FAQ About Butterfly Keychains in Crochet Pattern
Is the Butterfly keychains in crochet Pattern suitable for beginners? Yes. A beginner who already understands basic chain, single crochet, slip stitch, half double crochet, and double crochet stitches should be able to complete this project. The wing shaping may require a little practice, but the individual parts are small and quick to remake if necessary.
What yarn is best for crochet butterfly keychains? Cotton and cotton-blend yarns are excellent because they create well-defined stitches and maintain their shape. Acrylic yarn can also work, particularly for soft decorative bag charms. The most important consideration is selecting yarn that does not become excessively fuzzy after handling.
What hook size should I use? A hook between approximately 2.5 mm and 3.5 mm works well with many lightweight yarns. Always compare the hook with your chosen yarn. The ideal fabric should be firm and neat without being extremely tight.
How large should a finished butterfly keychain be? A practical finished width is approximately 8 to 10 cm, although there is no strict rule. Smaller butterflies can be around 5 to 7 cm wide, while larger versions measuring 12 cm or more can be used as handbag charms or decorative ornaments.
Can I crochet the butterfly without beads? Absolutely. Replace the bead body with a narrow crocheted strip, a small cylindrical crochet piece, or embroidered stitches. A fully crocheted version is also a good option when you want a softer accessory with fewer separate components.
How do I keep the butterfly wings symmetrical? Crochet matching wings using the same yarn, hook, stitch count, and tension. After completing each pair, place them side by side and compare their shapes before assembly. Light blocking can also help correct small differences.
Why are my crochet wings curling? Curling often occurs because there are too few stitches around the outer edge or because your tension is very tight. Add a few increases around the curved section or use a slightly larger crochet hook. Gentle blocking can also help flatten the final motif.
Why is the edge of my wing ruffling? Ruffling usually means there are too many increases. Remove some increases or replace selected groups of two stitches in one stitch with single stitches. The goal is a smooth curved edge rather than a heavily gathered border.
Can I use the same pattern for earrings or ornaments? Yes. For earrings, use very fine crochet thread and a small hook to make miniature wings. For ornaments, you can create larger motifs and replace the keyring with a hanging loop. The same basic butterfly crochet construction can be adapted to many decorative projects.
How do I attach the keychain ring securely? Create a reinforced crochet loop and sew it through multiple central stitches. Avoid attaching the ring to only one loose strand of yarn. The connection should distribute pressure across several stitches so the butterfly does not tear after repeated use.
Can this butterfly crochet pattern be made in one color? Yes. A monochromatic version can look elegant and minimalist. If you use only one yarn color, you can create contrast by adding pearl beads, metallic hardware, textured borders, or different stitch heights.
How long does one crochet butterfly keychain take to make? The time depends on experience and finishing details. Once familiar with the construction, many crocheters can complete the basic butterfly in a relatively short crafting session. Beaded bodies, careful assembly, and detailed edging naturally add more time.
Can I make several butterflies as handmade gifts? Yes. This pattern works particularly well for small gift projects because each butterfly uses little yarn and can be customized with different color combinations. You can also create coordinated sets for bags, keys, or decorative accessories.
Conclusion
The Butterfly keychains in crochet Pattern combines simple crochet techniques with creative shaping to produce a colorful and practical handmade accessory. Throughout this guide, you learned how to choose appropriate yarn and hooks, understand essential crochet stitch keys, create open-centered upper and lower wings, shape curves through increases, add a contrasting border, assemble the four wings, construct a crocheted or beaded body, make antennae, and securely attach a keychain ring.
The key to achieving a beautiful result is not only following the stitch sequence, but also observing the shape of your crochet fabric as you work. Small adjustments to increases, tension, yarn thickness, and wing positioning can make each butterfly look more balanced. Once you understand the basic construction, the same Butterfly keychains in crochet Pattern can be transformed through different colors, sizes, borders, beads, and decorative finishes.
Most importantly, this is a pattern that leaves plenty of room for creativity. Whether you choose deep purple and lavender, bright pink and magenta, soft pastels, or completely different combinations, each butterfly can have its own character while following the same crochet principles. If you make this crochet butterfly keychain, leave your sincere opinion about the pattern and share your suggestions. Which color combination would you choose, and what detail would you add to make your butterfly unique?