
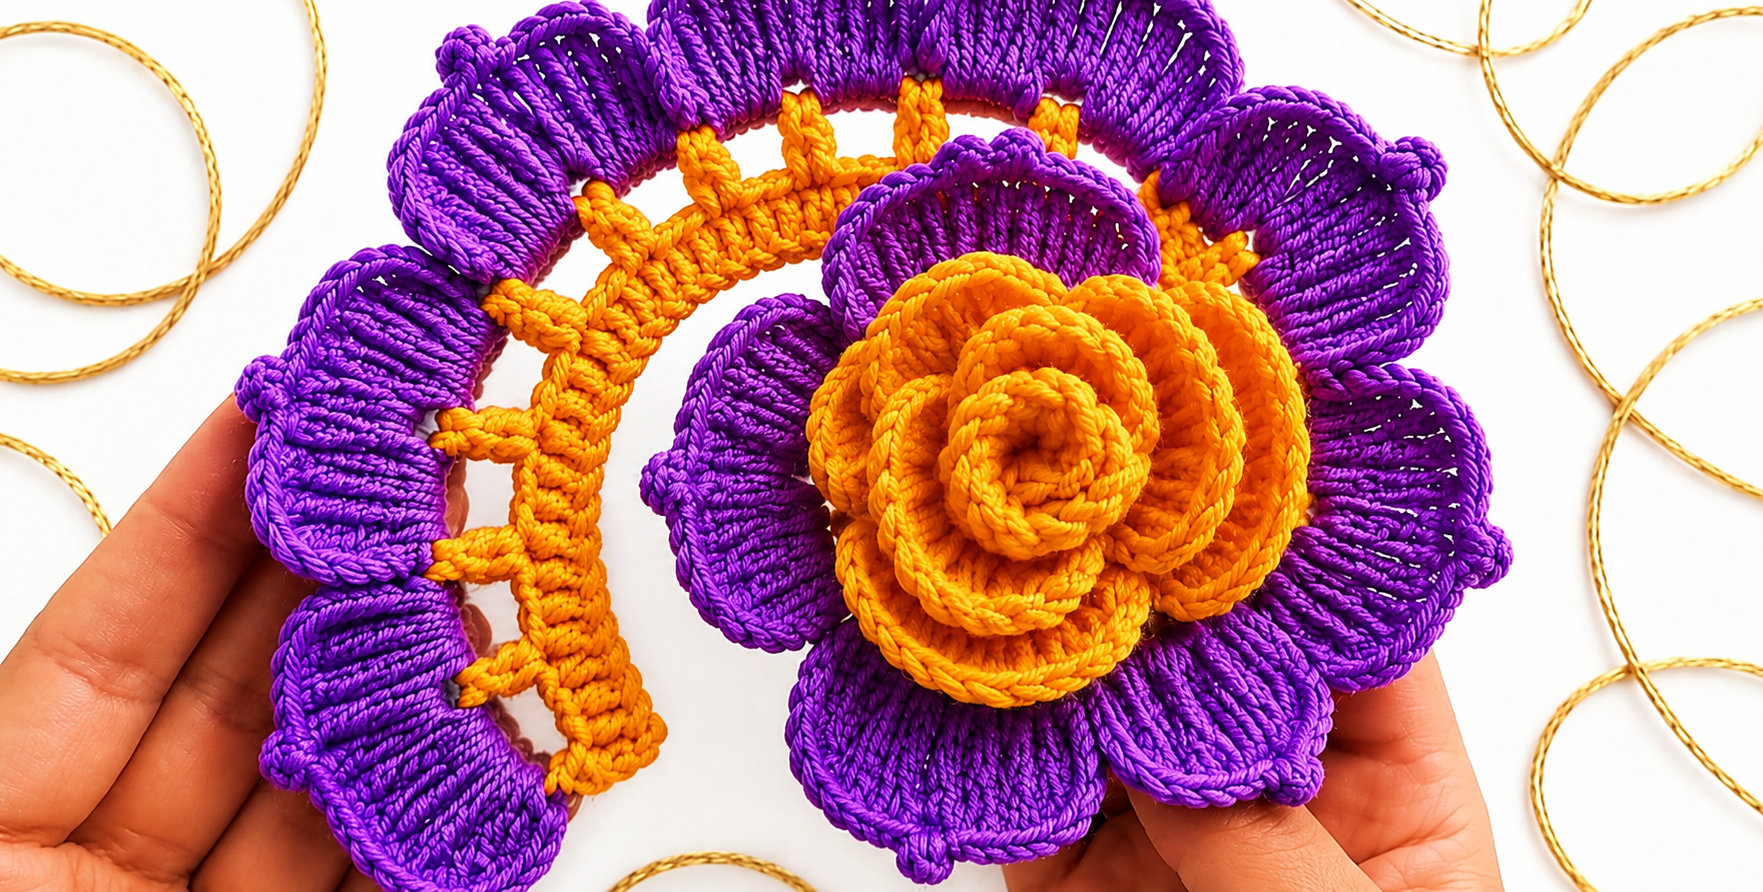
The 3D crochet rose Pattern is a beautiful way to turn simple crochet stitches into a flower with real depth, movement, and layered texture. Unlike a flat appliqué, a three-dimensional rose is built from overlapping petals that gradually increase in size, allowing the center to curl naturally while the outer petals open more widely. The finished flower can be used on cushions, bags, table decorations, wall pieces, blankets, wreaths, hair accessories, or as the centerpiece of a larger floral crochet project. The design shown here combines a warm orange rose with bold purple petals around it, creating an especially striking contrast. Although the project looks elaborate at first glance, the construction becomes much easier when you understand the crochet stitch key, the petal sequence, and the way each layer is assembled.
A successful 3D crochet rose Pattern depends more on controlled shaping than on complicated stitches. Most of the structure can be created with familiar techniques such as chain stitches, single crochet, half double crochet, double crochet, slip stitches, increases, and working into chain spaces. What gives the rose its realistic appearance is the progression from small, tightly curved petals in the center to broader petals on the outside. You will also learn how to create a decorative outer flower layer inspired by the purple petals visible in the project, making the rose suitable for a statement ornament rather than a simple flat flower. Because yarn thickness, hook size, and individual tension vary, the exact finished dimensions may change slightly, which is perfectly normal for handmade crochet.
This tutorial is designed to explain the construction clearly from beginning to end while also introducing the abbreviations commonly used in English-language crochet patterns. Before starting, choose a smooth yarn with enough definition to show every stitch. Cotton, mercerized cotton, or a cotton-blend yarn works particularly well for sculptural flowers because the petals remain firm without becoming excessively stiff. A medium or lightweight yarn paired with a hook approximately 3.0 mm to 4.0 mm is a practical starting point. You will need a main color for the rose, a contrasting color for the outer petals, a crochet hook appropriate for your yarn, scissors, a yarn needle, and optional sewing thread if you want extra reinforcement. The following instructions create an original flower inspired by the visible construction and can be adjusted according to your preferred final size.
Crochet Stitch Key and Materials for the 3D Crochet Rose Pattern
Before beginning the 3D crochet rose Pattern, become familiar with the stitch abbreviations. In U.S. crochet terminology, ch means chain, sl st means slip stitch, sc means single crochet, hdc means half double crochet, dc means double crochet, tr means treble crochet, st means stitch, sts means stitches, sp means space, and rep means repeat. When the pattern says inc, work two stitches into the same stitch or space. These abbreviations form the basic crochet key for the entire project and make it easier to follow written instructions without repeating long stitch names.
DISCOVER MORE FREE PATTERNS HERE!
The first essential technique is the chain stitch (ch). Make a slip knot, place it on the hook, yarn over, and pull the yarn through the loop already on the hook. Continue repeating this movement to form a flexible chain. Chains may serve as a foundation, a spacer between stitches, or a small arch behind the petals. Keep them relaxed and even because tight chains can make the petals difficult to shape later.
The single crochet (sc) creates a compact and sturdy section. Insert the hook into the indicated stitch, yarn over, pull up a loop, yarn over again, and pull through both loops on the hook. Single crochet is particularly useful around the base of a flower because it gives the structure enough firmness to support the three-dimensional petals. It can also be used along petal edges when you want a clearly defined outline.
The half double crochet (hdc) is slightly taller and softer. Yarn over, insert the hook into the selected stitch, yarn over, and pull up a loop. You will have three loops on the hook. Yarn over once more and pull through all three loops. In this flower, half double crochet provides a smooth transition between short stitches and taller stitches, which helps each petal curve instead of developing sharp corners.
The double crochet (dc) supplies most of the height and width needed for the rose petals. Yarn over, insert the hook into the stitch or chain space, yarn over, and pull up a loop. Yarn over and pull through two loops, then yarn over again and pull through the final two loops. Groups of double crochet stitches worked into one space naturally spread into a fan shape, making this stitch especially effective for constructing layered petals.
For additional height, you may use the treble crochet (tr) on the largest outer petals. Yarn over twice before inserting the hook, pull up a loop, then complete the stitch by drawing the yarn through two loops at a time. Taller stitches create a more dramatic open flower. However, maintaining even tension is important because excessively loose treble crochet stitches can make the outer layer floppy rather than sculptural.
Building the Center and Layered Rose Petals
To begin the center of the 3D crochet rose Pattern, make a short foundation chain of approximately 45 to 55 chains in your rose color. The number does not have to be mathematically exact if you want a larger or smaller flower. A longer chain produces more petals and a fuller rose, while a shorter foundation makes a compact blossom. Turn the work carefully without twisting the chain so the petal strip develops evenly.
For the foundation row, work 1 sc in the second ch from the hook, then continue with one single crochet in each chain across. This creates a stable strip that will later be rolled into the flower. Turn the work and chain one. On the following row, begin forming small chain spaces by working a sequence such as sc, ch 2, skip 1 st, sc in next st. Repeat this sequence across the strip. These spaces become the foundations for the individual petals.
Start the smallest petals near one end of the strip. Into the first few ch-2 spaces, work approximately 1 sc, 3 hdc, 1 sc. Slip stitch into the next connecting stitch if needed. These low stitches create petals that remain relatively tight when rolled, which is exactly what you want for the center. The first petals should not be extremely wide because a natural-looking rose begins with a compact spiral.
For the medium petals, gradually increase the height and number of stitches. A useful sequence in the next chain spaces is 1 sc, 1 hdc, 4 dc, 1 hdc, 1 sc. Work the stitches into the same chain space so they fan outward. Continue this sequence for several petals. If your yarn is thin, you may add one extra double crochet; if it is thick, fewer stitches may produce a better shape.
The largest petals can be worked as 1 sc, 1 hdc, 2 dc, 2 tr, 2 dc, 1 hdc, 1 sc into each larger space. This progression gives the outer end of the strip noticeably broader petals. Do not worry if the strip begins curling while you crochet. That natural curl is useful because it helps the flower roll into a three-dimensional shape without forcing the yarn.
When all the petals are finished, leave a long yarn tail for assembly. Starting from the end containing the smallest petals, roll the strip inward to form the center bud. Keep the first roll relatively tight, then gradually loosen the tension as you reach the larger petals. Use a yarn needle to sew through the foundation edge on the underside, catching several layers with every few stitches. Turn the rose over frequently to check the top. The goal is to secure the base firmly while allowing the upper edges of the petals to remain free.
Creating the Decorative Outer Petals and Crochet Framework
The decorative purple section surrounding the 3D crochet rose Pattern can be created separately and then attached beneath the finished rose. Start with a magic ring, or chain four and join with a slip stitch to form a small ring. Work 12 dc into the ring and join with a slip stitch to the first double crochet. This circular foundation gives you an even base from which the larger petals can grow.
In the next round, create spaces for the petals by working ch 4, skipping one or more stitches depending on your desired petal count, and anchoring the chain with a slip stitch or single crochet. Repeat evenly around the circle. For a flower with approximately eight outer petals, distribute eight chain spaces as evenly as possible. Do not be concerned if you need to slightly adjust the spacing, since different yarn thicknesses may change the circumference.
Each outer petal can be made by working several tall stitches into one chain space. A practical petal formula is 1 sc, 2 hdc, 5 dc, 2 hdc, 1 sc in the same space. For larger and more dramatic petals, replace the center double crochet stitches with treble crochet stitches. The concentration of many stitches inside one arch causes the fabric to expand and creates the rounded, raised shape characteristic of decorative crochet petals.
For even more volume like the bold purple petals in the inspiration image, work an additional edging across each petal. After completing a petal, turn slightly and work sl st or sc around the outer edge. You can also add a final round using single crochet in every stitch. This edging helps define each petal and can make the surface look more polished. If your yarn is naturally firm, however, one petal round may already provide sufficient body.
A second decorative element can be made as a semicircular or circular framework behind the flower. Crochet a foundation chain long enough to curve around part of the rose, then work a row of single crochet. On the following row, create evenly spaced arches with ch 4 or ch 5, skip 2 or 3 sts, sc in the next st. In the next pass, fill each arch with groups of double crochet or treble crochet stitches. This creates the scalloped, fan-like appearance that complements the central rose.
After completing the outer structure, arrange the rose over its center without sewing immediately. Rotate both pieces until the petals appear balanced. Once satisfied, thread the rose-color or matching yarn through a needle and sew the rose to the outer base from the back. Catch only the lower portions of the flower so stitches remain hidden. A few strategically positioned stitches between the lower rose petals and the purple foundation can help prevent the flower from shifting while still preserving its dimensional appearance.
Finishing, Shaping, Care, and Creative Uses
The final shaping stage can transform a good 3D crochet rose Pattern into a much more realistic flower. Gently pull the smallest center petals inward and allow the medium petals to curve slightly outward. The largest rose petals can be opened more generously. Avoid flattening the flower with your palm because the dimensional effect depends on retaining different heights throughout the layers. Instead, shape each petal individually using your fingers.
If a petal refuses to hold its shape, check your stitch tension before adding any stiffening treatment. Often, simply placing a hidden sewing stitch at the base of the petal solves the problem. Insert the needle through the lower section of one petal and anchor it to the layer beneath. This lets the upper edge remain free while controlling the direction in which the petal faces.
Weave all yarn ends securely into the back of the work. Run each tail through several stitches in one direction, change direction, and pass it through nearby stitches again before trimming. Because a three-dimensional crochet flower may be handled frequently, secure finishing is especially important. A loose end hidden only beneath one stitch can eventually work free and weaken the structure.
Blocking should be used cautiously with dimensional flowers. Traditional flat blocking can destroy the sculptural form. If your yarn benefits from light shaping, carefully dampen only the outer decorative section and arrange it on a towel while keeping the central rose raised. For synthetic fibers, always follow the yarn manufacturer’s care instructions and avoid excessive heat, which can permanently alter the fibers.
Color selection gives this 3D crochet rose Pattern an entirely different personality. Orange and purple create a vibrant, high-contrast combination, while red and dark green produce a more traditional floral appearance. Soft pink with cream can create a romantic style, while blue and white make the design feel fresh and decorative. You can also use variegated yarn for the petals, although solid colors usually make the individual stitch structure easier to see.
Once completed, the flower can become part of many creative projects. Sew it to the center of a crochet cushion, attach it to a handmade bag, incorporate several flowers into a wall decoration, or use a group of roses to create a floral wreath. A single small version can decorate a headband or brooch, while larger flowers can become striking table accents. Whatever application you choose, attach the flower according to its intended use and reinforce it especially well on pieces that will be washed or handled frequently.
FAQ: Frequently Asked Questions About the 3D Crochet Rose Pattern
Is the 3D crochet rose Pattern suitable for beginners?
Yes, an adventurous beginner can make this project after becoming comfortable with basic stitches. The main techniques are ch, sl st, sc, hdc, dc, and tr. The most challenging part is usually not the crochet itself but understanding how to roll and arrange the petals. Working slowly and checking the flower shape during assembly makes the process considerably easier.
What does ch mean in a crochet pattern?
Ch means chain stitch. It is one of the foundation stitches of crochet and appears frequently in flower patterns. Chains can create the initial foundation row, spacing between stitches, loops, and arches where groups of taller stitches are later worked.
What does sc mean?
Sc means single crochet in U.S. crochet terminology. It is a short, dense stitch that works particularly well for foundations and structural areas. In a three-dimensional flower, single crochet helps prevent the base from stretching excessively.
What does hdc mean in this pattern?
Hdc means half double crochet. Its height falls between single crochet and double crochet. When combined with shorter and taller stitches in the same petal, half double crochet creates a smooth curve and prevents the sides of the petal from looking angular.
What does dc mean in the 3D crochet rose Pattern?
Dc stands for double crochet. It is one of the principal stitches used for forming the body of the petals. Multiple double crochet stitches worked into one chain space create a fan that naturally widens toward the center.
Why does my crochet rose look flat?
A rose usually looks flat when the petal strip has been rolled too loosely, the petals do not increase enough in size, or every layer has been sewn completely flat against the base. Keep the center compact, gradually loosen the outer layers, and sew mainly through the lower edges. This gives the upper petals enough freedom to rise.
Why is my rose too bulky in the center?
Excess bulk can happen when the first petals contain too many tall stitches or when thick yarn is rolled too tightly. Try using fewer stitches in the smallest petals, replacing double crochet with half double crochet, or making a slightly longer foundation so the layers can be distributed more gradually.
Can I make the rose larger?
Yes. You can increase the flower size by using thicker yarn and a larger hook or by making a longer petal foundation. Another method is to add more medium and large petals before assembly. Increase gradually so the rose keeps a balanced proportion between its center and outer layers.
Can I make a smaller 3D crochet rose?
Certainly. Use thinner yarn, a smaller hook, and fewer foundation chains. Reduce the number of large petals and use mostly single crochet, half double crochet, and double crochet rather than tall treble stitches. Mini roses are particularly useful for small accessories and decorative appliqués.
What yarn works best for a 3D crochet rose?
A yarn with clear stitch definition and moderate firmness is generally easiest to shape. Cotton is a popular choice because the petals remain visible and structured. Acrylic can also work, especially when a softer appearance is desired. Extremely fuzzy yarn may hide the petal details, so it can be more difficult for beginners.
How do I keep the petals standing up?
Start with a hook size that produces firm but flexible stitches. Sew the lower edges securely and, when necessary, add one small hidden anchoring stitch behind selected petals. This gives them support without visibly stitching down the entire petal.
Do I have to use the same colors shown in the project?
No. The colors are completely customizable. The important part of the 3D crochet rose Pattern is the relationship between the center rose, its layered petals, and the optional outer decorative flower. Using contrasting colors makes each structural layer easy to see, while similar shades create a softer and more unified effect.
Can the flower be washed?
That depends mainly on the fiber used and what the flower is attached to. Always follow the care recommendations for your yarn. If the flower is sewn onto a washable project, make sure all tails and attachment stitches are especially secure. Gentle washing is generally kinder to dimensional crochet because strong agitation may distort the petals.
How can I make all my roses approximately the same size?
Use the same yarn, hook size, foundation-chain count, petal sequence, and tension for every flower. It is also helpful to record the exact number of each petal type you make. Handmade pieces will still show minor differences, but consistent materials and stitch counts produce a much more uniform group.
Can this pattern be used for a floral crochet arrangement?
Yes. One of the strengths of a dimensional pattern is its versatility. Make roses in several sizes and combine them with crochet leaves or other flowers. Slight variations in color and scale can make an arrangement appear richer while keeping the same basic construction technique throughout the project.
Conclusion
The 3D crochet rose Pattern demonstrates how a relatively small collection of basic stitches can become an impressive sculptural flower. By learning the crochet key for ch, sl st, sc, hdc, dc, tr, st, sp, inc, and rep, you gain the foundation needed not only for this project but also for many other dimensional crochet designs. The essential idea is to build the rose gradually: begin with small petals, progress toward wider petals, roll the strip carefully, secure the underside, and then add an optional decorative outer layer for extra color and volume.
The most important lesson is that shaping matters just as much as stitch count. A successful crochet rose should not be completely flat or perfectly symmetrical. Slight variations in how the petals curve and overlap actually help create the organic appearance of a real flower. By controlling tension, arranging each layer before sewing, and reinforcing only the areas that require support, you can achieve a flower that keeps its three-dimensional character.
You can also treat this 3D crochet rose Pattern as a starting point for your own designs. Experiment with different yarn weights, petal quantities, flower sizes, and contrasting color combinations. Once you understand how the smaller center petals transition into larger outer petals, it becomes much easier to customize the pattern and create unique variations for bags, cushions, blankets, wall decorations, and handmade gifts. I hope this tutorial helps you understand the entire process, from reading the crochet stitch key to shaping and finishing the final layered rose. If you make your own version, leave your sincere opinion about the pattern and share your suggestions. Which color combination would you choose for your 3D crochet rose, and what would you change or add to make the project even more beautiful?