
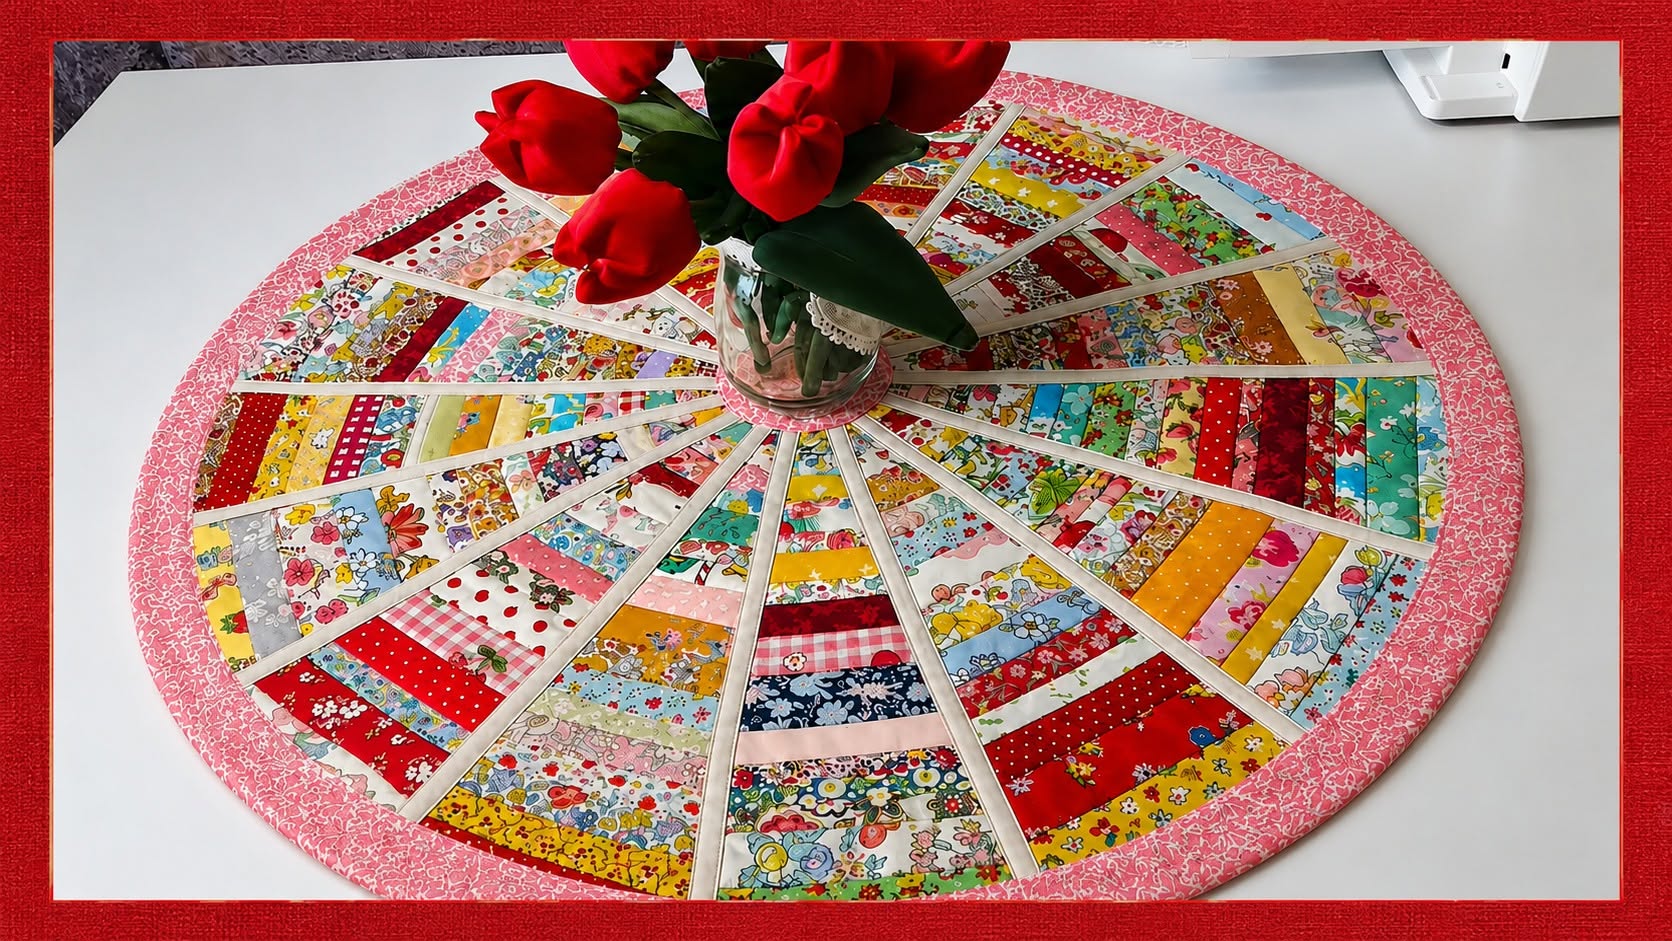
Patchwork fabric triangle centerpiece Pattern is a cheerful sewing project that transforms small fabric strips and triangular sections into a striking circular centerpiece with a beautiful radial design. Inspired by the colorful piece shown in the photo, this project combines traditional patchwork sewing, careful piecing, simple quilting, and a neat fabric binding to create an item that works wonderfully on a dining table, craft-room table, coffee table, or decorative display. The visual appeal comes from the repeated wedge shapes that spread outward from the center like rays of sunshine, while the many floral, polka-dot, gingham, and colorful prints give the finished piece a charming handmade personality. One of the best things about this design is that it can make excellent use of leftover fabric strips from previous sewing projects. Because the individual pieces are relatively small, you do not need large cuts of every fabric. The result can look highly detailed while still being approachable for a confident beginner who is comfortable sewing straight seams.
The key idea behind the Patchwork fabric triangle centerpiece Pattern is to build several wedge-shaped patchwork units and then join those units around a central point. Each wedge can contain a slightly different combination of fabrics, which means the project does not require every section to be identical. In fact, the variation is part of its charm. Bright reds, yellows, blues, pinks, greens, florals, tiny prints, and light neutral fabrics can all live together successfully when a consistent sashing color is used between the main wedges. In the photographed inspiration, the pale strips separating the colorful sections create visual breathing room and help the circular geometry remain clear even with dozens of prints. A pink outer binding then frames the entire centerpiece and pulls many of the warm colors together. This combination of organized geometry and playful fabric selection is what makes the project especially appealing for lovers of scrap quilting.
Although the centerpiece looks complex at first glance, the construction becomes much easier when it is divided into manageable stages. You will first organize your fabrics, sew strips together, cut or shape the patchwork into tapered triangular wedges, stabilize the sections, and arrange them in a complete circle before final assembly. After the patchwork top is constructed, batting and backing fabric are added to form a quilt sandwich. Quilting secures the layers and gives the centerpiece body, while the final binding creates a polished edge. A finished diameter of approximately 85 to 95 cm works well for a large table centerpiece similar in proportion to the photo, although the design can easily be reduced or enlarged. Treat these dimensions as adaptable project measurements rather than exact measurements taken from the photographed piece. What matters most is maintaining consistent wedge angles, accurate seam allowances, and balanced placement throughout your fabric triangle centerpiece.
Materials, Fabric Choices, and Preparation
Start your Patchwork fabric triangle centerpiece Pattern by gathering a varied collection of cotton quilting fabrics. For the colorful sections, approximately 25 to 40 different prints can create the lively scrap-patchwork appearance seen in the inspiration. Small leftovers are ideal because many strips need to be only about 3 to 6 cm wide before sewing. Try combining florals, checks, dots, small novelty prints, geometric designs, and subtle solids. Using several color families instead of limiting yourself to only two or three colors will give the finished centerpiece that joyful, collected-over-time appearance associated with traditional scrap quilt projects.
DISCOVER MORE FREE PATTERNS HERE!
You will also need a light coordinating fabric for the narrow separators between the wedges. Cream, ivory, soft beige, or another quiet neutral works particularly well because it prevents the colorful prints from visually blending together. Cut long strips approximately 2.5 to 3.5 cm wide for these separators, remembering that their visible width becomes narrower after seam allowances are sewn. The neutral fabric becomes an important design element because it defines the radial structure. It is worth choosing a fabric with enough contrast to stand apart from most of your patchwork prints.
For the outer edge, select a coordinating binding fabric. A pink floral or small pink print is especially appropriate if you want to reproduce the warm, romantic effect visible in the photo. Prepare approximately 4 to 5 meters of binding, depending on the final diameter of your centerpiece and your preferred binding width. Bias binding is particularly useful for a circular project because fabric cut on the bias bends smoothly around curved edges. Straight-grain binding can sometimes work on gentle curves, but bias strips generally produce a cleaner result with less puckering.
The project also requires batting and backing fabric. Lightweight cotton or low-loft quilt batting is a practical choice because a table centerpiece should remain reasonably flat. Excessively thick batting may cause glasses, bowls, or decorative objects to sit unevenly. Cut your batting and backing several centimeters larger than the completed patchwork top on every side. This extra space makes quilting easier and gives you room to square or trim the project before binding.
For basic tools, prepare a sewing machine, coordinating thread, quilting ruler, rotary cutter, self-healing cutting mat, fabric scissors, iron, pressing surface, pins or sewing clips, and a marking tool suitable for fabric. A long quilting ruler is especially helpful when trimming the wedge pieces accurately. Accuracy becomes increasingly important as more wedges are joined because small differences can accumulate around the circle. A reliable 6 mm seam allowance, approximately one quarter inch, is a common quilting choice and works very well for this project.
Before sewing, wash and press the fabrics if that matches your normal quilting routine. The most important preparation step is careful pressing. Wrinkled fabric can produce inaccurate cuts, particularly when making narrow wedges. Organize your scraps by color or print scale, but avoid over-planning the arrangement. The design benefits from controlled randomness. Spread several fabric strips on your table and move them around until you find combinations that feel balanced. Alternating light, medium, and dark fabrics within each wedge creates stronger visual movement than placing several similar values together.
Creating the Patchwork Triangle Wedges
The colorful wedges are the heart of the Patchwork fabric triangle centerpiece Pattern. Begin by sewing small fabric strips together into rectangular patchwork panels. Cut strips in assorted widths, such as 3 cm, 4 cm, 5 cm, and 6 cm, so the design does not look overly repetitive. Place two strips right sides together and sew along the long edge using your consistent seam allowance. Add another strip, then another, gradually building a panel. Each panel should be long enough and wide enough to cut one tapered wedge from it.
Press every seam after sewing. You may press the seam allowances consistently to one side or press them open, depending on your preferred quilting method. Pressing to alternating sides can make nesting seams easier, while pressing open reduces bulk in areas where many small strips meet. Whatever method you choose, avoid stretching the fabric while pressing. Use an up-and-down pressing motion rather than dragging the iron aggressively across the panel.
Once the patchwork panels are finished, create a wedge template. For a circle made from 16 wedges, each wedge occupies approximately 22.5 degrees of the complete circle. You can create a paper or template-plastic wedge that is narrow at the inner end and wider at the outer edge. Leave a small flat area at the inner end rather than extending every wedge to a perfect sharp point. This makes construction easier and allows the center opening to be covered cleanly with a circular fabric appliqué or centerpiece patch.
Place the template over each patchwork panel and cut the wedge carefully. Rotate the direction of the strips from wedge to wedge if you want a more dynamic appearance. Some sections may have horizontal-looking patchwork strips while others appear slightly angled once they are arranged around the circle. The variety helps reproduce the spontaneous look seen in the photographed project. After cutting each wedge, label it lightly or place it directly into its intended position on a large table or floor.
Before joining the wedges permanently, arrange all of them in a circle. This dry layout is extremely valuable because it allows you to distribute strong colors evenly. If several bright red fabrics appear close together, move one wedge to the opposite side. Do the same with dominant yellows, blues, or dark prints. The goal is not perfect symmetry but visual balance. Step back from the arrangement and look at the entire circle rather than concentrating on individual scraps.
Add the light separator strips between neighboring wedges as you assemble the sections. Sew one neutral strip to the side of a patchwork wedge, press it, then attach the next wedge. Continue building small groups rather than immediately sewing the entire circle in one continuous sequence. For example, construct four groups of four wedges. This method can make the radial points easier to control and gives you opportunities to check the shape before completing the final joins. Careful assembly at this stage determines whether your triangle patchwork centerpiece will lie flat.
Assembling, Quilting, and Binding the Circular Centerpiece
Once the individual groups are complete, place them together and inspect the inner and outer edges. The wedges should create a smooth circular or nearly circular shape without obvious waves or gaps. If the piece develops excessive fullness, check whether seam allowances have shifted or whether some wedge angles differ from the template. Small corrections can often be made by slightly adjusting the joining seams before the final circle is assembled. Avoid trying to force a distorted top flat with heavy pressing, because accurate piecing is a better solution.
Join the wedge groups until the entire patchwork ring is complete. Depending on your template, there may be a small opening at the center. This is useful because it prevents sixteen narrow wedge tips and seam allowances from stacking in exactly the same place. Cut a small circular piece of coordinating fabric to cover the center opening. The circle can match the outer binding, the neutral sashing, or another fabric that complements the overall palette. Turn its raw edge under and appliqué it neatly over the opening.
Next, prepare the quilt sandwich. Spread the backing fabric wrong side up on a clean, flat surface. Place the batting over it, followed by the patchwork top right side up. Smooth each layer from the center toward the outside so no wrinkles remain. Baste the three layers together using safety pins, temporary basting spray according to its directions, or large hand-basting stitches. Secure the layers thoroughly because a large circular quilted piece can shift during stitching.
For quilting, simple methods often work best because the patchwork already contains plenty of visual detail. Stitching along both sides of the neutral separator strips emphasizes the sunburst structure beautifully. You can also quilt straight lines through selected patchwork strips or stitch gently around the circular center. Keep the quilting density relatively even across the entire project. Uneven quilting can cause one section to shrink more than another, potentially distorting the round shape.
After quilting, trim the backing and batting level with the outer edge of the patchwork. Use scissors carefully around the curve or a rotary cutter where practical. If necessary, mark a smooth circular guideline before trimming. Do not worry if the handmade circle is not mathematically perfect; a clean, flowing outer curve is more important visually. Check the complete perimeter before cutting because trimming cannot easily be reversed.
Finish the Patchwork fabric triangle centerpiece Pattern with bias binding. Join the binding strips diagonally to reduce bulk, press them in half lengthwise, and attach the binding around the circumference. Sew slowly because curved edges require more frequent adjustment than straight quilt edges. Fold the binding over the raw edge and secure it by hand for a traditional invisible finish or machine stitch it for a faster and highly durable result. Give the completed centerpiece a gentle final press and allow it to rest flat before displaying it.
Styling, Customizing, and Improving Your Finished Project
The finished centerpiece works beautifully with a vase placed over the central circle, just as the photographed inspiration demonstrates. A central decorative object naturally highlights the radial structure because the wedge lines appear to extend outward from it. Flowers, a candle arrangement, a seasonal decoration, or a simple ceramic bowl can all work well. If the centerpiece will be used beneath objects regularly, choose stable containers with smooth bases to protect the quilting stitches.
Color customization is one of the biggest advantages of this Patchwork fabric triangle centerpiece Pattern. A spring version might combine pale pink, mint, yellow, lavender, and floral prints. An autumn variation could use rust, mustard, olive, burgundy, and brown fabrics. For Christmas, consider red, green, cream, and small metallic-looking prints. A coastal variation could feature navy, aqua, white, and sandy beige. The construction remains exactly the same while the fabric palette completely changes the mood.
The project is also ideal for using fabric scraps with sentimental value. Small pieces left from a child’s quilt, a handmade apron, a favorite cushion cover, or another family sewing project can be incorporated into individual wedges. Because every scrap occupies only a small area, fabrics from different collections can work together successfully. Repeating a few colors around the circle helps connect unrelated prints and gives the centerpiece a more intentional appearance.
If you are making your first radial patchwork design, focus more on accuracy than speed. Check the template regularly, keep the seam allowance consistent, and press each unit before adding another section. The most common reason circular wedge quilts refuse to lie flat is accumulated variation in seam widths or wedge angles. Even a difference of a few millimeters repeated many times can noticeably change the circumference. Slow, consistent sewing usually saves far more time than correcting the entire circle later.
You can also transform this pattern into projects of other sizes. A smaller version around 35 to 45 cm in diameter can become a decorative table mat. A medium version can serve as a round topper for a side table. A much larger version could inspire a dramatic wall quilt, although larger pieces require more careful stabilization and quilting. When resizing the project, scale the wedge template proportionally rather than simply making the outer edge wider. Maintaining the correct wedge angle is essential for completing a full circle.
Finally, remember that handmade patchwork does not need every fabric placement to be perfectly symmetrical. The beauty of the Patchwork fabric triangle centerpiece Pattern comes from the combination of precision in construction and freedom in color selection. Accurate seams create the structure, while playful scraps give it character. When those two elements work together, even a collection of small leftover fabrics can become an impressive decorative centerpiece that looks thoughtfully designed and professionally finished.
FAQ – Frequently Asked Questions
What is a Patchwork fabric triangle centerpiece Pattern?
A Patchwork fabric triangle centerpiece Pattern is a sewing design in which multiple tapered or triangular patchwork units are joined around a common center to create a circular decorative textile. The triangle or wedge sections usually contain smaller strips or pieces of fabric, which makes the technique particularly useful for scrap quilting.
Is this project suitable for beginners?
A confident beginner can make this project, especially if they already know how to sew a consistent straight seam and use a rotary cutter. The strip piecing itself is simple. The part that requires the most attention is cutting identical wedges and joining them without stretching the bias edges.
How many wedges should I use?
Sixteen wedges are a practical choice for this style because each section represents approximately 22.5 degrees of a full circle. However, other wedge counts are possible when using a template designed specifically for that number. Always make sure the combined angles equal 360 degrees.
What fabric works best for this centerpiece?
Quilting-weight cotton is usually the easiest option because it cuts accurately, presses well, and is available in countless colors and prints. Fabrics of similar weight are easier to combine than a mixture of extremely light and heavy materials.
Can I make the project entirely from scraps?
Yes. In fact, scrap fabric patchwork is one of the best approaches for this pattern. Small strips are perfect for building the colorful wedge panels. You may still want larger pieces of fabric for the backing, batting, separator strips, and binding.
Why is my circular patchwork not lying flat?
This usually happens when wedge angles are inconsistent, seams vary in width, or bias edges become stretched during construction. Check each section against the template and avoid pulling the fabric while sewing or pressing. Correcting a slightly inaccurate seam before joining the full circle is much easier than fixing the completed top.
Do I need batting?
Batting is recommended if you want the project to have the soft, substantial appearance of a quilted table centerpiece. A thin batting is generally preferable because it keeps the finished mat stable enough for tabletop use.
Should the binding be cut on the bias?
Bias binding is highly recommended for circular edges because it stretches gently and follows curves more smoothly than straight-grain binding. It can reduce puckers and create a cleaner outer finish.
How can I keep all the colors balanced?
Arrange every wedge on a flat surface before final assembly. Look for dominant colors and distribute them around the circle rather than allowing them to cluster in one area. Taking a quick photograph of the layout can also make color imbalance easier to notice before sewing.
Can this pattern be made in a more modern style?
Absolutely. Replace the floral and vintage-style scraps with solids, minimal geometric prints, or a limited monochromatic palette. For example, several shades from one color family combined with white separators can give the exact same construction a very modern appearance.
How should the centerpiece be cleaned?
Cleaning depends on the materials used, but quilting cotton projects are often washable when the fabric, batting, and thread are all suitable for laundering. Gentle washing and drying flat can help protect the shape. If your centerpiece includes specialty fabrics or delicate embellishments, use a cleaning method appropriate for those materials.
How long does this project take to make?
The time varies depending on sewing experience and the amount of patchwork detail. Preparing dozens of strips and arranging the colors may take longer than the actual machine sewing. Many makers will find it more enjoyable to complete the project in stages: fabric preparation, wedge construction, assembly, quilting, and binding.
Conclusion
Creating a Patchwork fabric triangle centerpiece Pattern is a wonderful way to combine colorful scraps, classic quilting techniques, and a strong geometric design in one useful decorative project. The process begins with selecting and organizing fabric strips, sewing them into patchwork panels, and carefully cutting matching triangular wedges. Those wedges are arranged around the center, separated with neutral fabric strips, and joined gradually to produce the characteristic sunburst effect.
After assembling the patchwork top, the addition of backing and batting transforms the fabric circle into a true quilted centerpiece. Simple quilting can highlight the radial geometry without competing with the colorful prints, while bias binding gives the curved outer edge a neat and durable finish. Paying attention to accurate wedge angles, consistent seam allowances, careful pressing, and balanced fabric placement will make the construction smoother and help the final piece lie beautifully flat.
Most importantly, this pattern gives you plenty of room for creativity. You can reproduce the lively multicolored look of the inspiration, create a carefully coordinated seasonal version, or turn meaningful fabric leftovers into a unique keepsake. The basic technique remains useful long after the first project is finished because the same wedge construction can inspire table mats, wall hangings, small quilts, and many other patchwork sewing projects. If you decide to make this Patchwork fabric triangle centerpiece Pattern, I would love to know what color combination you would choose. Leave your sincere opinion about the project and share your suggestions for variations, fabrics, borders, or quilting details that could make this centerpiece even more creative and personal.