
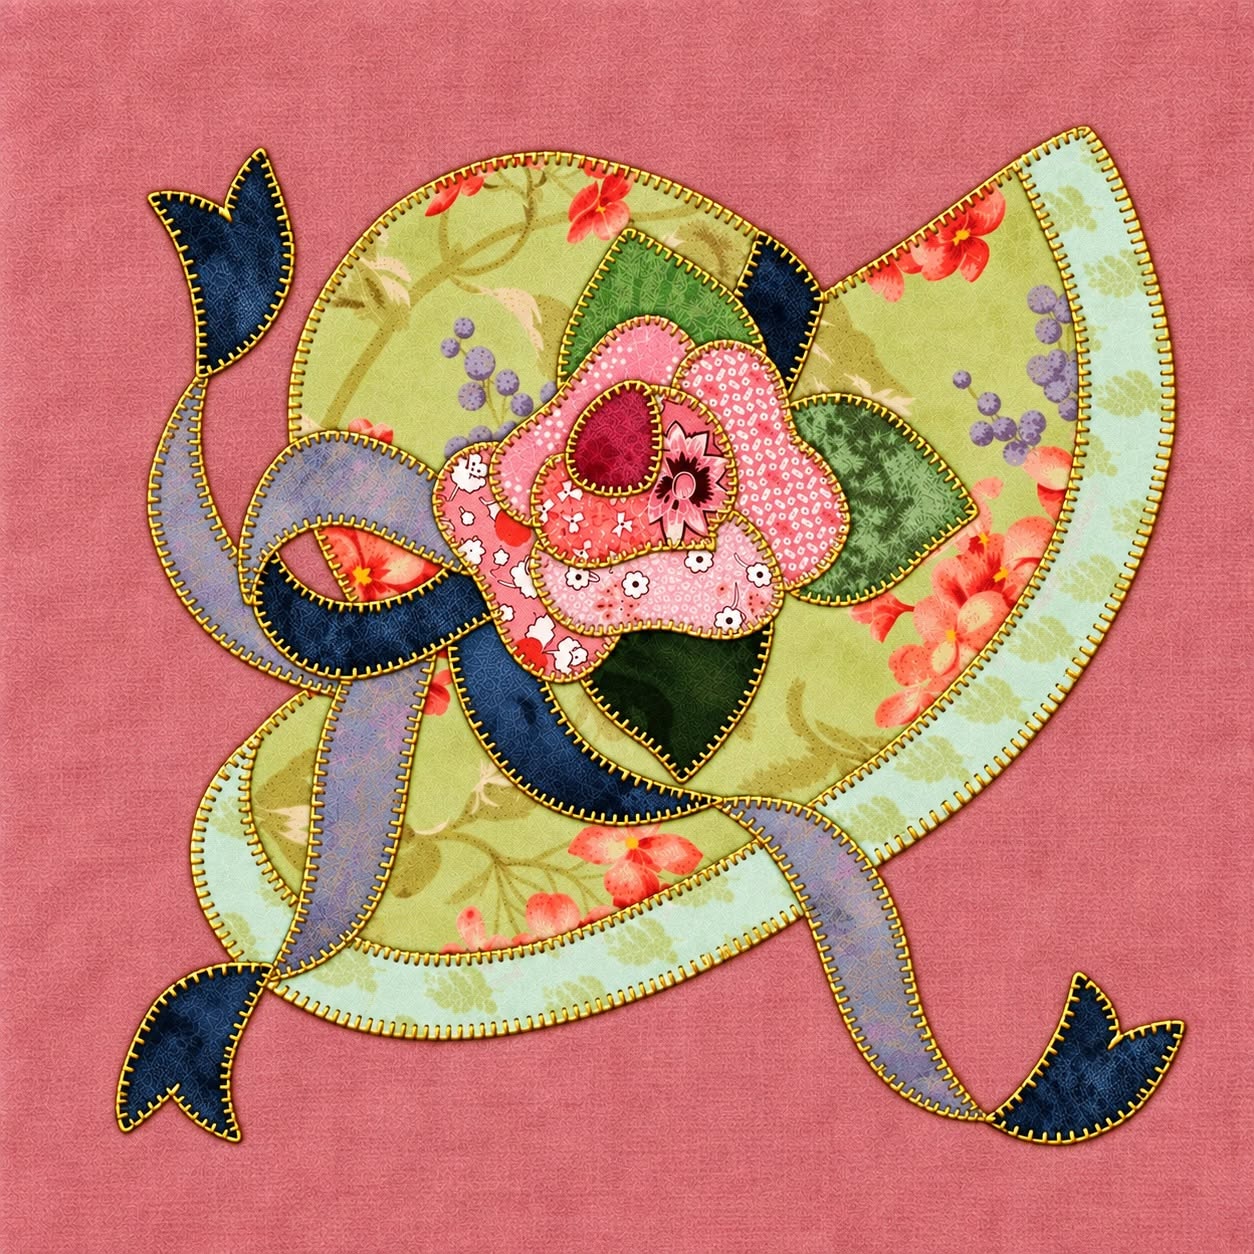
The Hat with Flower Appliqué and Ribbons Pattern is a charming fabric appliqué project that combines the graceful silhouette of a vintage-style hat with a layered fabric flower and flowing decorative ribbons. Inspired by the design shown in the reference image, this project is especially attractive because it transforms small pieces of coordinating fabric into an artistic textile composition. The soft floral prints, curved hat shape, contrasting ribbon details, and dimensional-looking flower create a balanced design that can be used for a quilt block, wall hanging, decorative cushion, table topper, or framed fabric artwork. Although the finished piece appears detailed, the construction becomes much easier when the design is separated into simple appliqué shapes. By preparing each component individually and assembling the elements in layers, even someone with moderate sewing experience can create a polished result. The key is careful fabric selection, accurate cutting, controlled stitching, and patience when positioning the different pieces.
Another reason the Hat with Flower Appliqué and Ribbons Pattern is appealing is its flexibility. You do not need to reproduce every fabric exactly as it appears in the inspiration image. Instead, the project gives you an opportunity to combine floral fabric, small prints, muted solids, scraps from previous quilting projects, and contrasting textiles. The hat can feature several related prints to imitate the segmented appearance of the original design, while the flower can become the strongest color accent. Darker fabric works beautifully for the ribbon tips because it defines their shape against the lighter background. This type of fabric appliqué pattern is also useful for scrap sewing because many components require only small amounts of material. The final appearance can be traditional, romantic, country-inspired, modern, or even whimsical depending on your fabric choices.
The construction method is based primarily on appliqué sewing, where individual fabric shapes are attached to a larger foundation fabric. Fusible web can make the process particularly accessible because it temporarily secures the pieces before stitching, reducing movement and helping the curves remain clean. Decorative machine stitches, blanket stitches, zigzag stitches, or carefully worked hand stitches can then secure the edges permanently. For the layered flower, several fabric pieces overlap to create visual depth, while the ribbons are positioned partly behind the hat to make them appear naturally connected to the design. Understanding the order of these layers is essential when creating the Hat with Flower Appliqué and Ribbons Pattern, because the pieces placed first will visually sit underneath the later pieces. Once that sequence is planned, the project becomes a rewarding exercise in color, shape, layering, and decorative sewing.
Materials, Fabric Selection, and Pattern Preparation
Before cutting anything, choose a stable foundation fabric large enough to comfortably contain the entire appliqué. A square approximately 45 cm x 45 cm provides enough working space for a decorative block similar in proportion to the inspiration image. Light cream, ivory, pale beige, or another subtle neutral background works particularly well because it allows the colorful hat, flower, and ribbons to become the focal point. Press the foundation fabric carefully before beginning so there are no wrinkles that could distort the positioning of your appliqué pieces.
DISCOVER MORE FREE PATTERNS HERE!
For the hat itself, gather approximately four to six coordinating quilting cotton fabrics. Floral prints in green, cream, coral, orange, or muted botanical shades will create the patchwork feeling visible in the reference design. Instead of cutting the entire hat from one textile, dividing it into several sections creates more texture and visual interest. Small-scale prints are generally easier to use because their motifs remain visible even after the fabric is cut into curved shapes. Try placing the fabrics beside one another before cutting to make sure neighboring pieces have enough contrast.
The flower should become a strong decorative focal point, so choose fabrics that stand out from the hat. Pink, coral, red, rose, or peach prints are excellent choices for a romantic flower appliqué. Using three or four related fabrics rather than a single print can create the illusion of layered petals. A deeper red or burgundy fabric may be placed near the center, while lighter pink patterns form the outer petals. This gradual change in value helps give the flower dimension without requiring complicated three-dimensional sewing techniques.
For the decorative ribbons, select one medium-value fabric and one darker contrasting fabric. In the inspiration design, long ribbon-like shapes curve outward from the hat and terminate in dark pointed ends. You can reproduce this effect using gray-blue, lavender-gray, denim-inspired, or muted purple fabric for the main ribbon and navy or charcoal for the ends. These fabric ribbons are not separate loose ribbons; they are appliqué pieces shaped to look like flowing fabric strips. This keeps the project flat and suitable for quilting.
You will also need fusible web, fabric scissors, paper scissors, a pencil, an iron, matching or contrasting sewing thread, pins, and optionally a removable fabric marker. A sewing machine is convenient, but this pattern may also be stitched by hand. If you use fusible web, always follow the manufacturer’s temperature guidance for the product you already have. The adhesive should bond the fabric sufficiently for stitching without making the finished appliqué unnecessarily stiff.
Create your paper templates before cutting the fabric. Divide the design into a main hat crown, curved brim, several decorative hat sections, flower petals, flower center, long ribbon strips, and ribbon tips. Draw or trace each component independently so that overlapping areas are included. Adding approximately 3 to 5 mm of overlap where two appliqué pieces meet can prevent the foundation fabric from showing through tiny gaps. Label every template before cutting it apart, because several curved shapes may look surprisingly similar once separated.
Creating and Assembling the Fabric Hat Appliqué
Begin with the largest shapes of the Hat with Flower Appliqué and Ribbons Pattern. The hat should occupy the center of the composition, with the crown leaning slightly to one side and the brim extending outward beneath it. A finished hat approximately 30 to 34 cm wide works nicely on a 45 cm foundation block. However, these measurements are flexible. What matters most is leaving enough space around the design for the decorative ribbons and for any future seam allowance if the block will become part of a quilt.
Transfer the hat templates to the paper side of your fusible web. If the direction of the design is important, remember that fusible appliqué typically reverses the template when it is transferred to the fabric. For symmetrical pieces this makes little difference, but the hat silhouette is asymmetrical, so check the orientation carefully. Rough-cut around each fusible shape, leaving a small margin outside the pencil line, and fuse it to the wrong side of the selected fabric.
After the fusible web has cooled, cut precisely along the drawn lines. Sharp fabric scissors are particularly important around the hat curves. Avoid making a series of abrupt cuts that can create angular edges. Instead, rotate the fabric gradually while keeping the scissors moving smoothly. Clean curves contribute significantly to the professional appearance of a fabric appliqué project, especially when the outer edge remains visible against a light background.
Arrange the hat sections on your foundation fabric without permanently fusing them yet. Start with the brim and larger crown pieces, then position the smaller sections over them. The different fabrics should create movement without looking randomly scattered. If two neighboring fabrics have similar values, move one elsewhere and replace it with a lighter or darker piece. This simple adjustment often improves the finished composition dramatically because each segment becomes easier to distinguish.
Once you are satisfied with the arrangement, remove the paper backing from the fusible web and fuse the hat sections in the correct layering order. Work gradually rather than attempting to iron everything simultaneously. Secure the pieces that belong underneath first, followed by the overlapping sections. Press rather than aggressively sliding the iron, because sliding can shift curved appliqué pieces before the adhesive has bonded.
Finish the edges with your preferred appliqué stitch. A narrow blanket stitch gives the project a traditional quilted appearance, while a short zigzag provides stronger edge coverage. Straight stitching approximately 1 to 2 mm inside the raw edge creates a contemporary raw-edge appliqué style. Choose a thread that coordinates with the fabrics for a subtle effect or a contrasting thread if you want the stitching to become part of the decorative design. Sew slowly around tight curves and stop with the needle down whenever you need to rotate the block.
Making the Layered Flower and Flowing Ribbon Details
The flower is the visual centerpiece of the Hat with Flower Appliqué and Ribbons Pattern, so take extra time when creating its shape. Rather than cutting one flat flower, construct the bloom from multiple irregular petal sections. Approximately five to eight overlapping pieces can produce a beautifully layered effect. Start with the largest outer petals, then progressively add smaller shapes toward the center. The finished flower may measure approximately 11 to 14 cm across, depending on the scale of your hat.
Use different but related prints for the petals. For example, combine coral floral fabric, pale pink fabric, deeper rose motifs, and a small red print. Avoid placing identical prints directly beside one another when possible. The goal is to make each petal visually distinct while maintaining an overall coordinated palette. This technique is sometimes described as layered appliqué, because several fabric shapes overlap to create depth and complexity.
Place the outer flower petals first and allow parts of them to overlap the hat. Then position the middle petals, followed by the inner sections and center. A darker fabric near the center can create the impression of a shadowed flower opening. Before fusing, stand back and inspect the composition from a distance. If the bloom looks too symmetrical, rotate some petals slightly. Natural flowers usually contain subtle irregularities, and reproducing that unevenness helps the appliqué feel more organic.
The long decorative ribbons should be prepared before permanently attaching the flower because portions of the ribbons may visually disappear underneath the hat or bloom. Cut gently curved strips approximately 2.5 to 4 cm wide. One ribbon can travel toward the lower right corner, while another loops toward the lower left or upper area. Avoid perfectly straight strips because flowing curves are responsible for much of the movement in this ribbon appliqué pattern.
Create the darker ribbon ends separately. Each end can be shaped like a pointed or folded ribbon tail, approximately 4 to 6 cm long. Position these pieces beneath the ends of the main ribbon strips so the transition appears continuous. A dark navy, charcoal, deep blue, or another strong contrasting fabric creates a clear visual anchor. If your background is darker, reverse this strategy and select lighter ribbon tips instead.
After checking every ribbon position, fuse the elements and secure their edges with appliqué stitching. The same stitch used around the hat will create consistency, although you may intentionally change thread colors for additional detail. When stitching long curves, guide the block gently rather than pulling it. Smooth handling will keep the ribbon edges graceful. Once the ribbons are stitched, attach and stitch the flower layers from the outermost pieces toward the center.
Finishing, Quilting, and Customizing the Completed Design
When all appliqué pieces have been attached, inspect the entire Hat with Flower Appliqué and Ribbons Pattern carefully. Check that every raw edge is secured and that no small corner has lifted. If necessary, reinforce these areas with a few extra stitches. Trim loose thread tails from the front and back. A careful final inspection is particularly worthwhile with layered designs because tiny areas can easily be missed during construction.
If the piece will become a quilted wall hanging or decorative quilt block, create a quilt sandwich using the appliqué top, batting, and backing fabric. Lightweight or medium-weight batting is suitable for this project. Baste the three layers together using your preferred method. The additional quilting can emphasize the appliqué by outlining the hat, ribbons, and flower approximately 2 to 4 mm outside their edges.
Background quilting provides another opportunity to make the design stand out. Gentle meandering, echo quilting, simple diagonal lines, or subtle free-motion curves can fill the empty foundation fabric without competing with the decorative appliqué. Keep the quilting density relatively consistent around the project. Dense quilting around an appliqué can make the fabric motifs appear slightly raised, giving the flower appliqué and hat additional visual dimension.
To transform the block into a cushion cover, enlarge the foundation as necessary and add an envelope or zipper-style backing after quilting. For a wall hanging, square the block and add coordinating borders and binding. A narrow floral border followed by a slightly darker outer border can complement the colors in the hat. If you prefer minimalist décor, simply bind the project with a fabric that matches one of the darker ribbon accents.
You can also customize the Hat with Flower Appliqué and Ribbons Pattern according to season or decorating style. Spring versions can use pastel green, pink, yellow, and lavender fabrics. Autumn designs can feature rust, ochre, olive, burgundy, and brown. A vintage variation might combine faded florals with tea-toned cream fabrics, while a modern version could replace botanical prints with geometric patterns and solids. Maintaining the basic silhouette while changing the fabrics allows the same pattern concept to produce completely different results.
Finally, press the completed project carefully from the reverse side whenever possible. Protect dimensional or heavily stitched sections by placing the work on a soft pressing surface. Square the block only after all quilting is complete so the final dimensions remain accurate. The finished piece should showcase a clear hat silhouette, beautifully layered floral focal point, and flowing ribbon details that guide the viewer’s eye around the composition. With thoughtful fabric placement and clean stitching, this appliqué sewing pattern becomes an expressive textile project that feels both artistic and handcrafted.
Frequently Asked Questions About the Hat with Flower Appliqué and Ribbons Pattern
Is the Hat with Flower Appliqué and Ribbons Pattern suitable for beginners?
Yes. A confident beginner can complete the project, particularly when using fusible web. The most challenging sections are the curved ribbon shapes and layered flower petals. Practicing the chosen appliqué stitch on fabric scraps before sewing the actual design can make the process easier and improve stitch consistency.
What is the best fabric for this appliqué project?
High-quality quilting cotton is one of the easiest materials to handle because it presses well, cuts accurately, and works effectively with fusible web. Lightweight cotton fabrics also layer without creating excessive bulk. Very stretchy fabrics may be more difficult for beginners unless they are stabilized first.
Do I need fusible web to make the pattern?
No. Fusible web is convenient but not mandatory. Traditional needle-turn appliqué can produce beautiful results, and some quilters prefer this method because the edges are folded underneath rather than remaining raw. The sewing process will take longer, but the finished appearance is soft and refined.
Which appliqué stitch should I use?
Blanket stitch, zigzag stitch, satin stitch, and straight raw-edge stitching are all possible. A blanket stitch appliqué works particularly well with the vintage-inspired character of the design. Machine settings vary, so always test stitch width and length on scrap fabric before working on your main block.
How can I prevent the appliqué pieces from shifting?
Fusible web is the easiest solution. Make sure the foundation fabric is pressed flat and arrange the entire composition before permanently fusing anything. Photographing or sketching your layout before removing pieces can also help you reconstruct the arrangement accurately during the fusing process.
Can I sew the entire project by hand?
Absolutely. Hand appliqué gives the design a traditional handcrafted appearance. Small blanket stitches can secure raw edges, while needle-turn appliqué can conceal them completely. Hand stitching may require more time, particularly around the flower, but it is an excellent method for anyone who enjoys portable sewing projects.
How large should the finished appliqué be?
For a foundation measuring approximately 45 cm x 45 cm, a hat measuring around 30 to 34 cm wide creates balanced proportions while leaving room for ribbons. However, templates can be enlarged or reduced. Just remember to scale all pieces together so the flower and ribbons remain proportional to the hat.
Can scraps be used for the flower and hat?
Yes, and this is actually an excellent fabric scrap project. The segmented hat and layered flower require many relatively small pieces, making the pattern useful for leftover quilting cotton. Coordinating scraps by color family will help the final composition appear intentional rather than visually disconnected.
Should the flower be sewn before or after the hat?
The main hat pieces should generally be positioned first. Ribbon sections that appear behind the hat should also be attached before the upper layers. The flower is usually one of the last major elements because it overlaps the hat and conceals some intersections between different pieces. Thinking from background to foreground will help determine the correct construction order.
Can this pattern be used for something other than a quilt?
Certainly. The finished Hat with Flower Appliqué and Ribbons Pattern can become a cushion front, tote bag panel, fabric wall art, table decoration, quilt block, sewing-room decoration, or framed textile piece. Adjust the scale and stabilizer according to the final purpose of the project.
How do I make curved ribbons look smooth?
Use long, gentle curves when drawing the templates and cut with sharp scissors. Avoid making numerous tiny angular cuts. When stitching, slow down before curves and pivot gradually with the needle in the fabric. These simple techniques help maintain the flowing appearance that makes the ribbons such an important feature of this design.
How can I make the flower look more dimensional?
Combine several petal fabrics with different values, using lighter fabrics around some outer areas and darker colors closer to the center. Overlapping petals also adds visual depth. Quilting immediately around the completed flower can further emphasize its silhouette and make it appear slightly raised from the background.
Conclusion
The Hat with Flower Appliqué and Ribbons Pattern demonstrates how simple pieces of fabric can be combined to create a sophisticated decorative composition. The project begins with careful fabric selection and template preparation, continues through the construction of the segmented hat, and develops further with layered flower petals and gracefully curved ribbon appliqués. By arranging the pieces from background to foreground, using fusible web when desired, and securing the edges with consistent appliqué stitching, you can reproduce the layered character of the inspiration while still giving your finished work a personal identity.
Throughout the project, fabric color and contrast are just as important as precise cutting. Coordinated floral fabrics build the hat, contrasting fabrics define the flowing ribbons, and stronger pink or coral tones help the layered flower become the focal point. Additional quilting can then emphasize these shapes and transform the appliqué into a finished wall hanging, cushion, quilt block, or decorative textile artwork. Best of all, the design can be adapted to different seasons and styles simply by changing the fabric palette.
EASILY FIND THE FREE PDF FOR THIS PATTERN HERE!
Whether you create the project closely inspired by the original composition or develop your own variation, the Hat with Flower Appliqué and Ribbons Pattern offers a wonderful opportunity to practice fabric appliqué, curved sewing, color coordination, layered construction, decorative stitching, and scrap-friendly quilting techniques. Take your time with the positioning of each element, test your stitches before sewing, and allow the personality of your fabric collection to become part of the design. After completing your project, leave your sincere opinion about this pattern and share your suggestions. Which fabric combination would you choose for the hat and flower? Your ideas and creative variations can inspire new ways to interpret this beautiful appliqué design.